Enroll Android Enterprise Devices with NFC Tags
Overview
With Android Enterprise, you or your users can integrate your devices into the management in a number of ways. In addition to the various classic methods or zero-touch enrollment, provisioning devices via NFC tags is a very efficient and simple method. As the administrator, you only need to describe an NFC tag with a few configurations, and you or your users can then start and complete the enrollment process in the management system by contacting the NFC tag the first time the device is started. In this guide we will show you what is required for NFC enrolment, what data needs to be written to the tag and how you or your users can perform enrolment.
What you need
- At least one blank NFC Tag. During this guide we used the mmtrade | 10x NFC Tag Sticker with 888 Bytes from Amazon . Please note that NFC Tags comes usually with varying amount of capacity in bytes and depending on how many options you will setup later on this guide, you may exceed your current available capacity.
- A NFC Tag writing application. During this guide we used NFC Tools - Pro. There a maybe others available, but this application is very easy and quite affordable. You can also start with the free version, but for example, saving profiles is not supported in the free version.
- At least one device that is running the NFC writing application and at least one test device.
Before you Start
- Note that Silverback generally provides two Android Enterprise management methods. In Silverback 23.0 Update 2, we have introduced a new Android Enterprise method that provides device enrollment using the built-in Android client using the Android Management API. In addition, with on-premises installations you can use the Android Enterprise Integration to enroll devices using the Companion application.
- NFC enrollment is available on Android 8.0 and above, and you must ensure that your devices can read NFC tags.
- NFC enrollment is intended for company-owned devices.
- The NFC data written to the NFC tags must be in a very specific format.
- There is a part of the data that you can always copy and paste, as it will be identical for each enrollment, based on the Android Enterprise method you are using.
- There is also some data that needs to be modified to match the enrollment token generated in a policy when using the Android Management API.
- In addition, there are optional NFC data parts that you can choose to use if you want to use the tag to automatically join a Wi-Fi during the NFC provisioning process or to customize the end user experience as outlined here when using the Companion application for enrollment.
Prepare your NFC Data
Minimum Information
Every Android Enterprise Enrollment that will be executed via Zero Touch, Advanced QR-Code or NFC enrollment contains in general several minimum information that you will need to write to every NFC Tag. This includes the following information:
- The Device Admin Component is the registered component to activate the Device Admin on the device
- The Device Admin Signature Checksum is corresponding checksum the Device Admin App
- The Package Download Location contains the Google Play link to the Device Policy Controller (either the built-in client on Android or the Matrix42 Companion application)
As an example, below is the minimum information you need to write to the NFC tags for enrolment using the Android Management API. The enrolment token is only required for this management method, and you can view the token in the policy you have created. Please refer to Manage Android Enterprise with Android Management API for additional information.
android.app.extra.PROVISIONING_DEVICE_ADMIN_PACKAGE_DOWNLOAD_LOCATION=https\://play.google.com/managed/downloadManagingApp?identifier\=setup
android.app.extra.PROVISIONING_DEVICE_ADMIN_SIGNATURE_CHECKSUM=I5YvS0O5hXY46mb01BlRjq4oJJGs2kuUcHvVkAPEXlg
android.app.extra.PROVISIONING_DEVICE_ADMIN_COMPONENT_NAME=com.google.android.apps.work.clouddpc/.receivers.CloudDeviceAdminReceiver
android.app.extra.PROVISIONING_ADMIN_EXTRAS_BUNDLE=com.google.android.apps.work.clouddpc.EXTRA_ENROLLMENT_TOKEN\=EHYXZWKAXTOUREPKUROZJDWX
For the Enrollment with Companion, the following information are required:
android.app.extra.PROVISIONING_DEVICE_ADMIN_PACKAGE_DOWNLOAD_LOCATION=https\://play.google.com/managed/downloadManagingApp?identifier\=matrix42
android.app.extra.PROVISIONING_DEVICE_ADMIN_SIGNATURE_CHECKSUM=mqoNjgDp_qAkeHhEj3EcO2oD69YhX3fLY4dbQJ-gx_0
android.app.extra.PROVISIONING_DEVICE_ADMIN_COMPONENT_NAME=com.silverbackmdm.epic.companion.ss/com.silverbackmdm.epic.DeviceMdmReceiver
Add Wi-Fi Configuration
To enrich the minimum setup information with several customized configurations, you can add as an example an additional Wi-Fi Configuration as listed below. Please refer to Manage Android Enterprise with Android Management API for additional Wi-Fi parameters that are not included in the example. Wi-Fi configurations can be used for both Android Enterprise methods (AMAPI and Companion).
android.app.extra.PROVISIONING_WIFI_SSID="Imagoverum #2.4"
android.app.extra.PROVISIONING_WIFI_SECURITY_TYPE=WPA
android.app.extra.PROVISIONING_WIFI_PASSWORD=Pa$$w0rd
Add Additional Features
Additionally, you can add additional Features like Language settings and if System Apps should be enabled or not during the enrollment. For the enrollment on Android Enterprise with Companion, do not use the Leave All System Apps enabled option as the setting will be overruled by the settings made in the Managed Account or in the Work Profile configuration inside your Tags.
android.app.extra.PROVISIONING_LOCALE:de_de
android.app.extra.PROVISIONING_LEAVE_ALL_SYSTEM_APPS_ENABLED:true
android.app.extra.PROVISIONING_USE_MOBILE_DATA:false
Add Companion Customization
To let your users start with the Login of the Self Service Portal during the enrollment, adjust your Silverback URL.
android.app.extra.PROVISIONING_ADMIN_EXTRAS_BUNDLE=server_url:https\://silverback.imagoverum.com
With Companion 23.0 Update 3, a special NFC Data configuration parameter will be available to either start with the Self Service Portal login or provide full authentication details:
android.app.extra.PROVISIONING_ADMIN_EXTRAS_BUNDLE=nfc_data: server_url:https://silverback.imagoverum.com
android.app.extra.PROVISIONING_ADMIN_EXTRAS_BUNDLE=nfc_data: server_url:https://silverback.imagoverum.com; user_name:maria.miller@imagoverum.com; otp:4444
Review the full example
The example below shows a configuration for enrollments with the Android Management API that requires ~860 bytes. You can use this example to update it with your settings.
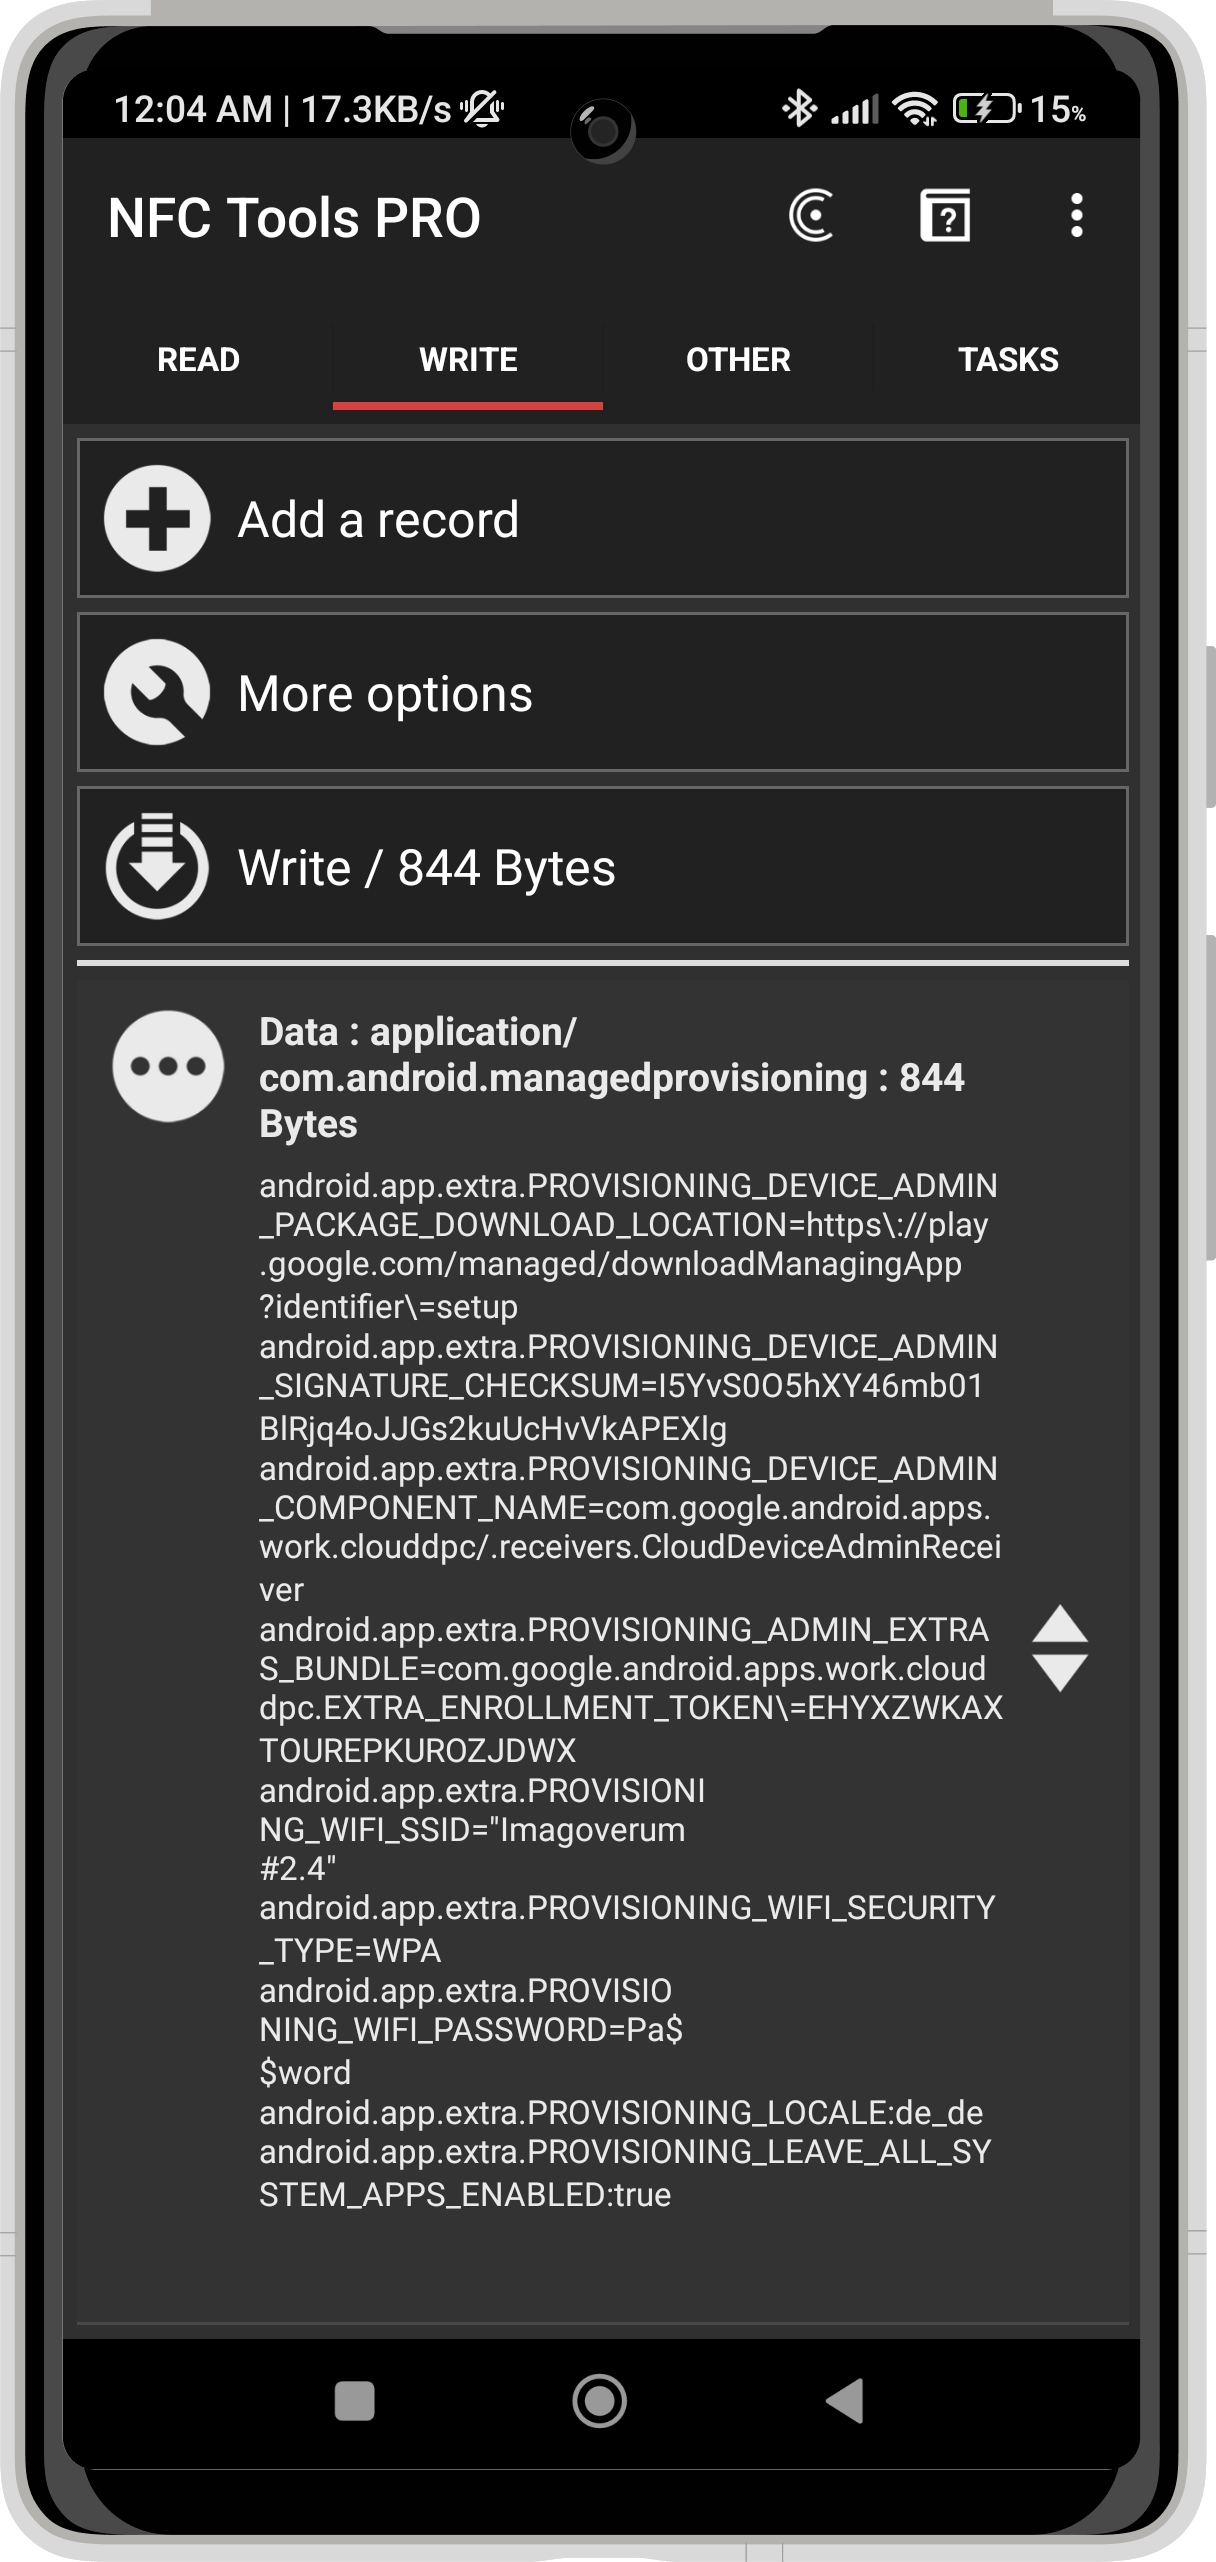
android.app.extra.PROVISIONING_DEVICE_ADMIN_PACKAGE_DOWNLOAD_LOCATION=https\://play.google.com/managed/downloadManagingApp?identifier\=setup
android.app.extra.PROVISIONING_DEVICE_ADMIN_SIGNATURE_CHECKSUM=I5YvS0O5hXY46mb01BlRjq4oJJGs2kuUcHvVkAPEXlg
android.app.extra.PROVISIONING_DEVICE_ADMIN_COMPONENT_NAME=com.google.android.apps.work.clouddpc/.receivers.CloudDeviceAdminReceiver
android.app.extra.PROVISIONING_WIFI_SSID="Imagoverum #2.4"
android.app.extra.PROVISIONING_WIFI_SECURITY_TYPE=WPA
android.app.extra.PROVISIONING_WIFI_PASSWORD=Pa$$w0rd
android.app.extra.PROVISIONING_LOCALE:de_de
android.app.extra.PROVISIONING_LEAVE_ALL_SYSTEM_APPS_ENABLED:true
android.app.extra.PROVISIONING_USE_MOBILE_DATA:false
android.app.extra.PROVISIONING_ADMIN_EXTRAS_BUNDLE=com.google.android.apps.work.clouddpc.EXTRA_ENROLLMENT_TOKEN\=EHYXZWKAXTOUREPKUROZJDWX
The example below shows a configuration for enrollments with the Companion applications that requires slightly less then 860 bytes.
android.app.extra.PROVISIONING_DEVICE_ADMIN_PACKAGE_DOWNLOAD_LOCATION=https\://play.google.com/managed/downloadManagingApp?identifier\=matrix42
android.app.extra.PROVISIONING_DEVICE_ADMIN_SIGNATURE_CHECKSUM=mqoNjgDp_qAkeHhEj3EcO2oD69YhX3fLY4dbQJ-gx_0
android.app.extra.PROVISIONING_DEVICE_ADMIN_COMPONENT_NAME=com.silverbackmdm.epic.companion.ss/com.silverbackmdm.epic.DeviceMdmReceiver
android.app.extra.PROVISIONING_WIFI_SSID="Imagoverum #2.4"
android.app.extra.PROVISIONING_WIFI_SECURITY_TYPE=WPA
android.app.extra.PROVISIONING_WIFI_PASSWORD=Pa$$w0rd
android.app.extra.PROVISIONING_LOCALE:de_de
android.app.extra.PROVISIONING_USE_MOBILE_DATA:false
android.app.extra.PROVISIONING_ADMIN_EXTRAS_BUNDLE=server_url:https\://silverback.imagoverum.com
The example below shows a configuration for enrollment with the Companion application, including authentication details in the nfc_data field (available with Companion 23.0 Update 3), that requires slightly less than 860 bytes.
android.app.extra.PROVISIONING_DEVICE_ADMIN_PACKAGE_DOWNLOAD_LOCATION=https\://play.google.com/managed/downloadManagingApp?identifier\=matrix42
android.app.extra.PROVISIONING_DEVICE_ADMIN_SIGNATURE_CHECKSUM=mqoNjgDp_qAkeHhEj3EcO2oD69YhX3fLY4dbQJ-gx_0
android.app.extra.PROVISIONING_DEVICE_ADMIN_COMPONENT_NAME=com.silverbackmdm.epic.companion.ss/com.silverbackmdm.epic.DeviceMdmReceiver
android.app.extra.PROVISIONING_WIFI_SSID="Imagoverum #2.4"
android.app.extra.PROVISIONING_WIFI_SECURITY_TYPE=WPA
android.app.extra.PROVISIONING_WIFI_PASSWORD=Pa$$w0rd
android.app.extra.PROVISIONING_LOCALE:de_de
android.app.extra.PROVISIONING_USE_MOBILE_DATA:false
android.app.extra.PROVISIONING_ADMIN_EXTRAS_BUNDLE=nfc_data: server_url:https://silverback.imagoverum.com; user_name:maria.miller@imagoverum.com; otp:4444
Write your nFC Tag
- Purchase, Download and Install NFC Tools Pro on one of your Android devices
- Open the application and pass the Welcome Screens
- Navigate to Write
- Press Add a record
- Scroll down and select Data
- Enter as Content Type the following information
- text: application / plain: com.android.managedprovisioning
- Under Data, add now your prepared NFC Enrollment data
- Press Ok
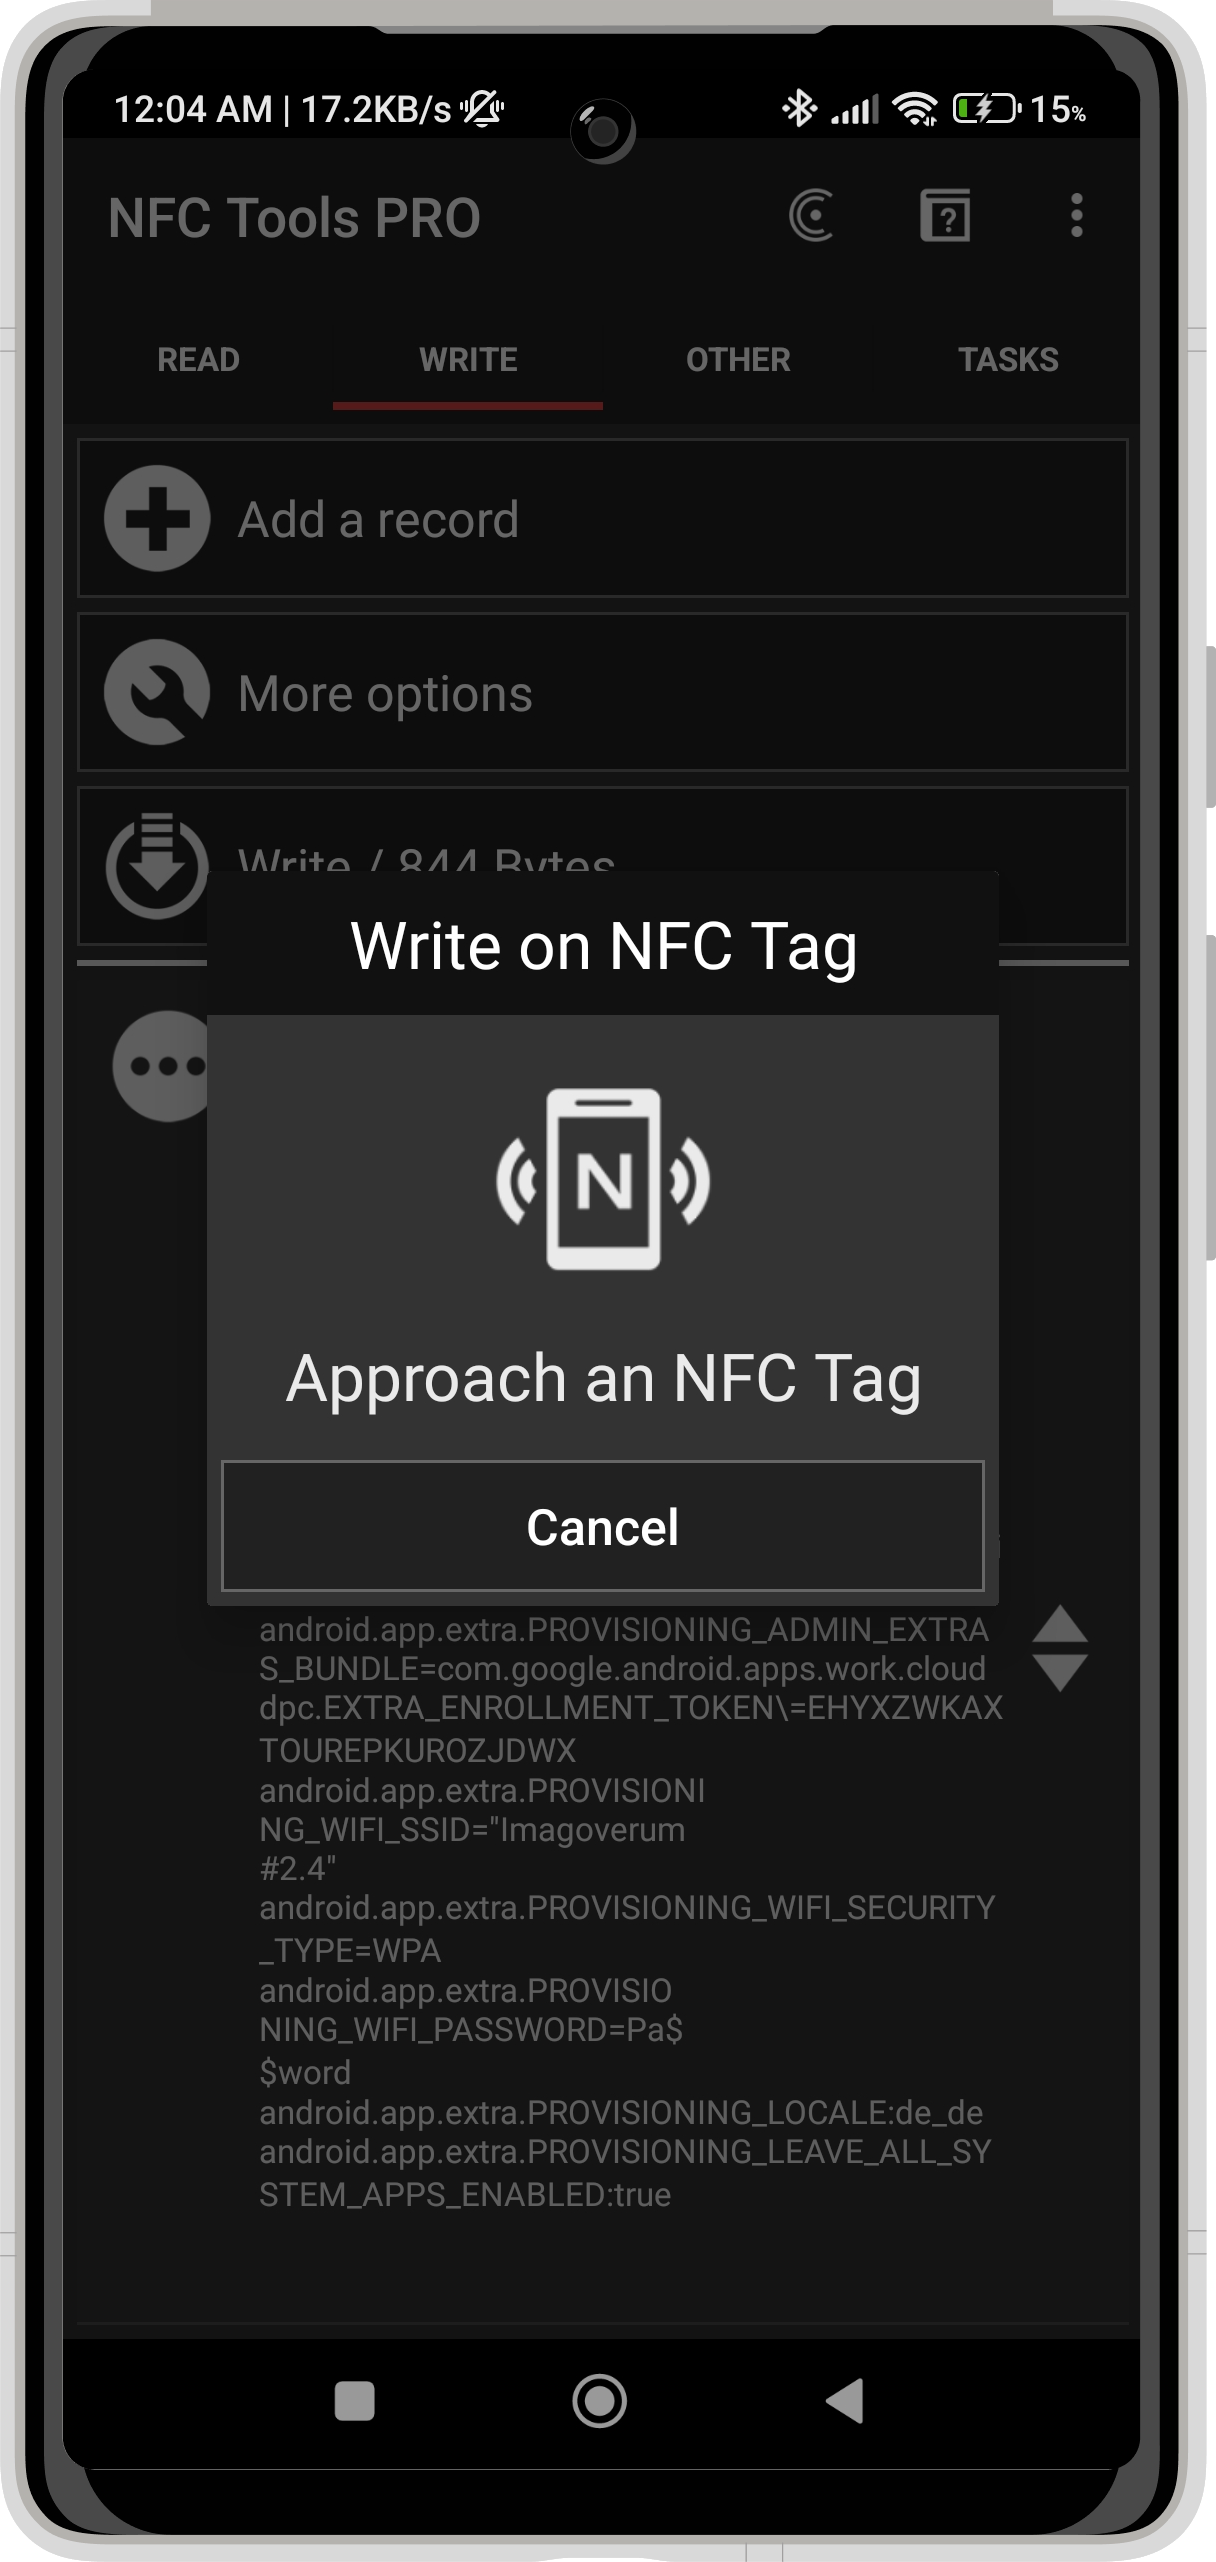
- Press Write
- Approach an NFC Tag
- Wait until the Write process is finished
 |
 |
 |
Enroll Devices
- Factory reset your device
- Once the device has been reset and is on the initial welcome screen, bump the device against your NFC tag.
- Press Next
- Now continue through the setup wizard until the enrollment process is complete. Please note that this process varies depending on the Android Enterprise method, management mode, OS version and manufacturer.