Manage Android Enterprise with Android Management API
Overview
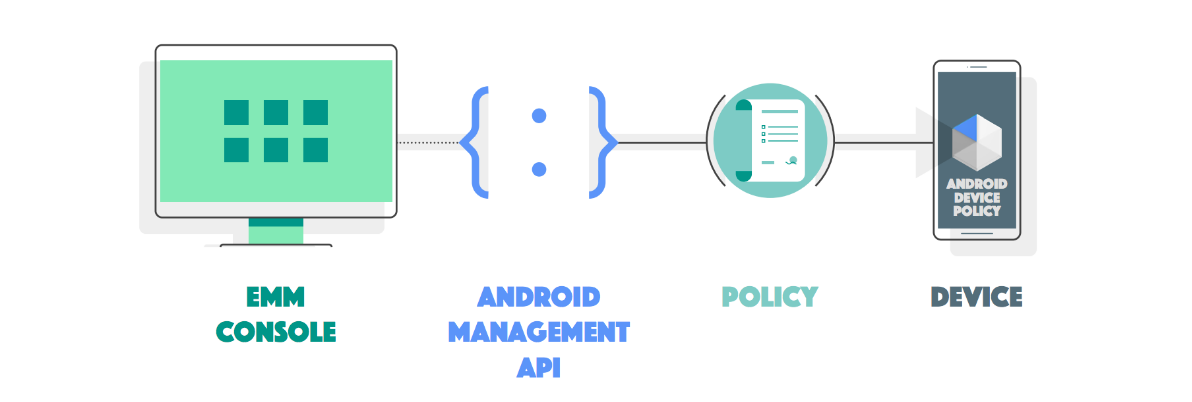
Android Management API (AMAPI) is an additional and newer method of managing Android devices compared to the regular Android Enterprise management. The Android Management API (AMAPI) is a policy and cloud-based management where devices communicate directly with the built-in Android client (Android Device Policy), whereas the traditional Android Enterprise method uses an additional client application (Companion). Managing Android devices with AMAPI gives you the ability to provision and manage your devices using any of the ownership methods provided by Google. Both Android Enterprise management methods (via Android Management API or via Android Enterprise with Companion as Device Policy Controller) work independently of each other in Silverback, and you can provision and manage your devices using either method, although switching devices from one management mode to another requires a factory reset for company-owned devices or a re-provisioning of the work profile for personally-owned devices.
Requirements
- Silverback 23.0 Update 2 SaaS
Device Ownerships
Google offers different device ownerships that provide different features and functionality. The Device Ownership for a device is defined during the enrollment, and later in this guide in the Policy Management section you will find the option to define policies for each ownership and instructions on how to enroll devices with the desired device ownership. An overview of the different types of Device Ownership can be found in the table below.
| Ownership | Description |
|---|---|
| Corporate-owned | This management method is suitable for company-owned devices intended exclusively for work purposes. You can manage all apps on the device and can enforce the full spectrum of Android Management API's policies and commands. It's also possible to lock a device down to a single app or small set of apps to serve a dedicated purpose or use case. This subset of fully managed devices is referred to as dedicated devices. Please note that the Dedicated devices mode for company-owned devices can already be reached via the App Management options, but further specific settings for Single App mode are currently not yet available directly in Silverback. The features will be available in newer versions. |
| Personally-owned | Devices owned by employees can be set up with a work profile. A work profile provides a self-contained space for work apps and data, separate from personal apps and data. Most app, data, and other management policies apply to the work profile only, while the employee's personal apps and data remain private. |
| Corporate-owned with personal Usage | Setting up a company-owned device with a work profile enables the device for both work and personal use. Most app, data, and other management policies apply to the work profile only and the employee's personal profile remains private. However, you can enforce certain device-wide policies and personal usage policies and you can use enforce compliance actions on an entire device or only its work profile. A factory wipe and device commands will apply to an entire device. |
Before you start
Before you start, here are a few things to keep in mind:
- A device can only be assigned to one policy, and policy switching is not supported..
- Use a persona model to create and configure policies and enroll your devices.
- For corporate-owned devices, the serial number is the only unique identifier for a device.
- For personally owned devices, the company-specific ID is the only unique identifier for a device.
- Users and devices have a randomized user name and device name. Therefore, it is not currently possible to use individual usernames to configure mail clients.
- System variables are not currently supported for managed configurations.
- Adding visibility flags, assigning labels to the device, and changing the ownership of a device after enrollment are not supported.
- Policies can only be deleted if there are no devices associated with the policy.
- Policies cannot be named Default and cannot be renamed after they are created.
- Do not use # / \ symbols in policy names or use exceptionally long names
- Devices that have been manually reset to factory settings by the user or if the user manually deletes the work profile remain unchanged in the Android Management API and Management Console. Review the Additional Information section for more information.
Integration
Initiate the Activation Process
- Open your Silverback Management Console
- Login as an Administrator
- Navigate to Admin
- Select Android Management
- Press Activate
- Confirm with OK
- You will be redirected to Android Enterprise Sign-Up page
- Proceed with Create an Admin account and register your company
Create an Admin Account and register your Company
With the update of the sign-up flow for the two Android Enterprise forms described in the overview, Android has harmonized the registration process for an enterprise with Android Enterprise since 13th of June 2024. As of today, the following 3 different registration variants are available and valid for both Android Enterprise methods. The variants listed below will take you to the instructions for registering Android Enterprise via the Companion application. However, the process is almost identical for registering Android Enterprise via Companion and via the Android Management API. The only step you can ignore in the instructions is the token download variant. This is not applicable for the registration with Android Management API. For this reason, please follow the general descriptions from the 3 links and from the point where you get back to Silverback, continue with this article.
Complete the Registration and Integration
After you have created your admin account and registered your company, you will be redirected back to your Silverback Management Console and should now be at the point where your Android Management view displays a sign-up URL name and an Enterprise Token.
- Leave everything as it is and press Save and Confirm with OK to complete the registration and to fetch all your Enterprise information in Silverback
Congratulations! Your Enterprise is now ready and you can choose what to do next:
- Update your Enterprise to add or update several organization related information
- Delete your Enterprise for testing purposes or
- Proceed with adding your Applications
Update your Enterprise
After your Android Enterprise Integration with the Android Management API, you can adjust at any time several information for your Enterprise. If you are not already the Android Management Screen, login to your Management Console and navigate to Admin > Android Management.
- You can update your Enterprise Display Name that used to display to users in various places across Android Enterprise (e.g. on the Device Lockscreen).
- You can define a primary color to display in the device management app UI
- Either by entering the color in the Hex format, e.g #000000 for black
- Or by selecting the colored area to easily pick your color
- You can enter a primary contact email that will used to send important announcements related to managed Google Play
- And you can update your Data Protection Officer and EU Representative Contact Information if needed
- Press Save and confirm with OK to save your changes
Delete your Enterprise
Deleting your Android Enterprise automatically resets all company-owned devices to factory settings and removes the work profile from personal devices. Your applications and policies will also be irrevocably deleted. If you need to delete your Enterprise, you can do so by performing the following steps:
- Navigate to Admin
- Select Android Management
- Press Delete
- Confirm the Deletion by entering your Enterprise ID
- Press OK
- Wait until the deletion is finished
- If you have followed the tutorial step by step, create again your Enterprise and/or proceed with integrating your applications
Application Management
Add your OEM Configuration App
At this point, you can start with integration your OEM Configuration App or add any other app type that is described in the chapters below.
- Navigate to App Portal
- Select Android Enterprise
- Press New Application
- Press the search icon
- Search for an application, e.g. Knox Service Plugin
- Select your Application and confirm with Select
- Enter the Name to a user friendly Application (Optional)
- Now define your App Management options as a Template that will be used when you add the applications later into a Policy
- Press Save
Add additional Managed Play Apps
- Repeat the above mentioned steps again to add additional applications like Microsoft 365 Apps.
Add Web Apps
When you add an app into the App Portal and use the search icon, as you have already learned in the course, the Managed Google Play is displayed in the iFrame in each case. Here you have in the left side of the iFrame more functions like Web Apps, Private Apps, and Organize Apps. Web apps are Android apps that you create using a website address (URL), icon image, and title. For those who have been using Silverback for a while, the Web App features are the counterpart to the Web Clips you can distribute for other platforms. Web apps open in Google Chrome, so be sure to add Google Chrome as a Managed Play application in the App Portal if you plan to distribute Web apps. For more information, see the official Create Web Apps documentation provided by Google.
Add Enterprise Apps
If you want to distribute enterprise applications (*.apk), Android Enterprise provides the ability to upload and distribute via the Managed Google Play iFrame as a Google Hosted Private App. To do this, click New Application in the App Portal and use the search icon to open the Managed Play iFrame. In the left tab, select Private Applications and upload your *.apk file. Afterwards you can add the application to the App Portal as a Managed Play application for distribution. For additional information, see the official Publish private apps from managed Play in your EMM console documentation. In case you receive the Error that the package name is already used by another application while uploading, get in touch with the application developer to use the option outlined in Add Enterprise Apps to Managed Google Play. This lets the app developer share the private app with your Enterprise ID through their Google Play Developer Console.
Organize apps into collections
When you have opened the Managed Play iFrame, you will find in the left tab the Organize Apps section. The Managed Google Play's Organize apps feature lets you group work apps into collections. Collections are displayed on the front page of the managed Play Store app, giving your users quick and easy access to the apps they need for work. You can use collections to organize apps into different categories. For example, you can create an Prodcutivity collection for frequently used apps, and an Collaboration collection for apps related to Microsoft Teams, Viva Engage, etc. In the managed Play Store app, each collection is displayed as a row of apps on the homepage. Users can identify collections by their title (Essentials or Expenses, for example), and can scroll horizontally to view all the apps in a collection. For more information, see the official Organize apps into collections documentation.
Policy Management
Create your Policy
- Navigate to Tags
- Press New Policy
- Review the Tooltip next to Name
- Now enter a unique Name for your Policy, e.g. Marketing Department
- Enter a Description, e.g. Device Configuration for Marketing Department (optional)
- Enable Profile and Apps as Features
- Select your Device Ownership
- Press Save
Configure your Policy
In the first phase of implementing Android Management via the Android Management API, we focused on the main functions for creating your enterprise, device enrollment, device integration, and device actions, so the profile section currently offers only a selection of restrictions. Android Enterprise's approach is to include the OEM configuration from the hardware vendor for configuring devices. The OEM configuration provides almost all the options for configuring your devices for the specific deployment scenario. As an example, we will configure and deploy passcode settings and a Wi-Fi profile with the Knox Service Plugin. You can use this as a model and review the other OEM Configurations to perform such actions for Zebra devices, for example. Google does not offer an OEM configuration application and we will be adding more profiles as soon as possible in upcoming Silverback releases, so stay tuned.
Set Restrictions
- Navigate to Profile
- Select Restrictions
- Configure your Restrictions
- Press Save
Set Passcode
As explained in the section above, we will use the Knox Service Plugin to configure passcode for Samsung devices. Therefore you need to add the Knox Service Plugin into the Policy and configure the application via the Managed Configuration:
- While having your Policy opened, navigate to Apps
- Press Assign More Apps
- Select Knox Service Plugin
- Press Add Selected Apps
Acknowledge that the State of the App is currently Not Active. Please hover over the State tooltip to review how to activate the App in the Policy. We added this mechanism for safety reasons if you added applications to the App Portal with a Preinstalled or Force state that might should not be applied with this setting in this Policy.
- Now press the Edit button
- Press the Edit button next to Edit managed configuration
- General Config
- Enter a Profile Name, e.g. Marketing Department
- Enter your Knox License Key
- Enable the Debug Mode for your testing period
- Device-wide polices
- Enable the checkbox next to Device-wide policies and expand the section.
- In case you selected in the Policy the Device Ownership Personally-owned, ensure to enable and use the work profile policies instead.
- Now Enable device policy controls and keep this process with enabling sections and controls in mind
- Enable and expand Password Policy
- Enable password policy controls with KSP
- Enable and expand Passcode Change as this will enforce the user to set a passcode
- Now configure your desired passcode settings and follow the approach to enable the specific sections
- General Config
- Press Save to finish your configuration
- Now set your desired App Management options
- We recommend to set the Installation type for the Knox Service Plugin in general to Required for Setup, Preinstalled or Force Installed. As the Knox Service Plugin will add itself as a Device Admin on the device, your users won't be able to deinstall the application. While selecting Required for Setup you increase the security as e.g. a Passcode change and other configured settings will immediately applied during the Device Setup.
- Press Save to finish the configuration
- The state of the App should now be switched from Not active to Active, which means the App and the Application configuration is applied to the Policy on the Android Management API
Configure a Wi-Fi
Now you can add if needed Wi-Fi configuration to the Knox Service Plugin with the following steps:
- Press again the Edit button for the Knox Service Plugin application
- Press Edit Managed Configuration
- For testing purpose, rename your current Profile Name to e.g. Marketing Department v2
- Ensure to enable the sections Device-wide policies > Device Controls > Wi-Fi Policy and the corresponding controls
- Enable in the Wi-Fi Policy the following checkbox Allow to configure Wi-Fi (Configure details below)
- Now scroll to the bottom to Wi-Fi Configurations and press Add
- Enable again the section
- Now enter and configure your Wi-Fi details
- Confirm your configuration with Press Save
Add Additional Apps
- From the Apps Tab in the Policy, you can add now several addition apps from the App Portal
- Press again Assign More Apps
- Add your application(s)
- Activate the applications by pressing the edit button to configure your App Management options
- After you have added and configured all your desired Apps, it is time to enroll a device
- Proceed with Device Enrollment
Device Enrollment
- While having your current Policy opened, navigate to Enrollment
- Review the explanation, the provided (Enrollment) token, the QR-Code and the described Enrollment Process
- Perform the device enrollment based on the selected Device Ownership in the Definition Tab
Enrollments based on the Ownership
| Ownership | Enrollment Steps |
|---|---|
| Corporate-owned | There are several methods to set up full administration on a company-owned device. The simplest method is to turn on the new or factory reset device and tap the same spot six times on the welcome screen and scan the provided QR code to complete the setup. Another method is to follow the steps in the Setup Wizard up to the Google Accounts step. Instead of adding a Google Account, the user can enter afw#setup to download the Android Device Policy application and then scan the QR code or enter the enrollment token manually. The third option is to utilize the Zero-Touch or Knox Mobile Enrollment, as outlined in the Zero Touch or Knox Mobile Enrollment section. |
| Personally-owned | To set up a work profile on their device, users can go to Settings > Google > Set up & restore and tap Set up your work profile. These steps initiate a setup wizard that downloads Android Device Policy on the device. Next, the user will be prompted to scan the QR code or manually enter the enrollment token to complete the work profile setup. Alternatively, users can download the Android Device Policy from Google Play. Once the App is installed, the user will be prompted to scan the QR code or manually enter the enrollment token to complete the work profile setup. |
| Corporate-owned with personal Usage | There are several ways to set up a corporate device for personal use, and the general process is the same as for corporate devices, but during the setup wizard the user will see some additional steps for the personal space, such as the option to add a personal Google account. The simplest method is to turn on the new or factory reset device and tap the same spot six times on the welcome screen and scan the provided QR code to complete the setup. Another method is to follow the steps in the Setup Wizard up to the Google Accounts step. Instead of adding a Google Account, the user can enter afw#setup to download the Android Device Policy application and then scan the QR code or enter the enrollment token manually. The third option is to utilize the Zero-Touch or Knox Mobile Enrollment, as outlined in the Zero Touch or Knox Mobile Enrollment section. |
Add Features by creating a custom QR-Code
As mentioned above, we will gradually add more features for managing Android devices via the Android Management API. This includes some configuration options that can be provided with the QR code for device enrollments. To get you started right away, we will show you how to create a custom QR code with additional features.
- While having your current Policy opened, navigate to Enrollment
- Now scan the displayed Code with a QR-Code reader on a mobile devices to review the content
- Every barcode on the Android Management API contains the following minimum information:
- Device Admin Component is the registered component to activate the Device Admin on the device
- Device Admin Signature Checksum is corresponding checksum the Device Admin App
- Package Download Location contains the Google Play link to the Device Policy Controller
- Admin Extras contains the Enrollment Token for your policy
- In general, the content of your QR-Code looks like this:
{
"android.app.extra.PROVISIONING_DEVICE_ADMIN_COMPONENT_NAME":"com.google.android.apps.work.clouddpc/.receivers.CloudDeviceAdminReceiver",
"android.app.extra.PROVISIONING_DEVICE_ADMIN_SIGNATURE_CHECKSUM":"I5YvS0O5hXY46mb01BlRjq4oJJGs2kuUcHvVkAPEXlg",
"android.app.extra.PROVISIONING_DEVICE_ADMIN_PACKAGE_DOWNLOAD_LOCATION":"https://play.google.com/managed/downloadManagingApp?identifier=setup",
"android.app.extra.PROVISIONING_ADMIN_EXTRAS_BUNDLE":{"com.google.android.apps.work.clouddpc.EXTRA_ENROLLMENT_TOKEN":"OTQGFQLNFYLWPLFKTJUEWUYB"}
}
- While comparing the available Extra Bundles from the official Google Documentation, you can add several options to your QR-Code as shown in the example below:
{
"android.app.extra.PROVISIONING_DEVICE_ADMIN_COMPONENT_NAME":"com.google.android.apps.work.clouddpc/.receivers.CloudDeviceAdminReceiver",
"android.app.extra.PROVISIONING_DEVICE_ADMIN_SIGNATURE_CHECKSUM":"I5YvS0O5hXY46mb01BlRjq4oJJGs2kuUcHvVkAPEXlg",
"android.app.extra.PROVISIONING_DEVICE_ADMIN_PACKAGE_DOWNLOAD_LOCATION":"https://play.google.com/managed/downloadManagingApp?identifier=setup",
"android.app.extra.PROVISIONING_LEAVE_ALL_SYSTEM_APPS_ENABLED": true,
"android.app.extra.PROVISIONING_USE_MOBILE_DATA": false,
"android.app.extra.PROVISIONING_LOCALE": "en_us",
"android.app.extra.PROVISIONING_WIFI_SSID": "Imagoverum #2.4",
"android.app.extra.PROVISIONING_WIFI_PASSWORD": "Pa$$w0rd",
"android.app.extra.PROVISIONING_WIFI_SECURITY_TYPE": "WPA",
"android.app.extra.PROVISIONING_WIFI_HIDDEN": true,
"android.app.extra.PROVISIONING_WIFI_PROXY_HOST": "192.168.0.50",
"android.app.extra.PROVISIONING_WIFI_PROXY_PORT": "8080",
"android.app.extra.PROVISIONING_WIFI_PROXY_BYPASS": true,
"android.app.extra.PROVISIONING_WIFI_PAC_URL": "http://proxy.imagoverum.com/proxy.pac",
"android.app.extra.PROVISIONING_ADMIN_EXTRAS_BUNDLE":{"com.google.android.apps.work.clouddpc.EXTRA_ENROLLMENT_TOKEN":"OTQGFQLNFYLWPLFKTJUEWUYB"}
}
- You can paste the example content into any Text Editor and modify the settings to your needs
- Then you can use a QR-Code creator like https://www.the-qrcode-generator.com to create your custom QR-Code and use it for device enrollments.
Zero Touch or Knox Mobile Enrollment
- To utilize the Zero Touch Enrollment, please refer to Android Enterprise V: ZeroTouch Enrollment and select in your configuration Android Device Policy as EMM DPC and add the following to the DPC Extras and ensure to use the enrollment token from your target Policy. Then assign the profile to your devices as usual.
{"android.app.extra.PROVISIONING_ADMIN_EXTRAS_BUNDLE":{"com.google.android.apps.work.clouddpc.EXTRA_ENROLLMENT_TOKEN":"EHYXZWKAXTOUREPKUROZJDWX"}}
- To utilize the Knox Mobile Enrollment, please refer to Android Enterprise VI: Knox Mobile Enrollment and select during the Android enterprise profile creation Other as Pick your EMM and use the following URL: https://play.google.com/managed/downloadManagingApp?identifier=setup and keep the EMM server URI field empty. In the next screen, use the following as Custom JSON data with the enrollment token from your target Policy. Then assign the profile to your devices as usual.
{"com.google.android.apps.work.clouddpc.EXTRA_ENROLLMENT_TOKEN":"EHYXZWKAXTOUREPKUROZJDWX"}
Device Management
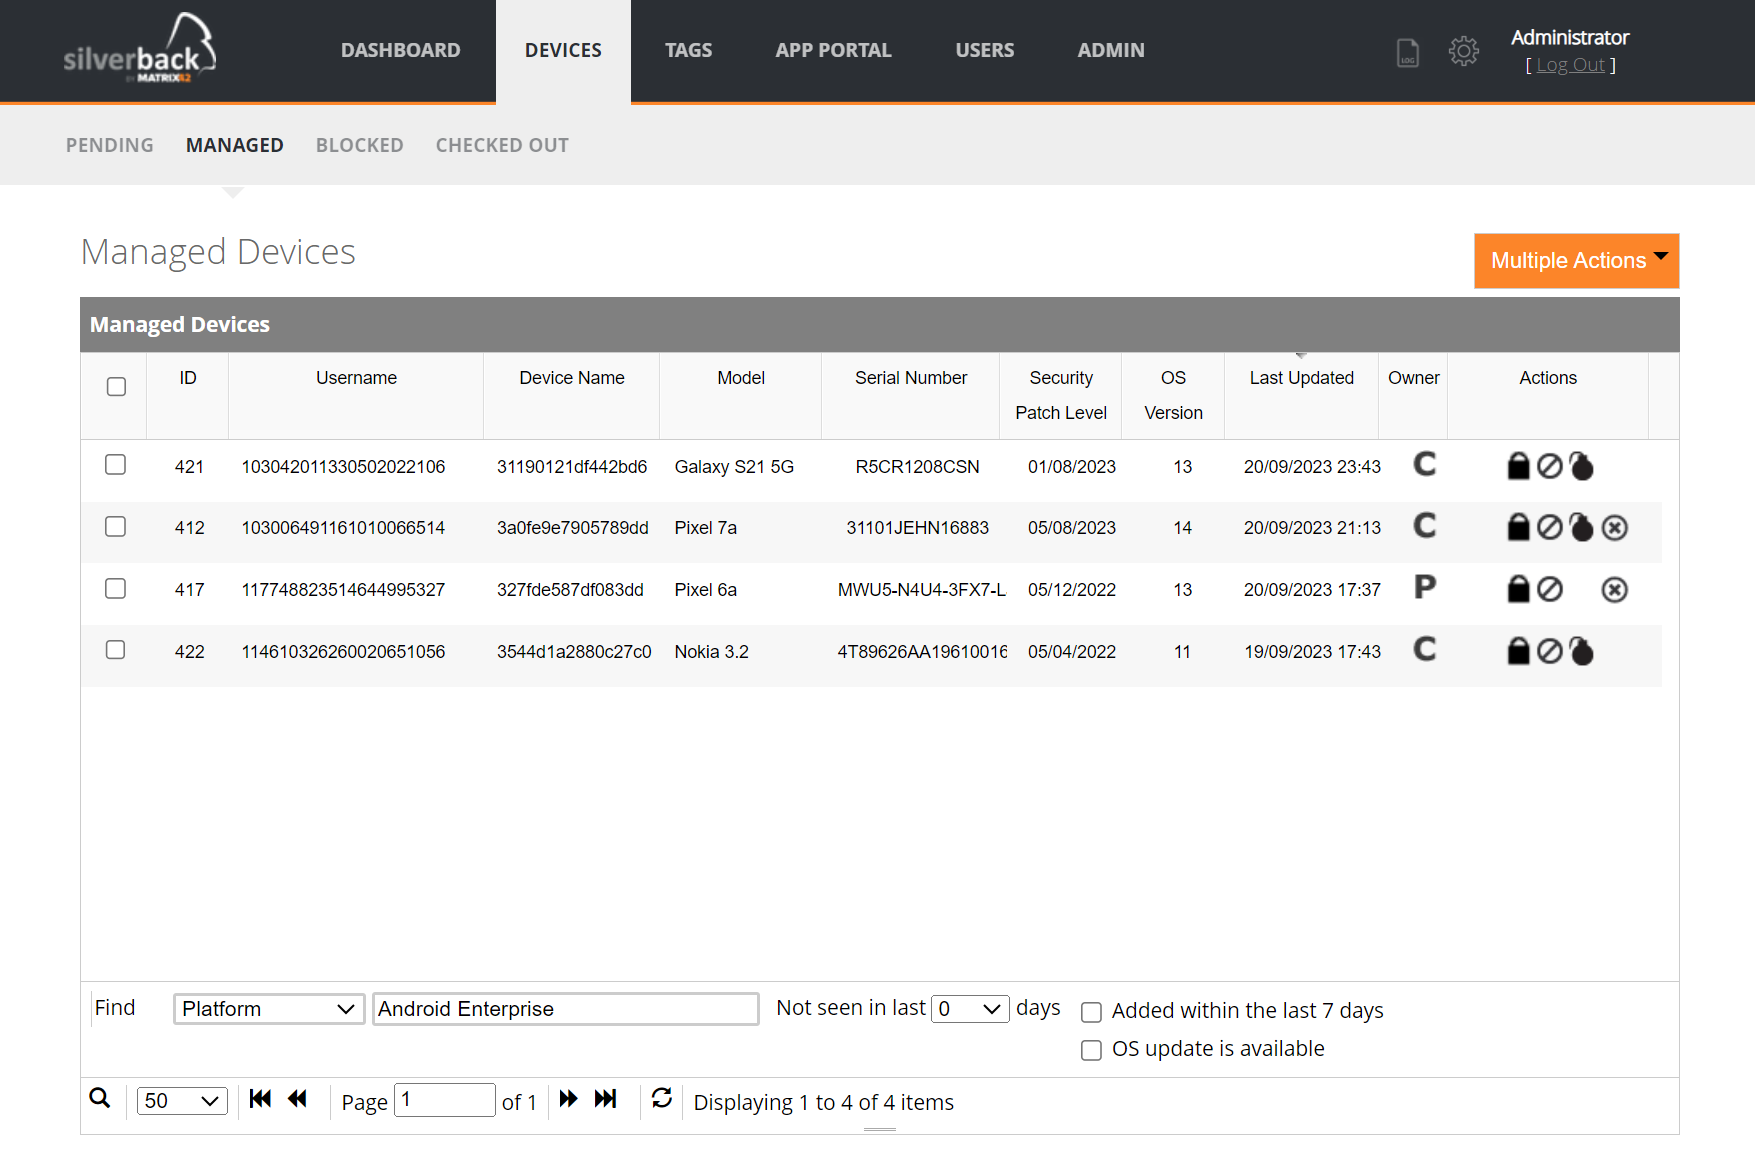
After the device enrollment, your device(s) should be listed in the Management Console under Devices > Managed. Corporate-owned devices, including devices with enabled personal usage are marked by default as Corporate devices. Personally-owned devices will appear by default as Personal. To open a Device Overview, press on a device and refer to the Device Information section for additional information.
Additional Notes:
- For personally-owned devices running on Android 12 and newer, the Serial Number is taken from the Enterprise Specific ID attribute, that uniquely identifies a personally-owned device in your organization. On the same physical device when enrolled with the same organization, this ID persists across setups and even factory resets.
- To distinguish Corporate-owned devices and Corporate-owned devices with personal usage, you can utilize the Device Overview and review the Management Mode as corporate-owned devices will have the Management Mode Device Owner and Corporate-owned devices with personal usage will indicate Profile Owner.
- Unlike other platforms that are managed with Silverback, the ownership cannot have changed after enrollment for devices that have been integrated with the Android Enterprise Management API.
- If you miss a Device Model, please refer to Missing Device Models: Overview
Device Information
You can access the Device Overview screen by clicking a device in the Management Console. Depending on the ownership, manufacturer and OS version of the device, some information from the device may or may not be transmitted and displayed. For example, personally owned devices transmit much less information than corporate-owned devices. If there is no information at all in any of the areas described below, that area will be hidden in the Device Overview, with the exception of the Network Information.
| Information | Availability | Description |
|---|---|---|
| Device Information |
|
Contains several information about the device, the operating system and enrollment data. |
| Assigned Policy |
|
Displays the assigned policy with which the device was set up and configured. |
| Security Settings |
|
Shows information about security-related device settings, such as whether the device is secured with a PIN or password, whether Developer Mode is enabled, and the encryption status. |
| Security Information |
|
Displays the possible security posture values of a device indicated by is secure, at risk or potentially compromised. |
| Available OS Updates |
|
Indicates wether the device has an available operating system update or if it is up to date. Possible values are Up to Date or a pending unknown, security, or OS update. |
| Hardware Information |
|
Provides detailed information about the device hardware like the Brand, Manufacturer, Serial Number, Model, and the Enterprise Specific ID for Personally-owned devices. |
| Network Information |
|
Displays device network information like IMEI, MEID, Wi-Fi MAC and the name of the current registered operator (Network Operator Name). |
| SIM Card / Data Plan 1 |
|
Show the Phone Number and Carrier Name associated with a given SIM card on the device. |
| SIM Card / Data Plan 2 |
|
Show the Phone Number and Carrier Name associated with a given SIM card on the device. |
| Display Information |
|
Provides detailed information about displays on the device like the refresh rate in FPS, the resolution in pixel and the density in DPI. |
| Temperature Thresholds |
|
Temperature thresholds technically belong to the hardware information and show e.g. throttling and shutdown temperature thresholds for each battery, CPU and GPU. |
| Hardware Status |
|
Displays the latest hardware status samples about the current Battery, CPU, GPU temperatures including Fan Speeds in RPM, skin temperatures. and CPU usages. |
| Applied Password Policies |
|
Displays the password requirements currently applied to the device. The password requirements need to come from a policy and not from a managed configuration, so this information will be available to you upon our implementation of the Passcode Profile feature. |
| Non Compliance Details |
|
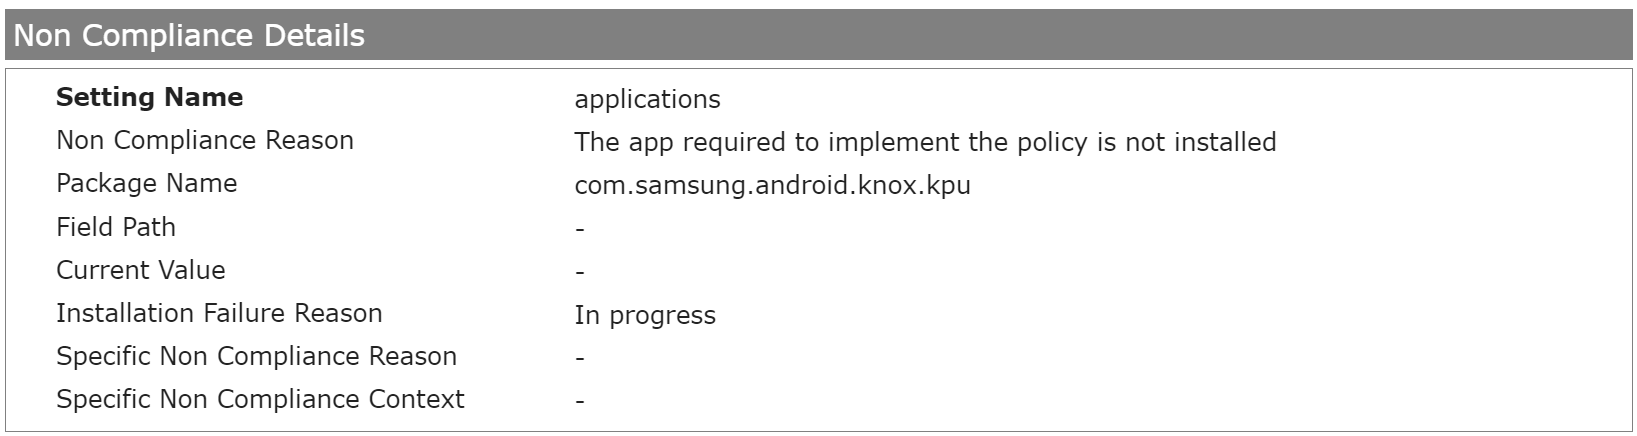
Provides detail about non-compliance with a policy setting. For example, an application defined in the policy cannot be installed because it is not available, a restriction set is not supported for the management mode, or the device does not have the prerequisite to apply the restriction. Please refer to Non-Compliance for additional information. |
| Application List |
|
Displays information about installed applications, either installed from the Google Play Store or sideloaded from an unspecified source. System Apps from the device's factory image and updated system apps are excluded from the report. For personal devices and corporate devices with personal usage, installed applications from the work profile are displayed. |
Non-Compliance
The Non-Compliance section displays information about whether the target and actual state between the configured policy and the device match. For example, common cases include:
- A policy includes an application that is not supported for the device type. This can be provoked very easily by adding the Knox Service Plugin into a policy and enrolling a Google Pixel device into that policy. As Knox service plugin is only supported for Samsung devices, the application is not available and can't be installed on Google devices.
- For an application, the App Management option is set to Required or Forced as the installation type, and the application is still being installed (Screenshot below).
- A restriction has been set that is either not supported by the management mode or requires a newer OS version (API level) of the device.
- A restriction set in the policy has not yet been set by the user. A good example here is the Degree of location detection enabled restriction, which must be manually deactivated or changed by the user to make the device compliant again.
- By default, Google sets some default compliance rules for the Android Management API that will restrict the use of the device or work profile if it is out of compliance. In this case, the user has 10 days to bring the device into compliance before the device is either reset or the work profile is removed. The Degree of location detection enabled restriction is again a perfect practical example. Please refer to Set up policy compliance rules for additional information and note that only the default compliance rules set by Google are currently active, and in this scenario devices will remain as managed in the Management Console.
- You can get more information about the reasons for non-compliance here: Non Compliance Reason
Device Actions
Based on device ownership, several device actions can be performed, as described below. Please note that the Lock, Block, Factory Wipe, and Delete Business Data actions are located in the Devices tab (Managed, Blocked), while the Restart and Clear Passcode actions are located in the Device Overview under Actions.
| Action | Availability | Description |
|---|---|---|
| Lock |
|
Locks the device, as if the lock screen timeout had expired. |
| Block |
|
Sets the device status to disabled to block access to apps and data on a company-owned device or in a work profile with some exceptions like Google Play. Depending on the Device Ownership the block action will take affect only to the Work Profile. You can add a blocked reason message that will be displayed to the user and in the Device Overview for the particular device. |
| Factory Wipe |
|
This operation wipes the device with additional flags used to control data wiping behavior when a device is deleted. By default all user data and factory reset protection data is wiped. Preserve factory reset protection data: By adding a personal Google account on the device, the factory reset protection is activated and when wiping the device, either the last passcode or the credentials for the Google account are required the next time the setup wizard is started. Without activating this checkbox, this information will not be required during the next setup wizard. Wipe external storage (SD cards): Additionally wipes the device's external storage (such as SD cards). |
| Delete Business Data |
|
Personally-owned: removes the work profile and you can add a short message displayed to the user before wiping the work profile on personal devices. The maximum message length is 200 characters. Corporate-owned with personal usage: Removes the work profile and all policies from a company-owned Android 8.0+ device, relinquishing the device for personal use. Apps and data associated with the personal profile(s) are preserved. The device will be deleted from the server after it acknowledges the command. |
| Restart |
|
Reboots the device without any user notification. Please note that user may lose unsaved work by executing the action. |
| Clear Passcode |
|
Reset the user's password with optional attributes. This applies for Personally-owned and Corporate-owned devices with personal usage to the Work Profile.
|
| Enable Lost Mode |
|
Turns a device into lost mode with optional information. |
| Disable Lost Mode |
|
Disables an activated lost mode. |
Application Feedback
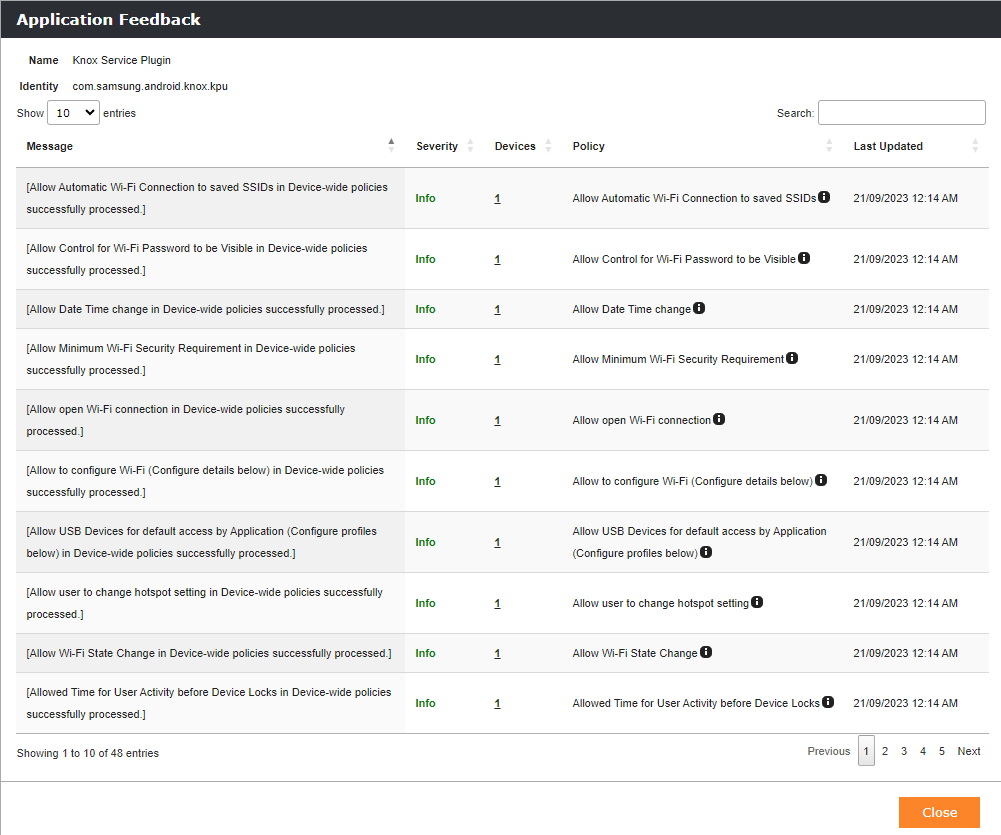
Google offers to application developers a feedback channel, so that applications configured via managed configurations can send to Google and to the MDM/EMM system feedback about applied configurations with information like if they are applied successfully or if issues appeared. In the App Portal you will find new message-centric bird's eye view where you can get a summarized feedback for each application that is using the feedback channel capability. Starting from the App Portal, the summarized feedback is indicated with a notification icon inside the actions column. By opening the icon, a new pop-up will open with a collection of feedback's shown over all devices where a feedback has been received. The overview contains the received messages, an indication for the severity, a device drill down option and the policy name and the policy path.
Troubleshooting
Review Device Policy
Users and administrators can see when the device was last synchronized with the Android Management API, which policies are applied to the device, and which applications are associated with the device in Settings > Google > (Work Profile) > Device Policy. Users can also see what information an IT or administrator can access. Note, however, that the information may not be fully visible under Policies that affect your device. By tapping the three dots on the upper right in the Your Work device screen, users can also manually Sync policies.
Capture and Analyze Logs
For troubleshooting scenarios with the device management via the Android Management API, there is a separate tab in the Log view called Android Management . You can set the depth of the logs under Admin > Logs in the Vendor Specific Logs section using the Configure button. Here you can use the log level options Information and Error, where Information is a more verbose level than Error. The View Log button will take you to the corresponding Android Management tab in the logs. With Information set as the log level, you can closely examine all the events that happen on the Android Management API. Please do not forget to set the log level back to Error after an analysis.
By using Notepad++ with the JSON Viewer plugin you can easily beautify the messages using the Format JSON option and removing any content before the { symbol, e.g when the event starts with The response from Android Management API has been received: { you need to remove the bold part and then utilize the Format JSON option.

Additional Information
- Devices that have been manually reset to factory settings by the user or if the user manually deletes the work profile remain unchanged in the Android Management API and Management Console, as no event is sent to the Android Management API for the action. These devices can be removed from the Management Console and Android Management API using the Factory Reset or Delete Business Data action in Silverback. After a subsequently executed refresh of the devices, an error is displayed and the device is subsequently set to inactive and thus removed in both sources. To prevent this scenario, we recommend to set the Disallow user to perform factory reset Retriction to true where applicable.