Factory Reset Protection and Bypassing for Android and Samsung Knox
Factory Reset Protection and Bypassing
The Factory Reset Protection is a security feature on Android and Samsung Knox devices running on Android 5 and newer. It was designed to make sure that someone is not able wipe and factory reset a phone that is lost or stolen. If a user adds to their devices one or multiple Google Accounts, the Factory Reset Protection is active and when the devices go though an untrusted factory reset, the next user for the device needs either to enter one of the previously added Google Account or use the last known Passcode or PIN to unlock the device. As this scenario is very useful for private used devices, it might lead to a scenario where a user in your organization is using a managed device with a personal Google Account and will leave your company for any reason. In this scenario, you will probably wipe the device from the Management Console and hand the device over to the next user. As the remote wipe from the Management Console is a method, that is considered as untrusted, the next user would need (one of) the previous Google Account credentials to unlock the device. Without having this account or at least the last used Passcode/PIN, the device can't be used anymore as it is locked. With the Factory Reset Protection configuration in Silverback, we are offering two ways to prevent this scenario in the future. You can choose if you want to disable the Factory Reset protection on managed devices or to determine which account can unlock the device, like a master account that is capable to unlock the device after an untrusted factory reset has been performed. Within this article, we want to provide first an overview about several topics of the Factory Reset Protection, before we start with the configuration.
This guide has been executed and created in combination with a Google Pixel 4A, running on Android 12 and your experience might be slightly different according to your hardware manufacturer and operating system version.
Trusted vs Untrusted Factory Reset
If the Factory Reset protection is enabled on the device, the next time a user sets up the device, it is mandatory to enter the previously used Google Account, unless a trusted factory reset was performed and you should keep this behaviour in mind, if you plan on selling this devices or giving the device to someone else. The following table demonstrates the differences between a trusted and an untrusted factory reset:
| Method | Description |
|---|---|
| Trusted Factory Reset | A trusted factory reset is a manually performed factory reset from the Setting application on Android. Mostly this action can be performed under Settings > System > Reset options > Erase all data (factory reset) but the navigation may vary from vendor to vendor. |
| Untrusted Factory Reset |
An untrusted factory reset is when the device is factory reset as a result of the following:
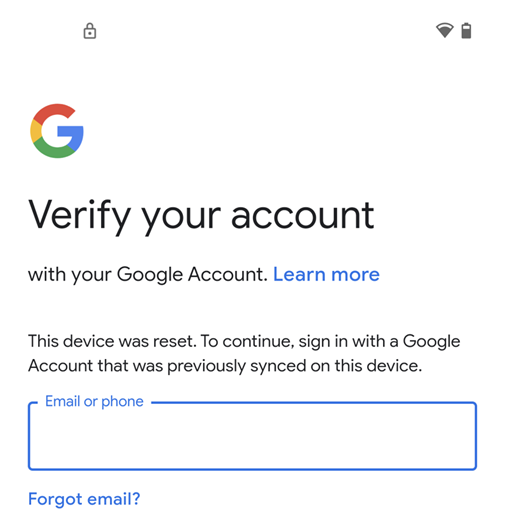
This list is may not showing all possible ways of an untrusted factory reset An untrusted factory reset will lead to the following screen during the Out-of-box experience |
Why you should setup a PIN or Passcode
When you review the trusted factory reset description, you will see that whenever the device is factory wiped from the Settings application, it is recognized as a trusted factory reset. If a device has no passcode on it, and it is getting lost or stolen, it can be simply wiped from anyone from the Settings application as there is not additional security on the device to prevent this. In this case, the device is not protected and can be used or sold by the thief or the attacker. This is one of the reasons, why we highly recommend to configure and apply a Passcode profile to every managed device with Silverback.
Disable Factory Reset Protection
One way to disable the factory reset protection is to remove all Google Accounts from the device. Keep in mind that removing the Google Account will prevent users from using other Android Device Manager features such as locating, or remotely locking, and factory resetting the device. To disable the Factory Reset Protection with Silverback, you can create and apply a Factory Reset Protection profile and assign this to your target device owner devices that are running on Android 11 and newer. Please review the minimum requirements for the Factory Reset Protection control, before starting with the preparation of your test device.
Minimum Requirements
- Silverback Version 22.0 and newer
- Companion Version 22.0 and newer
- Android 11 and newer
- Activated Android Enterprise with devices enrolled as device owner
The minimum requirements are also valid for Bypassing the Factory Reset Protection.
Prepare Device
- Enroll a device as device owner and add a Google Account to the device
- After adding the Google Account, the Factory Reset Protection is by default set to active
- Note down the Device ID of the enrolled device
Create a new Tag and configure Profile
- Open your Silverback Management Console and login as an Administrator
- Navigate to Tags and press New Tag
- Enter as Name e.g., Factory Reset Protection and enter an optional description
- Enable Profile next to Enabled Features and Enable as Device Type Android and/or Samsung Knox
- Press Save
- Navigate to Profile
- Select Factory Reset Protection
- Enable the Factory Reset Protection configuration
- Select as Configuration Disable Factory Reset Protection
- Press Save
- Confirm with OK
If you have enabled Android and Samsung Knox in this Tag, ensure to configure the Factory Reset Protection profile in both tabs.
Assign Tag and Review Profile Installation
- Now Navigate to Definition
- Press Associated Devices and Select Attach More Devices
- Locate your enrolled test device and select it
- Press Attach Selected Devices
- Confirm with OK and click Close
- Navigate now to the Devices Tab
- Locate your device and open the device information
- Select Actions and click Pending Commands
- Review the InstallProfile command that contains the Restrictions Profile with the Status Acknowledged, as the Factory Reset protection profile is part of the Restrictions profile.

Factory Wipe with Disabled Protection
- Close the Pending Commands overview and close the Device Overview
- Locate again your device in the Devices Tab and select the Factory Wipe action
- Confirm with press Send
- Wait until the device is performing the factory reset
- Now walk through the steps of the Out-of-box experience and try to re-enroll your device as device owner
- At this time, you should not get asked to enter the previously used Google Account during the OOBE
After re-enrolling the device, we recommend adding again a Google Account to the device and wipe the device again from the Management Console. As you manually assigned the Tag within the previous steps it won't be assigned again automatically to the device, so the default behaviour of the device is active. This is now an ideal opportunity to check the changes in the behaviour with an activated Factory Reset protection. Within this run, you should get prompted for the previously configure Passcode/PIN or added Google Account. An indicator for a protected device is the lock icon in the notification bar.
Bypassing the Factory Reset Protection
After we disabled now the Factory Reset Protection for your test device, we will focus now on the second option that is available with the Factory Reset Protection control. Within the following steps, we will use and setup a Google Account that is eligible for unlocking a factory reset protected device. We will focus here on adding one Google Account for unlocking devices, but we recommend using multiple accounts or at least a shared account within your organization, so that the access to this account is always granted.
Prepare Device
- Enroll again the device as device owner and add a Google Account to the device
- After adding the Google Account, the Factory Reset Protection is again set to active
- Note down again the Device ID of the enrolled device
Get Account ID
Before we start now with modifying our previously created Tag, we will need to get the Account ID from the Google Account(s) that you want to use for bypassing the Factory Reset Protection. To perform this, proceed with the following steps:
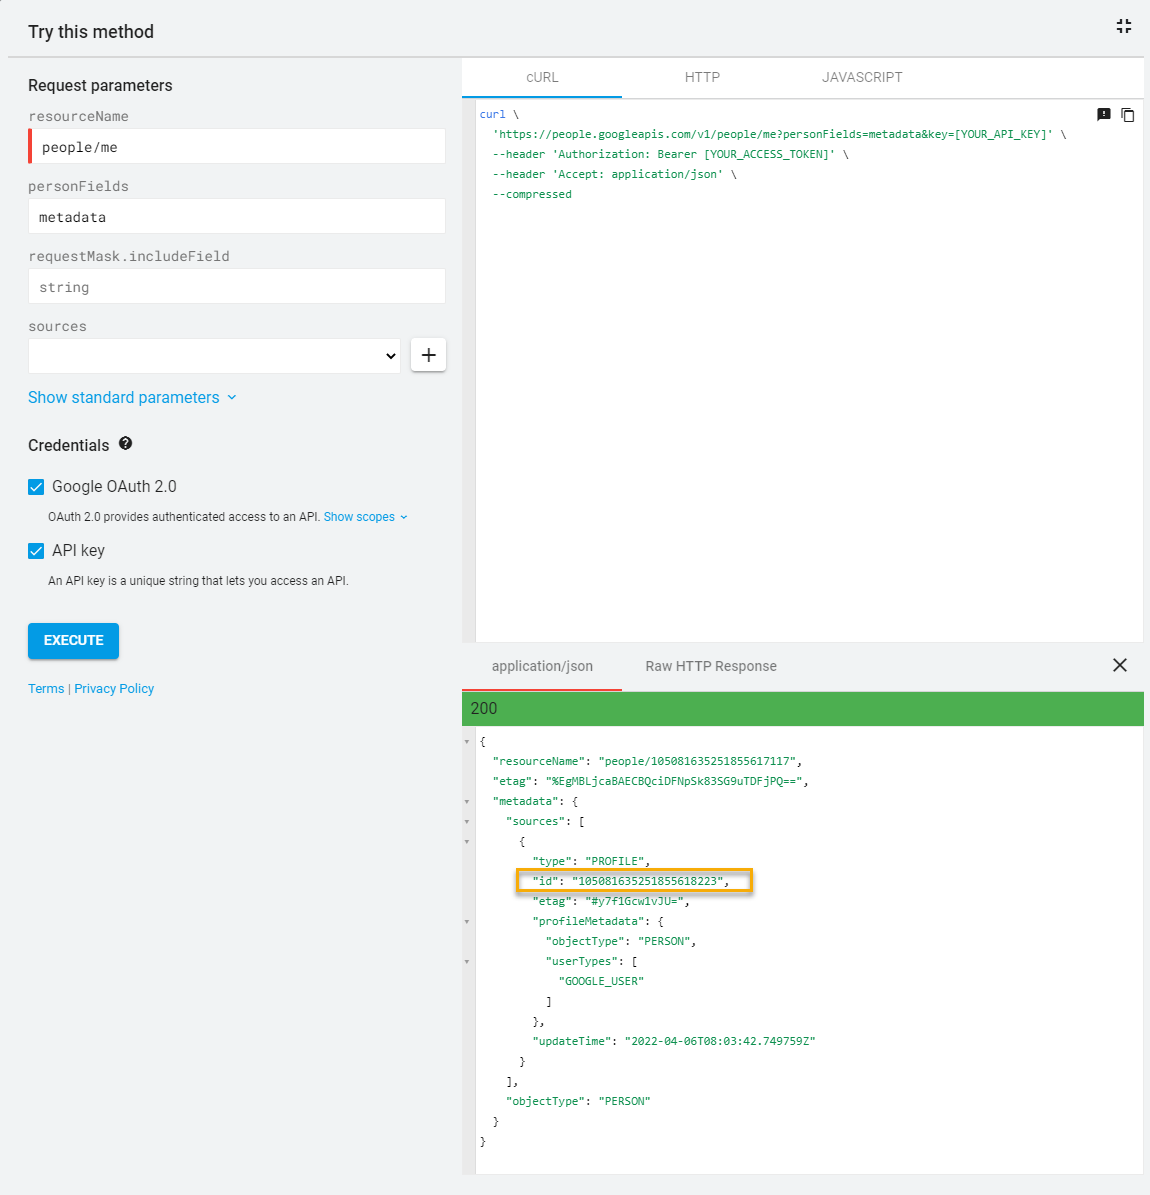
- Open this Link to query Google's People API
- Ensure the following settings are configured:
- resourceName: people/me
- personFields: metadata
- requestMask.includeField: string
- Enabled Google OAuth 2.0
- Enabled API Key
- Press Execute
- Now login with your desired Google Account and ensure to not use the account that you added to your device during the preparation
- Press Allow to trust the Google APIs Explorer
- Now note down the 21-digit ID corresponding to id under application/json from your Google Account
Repeat this steps for additional accounts that you want to use for bypassing
Adjust Factory Reset Protection Profile
- Navigate back to your Silverback Management Console
- Select Tags and Edit your previously created Tag for disabling the Factory Reset Protection
- Navigate to Profile
- Select Factory Reset Protection
- Change the Configuration from Disable Factory Reset Protection to Bypass Factory Reset Protection
- Press Add
- Enter now your Google Account, e.g. ttober@gmail.com
- Enter now your captured 21-digit Google ID to the corresponding field, e.g. 105081635251855618223
- Press Save and Confirm with OK
To add more accounts, use the Add button and to remove accounts, use the X button
Assign Tag and Review Profile Installation
- Navigate to Definition
- Press Associated Devices and select Attach More Devices
- Locate your enrolled device and select it
- Press Attach Selected Devices and confirm with OK
- Click Close
- Again, you can now navigate back to the Pending Commands section and review the profile installation
- Additionally, you can open the Companion application on the device and perform a manual sync
Factory Wipe Device with Bypassed Protection
- Locate again your device in the Devices Tab and select the Factory Wipe action
- Confirm with press Send
- Wait until the device is performing the factory reset
- Now walk through the steps of the Out-of-box experience and try to re-enroll your device as Device Owner
- At this time, you should get asked to enter the previously added Google Account during the preparation step
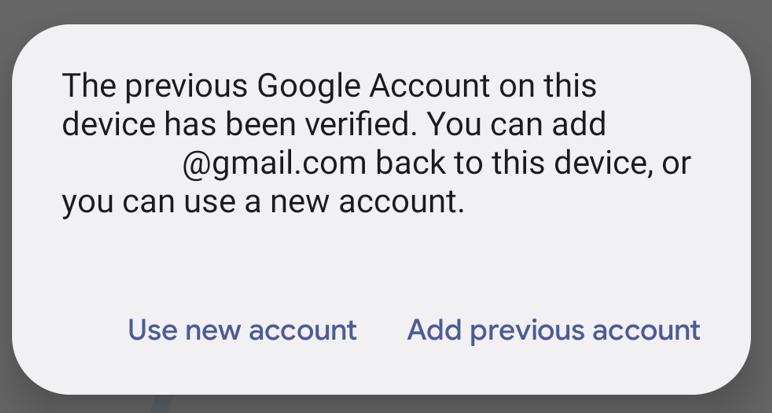
- At this point, you can login now with your configured Google Account from the Bypassing configuration and you should be able bypass the protection with this account.
- At the following screen, you can Use new account to enroll the device again as a device owner or use the device as a usual consumer device by adding a personal Gmail account
Review Status
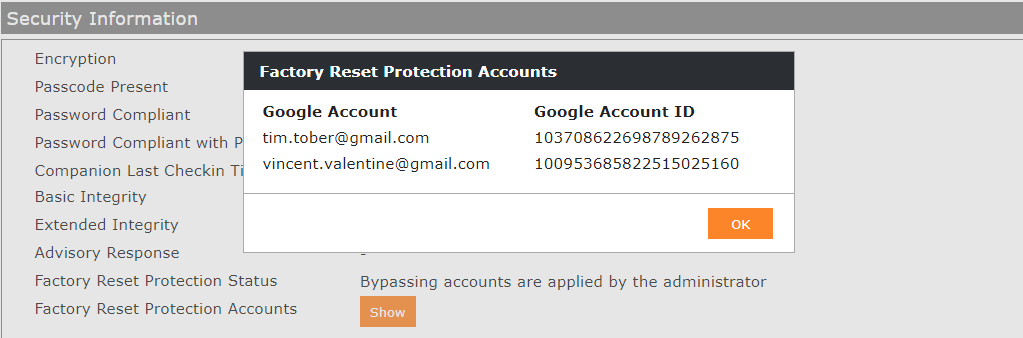
Inside the Device Overview for your particular device, you will find in the Security Information section two information about the Factory Reset Protection status. First, the Factory Reset Protection Status shows three different status depending on the configuration:
- If the Factory Reset Protection is not controlled, the status is Unmanaged and controlled by the user
- If the Factory Reset Protection is disabled via a profile, the status is Disabled by the administrator
- If the Factory Reset protection is set to bypass, the status is Bypassing accounts are applied by the administrator
The second information is the Factory Reset Protection Accounts where you can press the show button to review which bypassing accounts are applied to the device
Additional Notes
- After you successful accomplished this article, you can configure the Factory Reset protection to your needs and enable the Auto Population for the Tag
- Plan and perform the configuration and assignment carefully, as you might need to return the device to your supplier for repairing in a worst-case scenario
- If you assign multiple Tags with a configured Factory Reset protection, the last modified profile will win. You can review the assignment in the Resultant Tag
- If you disable the profile or remove the tag, the device will set back the original state as it was before the profile was assigned
- If the device is targeted to be given to someone else, consider advising the current user to perform a trusted wipe
- A Factory Reset protected device will display a lock icon in the notification bar during the out-of-box experience
- And in addition to that, the Set up offline button is not available as the device must be activated online
- If you change or recover the password for an account that you want to use to bypass, it might take up to 24 hours until the password change is applied
- Store your credentials for the bypassing accounts carefully and enable the multi factor authentication for these accounts.