Bulk Staging Mode
Overview
The bulk staging mode allows you to create for certain scenarios for staging users multiple pending enrollments with an unlimited expiration time. One use case is certainly if you have devices in your organization that are not personalized and have a specific purpose, these devices can be provisioned very easily through this mechanism, as the enrollment information consisting of username and one-time password, can be used for the devices at any time. For iOS and iPadOS devices, this leads to the opportunity to use always the same QR-code to enroll the device or use the same credentials during the enrollment for Device Enrollment Program devices or by opening the activation page through the device browser, which is also valid for macOS and Windows 10/11 devices, too. The approach can be also used for Android and Samsung Knox devices, but we recommend to use the Advanced QR-Code Provisioning, Zero Touch Enrollment or Bulk Enrollments with Samsung Knox Mobile Enrollment instead. Another use case is when you remotely want to enroll your current Windows 10 and Windows 11 device fleet, managed by Empirum, to the Co-Management scenario as described in Windows 10/11 Bulk Enrollments with Empirum and Provisioning Packages. In this guide, we will create a local staging user, enable the bulk staging mode and select your staging user, before we will create the unlimited pending enrollments and perform device enrollments.
Create your Staging User
- Login as an Administrator into Silverback
- Navigate to Users
- Click New Device User
- Enter as Username e.g. staging@imagoverum.com
- Add the following information
- First Name
- Last Name
- Email Address
- Password
- Confirm Password
- Click Save
Enable Bulk Staging Mode
- Open your Silverback Management Console
- Login as Administrator
- Navigate to Admin
- Select Self Service Portal
- Choose One Time Password
- Enable Allow Multiple Pending Enrollments
- Enable Activate Bulk Staging Mode
- Enable Set OTP Expiration Date to unlimited
Add your staging user
- Add your bulk staging user, e.g. staging@imagoverum.com
- Use either SamAccountName
- or UserPrincipal Name
- or Local Username
- Press Save
Create Pending Enrollments
- Navigate to Devices
- Select Pending
- Click Bulk Provision Users
- Click New Bulk Provision
Create your *.csv file
- Open Microsoft Excel
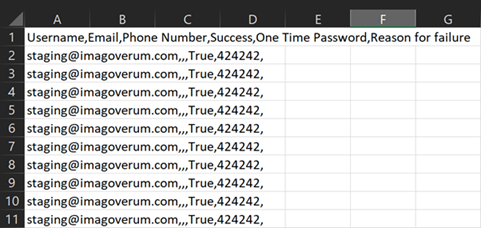
- Add in the first line your bulk staging user
- Depending on how many devices you want to enroll, add this information in the next rows as well
- For 10 upcoming device enrollments, the *.csv file should look like this

- Save this file as a *.csv file
- e.g. imagoverum_staging_10_devices.csv
Upload your *.csv file
- Navigate back to your Silverback Management Console
- Click Choose File
- Select your imagoverum_staging_10_devices.csv
- Click Open
Start creating Pending Enrollments
- Enable Define OTP
- Enter as OTP e.g. 424242
- Select Ownership
- Enable Email User Details (optional)
- Enter either LDAP (Admin) or local System User credentials to authorize the action
- e.g. ffryer_adm@imagoverum.com if your user list contains LDAP users
- e.g. any other system user in silverback if your user list contains only local users
- Click Submit
- Press OK in the Information popup
- Wait until the process is finished, this may take a couple of time
Verify creation process
- When its done click download
- Open the downloaded file
- It should look like this now
- Switch back to your Silverback Management Console
- Click Back
- You should see now the following screen with 10 pending enrollments

Enroll your Devices
In the following examples, we will use the different approaches on devices, but you can also the QR-Code enrollment or use the credentials during Device Enrollment Program enrollments and so on.
Apple Devices
- Open Safari on your device
- Navigate to your activation URL
- e.g. https://silverback.imagoverum.com/activate
- Enter your username, e.g. staging@imagoverum.com
- Enter your One Time Password, e.g. 424242
- Click Submit
- Download the profile and install it
- Follow the instructions given by the operating system
For each device you enroll the Pending Enrollments will decrease
Android Enterprise
- Factory wipe your device or start with a new device
- Start your device and configure your region & language setting
- Depending on your hardware vendor and Android version, accept terms and agreement and start setup as a fresh device
- Connect to Wi-Fi or skip if you have a network connection
- Enter as Google Account Email or Phone the following identifier
- afw#matrix42
- Download and install Matrix42 Companion
Map your devices to your organization with the Android Zero Touch or Knox Mobile Enrollment and simplify and automate the enrollment process.
- Accept all permissions
- Choose Enter Manually
- Enter as Email or MDM username your staging user
- Enter the One Time Password
- e.g. 424242
- Enable Add server URL
- Enter your Server URL
- e.g. silverback.imagoverum.com
- Press Next
- Wait until the device setup is finished
Windows 10/11
- Open Edge on your device
- Navigate to your activation URL
- Confirm to switch apps
Depending on your current operating system version, the following enrollment process is slightly different. For Windows 20H2 and newer, select in the screen Enroll only in device management and proceed with entering your username.
- Enter your username, e.g. staging@imagoverum.com
- Enter your MDM Server URL, e.g. silverback.imagoverum.com
In case you were prompted during the process to enter a Silverback URL, you might missed to add the DNS entry EnterpriseEnrollment.imagoverum.com to your Silverback Server.
- Click Next
- Enter your One Time Password, e.g. 424242
- Click Enroll
- Follow the instructions given by the operating system