Advanced QR-Code Provisioning
Advanced QR-Code Provisioning
The Advanced QR-Code provisioning method allows to enroll corporate-owned devices into the Android Enterprise Device Owner Mode by scanning a QR-Code during the initial device setup. Administrators creates and either sends the QR codes to their end users or use the QR-Code by themselves to provision their devices by scanning the QR codes. Administrators or users can tap the Welcome screen six times in the same spot to launch the QR code setup wizard. The QR-Code contains either Wi-Fi credentials or a flag to use mobile data and allows either to automatic provisioning the device or let the user start at the Self-Service Portal. By selecting automatic provisioning, each value entered as usage count reserves the same number of licenses.
Minimum Requirements
- Silverback Version 21.0 Update 3 for Advanced QR-Code Enrollments with Wi-Fi Network
- Silverback Version 23.0 Update 1 for Advanced QR-Code Enrollments with Mobile data
- Android Enterprise Integration
- Devices running Android 7.0 and newer
Before you Start
- With Advanced QR-Code Provisioning you have different options to perform the authentication setup during the enrollment
- Self Service Portal (e.g. for standardized enrollments with user authentication)
- Automatic Provisioning (e.g. for bulk-enrollments or single usage for a specific user)
- Localization settings defines not the complete Out-of-the-box experience in the desired language, take that into account
- By using Advanced QR Code Provisioning, you can either allow devices with a SIM or eSIM to use the mobile network, or you must add a mandatory Wi-Fi configuration with supported Wi-Fi security types WEP, WPA, or none.
- QR-Codes with selected enrollment option Self Service Portal can be reused at any time
- After generating QR-Codes, administrators can download the QR-Code and review present Pending Enrollment QR-Codes by selecting View OTP
- When using Self Service Portal, Administrators won't get notified via e-mail, as no new pending enrollments will be generated
- QR-Codes with Automatic Provisioning will create new pending enrollments and reserves licenses referred to the selected Usage Count
- The Usage Count for Automatic Provisioning count can't exceed your devices remaining license value
- For Automatic Provisioning, by default the One Time Passwords settings configured under Admin > Self Service Portal will be used
- By selecting Define OTP for Automatic Provisioning, One Time Passwords settings can be overruled
- When selecting Automatic Provisioning with LDAP Users, Administrators are required to enter their Administrative LDAP credentials
- Administrators can send enrollment information to the select users or to any other custom email address, e.g. it-service@imagoverum.com
- When using Automatic Provisioning, Administrators that have enabled to be a Mail recipient will receive the QR-Code by default via Email, as new pending enrollments will be generated
Ensure to not use Advanced QR-Code provision with devices linked to Zero Touch or Knox Mobile Enrollment as this is a conflict or limitation in the deployment process of the operating system. In these scenarios devices will get forced to factory wipe after finalizing the device setup and needs to be enrolled with the usual Deployment Program method.
Process
- Administrators will create a QR-Code containing Wi-Fi credentials or a flag to use mobile data and with the URL for the Self Service Portal or for the complete authentication
- Users starting the Out-of-the-box experience on their devices and users tap the Welcome screen 6 times in the same place on the screen
- The user scans the QR code and let the device connects to the Wi-Fi network or it will use the mobile data
- The setup wizard downloads Matrix42 Companion and initiates the device owner provisioning process
- Users will go through the Matrix42 Companion Setup wizard and accepts the required permissions
- Depending on the select the Enrollment Option, the provisioning process will be finished as following:
- For Self Service Portal process users are required to login, press start and press the enrollment link to finish the setup
- For Automatic Provisioning, the credentials are supplied in the QR-Code and the enrollment will be finished automatically
On several older devices and operating systems, users are required to open the Companion to finish the provisioning process. Companion will display a notification.
Older devices might not have a QR-Code reader on-board, so they are required to connect first to any other network to download the QR-Code reader
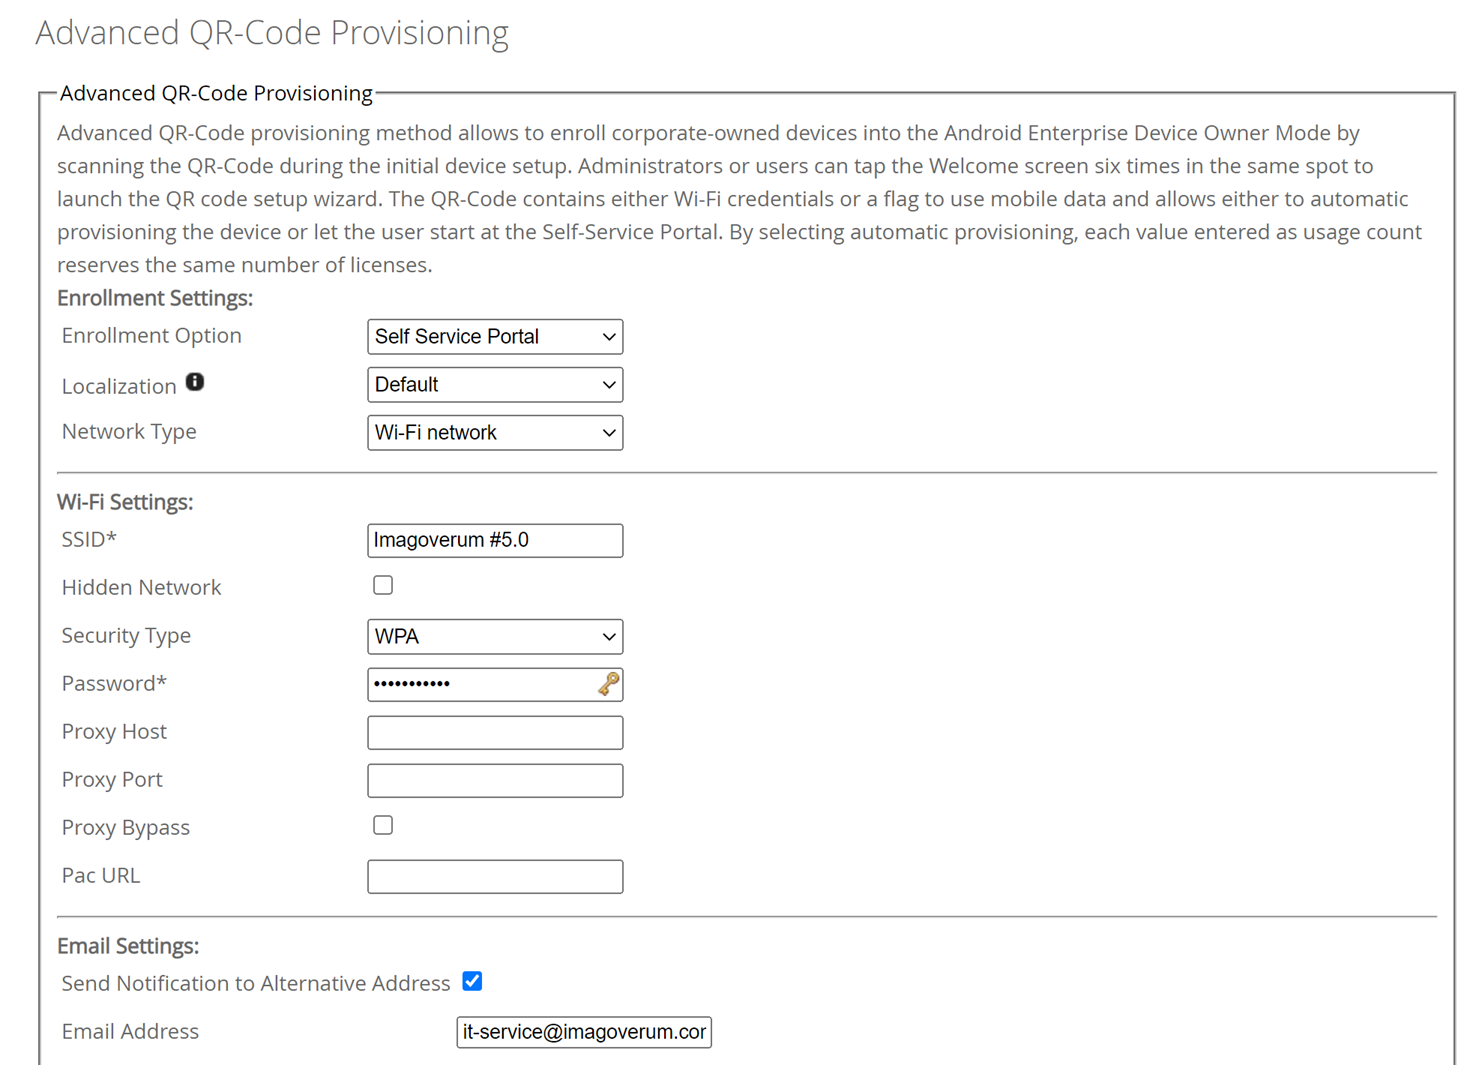
Self Service Portal
When selecting the Enrollment Option Self Service Portal, users will scan the provided QR-Code at the beginning of the Out-of-the-box experience and will start the setup process. Their device will either connect to the provided Wi-Fi automatically or will use the mobile data, start to download the Companion application and users will start at the Self Service Portal login screen. On the login screen, users can login with their credentials (Local Users, Active Directory or Azure Active Directory) to finalize the authentication setup by themselves. Afterwards the device will be enrolled to Silverback and devices are under management. As the Self Service Process is not personalized, you can reuse this QR-Code unlimited times and no e-mails are sent out by default to a specific user or administrator. To receive the QR-Code via Email, you can send the QR-Code to any custom email address at the point of the creation.
- Login to your Silverback Management Console
- Navigate to Devices and Pending
- Click Advanced QR-Code Provisioning
- Select Self Service Portal
- Select a Localization, e.g. English or de-ch (Switzerland) or it (Italian) as custom localization
- Select the Network Type
- If Wi-Fi network is selected, enter your Wi-Fi Settings
- If Mobile data is selected, ensure your devices have an SIM or eSIM equipped with mobile data
- Enable Send Notification to Alternative Address (optional)
- Press Save
- Review and download the generated QR-Code
- If Email settings are applied, review your new email with the An Administrator has provisioned a device on your behalf subject
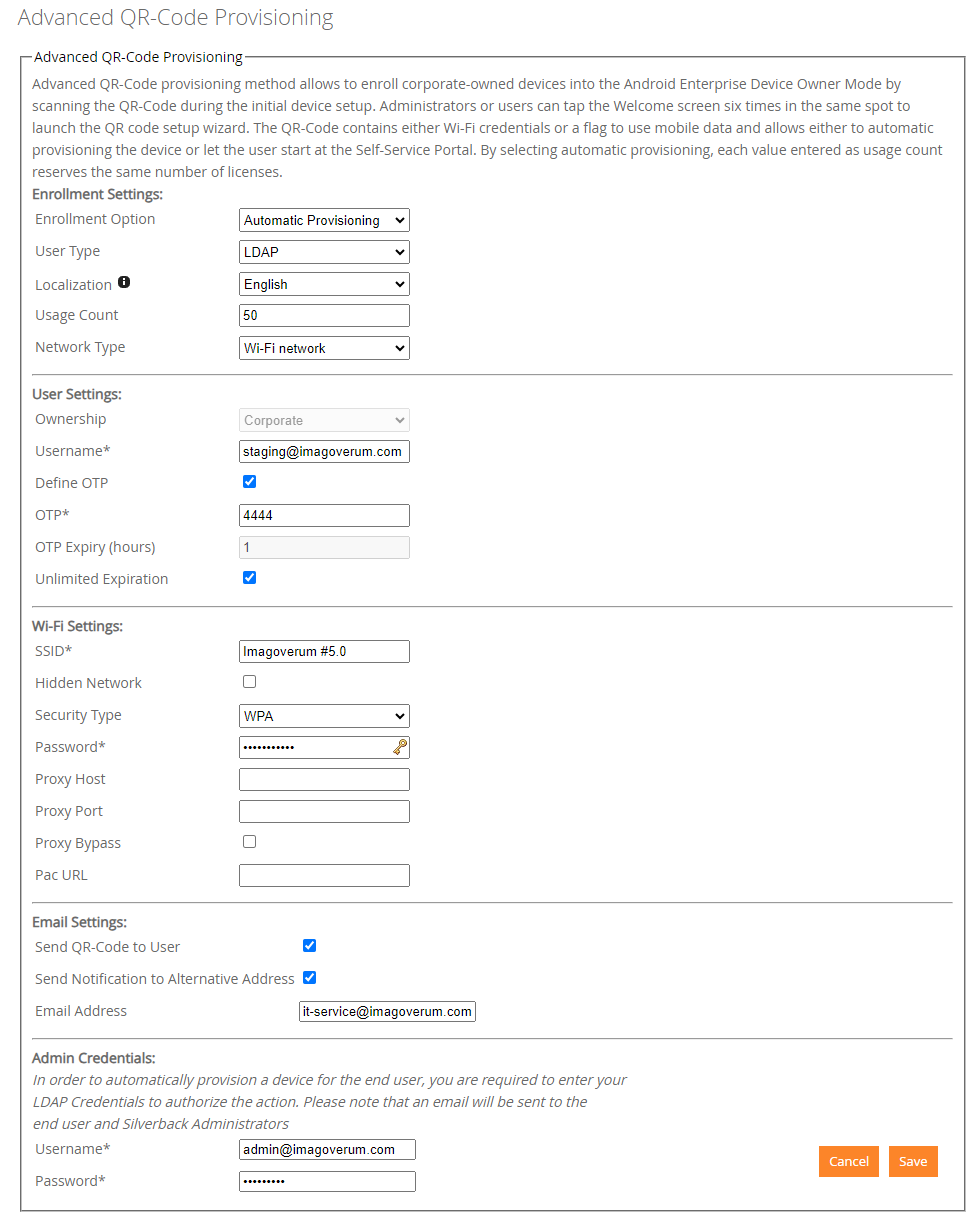
Automatic Provisioning
When selecting the Automatic Provisioning as Enrollment Option , one or multiple pending enrollments for a specific user are created and the provided QR-Code will contain the authentication information for users. Users will scan the provided QR-Code at the beginning of the Out-of-the-box experience and will start the setup process. Their device will connect to the provided Wi-Fi automatically or will use the mobile data, start to download the Companion application and will receive the present authentication information to finalize the setup. Afterwards the device will be enrolled to Silverback and devices are under management. Depending on your needs, the Automatic Provisioning is suitable for single enrollments, when the users are located in a reachable Wi-Fi area or while using mobile data or if you want to bring in multiple devices with a specific service user account, as a bulk enrollment e.g. for special purpose devices. Specially for the last scenario, you can increase the usage count to a maximum of available licenses and additionally you are able to set the OTP expiration to unlimited by enabling the Define OTP checkbox.
- Login to your Silverback Management Console
- Navigate to Devices and Pending
- Click Advanced QR-Code Provisioning
- Select Automatic Provisioning
- Select as User Type either LDAP or Local
- Select a Localization, e.g. English or de-ch (Switzerland) or it (Italian) as custom localization
- Enter a Usage Count for this QR-Code, e.g. 1 or 50
- Select the Network Type
- If Wi-Fi network is selected, enter your Wi-Fi Settings
- If Mobile data is selected, ensure your devices have an SIM or eSIM equipped with mobile datark
- Enable Send QR-Code to User (optional)
- Enable Send Notification to Alternative Address (optional)
- Press Save
- Review and download the generated QR-Code
- If Email settings are applied, review your new email with the An Administrator has provisioned a device on your behalf subject