Web Content Filter for iOS and iPadOS
Overview
The Web Content Filter on iOS and iPadOS devices allows you to control which websites can be viewed on your managed devices. The Web Content Filter is applicable for supervised devices running on iOS 7.0 or newer versions and it supports you with the following:
- You want to automatically filter out adult content
- You want to automatically filter out adult content, and then permit or deny access to specific sites
- You want to setup a device that can view only specific websites and create bookmarks for those sites
The web content filter uses on a high-level the same functions as the consumer feature Screen Time. If you navigate to Screen Time > Content & Privacy restrictions > Content Restrictions and Web Content, you will see the following options:
- All websites: Web content isn’t filtered
- Limit adult content: Limits access to many adult websites automatically
- Specific websites only: Limits access to predetermined websites, which can be customized
And this is basically what you can configure with the Web Content Filter, too. The search algorithm from Apple evaluates each web page as it loads and attempts to identify and block content not suitable for children is complex and may vary from release to release, but it’s basically looking for adult terms, including profanity and sexually explicit language. According to Apple recommendations, organizations with simple or limited content-filtering needs should or can utilize this feature. Organizations with complex or legally mandated content-filtering requirements should use a global HTTP proxy.
Requirements
To enforce the Web Content Filter, the device(s) must meet the following criteria:
- iOS 7.0 and newer
- Supervised device
Enable Automatic Filtering
The first and easiest option is simply to enable the Web Content Filter to automatically filter out adult content.
- Open your Silverback Management Console
- Login as an Administrator
- Create a new Tag with enabled Profile Feature and iPhone, iPad or iPod enable as device type or modify an existing Tag
- Navigate to Profile
- Select first your device type if you enabled multiple device types
- Now Select Web Content Filter
- Enable the checkbox to Enable the Web Content Filter
- Press Save and confirm with OK
Now you need to assign the Tag to one of your device. For this you can navigate within the Tag to the Definition Tab and use the Associated Devices button. Another way is starting from the Devices Tab. Here you can locate one of your device and press the Tag symbol from the Actions column. After your tests with the Web Content Filter, you can enable the Auto Population option to automatically assign the Tag to your target devices.
Review Installation
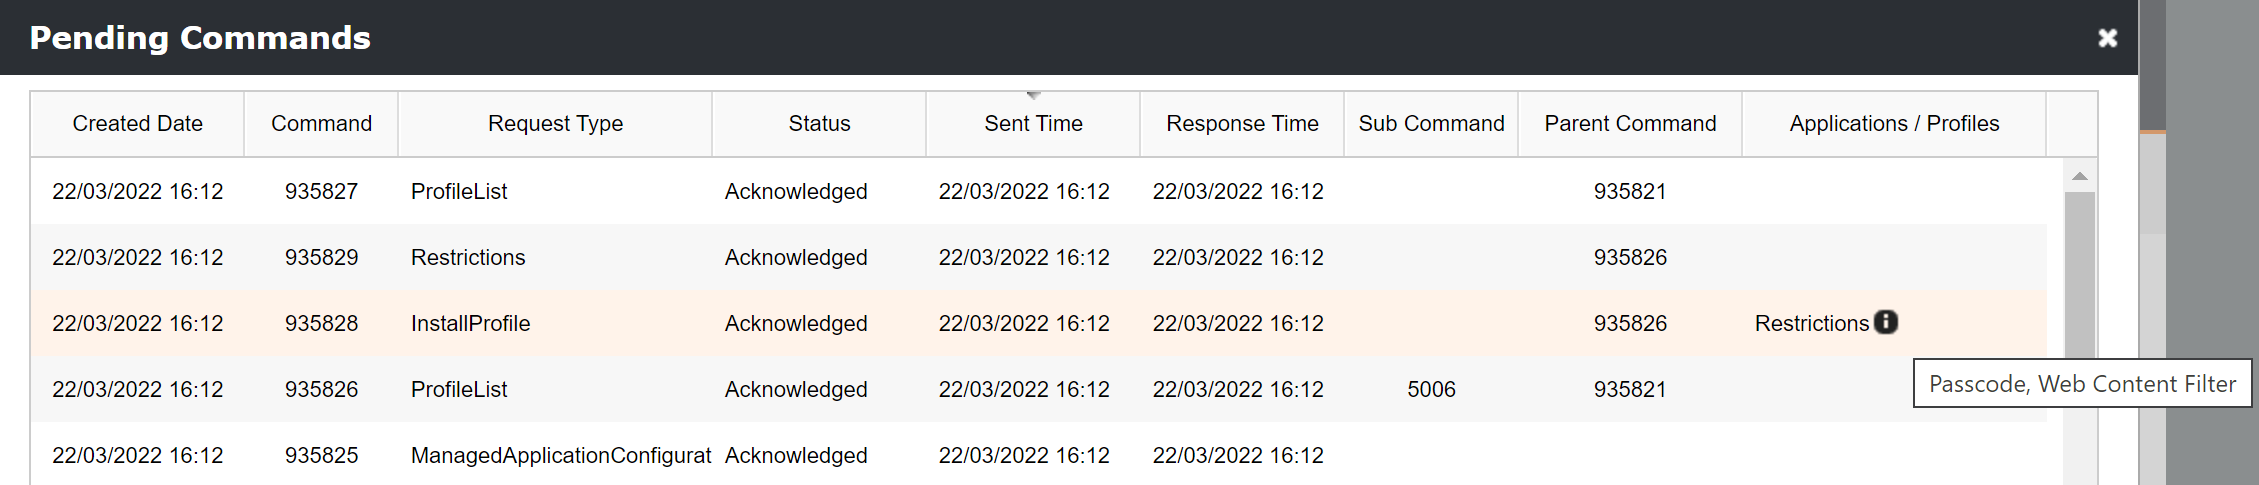
After assigning the Tag, Silverback will install the Profile on the device. You can review the installation from the Pending Commands for each particular devices by opening the device information, selecting Actions > Pending Commands. The Web Content Filter is part of the Restriction Profile as shown in the screenshot below.
On the device, you can navigate to the MDM Profile to review the configuration. As for iOS 15, you can review the MDM Profile within the Settings application under General > VPN & Device Management > Silverback MDM Profile. Here you should see the entry Web Content Filter. When you select Restrictions and scroll to the bottom, you can see the Web content filter option and by opening the profile, you should see here now Auto Filter Enabled.
Review Automatic Filtering
After the Web Content Filter is applied, you can open Safari, Google Chrome, or Microsoft Edge. If you open now a website that Apple identify as not suitable, you will receive the information "You cannot browse this page "xxx.com" because its restricted. All other pages can be opened and reviewed as usual.
The search algorithm from Apple evaluates each web page as it loads and attempts to identify and block content not suitable for children is complex and may vary from release to release, but it’s basically looking for adult terms, including profanity and sexually explicit language.
Block Additional URLs
Now we want to extend the Automatic Filtering with a list of Websites, that you want to explicitly block when they are not automatically blocked by the operating system. For this scenario, we will use Facebook and Wikipedia as an example. Before adding the Websites to the Web Content Filter, just open for testing purpose facebook.com and wikipedia.org with your preferred browser on your managed device. Then proceed with the following:
- Navigate back to your Tag with the enabled Web Content Filter
- Select Profile and Web Content Filter
- Press under Blacklisted URLs the Add button
- Enter now https://facebook.com
- Press again the Add button
- Enter now https://wikipedia.org
- Press now Save and confirm with OK
Now open again the device overview of your device, press refresh and review again the profile installation from the Management Console.
Review Installation
On your device, navigate back to your MDM Profile and review the changes. The Web content filter shows now Filters: Automatic Filter, Deny List. This means that on top of the Automatically Filter, you have now successfully configured the Deny List. When you open the Web Content Filter restriction, you will see Prohibited URLS list containing the following:
Review Additional Blocked URLs
Now open again Safari, Chrome, or Microsoft Edge and try to open facebook.com or wikipedia.org. For Facebook you should see now the "You cannot browse this page "facebook.com" because it is restricted" and for Wikipedia "You cannot browse this page "wikipedia.org" because it is restricted."
Permit Additional URLs
After we have enabled the Automatic Filtering and added additional URLs that should be prohibited, we will extend now the Web Content Filter with an additional mechanism. It might be that one of your target URLs will be blocked by Apple's search algorithm and that is exactly the point when the Permitted URLs option comes into action:
- Navigate back to your Tag with the enabled Web Content Filter
- Select Profile and Web Content Filter
- Press under Permitted URLs the Add button
- Enter now as an example https://xxx.com
- Press now Save and confirm with OK
Now open again the device overview of your device, press refresh and review again the profile installation from the Management Console.
Review Installation
On your device, navigate back to your MDM Profile and review the changes. The Web content filter still shows Filters: Automatic Filter, Deny List, but when you open the content of the profile, you will see the new section Permitted URLS list containing the following:
Review Additional Permitted URLs
Now open again Safari, Chrome, or Microsoft Edge and try to open xxx.com. This time you should be able to open the page.
Allow only Specific Websites
After enabling the automatic filtering and the configuration of the permitted and denied URLs, we want to review the last option for the Web Content Filter. If you want to setup a device that can view only specific websites, you can use the bookmarks feature. Using the Bookmarks feature fit as an example in lock down environments, such as retail stores, schools, or restaurants.
- Navigate back to your Tag with the enabled Web Content Filter
- Select Profile and Web Content Filter
- Press under Whitelisted Bookmarks the Add button
- Add as Title the name of the bookmark, e.g., Matrix42
- You can keep the Bookmark Path empty as Apple changed the Bookmark Path behaviour in newer OS version. Please refer to the information box below.
- Enter now your URL, as an example https://matrix42.com
- Press now Save and confirm with OK
Apple changed the Bookmark Path behavior, and All bookmarks go into the Allow Sites folder instead of going into the bookmark path you enter. Created bookmarks are also shown as Favourites when opening a new Tab.
Now open again the device overview of your device, press refresh and review again the profile installation from the Management Console.
Review Installation
On your device, navigate back to your MDM Profile and review the changes. The Web content filter shows now Filters: Automatic Filter, Allow list, Deny list. When you open the Web Content Filter restriction, you will see the Allowed Bookmarks section containing your previously created title for the bookmark: Matrix42
Review behaviour for specific websites
After applying the Bookmark(s) to your device, you will only be able to visit the configured URL for the bookmark. All other pages are restricted, and this means even that URLs added to the Permitted URLs section will be blocked. But in case your bookmarks contain content that is blocked by Apple's search algorithm, you can use the Permitted URLs section to allow this bookmark explicitly. In case your bookmark is listed under the Blacklisted URLs section, the denied list will win, and the bookmark URL will be blocked.
Recap the experience
After you have now configured all the possible options with the Web Content Filter, we now want to summarize what we have experienced:
- Enabling the Web Content Filter will automatically filter content
- If by accident one of our target URLs will be blocked by the automatic filtering, you can add these URLs to the Permitted URLs list
- If you want to additionally block URLs which are not blocked by the automatic filtering, you can define them in the Blacklisted URLs list
- If you want to allow only specific sites, the Whitelisted Bookmark section is your preferred solution
- If the Whitelisted Bookmark is blocked by the automatic filtering, you can add the URL to the Permitted URLs list to make it accessible
- If the Whitelisted Bookmark is part of the blacklisted URLs, users won't be able to access the bookmark and you need to remove the URLs from the Blacklisted URLs list.
Additional Notes
- With an enabled Web Content Filter, users won't be able to use incognito mode for Safari and it is also preventing users from clearing the Safari browser browsing history
- Wildcard characters URLs such as *.imagoverum.com, https://*.com are not supported
- The web content filter feature impacts all browsers and web views
- Blacklisted URLS may be still accessible through the corresponding installed application on the device. For example, even if facebook.com is blacklisted, users can still access Facebook via the application. For the Wikipedia application it is as an example different, as you can open the application but when you are opening an article, the application shows an error that the URL was blocked by a content filter. Please refer to Application Black- and Whitelisting for additional information about preventing the usage of applications.
- We recommend create a separate entry for each if you want to permit or block both http:// and https:// for the same site
- If a blacklisted URL is configured and it is redirecting, then the restriction will not be applied, unless the redirected URLs is also added
- Mobile version of the URLs and different should be considered as separate URLs. As an example : facebook.com, facebook.de, m.facebook.com, etc.
- If you assigned multiple tags containing a Web Content Profile, you can use the Resultant Tag option to review the applied configurations on your devices.