Application Server Hardening Guide
Hardening
The goal of product hardening is to reduce the possibilities of exploiting vulnerabilities in order to be better protected against attacks. For example, vulnerabilities are exploited for identity theft, resulting in the imminent blackmail or industrial espionage. For this reason, appropriate protective measures should be activated with the following objectives:
- Reduction of the possibilities for exploiting vulnerabilities
- Minimization of the possible methods of attack
- Limiting the tools available to an attacker after a successful attack
- Minimizing the privileges available to an attacker after a successful attack
- Increasing the probability of detection
IIS Shortname Vulnerability
According to CVE-1999-0012, some web servers under Microsoft Windows allow remote attackers to bypass access restrictions for files with long file names. Security scan tools indicate that Microsoft Internet Information Server (IIS) is vulnerable to an issue that permits the discovery of short file and directory names that conform to the 8.3 file naming convention. By sending specially crafted requests using the tilde '~' character, an attacker could exploit this flaw to uncover files or directories that are otherwise hidden, potentially exposing sensitive information. Additionally, due to the nature of the filesystem calls triggered by the remote server, an attacker may also attempt to launch a denial-of-service (DoS) attack against the target application. To mitigate the IIS Shortname vulnerability, execute the following to disable 8dot3 name creation for all volumes on the system, before installing Silverback:
- On your Silverback Server, open the registry editor
- Navigate to HKEY_LOCAL_MACHINE\SYSTEM\CurrentControlSet\Control\FileSystem
- Right-click NtfsDisable8dot3NameCreation, and then click Modify.
- In the Value data box, type 1, and then click OK.
Silverback 24.0 Update 2 contains a URL Rewrite Rule to abort any request that contains the ~ character in the URL to stop the potential disclosure of filename or directory information on the server. To set the rule manually, you can perform the following steps:
- On your existing Silverback Server, open the Internet Information Services (IIS) Manager
- Navigate to Sites > Silverback
- Double-click URL Rewrite
- Select Add Rule(s)
- Select Request Blocking (Inbound Rules)
- Configure the following
- Block access based on: URL Path
- Block request that: Matches the Pattern
- Pattern (URL Path): \~
- Using: Regular Expressions
- How to block: Abort Request
- Confirm with OK
Administrative Accounts
As a part of the Installation Guide III: Basic Setup it is strongly recommended to change the default password for the built in administrative accounts "admin" and "settings". Additionally you can delete these default accounts after the basic setup, but please ensure that you have created new administrative accounts with the roles Administrator and Settings Administrator before. The following step by step guide helps to perform the steps:
After a fresh installation, perform the following steps:
- Open your Silverback Management Console
- Login with the default admin user
- Navigate to Admin
- Select User Management
From here you should see two System Users listed with the usernames "admin" and "settings". First you should created two new accounts:
Account 1: Administrator
- Press New System User
- Enter a Username
- Enter a Email address
- Enter a new strong password
- Confirm your new strong password
- Keep Receive Email Alerts enabled
- Adjust the Date Format
- Adjust the Time Zone
- Select as Role Administrator
- Change to your preferred language
- Click Save
Account 2: Settings Administrator
- Press New System User
- Enter a Username
- Enter a Email address
- Enter a new strong password
- Confirm your new strong password
- Keep Receive Email Alerts enabled
- Adjust the Date Format
- Adjust the Time Zone
- Select as Role Settings Administrator
- Change to your preferred language
- Click Save
After the successful creation of the two new individual administrator accounts Log Out from the default "admin" account and login with the new Administrator account.
- Navigate to Admin
- Select User Management
- Click the Remove button for the default admin account with the Id 1
- Confirm with OK
- Click the Remove button for the default settings account with the Id 2
- Confirm with OK
As an alternative you can also run the following database queries:
- Delete from dbo.SystemUser where Username = "admin"
- Delete from dbo.SystemUser where Username = "settings"
Multifactor Authentication
To enhance the security of the Management Console, Multi-Factor Authentication (MFA) can be used. This additional layer of security ensures that administrators must verify their identity beyond just using a password, reducing the risk of unauthorized access. You have the flexibility to define how Multi-Factor Authentication (MFA) is enabled for system users accessing the Management Console. You can either enforce MFA by default for all users or allow users to activate it at their discretion. For more information on enabling, forcing and using Multifactor Authentication, please refer to Multifactor Authentication for System Users .
Accessibility
When installing Silverback, the management console for the administrative access is usually accessible from the internet. To increase the level of security, we recommend to allow the administrative login only from the internal network. This administrative access refers to your Silverback URL with the ending /admin.
If you want to make the administrative part of Silverback accessible only from your corporate network you can accomplish it in different ways:
- Enabling a URL filtering or request blocking rule at your corporate firewall or your reverse proxy
- Implementing the IIS Role Service "IP Security"
The following tutorial will describe the procedures to enable and configure the "IP Security" implementation. Please note that the configuration must be reapplied after each update or reinstallation of Silverback, because the settings will bet set to default on the IIS during an update or reinstallation.
Installation
- On your Silverback Server launch the Server Manager
- Click Add roles and features
- Proceed with Next
- Under Server Roles expand Web Server (IIS) > Web Server > Security
- Enable the Role "IP and Domain Restrictions"
- Proceed with Next and start the Installation
- Wait until the installation is finished and close the Add Roles and Features Wizard
Configuration
- On your Server Manager select Tools
- Run Internet Information Services (IIS) Manager
- Expand your Server > Sites > Silverback
- Select admin
- Perform a double click on IP Address and Domain Restrictions
- Click "Add Allow Entry" and define here your allowed IP address or IP address range
- e.g. 192.168.123.0 and 255.255.255.0
- Repeat this step if necessary
- Confirm with OK
- Click "Add Deny Entry" and exclude all IP addresses
- e.g 0.0.0.0 and 255.255.255.255
- Repeat this step if necessary
- Confirm with OK
- Click "View Ordered List" and ensure the Deny Role is located at the bottom of all entries.
- Navigate to your Server and Restart the IIS
Review
After successful implementing you still should have access from your corporate network to the Silverback Management Console, but from the internet you should get the message "You do not have permission to view this directory or page." Also you should have access to the Self Service Portal independently from your corporate network or from the internet.
Protocols & Cipher Suites
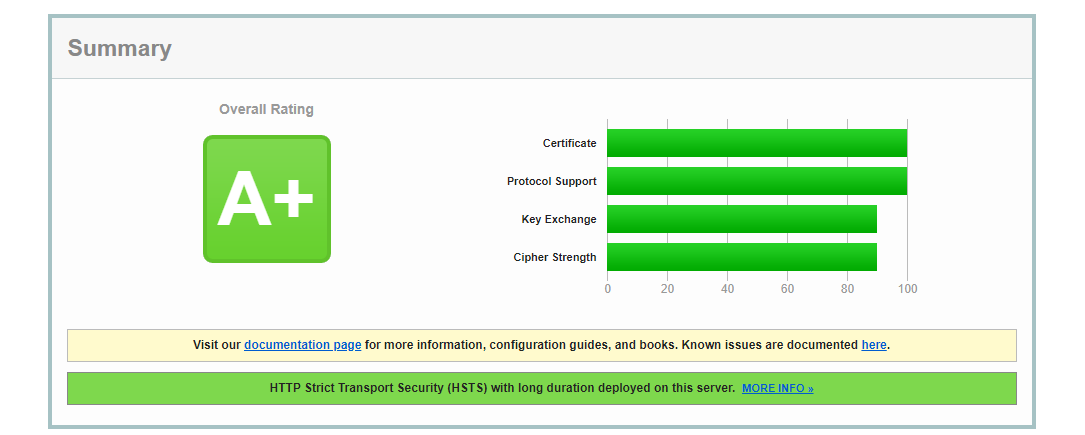
Qualys, Inc. offers with the SSL Server Test a free online service to perform a deep analysis of the configuration of your SSL web server on the public Internet. We recommend to review your current configuration with the SSL Server Test.
- Open https://www.ssllabs.com/ssltest/
- Enter your Hostname, e.g. silverback.imagoverum.com
- Wait until the check has been finished
- As a result you should have the Overall Rating of A+
- If your result is lower then A+, please proceed with the next chapters and run the attached script on your server
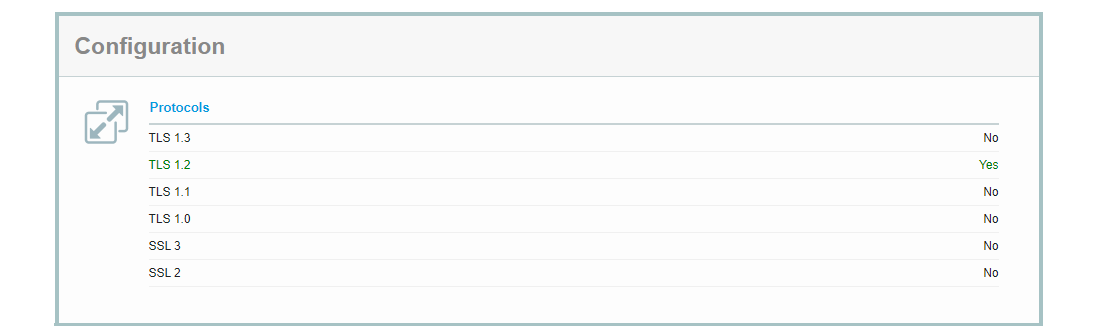
Protocols
As of today, we recommend to configure your Silverback Server running with the TLS Protocol 1.2, and we strongly recommend to deactivate all older protocols and versions as they marked as insecure. Basically you can enable and disable the protocols used by the Server through the Windows Registry. For your convenience you can run the attached script to ensure that Silverback is running on the highest possible hardening level.
Cipher Suites
As of today, we recommend to configure your Silverback Server running only with the following Cipher Suites, and we strongly recommend to deactivate all other Cipher Suites as they marked as insecure. Basically you can enable and disable the protocols used by the Server through the Windows Registry. For your convenience you can run the attached script to ensure that Silverback is running on the highest possible hardening level.

Script
To ensure that your Server is hardened and Silverback can run on the highest possible security level, you can easily run this script on your Silverback Server.
- Download the Silverback Hardening Script: Silverback_Hardening_Script_Cipher_Protocols_v3.0.1.zip
- Copy the archive to your Silverback Server
- Extract the archive
- Right click the unpacked PowerShell script
- Select Run with PowerShell
- Wait until the script has been executed
In case you run into a permission issue during execution, open the Windows PowerShell ISE with administrative privileges, import the Script and press Run Script (F5) and ensure your Execution Policy is set to unrestricted with the command set-executionpolicy unrestricted.
- Reboot your Server
- Run the SSL Server Test again, you should have now a A+ Rating.
If you Silverback Server is located behind e.g. behind an Web Application Proxy, executed the script there as well but ensure first that all other products behind will be able to work. With a double click on the PowerShell script you can review what will be changed.
The fundament of the script has been provided by Alexander Hass (www.hass.de) and has been adjusted for the usage with Silverback.
Review NTFS Permissions
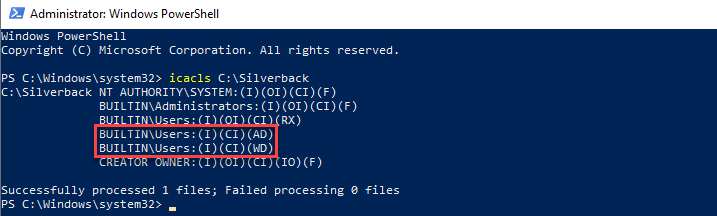
In Silverback versions earlier then 22.0, the default installation path for Silverback was C:\Silverback in the installation routine. During the folder creation of Silverback and depending on your security configuration of your Windows Server, the folder permissions for e.g., C:\Silverback were probably inherit from your C:\ folder or similar. Due to this scenario, it might be that local user accounts have been granted by default with write permissions for this folder. This could also happen if you changed the default installation folder to a custom location. To increase your security, please review the permissions granted to BUILTIN\Users by executing the following CMD or PowerShell command:
icacls C:\Silverback
In case your BUILTIN\Users has granted one of the following permissions, ensure to remove them:
- WD - Write data/add file
- AD - Append data/add subdirectory
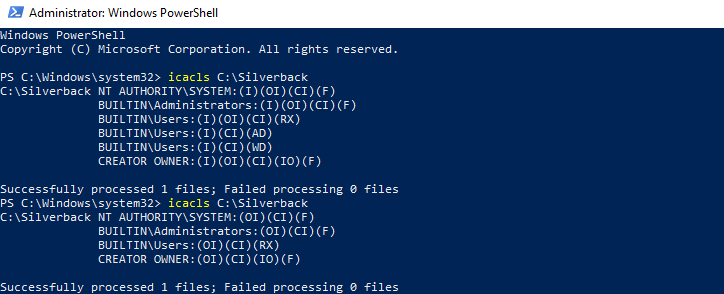
In newer Silverback installations, the default installation is set to C:\inetpub\, where BUILTIN\Users are not granted with the excessive NTFS write permissions. In case you selected a different installation folder then C:\inetpub\ during the setup, ensure to review your granted NTFS permissions, too.
To remove the permission, perform the following steps:
In our Testlabs, we recognized several different ways how the permissions were shown in the UI. Basically, you need to ensure that WD and AD are removed from the permission list and the following tutorial describes at least one way how to achieve it, but your experience may be different.
- Open Windows Explorer
- Right-click C:\Silverback and Select Properties
- Navigate to Security and press Advanced
- Press Change Permissions and press Disable Inheritance
- Select Convert inherited permissions into explicit permissions on this object
- Now double click the User Principal (you might have multiple User Principals -> look for Special as Access Type)
- Select Show advanced permissions and Disable Create files / write data and Create folders / append data
- Press OK and Apply and wait until the changes are taken and press OK to close the Window
- Select Remove all Inherited permissions from this Object
Now you can execute again the PowerShell command and review that BUILTIN\User does not have any WD or AD permissions:
Patch Management
It is recommended to establish a patch management. Increasing IT security is the most obvious benefit of patch management, as software vendors usually release patches to fix security vulnerabilities that can be exploited by malicious software or individuals. The timely application of these security patches significantly reduces the probability of security breaches of various kinds.
Matrix42 is providing a Patch Management solution.
The solution automates the backup, update, and smooth operation of your systems by reliably installing the latest patches. The solution supports centralized management of over 50,000 patches for Windows systems and countless leading applications from 100 other software vendors. Matrix42 Patch Management seamlessly integrates with Matrix42 Unified Endpoint Management. This allows you to manage all your endpoints holistically and efficiently.