Lost Mode for iOS and iPadOS devices
Overview
This article describes the Lost Mode security measure for supervised iOS and iPadOS devices that can be used to secure and locate managed devices if they are lost or stolen. Activating Lost Mode on iOS or iPadOS completely locks the device to a screen that displays a message, a contact number, and a call button when the device is connected to a mobile operator. The message can be customized to indicate that the device is lost, and the person who finds the device can contact the specified number. In addition, the Play Sound option makes it possible to physically locate the device with a sound under certain conditions. This guide will provide you with all the necessary and important information before demonstrating the feature and its dependencies.
Before you start
Before you start working with the Lost Mode, we would like to inform you in advance about a special aspect. Passcode-protected devices initially lose their Internet connection after a reboot, which is not re-established until the device is unlocked, as the security design prevents the device from accessing the keychain when locked. This means that devices that are in Lost Mode and are restarted can no longer be activated, as the device cannot receive any commands to disable the Lost Mode due to the missing Internet connection. For passcode-protected devices, it is therefore an option to clear the passcode from the device remotely as a first step before activating Lost Mode. However, this may be problematic from a security point of view. Another option for recovering Passcode-protected devices that have Lost Mode active and no longer have a network connection is to recover the internet connection to make the device usable again. Both options are explained briefly below:
Clear Passcode
Before you clear the passcode, we want to emphasize that this action is your responsibility and should be discussed with your security advisor before performing. After the command is acknowledged, the device is no longer passcode protected and free to use until it receives the enable Lost Mode request. To clear the passcode before enabling Lost Mode, refer to the Enable Lost Mode section below and select and execute first the Clear Passcode operation. From the pending commands, check the acknowledged Clear Passcode operation to review the process.
Recover Internet Connection
Getting the device back to a usable state when no connection is present it can be very challenging, but the easiest method to try first is to insert a non-PIN protected SIM card into the device to establish a network connection. In addition, you can try to connect the device via a LAN connection using an adapter. In order for this method to work, the Allow pairing option must have been allowed when the device was enrolled through the Device Enrollment Program. Additionally, additional set restrictions might influence the process. Another method that probably won't work, but can at least be tested, is to try to connect to iTunes or Apple Configurator 2 and reset the device from there. If all mentioned scenarios won't work, please get in touch with your Apple support.
Devices with an Apple ID
In addition, we want to highlight that the Lost Mode is designed for managed corporate-owned devices that are in supervised mode. For personal-owned devices or devices that are connected to an Apple ID, similar actions may be performed via Apple services such as iCloud or Find My. Please refer to If your iPhone or iPad is lost or stolen for additional information or contact your Apple support. In any case, please note that you may have limited access to available Apple services with configured restrictions on your managed devices and for security reasons.
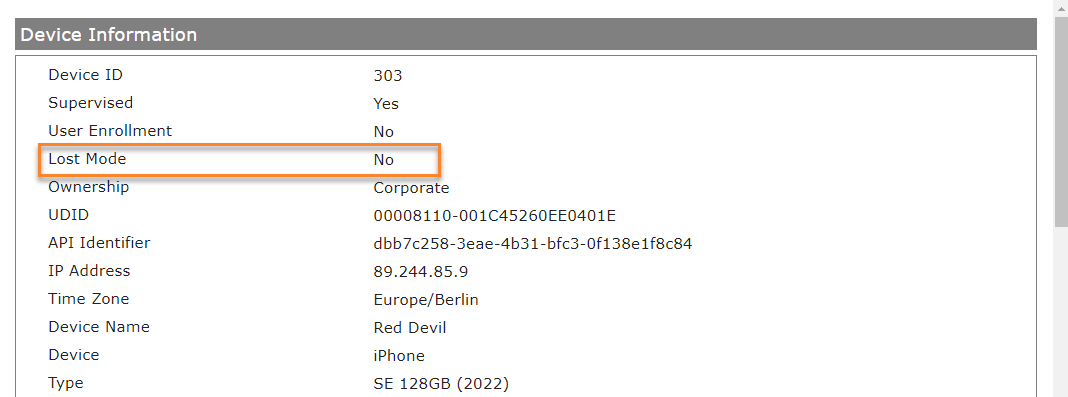
Enable Lost Mode
- Login to your Silverback Management Console
- From the devices view, locate your supervised device
- Press the device to open the Device Information

- Select Actions
- Select Lost Mode (supervised only)
- Press Enabled
- Enter a Phone Number
- Enter a Message
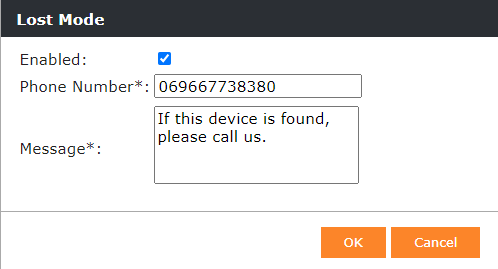
- Press OK.
Review if device is reachable
After pressing OK, Silverback will send the command to activate Lost Mode. Since this is done over the Internet, the device must be reachable. To review the process, follow these steps:
- Press Actions
- Select Pending Commands
- Locate or search for the EnableLostMode request
- If the request is acknowledged, it means that the Lost Mode is enabled on the device

- If the status is pending for a longer period, it might be that the device is not connected to any network.
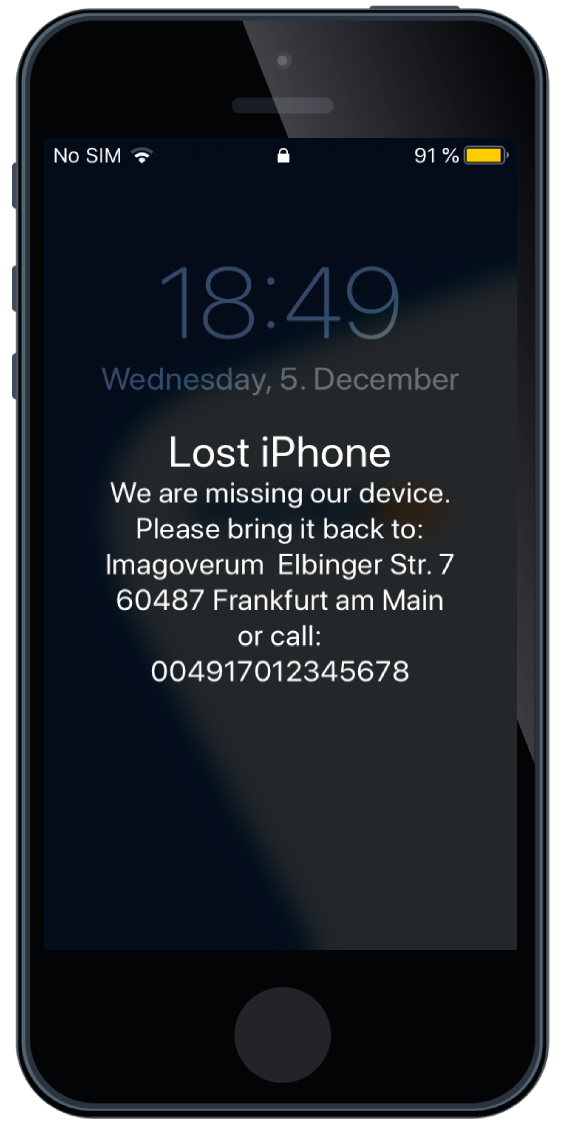
Device with Enabled Lost Mode
When Lost Mode is activated on the device, a screen is displayed on the device containing the two pieces of information from the action performed. The device cannot be used in this state, but it is possible to turn off the device and if the device has an unlocked SIM card and can make calls, an option to call the set telephone number is also displayed. In the example screenshot used, there is no SIM card and therefore the Call button is not visible. When the device is in this state, you can perform further actions within the Lost Mode. by proceeding with Additional Lost Mode actions.
Additional Lost Mode Actions
With the next device information request, the device should report itself as being in Lost Mode, and this unlocks additional actions that can be performed on the device with Location and Play Sound.
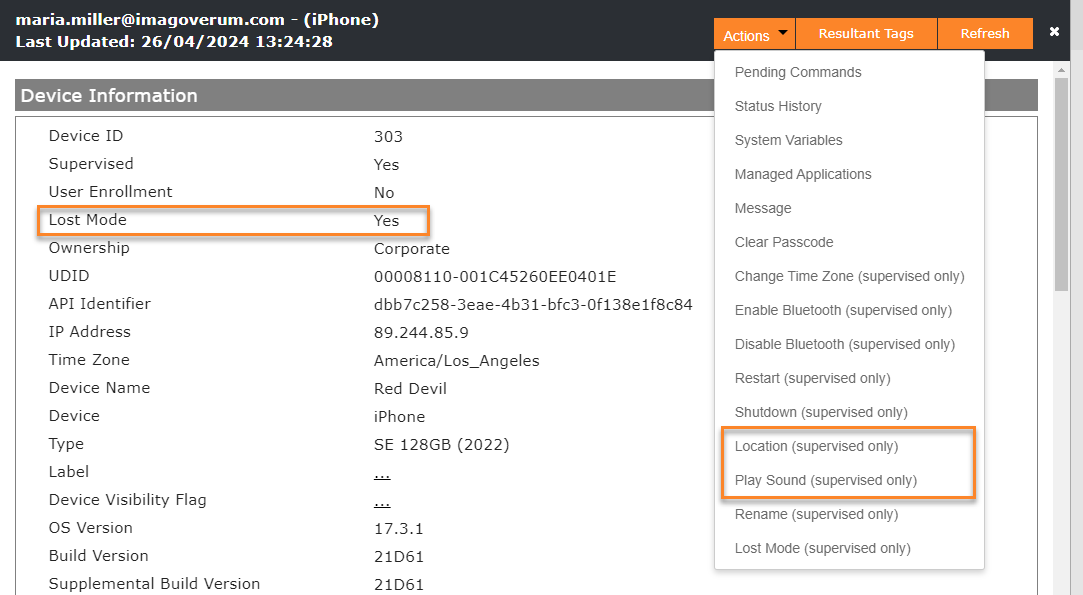
Get Location
After activating Lost Mode and refreshing the device, the Location action will be available. Please note that the device must first respond to Silverback that it is currently in Lost Mode in order to track the location. After getting the location, the Location section in the Device Overview will contain the information reported by the device by showing the Last Known location status and a timestamp. Pressing Map will take you to Google Maps for the exact last known location of the device. The entire process is as follows:
- Press the Location (supervised only) button
- Confirm with OK
- Open again the Pending Commands section
- Review the DeviceLocation request
- When the command has been executed, Silverback received the Location from the device

- Now close the Pending Commands section
- Scroll down to the Location section in the Device Overview
- You should see now the Last known location and the Captured At timestamp.

- Press Map to get to the Device Location
Play Sound
- To play a sound, press again Actions
- Now select Play Sound
- Review the confirmation and continue with OK
- Review again the pending commands to locate the PlayLostModeSound request
- When it is Acknowledged, the device starts ringing

- Please note that the ringer will start also while in silent mode but it can be suppressed by the current holder of the device.
Disable Lost Mode
Now that we have analyzed the principles of Lost Mode and its behavior on the device, and the device may have been recovered, we can disable Lost Mode. At this point, we would like to refer you back to the behavior described in the Before You Start section in case you encounter any difficulties.
- For this, open again the Device Overview of the specific device
- Press Actions and select Lost Mode
- Disable the Enabled checkbox and confirm with OK
- Review the DisableLostMode command

- When it is acknowledged, the Lost Mode on the device is disabled
- If the device location has been tracked, the user will see this information on the device and can unlock the device, by pressing Continue
- With the next process device information request, the device should report that the Lost Mode is disabled.