Bulk Enrollments with Samsung Knox Mobile Enrollment
Bulk Enrollments with Knox Mobile Enrollment
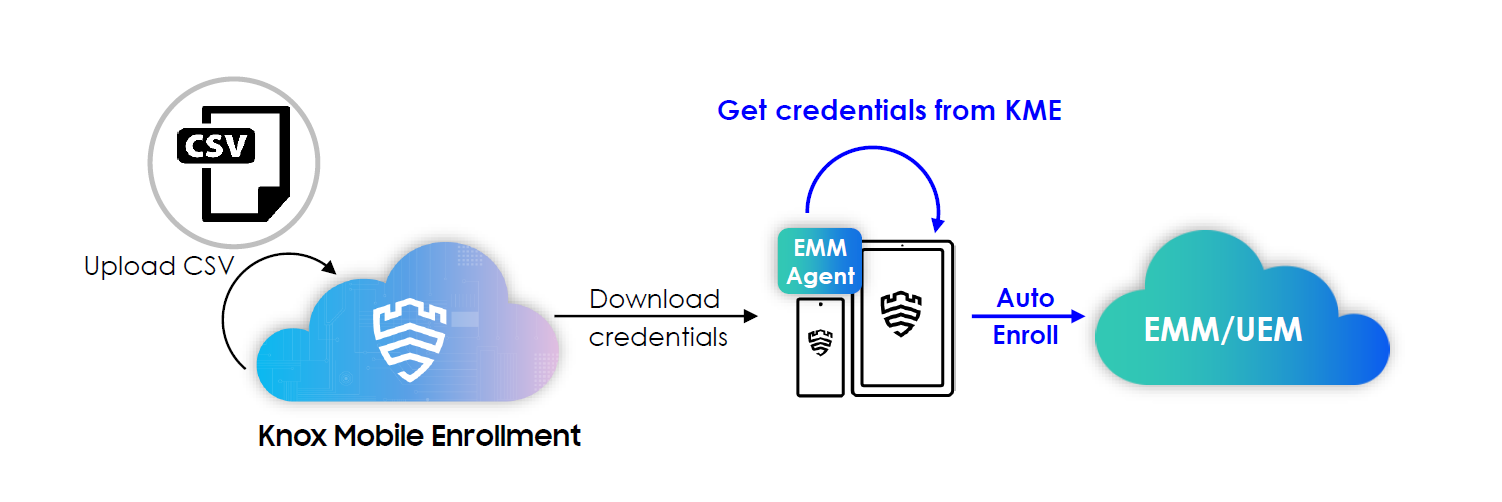
Samsung Knox Mobile Enrollment is Samsung's counterpart to the Apple Device Enrollment Program and/or Android Zero Touch Enrollment. Overall Knox Mobile Enrollment saves IT departments and users the tedious manual configuration of proprietary Samsung smartphones and tablets. Devices are pre-configured online with the settings desired by an Administrator. When booting for the first time, the devices check whether they are assigned a configuration and if so, they will download the (pre-configured) Matrix42 Silverback Companion app which will guide the user to finish the setup. Within this article, we will configure the Bulk Enrollment option for the Samsung Knox Mobile Enrollment. This ensures to prepare device rollouts for Administrators and let users to perform the device enrollment without the need of entering any authentication credentials inside the Matrix42 Companion application.
Requirements
- Successful Android Enterprise Integration
- Successful Knox Mobile Enrollment Registration
Process Overview
- Hardware vendor or Administrators adds devices to the Knox Mobile Enrollment Program
- Administrator creates a Knox Mobile Enrollment Profile that contains the Companion and the Silverback server address
- Administrator downloads the device list from the Knox Mobile Enrollment Program
- Administrator creates pending enrollments for users in Silverback
- Administrator creates a *.csv file for adding enrollment credentials to Knox Mobile Enrollment
- Administrator uploads the *.csv file to Knox Mobile Enrollment
- Users starts with the out-of-the-box experience and connects the device to a network
- During the enrollment, the Knox Mobile Enrollment Service provides the user credentials to Matrix42 Companion
- Devices will be enrolled into Silverback and are managed.
Additional Notes
Within this guide we will use the bulk configuration option for Knox Mobile Enrollment devices, but you can additionally create a single pending enrollment in Silverback with the Provision User option (Devices > Pending > Provision User) and enter manually the username and the one-time password by opening the device in the Knox Mobile Enrollment Portal > Devices and enter a single User ID (Username in Silverback) and the Password (Silverback One-Time Password). If you intend to use a service account for bulk enrollment, we recommend to use the following Bulk Enrollment with a Service Account approach with a dedicated profile configured with a DPC Extras.
Another option is to predefine only the username in the KME Portal and in this case, the Companion application will pre-fill during the enrollment the username and your Silverback Server address. If you intend to only predefine the username, you can add only two columns (IMEI/MEID or Serial Number, Username) in the kme_devices_authentication_upload.csv file and during Bulk Provision Users in Silverback, you can enable the Email User Details checkbox to send users the specific One-Time Passwords. In this case, ensure to add in the Bulk Enrollment for KME.csv two columns (Username, E-Mail Address). If you do not enable the Email User Details checkbox during bulk provision users, you can always review from the Bulk Enrollment - Timestamp.csv the One-Time Passwords for users for enrolling the devices on the behalf of users and/or for adding the corresponding One-Time Passwords into the Knox Mobile Enrollment Portal.
Please note additionally that the One-Time Passwords are only valid for a one-time usage, so in case a device will be factory wiped, the existing One-Time Password might already be used and a new one needs to be generated. In case an already used One-Time Password is present in the Knox Mobile Enrollment portal, the user will face during the enrollment the information Pending Enrollment not found. By creating a new pending enrollment, users are able to change the pre-filled OTP to a new valid one. You can assign after the bulk enrollment a different profile and clear user credentials in the Knox Mobile Enrollment portal, which will let the users starts after the next factory wipe at the Self Service Portal. Please refer to Configure Profile and further for additional information.
Create Profile and Download Devices
The first step for bulk enrollments with Knox Mobile Enrollment is to create an Android Enterprise profile that contains Matrix42 Silverback as MDM solution and your Silverback URL. Afterwards we will download your target device list which we will use later on to match devices to users and their authentication details.
Login to Samsung Knox
- Open https://www.samsungknox.com/
- Press Sign in
- Sign in with your Samsung Account
- e.g. silverback@imagoverum.com
- e.g. Pa$$w0rd
Create a Profile
- From the Knox Admin Portal, select Knox Mobile Enrollment
- Select Profiles
- Press Actions and select Create Profile
- Enter as Profile Name, e.g. Silverback KME Bulk
- Enter a Description, e.g. Silverback Bulk Enrollment Profile
- Enter your Company Name
- Enter your Support email
- Enter your Support phone number
- Press Next
- Under Pick your MDM select Matrix42 Silverback
- Wait until the verification is finished
- Under MDM Server URI, enter your Silverback Server URL, e.g. https://silverback.imagoverum.com
- Press Next
Configure Profile
- Keep the DPC extras empty
- Disable or Leave all systems apps enabled
- Configure the Enrollment screens (optional)
- Add Privacy Policy, EULAs and Terms of Service (optional)
- Upload a Root and intermediate certificate (optional)
- Disable the Enrollment screens options (optional)
- Enable and configure Advanced settings (optional)
- Press Next
- Review and edit (if needed) your made configurations
- Press Create
- If you are using Advanced settings, confirm the information message
Download Devices
- Navigate to Devices
- Select the devices that you want to use with bulk enrollment
- Click Actions
- Select Download devices as CSV
Create Pending Enrollments
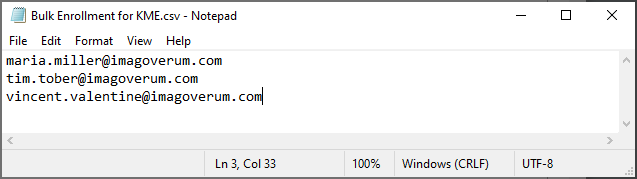
Now we will generate first a *.csv file that Silverback will consume to create for each desired user a Pending Enrollment that contains the username and the One Time Password for the specific enrollment. If you want to provision as an example 5 devices, then this *.csv file should contain 5 users. As content just enter each username in each line.
Create Users List
- Open any Text Editor, e.g. Notepad or Notepad++
- Enter in each line a username
- Press Save as
- Save the file as a *.csv file, e.g. as Bulk Enrollment for KME.csv
Bulk Provision Users
After creation of the Bulk Enrollment for KME user list, we will generate for each user a pending enrollment with the Bulk Provision Users functionality of Silverback. Here we will upload the previously create *.csv and we will define the expiration time in hours for each pending enrollment that will be created.
- Login to your Silverback Management Console
- Navigate to Devices
- Select Pending
- Select Bulk Provisioning Users
- Click New Bulk Provision
- Select Choose File and upload your previously created Bulk Enrollment for KME.csv
- Set the OTP Expiry (hours) to a value when you estimate the completeness of the device enrollments
- e.g. 24 for one day
- e.g. 168 for one week
- e.g. 720 for one month (maximum)
- Keep all other values as default
- Enter either LDAP (Admin) or local System User credentials to authorize the action
- e.g. ffryer_adm@imagoverum.com if your user list contains LDAP users
- e.g. any other system user in silverback if your user list contains only local users
- Press Submit
- Wait until the Bulk Provisioning User process is finished
- Press Download
- Open your downloaded Bulk Enrollment - Timestamp.csv file with Microsoft Excel
- Use the text to columns option to make the *.csv more easier to read

- Locate the Username (A) and the One Time Password (D) column
Merge and Upload
As we have now the exported devices list from Knox Mobile Enrollment and the Pending Enrollments from Silverback, we need to merge both information into one *.csv file that we will upload to the Knox Mobile Enrollment portal to match devices with specific users and pending enrollments in Silverback.
Merge Devices and Users
- Open your recently downloaded kme_devices.csv with Microsoft Excel
- Use the text to columns option to make the *.csv more easier to read

- Now create a new Blank Workbook
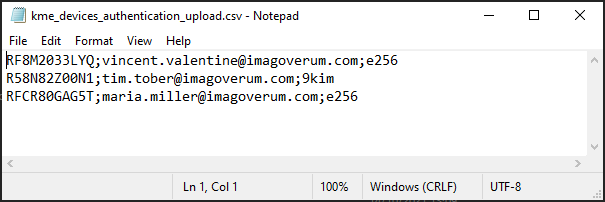
- Copy and paste and the IMEI/MEID or Serial Number from the kme_devices.csv into Column A in your new Workbook
- Now enter in Column B the Usernames from Bulk Enrollment - Timestamp.csv that will receive these devices
- Now enter in Column C the corresponding One Time Passwords from Bulk Enrollment - Timestamp.csv

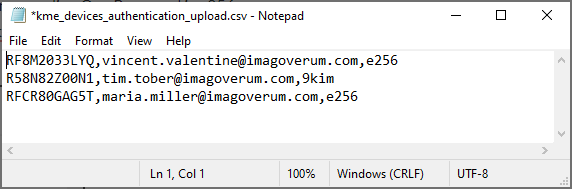
- In this case, Maria Miller will receive device RFCR80GAG5T and the corresponding One Password is e256
- Review all devices, usernames and OTP and save the Workbook as e.g., kme_devices_authentication_upload.csv
- Open your saved kme_devices_authentication_upload.csv with Notepad or Notepad++
- Review if your export contains ; or , as a separator
- Depending on your regional settings, the *.csv will contain ; instead of , as a separator.
- If your export contains ; as shown in the screenshot below, use the replace function and replace ; with ,
Starting with Knox Cloud Services 24.04, it is also possible to define an additional column in the upload list that will assign devices with user credentials to different profiles in a bulk action. To do this, you need to add an additional column containing the name of the target profile, as highlighted here: Bulk device operations. For the purposes of this guide, we will prepare the list without the profiles and assign all entries in the list to a single profile in a bulk action. If you intend to assign user credentials and several profiles, make sure to prepare the list correctly and select the Assign user credentials and different profile option in the Upload List section instead of Assign User Credentials and same profile.
- Click Edit
- Select Replace
- Use the Replace function as followed and select Replace All
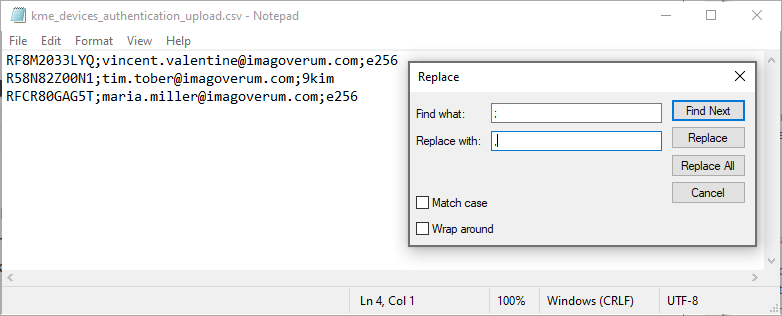
- This is how the final kme_devices_authentication_upload.csv should look like
Upload List
- Navigate back to your Knox Mobile Enrollment
- Navigate to Devices
- Select Bulk Actions
- Click Assign User Credentials and same profile
- Press Select and upload your previously created kme_devices_authentication_upload.csv
- Under Modify the MDM profile of selected devices, select your previously created Silverback KME Bulk profile
- Add a Tag, e.g. Wave 1 (optional)
- Press Submit
Review Assignments and Enroll devices
- Navigate back to devices
- Your target devices should now contain a User ID, e.g. maria.miller@imagoverum.com

- Now start one of your target devices from the out-of-the-box experience
- In case the device is already enrolled, you will need to factory wipe it first
- Inside the out-of-the-box experience, connect your device to a network connection
- Afterwards you will see the Updating Knox Service Enrollment information
- Wait until the process is finished and Companion will launch
- Proceed with the Onboarding wizard inside Companion and accept required permission
- Press Continue and wait until Companion will finish the enrollment with the preset authentication information
- When the device is finished, open Companion once to accept the Knox license activation
- Your devices should now be managed and ready for usage.