Classroom Configuration
1-to-1 Configuration
Available with Silverback 21.0 Update 2
Classroom is a powerful app for iPad and Mac that helps you guide learning, share work, and manage student devices. ... You can launch a specific app, website, or textbook page on any iPad in the class, share documents between teacher and students, or share student work on a TV, monitor, or projector using Apple TV. With this Release, we introduce the Classroom Configuration with Silverback for iPads. This is the payload for configuring users, groups, and departments within an educational scenario. Apple Classroom can be configured in two main ways: Shared iPad or 1-to-1 iPad. The current classroom profile in Silverback supports the 1-to-1 scenario and the manual configuration of the classroom profile. In this scenario you don't need accounts on Apple School Manager or Managed Apple IDs and your users will always be keeping the same device with them.
 |
 |
Classroom Help
- Please review first all official classroom requirements from the Classroom Help
In our test labs, the Classroom Profile was only working when devices are connected to a 5Ghz network, even when it is not an official requirement
Management Console
- Open your Silverback Management Console
- Login with your Administrator account
- Navigate to Tags
Configuration Profile
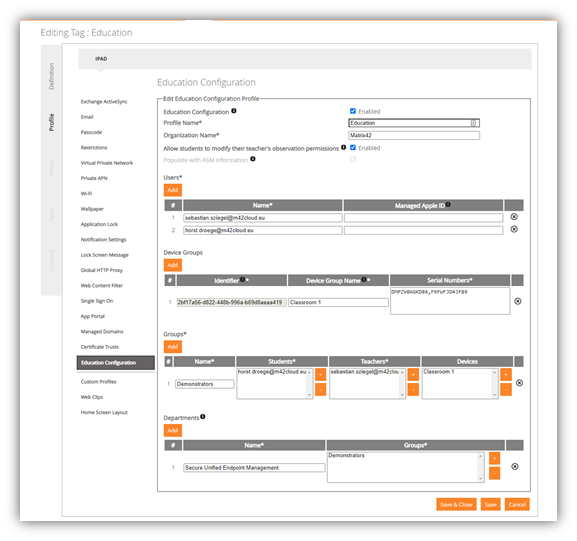
To configure the Classroom profile, you need to add users in the form of the username given in Silverback and add them as students or teachers into specific groups. All other options are optional and are dedicated for more granularity.
- Click New Tag
- Enter a name, e.g. Global Classroom Profile
- Enable Profile and iPad and press save
- Navigate to Profile and select Classroom
- Enable the Profile
- Enter a Profile Name, e.g. Classroom
- Enter an organization Name, e.g, Imagoverum University
- Click Add in the Users section and add all of your users with their usernames in Silverback e.g. tim.tober@imagoverum or ttober
- Click Add in the Device Group section, enter a Device Group Name and group your devices by their serial numbers (optional)
- Click Add in the Groups section, enter a name, e.g. Classroom 5th and structure your group now between student and teachers and add a device group
- Click Add in the Departments section, enter name and add your created groups (optional)
- Press Save
Classroom Application
Now you need to add and distribute the Classroom application for teachers.
Under Additional Information you'll find a link to the teacher’s guide to the Classroom app.
Import Application
- Navigate to the App Portal
- Select iPad
- Click New Application
- Enter in Name Classroom
- Scroll down and select the Classroom application with the Bundle ID com.apple.classroom
- Press Save
- Confirm with OK
Create a new Tag and add the application
- Navigate to Tags
- Click New Tag
- Enter a name, e.g. Teacher Application
- Enable Apps and iPad and press save
- Navigate to Apps
- Click Assign More Apps
- Select your recently added Classroom application
- Click Add Selected Apps
- Press now Edit in the Manage Config column
- Ensure to Enable Automatically push to managed devices
- Press Save
Assign Tags
You must now ensure that devices used by students are assigned the Global Classroom Profile tag. For devices used by teachers you need to ensure that the Global Classroom Profile tag and the Teacher Application are assigned. You can either assign Tags manually or utilize the Auto Population options with several variables. Additionally you can use the Hardware Authentication to add labels to your Device IDs
Review Devices
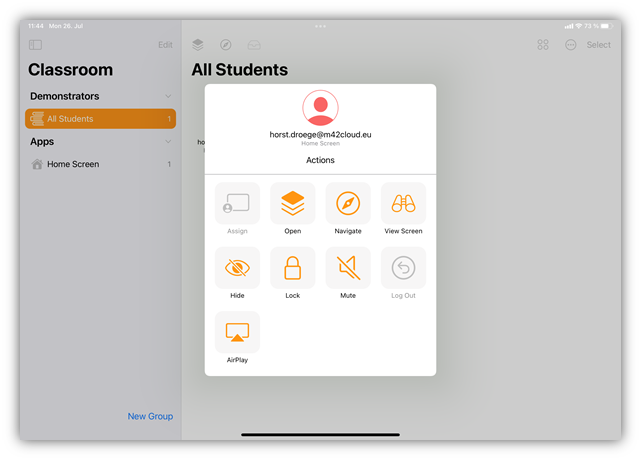
After assigning the profile, you can review the configuration and the behaviour on a student and teacher device. On both devices you can open the Settings application and navigate to General > (VPN &) Device Management > Silverback MDM Profile. On the first screen under contains you should see now the entry Education Configuration. Under More Details you will find several member and leader identity certificates and additional information under Classroom (e.g., Departments, Groups, Users). On Student devices you will find in the Settings application in the left pane a new Classroom section and on the top right an Classroom icon. On a teacher device you need to open the Classroom application, accept the Notification permissions. After accepting the Notifications, the Teacher will see all of his classes with a drill down and can perform user based or bulk actions.
Additional Information
- Please refer to the Classroom teacher guide for the Classroom application
- Additional Classroom Restrictions can be configured on-top
- Configure Notifications Settings for applications
- Some restrictions might conflict with the operational mode of the 1-to-1 setup, so reduce other restrictions to a minimum
- Ensure to only apply one Classroom Profile to any of your managed devices
- You can keep the Managed Apple ID values empty
- As the complexity of this profile is very high, the user interface does not contain a fully protection for misconfigurations. This means you need to ensure the following:
- Do not add multiple users with the same name
- Follow the 1-to-1 principle: One user has one device. Device Groups and Groups must have unique names. A user can only be a teacher or a student. Add groups only 1 time to departments etc.
- Ensure when deleting a user to remove the user also from the Groups section
- Ensure when deleting a group to remove the group also from the Departments section