Enroll Zebra devices with Barcode Scanner and StageNow
Overview
This article is intended for Zebra devices that are unable to scan the regular QR codes generated by Silverback. You have probably come across this article because you have encountered a problem with your Zebra device (e.g. TC20) during a device owner enrolment where, after installing the Companion application, the camera application cannot be opened and you cannot scan the regular QR code from Silverback to finally provision the device without entering the authentication information (username, OTP and server) manually. The problem is that these devices do not have a native camera application and therefore cannot take pictures, but can read barcodes. For this scenario, StageNow provides a common way to create barcodes via the StageNow Client that can be read by these devices, and it is therefore possible to provision the devices with this process in just a few steps. This guide has been tested with StageNow version 5.8 on a Zebra TC20 running Android 8.1 and MX version 8.1. Please note that newer MX and StageNow versions may offer additional features.
Download and Install
- Download the latest StageNow Administrator Tool
- Install the StageNow Administrator Tool
- Run the StageNow App and perform the basic required configuration steps
Profile Creation
Create Profile
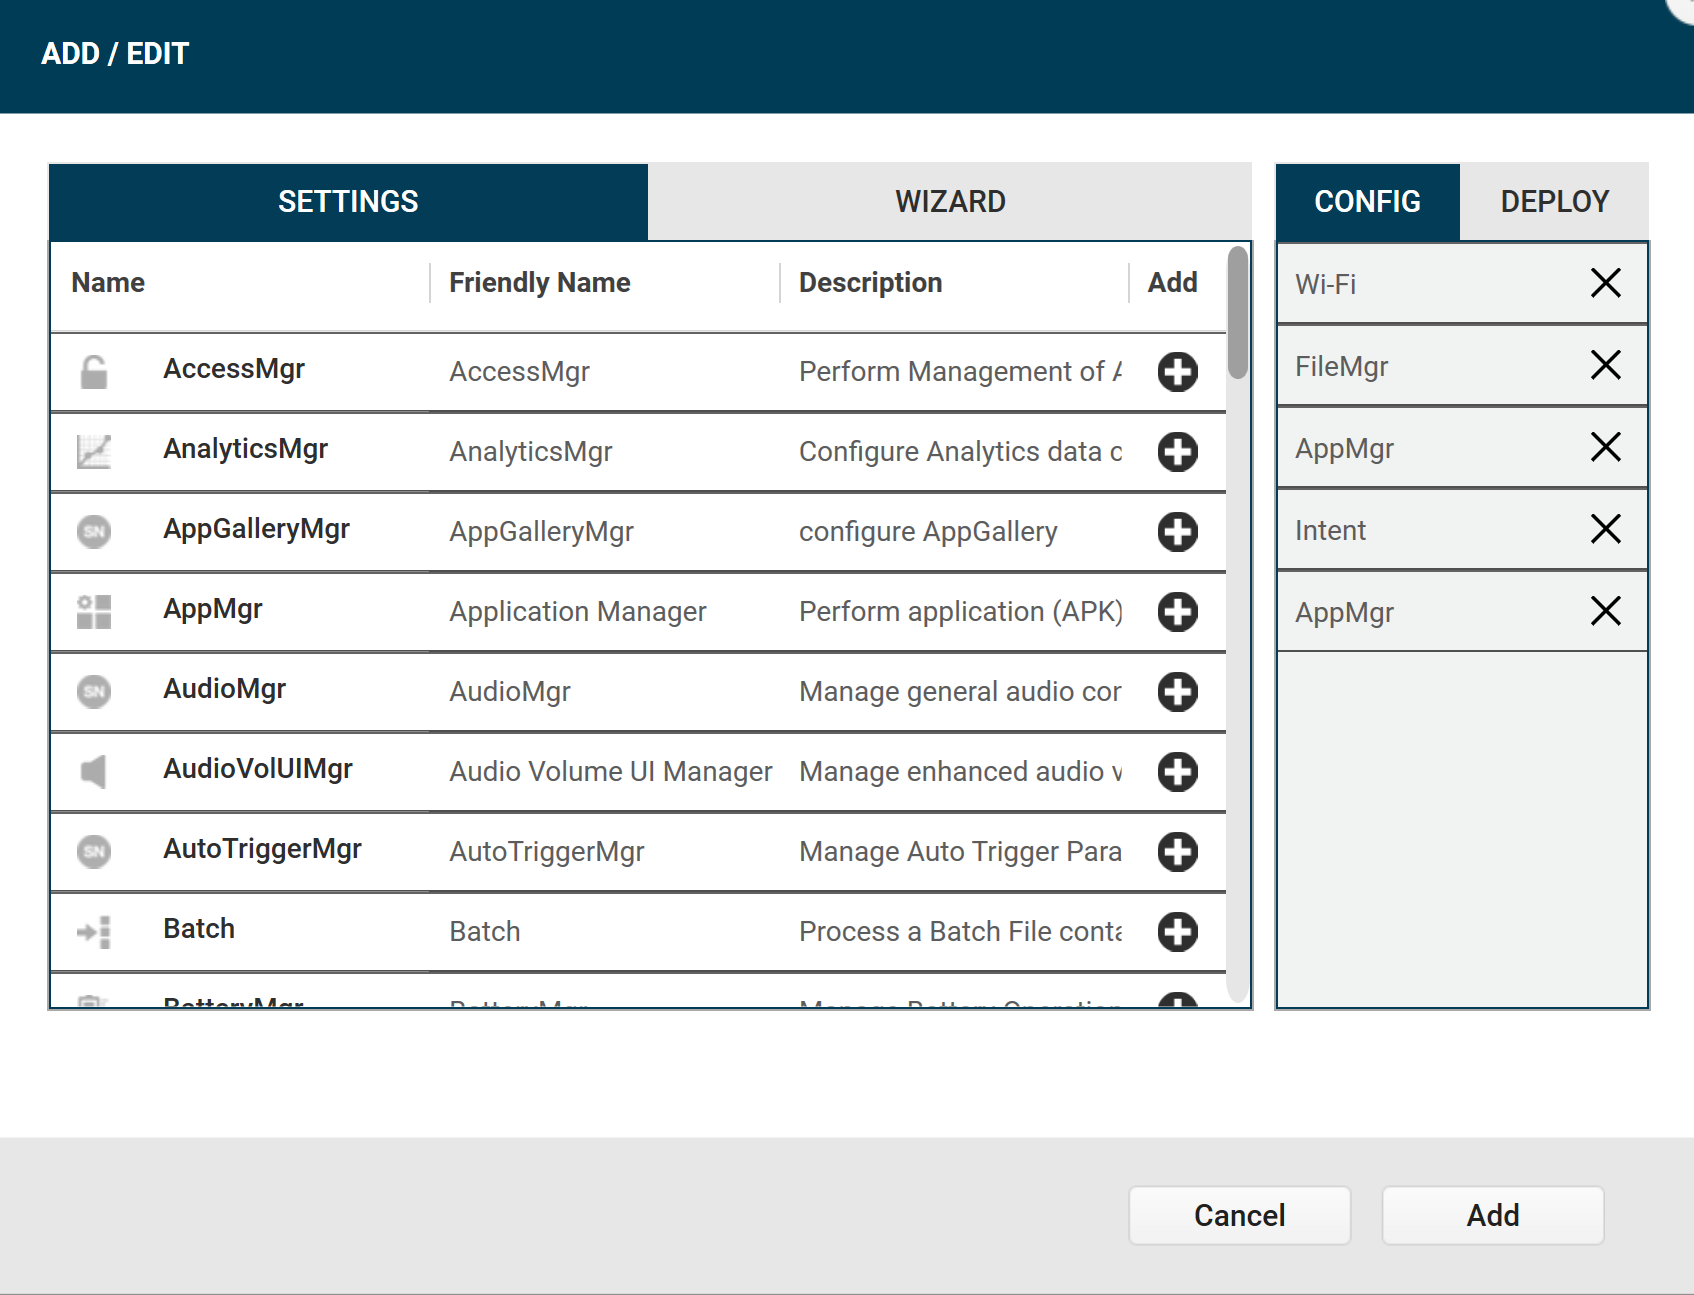
Add Settings
- From the Settings Tab, scroll down to Wi-Fi
- Press the Add button or perform a Double Click
- Scroll up to FileMgr and add the Setting in the same way
- Add the following Settings in the following running order:
- AppMgr
- Intent
- AppMgr
- Press Add to proceed
- Wait until the Loading Process is finished
Configure Profile
Now you can configure the StageNow profile:
Wi-Fi configuration
- Enable Wi-Fi
- Select as Network Action Add a New Network
- Enter the SSID
- Configure your Security Settings
- Proceed with Continue
Enable the Save Setting for Re-use option
FileMgr Configuration
- As File Action ensure Transfer/Copy File is selected
- Enter as Target Path and File Name the target location for the Companion application, e.g /sdcard/Companion.apk
- As Source Access Method ensure that File on a remote server is selected
- Press the three dots to Add a Source File URI
- As Staging Server, select External
- Enter the following Source Path and File Name
-
https://m42builds.blob.core.windows.net/silverback-android-companion/Companion.apk
-
- Confirm with OK
- Proceed with Continue
AppMgr
- Ensure that Install is selected as Action
- Enter as APK Path Name again the target Location, e.g. /sdcard/Companion.apk
- Proceed with Continue
Intent
- Select as Action Enroll to Device Owner
- Enter as package name com.silverbackmdm.epic.companion.ss
- Enter as class name com.silverbackmdm.epic.DeviceMdmReceiver
- Now you will need to create a *.json file with the Companion Provisioning Details
- Review the first 4 Extra Provisioning information below as they are mandatory and static fields
- With the Admin Extras Bundle you have a customizing option to provide specific enrollment information, as highlighted here Additional Enrollment Options
- To create the *.json file, open any Text Editor
- Enter your desired and customized DPC extras in XML format
- The following example enrolls the device without any authentication input from the user
{
"android.app.extra.PROVISIONING_DEVICE_ADMIN_COMPONENT_NAME": "com.silverbackmdm.epic.companion.ss/com.silverbackmdm.epic.DeviceMdmReceiver",
"android.app.extra.PROVISIONING_DEVICE_ADMIN_SIGNATURE_CHECKSUM": "mqoNjgDp_qAkeHhEj3EcO2oD69YhX3fLY4dbQJ-gx_0",
"android.app.extra.PROVISIONING_DEVICE_ADMIN_PACKAGE_DOWNLOAD_LOCATION": "https://play.google.com/managed/downloadManagingApp?identifier=matrix42",
"android.app.extra.PROVISIONING_SKIP_ENCRYPTION": false,
"android.app.extra.PROVISIONING_ADMIN_EXTRAS_BUNDLE": {
        "server_url": "https://silverback.imagoverum.com",
        "user_name":"zebra@imagoverum.com",
        "otp":"4444"
    }
}
- Save the file to your PC as filename.json and navigate back to StageNow
- Press the three dots next to JSON File
- Select your recently created filename.json
- Press Continue
AppMgr
- Select as Action Launch an application
- Enter as name Companion
- Proceed with Continue
Review and Publish
- In the Review screen press Complete Profiles
- In the Publish screen enable your required Barcode Type and StageNow as Staging Client
- Press Test
- A PDF File with several Barcodes will be created
- Print this document
Enroll Device
- Factory Wipe or Unbox your Device
- Scan the QR-Code provided by Zebra to bypass the setup wizard
The bypass barcode is usually provided in the PDF export, but in our Test Lab we were not able to scan this code and used it from the browser
- Open StageNow App
- Now scan all the barcodes from your printed document
- Wait until the process is finished
- Depending on your provided filename.json the Companion will open and display the Self Service Portal or will fully automatically enroll the device