Renew your Exchange Enrollment Agent Certificate
Overview
If you have configured a certificate deployment for Windows 10/11 devices, your Exchange Enrollment Agent certificate will most likely expire every 2 years, and failure to renew this certificate will result in failures when deploying certificates to your Windows devices. You will receive a warning in the Silverback Management Console when the expiration date is approaching and this article provides instructions on how to create and update the new certificate.

Before you Start
Before you start, it is good to review your current status and where you are in order to start with the right step. So please follow the description below and check your starting point:
- Log onto your Silverback or Cloud Connector Server
- Open the File Explorer and review under C:\ if there is a folder named as certificates
- If yes, it means that you probably created the last certificate already according to the Integration Guide guide and you should have the following situation:
- An EnrolmentAgent.inf file is present
- In addition, you might have several other files names as EnrollmentAgent (req, rsp, cer)
- In this case, we recommend to create a new folder and name it to the expiration year of your current certificate and move the files, except the *.inf file, into the new folder for having a backup
- If you still have the EnrollmentAgent.inf file, you can skip the creation of a new file and you can proceed with Generate New Enrollment Agent Certificate
- If no, it means that you will need to start a bit earlier in the process, so perform the following steps
- Create a new folder under C: and name it certificates
- Ensure that you granted your user account the permission on the Exchange Enrollment Agent (Offline request) template as explained in the Integration Guide
- Proceed with Create Enrollment Agent Setup Information File
- If yes, it means that you probably created the last certificate already according to the Integration Guide guide and you should have the following situation:
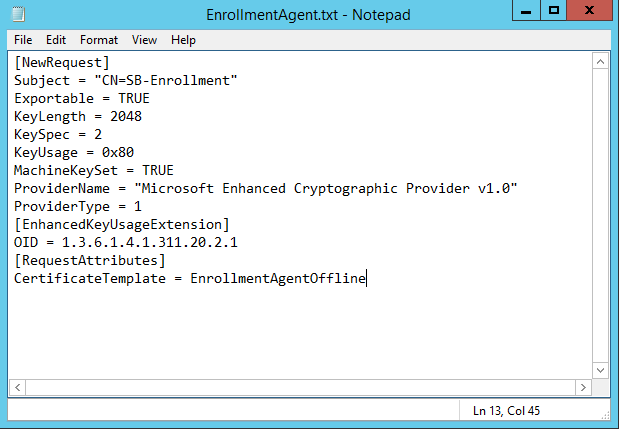
Create Enrollment Agent Setup Information File (*.inf)
- Right Click in any empty are in this Folder
- Click New
- Select Text Document
- Name it EnrollmentAgent.txt
- Open the File with Notepad
- Paste the following information into the File
| Values | Screenshot |
|---|---|
| [NewRequest] Subject = "CN=SB-Enrollment" Exportable = TRUE KeyLength = 2048 KeySpec = 2 KeyUsage = 0x80 MachineKeySet = TRUE ProviderName = "Microsoft Enhanced Cryptographic Provider v1.0" ProviderType = 1 [EnhancedKeyUsageExtension] OID = 1.3.6.1.4.1.311.20.2.1 [RequestAttributes] CertificateTemplate = EnrollmentAgentOffline |
 |
- Click File
- Click Save As
- Ensure that Encoding it set to ANSI
- Change Save as type to All Files (*.*)
- Change the File ending from .txt to .inf
- Click Save
- Navigate back to your Windows Explorer and ensure the file is saved as EnrollmentAgent.inf
Generate New Enrollment Agent Certificate
- Open an Administrative Command Prompt
- Navigate to C:\Certificates
- Run the following commands step by step
- certreq –f -new EnrollmentAgent.inf EnrollmentAgent.req
- certreq –submit -config "ca.imagoverum.com\Enterprise Root Authority" EnrollmentAgent.req EnrollmentAgent.cer
- certreq –accept EnrollmentAgent.cer
Click OK at the User context template conflict prompt. You can ignore this warning
Change the Enterprise Root Authority Address path to your own. Open a command prompt on your Certification Authority and type certutil, press enter and take the value displayed in config.
Change Permissions
- Run certlm.msc
- Expand Certificates (Local Computer)
- Expand Personal
- Click Certificates
- Right Click your new SB-Enrollment Certificate
- Select All Tasks
- Select Manage Private Keys
- Click Add
- Search for Network Service
- Click OK
- Uncheck Full control and ensure that Read is enabled
- Click OK
Update Certificate in Web Settings
- Open your Silverback Management Console
- Login as an Settings Administrator
- Navigate to Certificates
- Locate the Windows Certificate Settings sections
- At Exchange Enrollment Agent select your recently created certificate
- Click Save
- Confirm with OK
For all cloud customers, the certificates needs to be imported on your hosted server. Please get in touch with our technical support.
Restart Services
- Run PowerShell with elevated privileges
- Run the following command:
- restart-service w3svc,silv*,epic*
For all cloud customers, restart your Cloud Connector services after the certificate has been updated in Web Settings.
Update Certificates in Profiles
In Silverback 24.0 Update 3, we have significantly expanded the functions of our product to make the distribution of certificates on Windows 10 and 11 devices more flexible. This included a change where the address for your CA and the selected Issuing CA, CEP Encryption Agent and Exchange Enrollment Agent certificates configured in Web Setting will be used as defaults in each individual client certificate configuration, but can be overwritten individually. This means that you have now only changed the default settings for new certificate profiles within the chapter Update Certificate in Web Settings.
As the main configuration now takes place in your Tags, you will need to update the new certificate in your Certificate Profile(s). If you are not sure in which tag the certificate profile(s) are configured, we recommend that you open devices at random and use the Resultant Tags information (Profile > Certificate Profile) to find out which Tag(s) contain possible certificate profile(s).
After opening the Tag, navigate to your Certificate Profile, press Edit and select the new Exchange Enrollment Agent certificate. Before pressing save, review the CEP Encryption Agent certificate. As you may have created or updated the CEP Encryption Agent certificate at the same time and as both certificates are required to distribute certificates, review if you need to update your CEP Encryption Agent Certificate as well. Due to new settings in the profile and updating the profile for the first time after the update to Silverback 24.0 Update 3, pressing Save will trigger once an update of certificates on your devices. To avoid possible interruption due to a misconfiguration, we recommend to create first a new Tag and add a new Certificate Profile for testing purpose. After assigning this to some test devices you can verify if the certificate renewal was successful.
After the confirmation, you are ready to replace both certificates in your production certificate profile(s).