Troubleshoot Silversync
Silversync Troubleshooting Steps
The following guide is intended to perform an in-depth analysis in case of problems with Silversync and access to files and folders. Since for the availability of the service some products and settings must harmonize with each other, challenges can arise here, which should best with the described steps at least allow a narrowing of the problem. This guide was based on two problems that occurred due to a storage appliance that did not support RFC 6806: Enterprise Principal Name Type. In another case the solution was the removal of the created delegation in the Active Directory and a reboot of all involved servers.
Check and Restart Services
- First, check always if your Silversync Service and Matrix42 UAF Service is running
- Connect to your Silversync Server
- Open Services MMC and restart the Matrix42 UAF Service first and then the Silversync Service
- For further troubleshooting, please note that any change to the Silversync settings will always require a restart of the Silversync service
Try to Unassign and Reassign the Tag
- In case the Auto Population is enabled, disable it and unassign the Tag from the device
- Perform a Device refresh
- Then reassign the Tag
- Execute again a Device refresh
Kill or Reinstall the Application
- You can try to kill the application or force it to close using the methods supported by the operating systems
- It may also be helpful to uninstall the Matrix42 Documents application if this is not done automatically
Review Logs and Tag Configuration
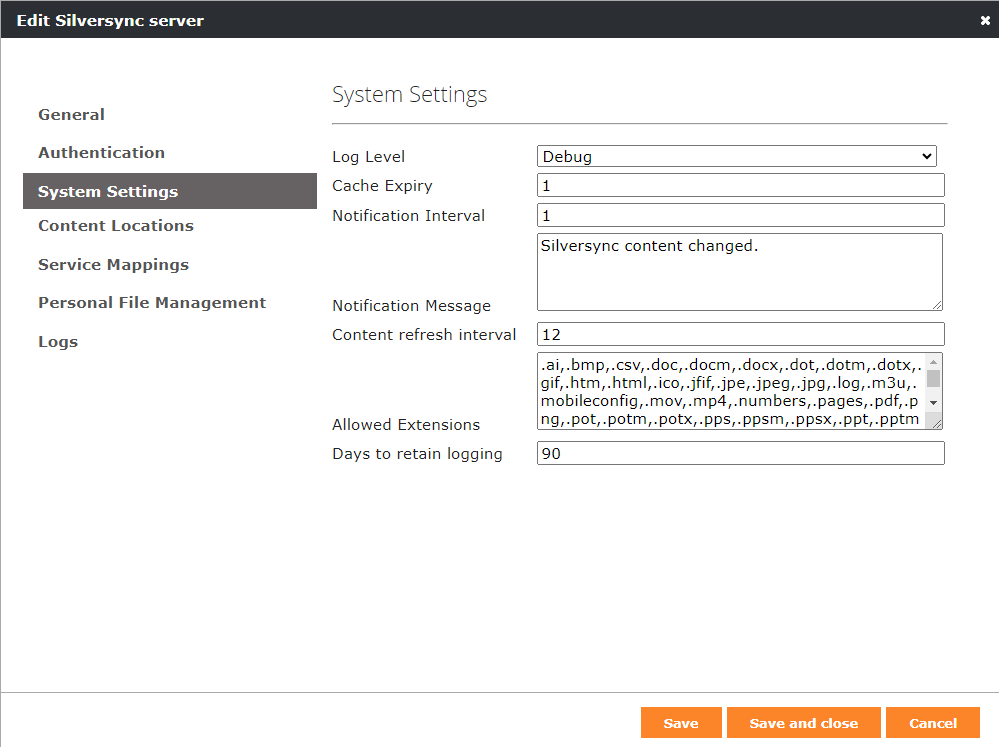
- Set the log level for Silversync to Debug under System Settings in the Silverback Management Console
- Restart the Silversync Service
- Now kill the application, reopen it and try to connect again from the device
- Navigate to the Silversync server logs and press refresh and review possible entries
- With the debug option configured, you will find additional logs for each user that tries to access on your Silversync Server under C:\Silversync
- Open the *.txt file for the specific user and check if you have accidentally made any typos or wrong share names

Check Permissions
Review your folder permissions and ensure that:
- The Silverback computer must have read permissions to folders if Server Authenticates is configured as the access method
- The user must have at leat read permissions (direct or inherited through a group or authenticated users) to folders if User Authenticates is configured as the access method
- The user must have direct or inherited write permissions (e.g. through a group or Authenticated users) to folders if User Authenticates is configured as the access method and it is desired to allow users to upload files
Check Supportability
- Silversync uses the Kerberos standard RFC 6806: Enterprise Principal Name Type (kRB5-NT-ENTERPRISE-PRINCIPAL)
- If your storage is not on a Windows Server, check the logs and contact with your appliance vendor to ask for RFC 68086 support for your current used version
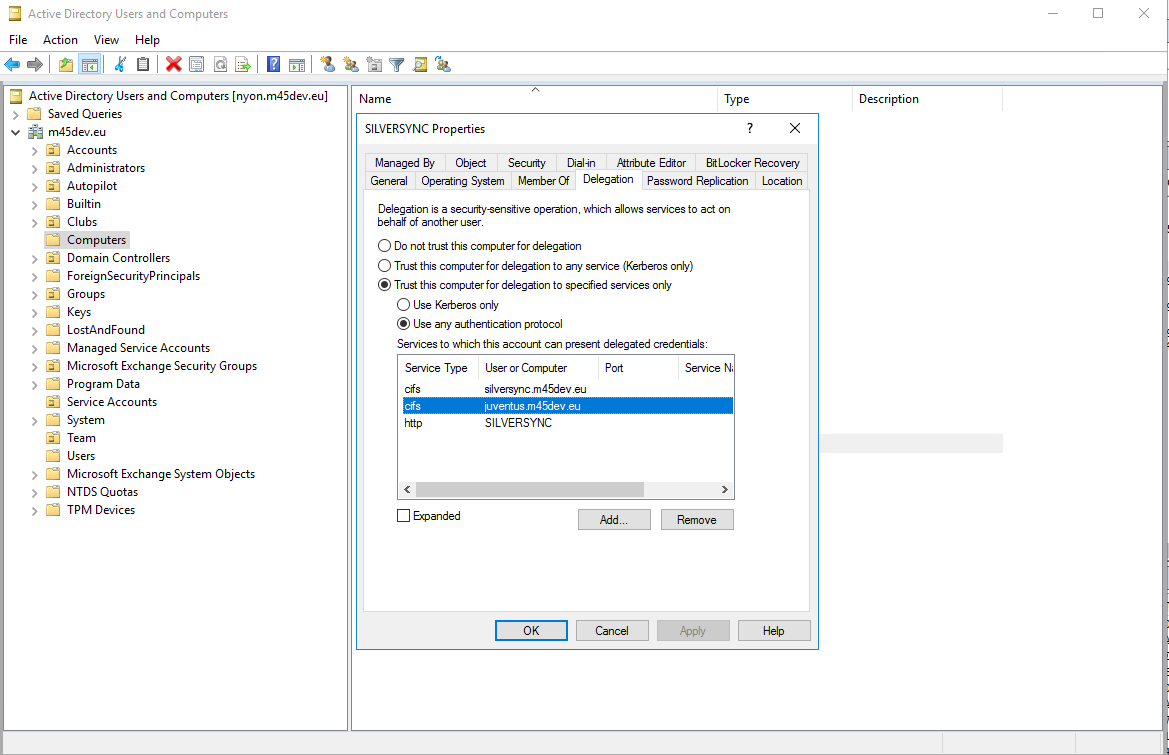
Review Delegation
- Connect to your Active Directory server
- Open Active Directory Users and Computers
- Select Computers
- Locate your Silversync Server
- Perform a double click and navigate to Delegation
- Ensure that for the paths on the Silversync server itself, a http SPN is available if Server Authentication is selected as file access method
- Ensure that for paths on remote servers inside the domain, a cifs SPN is available if User Authentication is selected as file access method
- This is what will be executed in the background while adding Default Content Locations and providing Domain Administrator Credential at this step or during the manual configuration
- Two things might appear here:
- It might be that you need to switch to the Computer Name instead of the FQDN while Adding Content to the Edit Silversync Server form
- You can try to remove the cifs entry for a remote share and re-create it manually, but note that there may be some caching by the operating system
By enabling Expanded, you might see additional entries
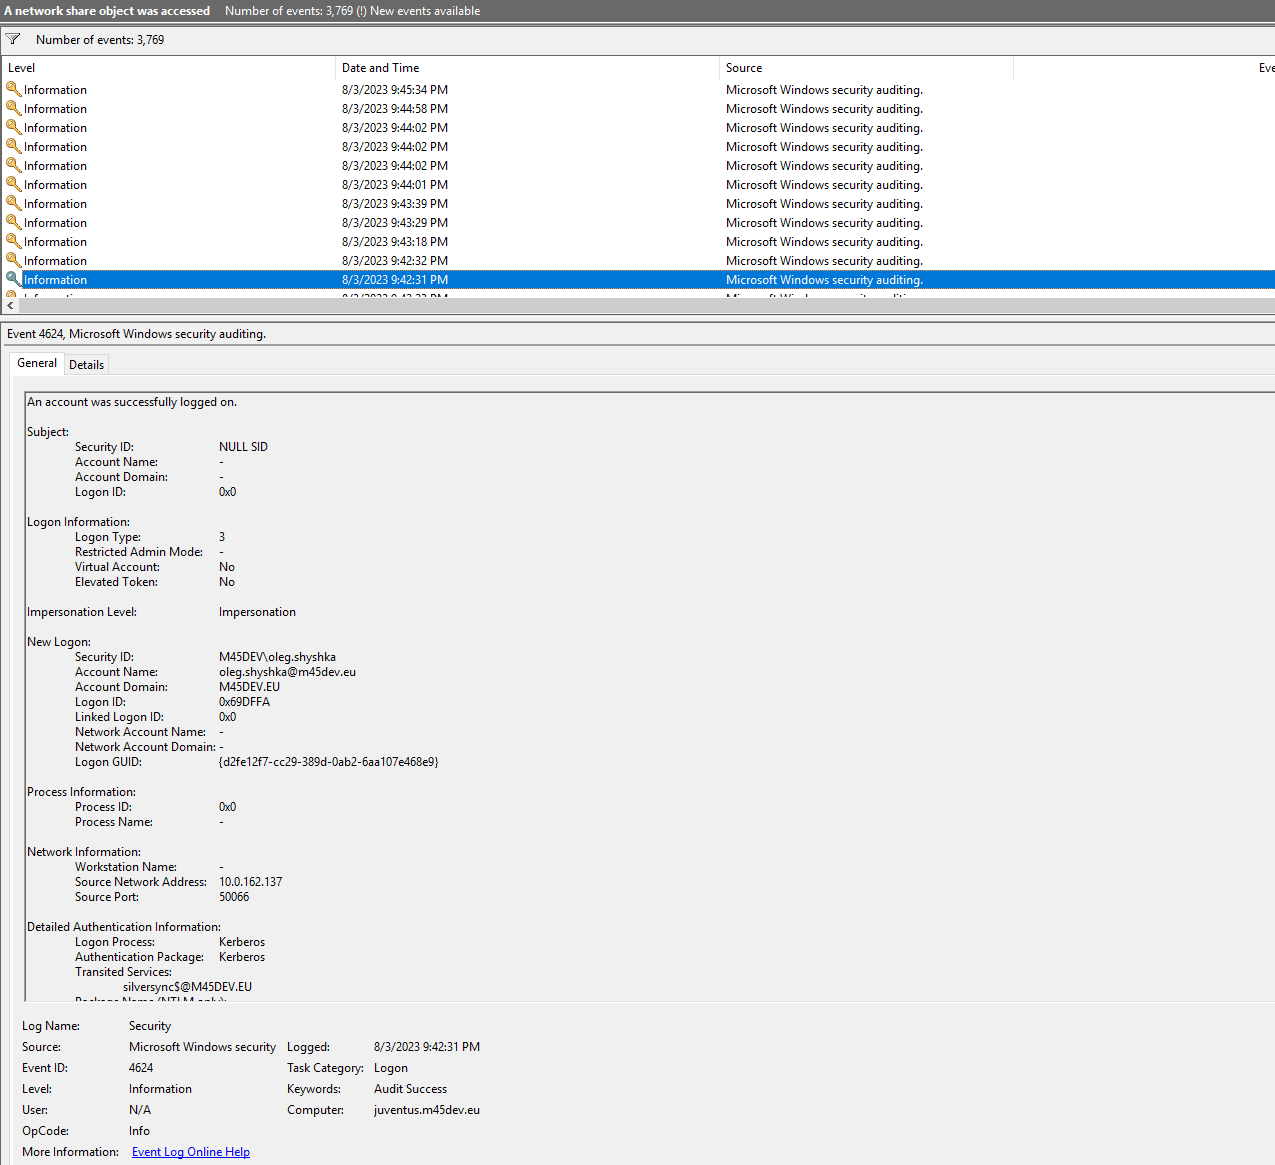
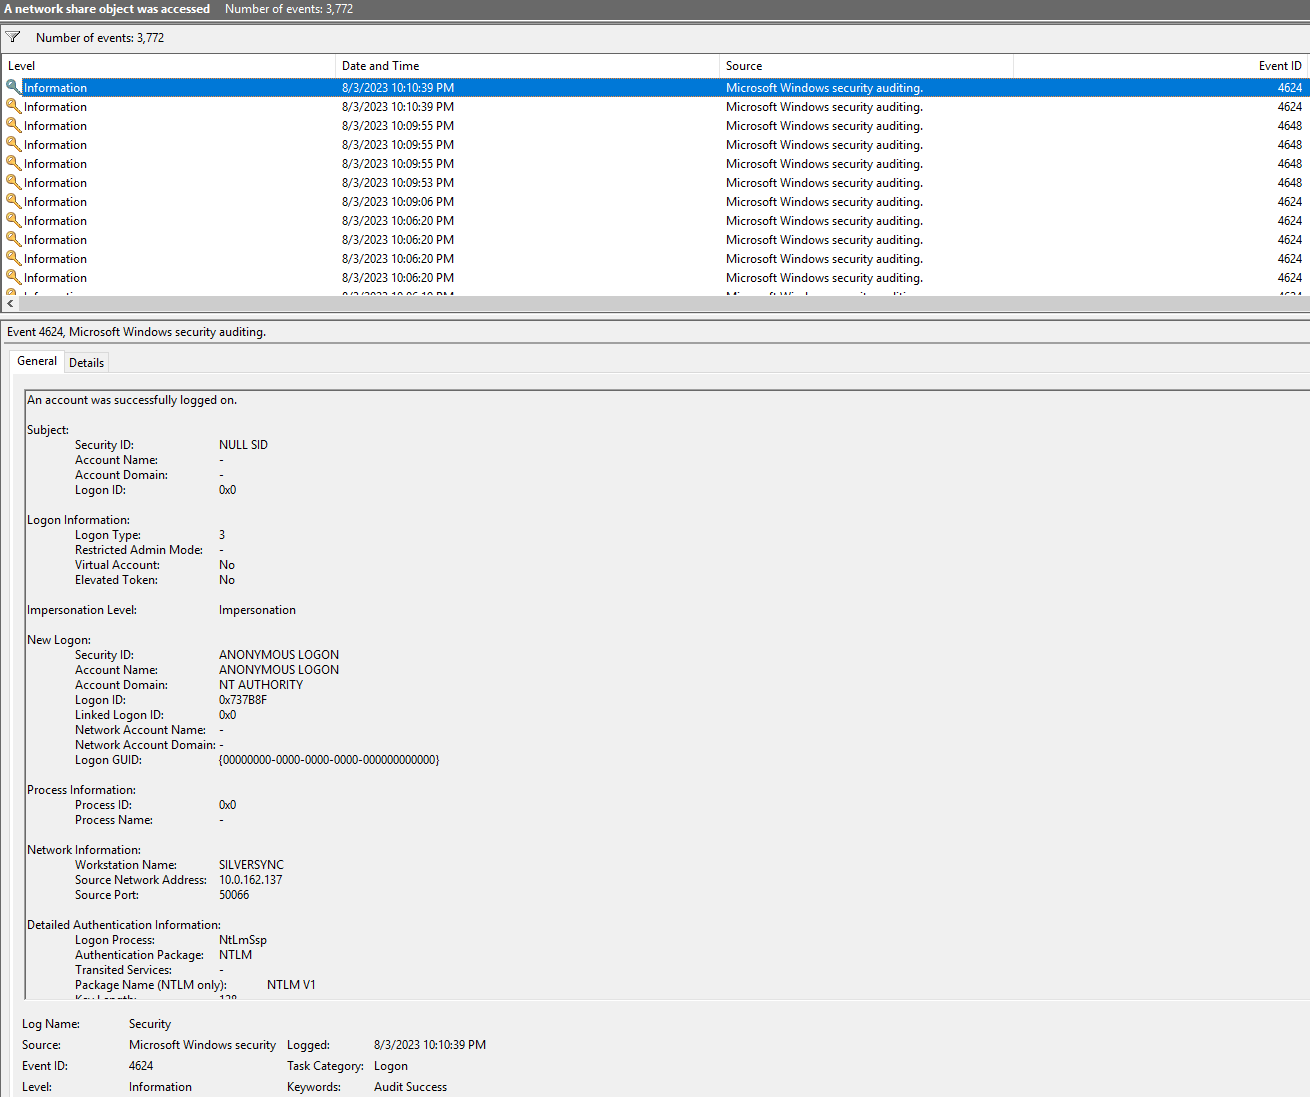
Audit Object Access
What might be helpful is to enable the Audit object access from the Local Security Policy and configure auditing on files from the Advanced Security Settings on this folder and then use the Event Viewer to search for events under Windows Logs > Security.
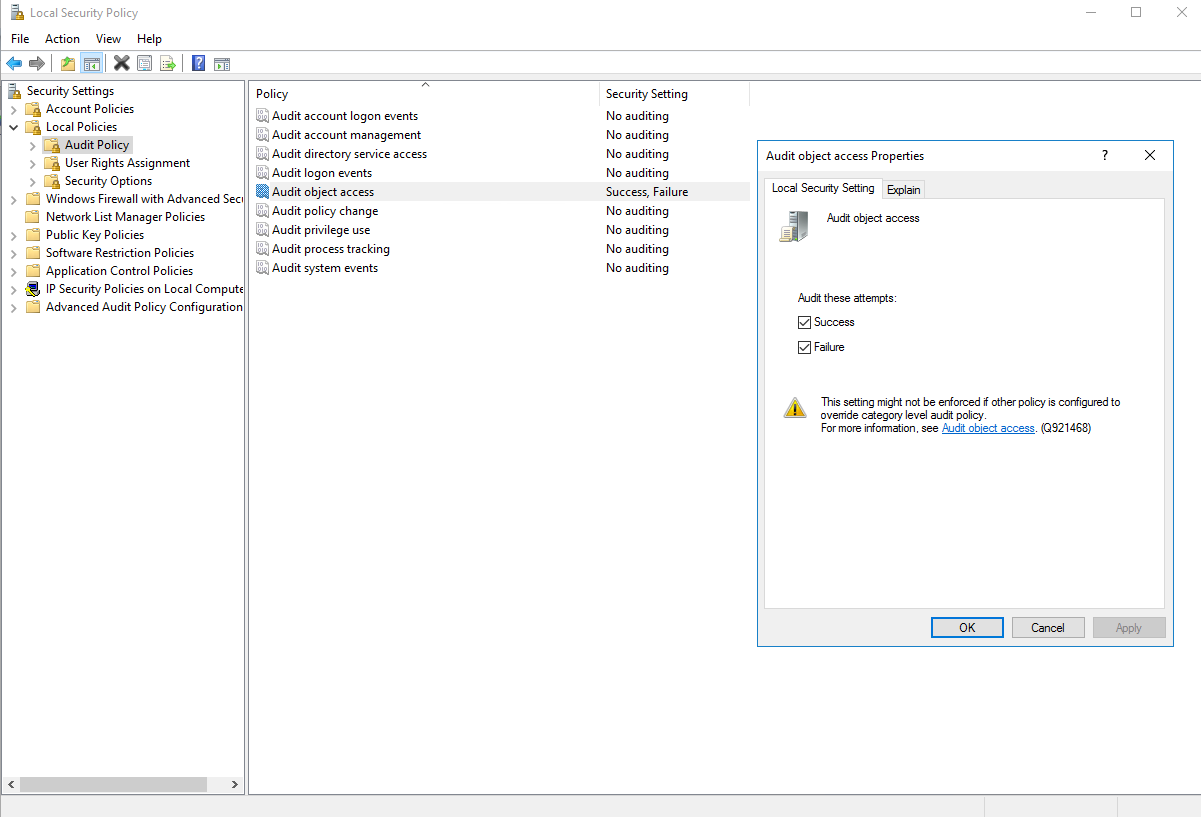
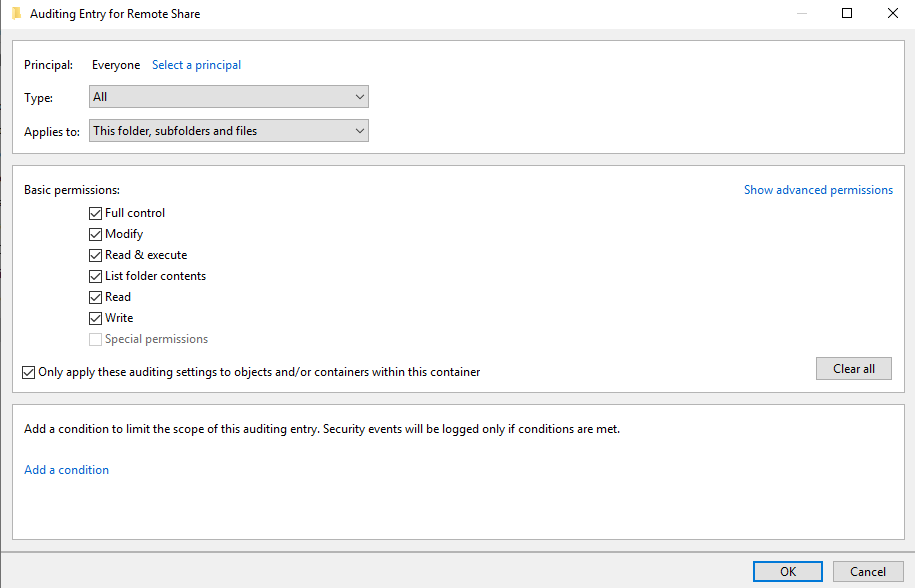
From the Properties of the folders, navigate to security and press Advanced. Navigate to Auditing and press add. Use select as Principal to define users or groups whose actions you want to audit. If you want to audit all users’ activities, enter Everyone in the Enter the object name to select field, and click Check Names. Then choose as Type All and set the audit to all activities with enabling full control and confirm everything with OK.
 |
 |
From the event viewer and after trying to access your content from the device, watch out for events with the following IDs:
- Windows Event ID 5140 – A Network Share Object Was Accessed
- Windows Event ID 5168 – SPN check for SMB/SMB2 failed
- Windows Event ID 4624 – Successful logon
- Windows Event ID 4625 - An account failed to log on
- Windows Event ID 4634 – An Account Was Logged Off
- Windows Event ID 4648 – A Logon Was Attempted Using Explicit Credentials
- Windows Event ID 4663 – An Attempt Was Made To Access An Object
Additional Event IDs can be found here: Audit File Share and Windows Security Log Events
When accessing a file an entry is created and it is helpful to check the impersonation level, the security ID and the account name and Kerberos part. The first screenshot below shows a successful access, while the second shows an invalid access.
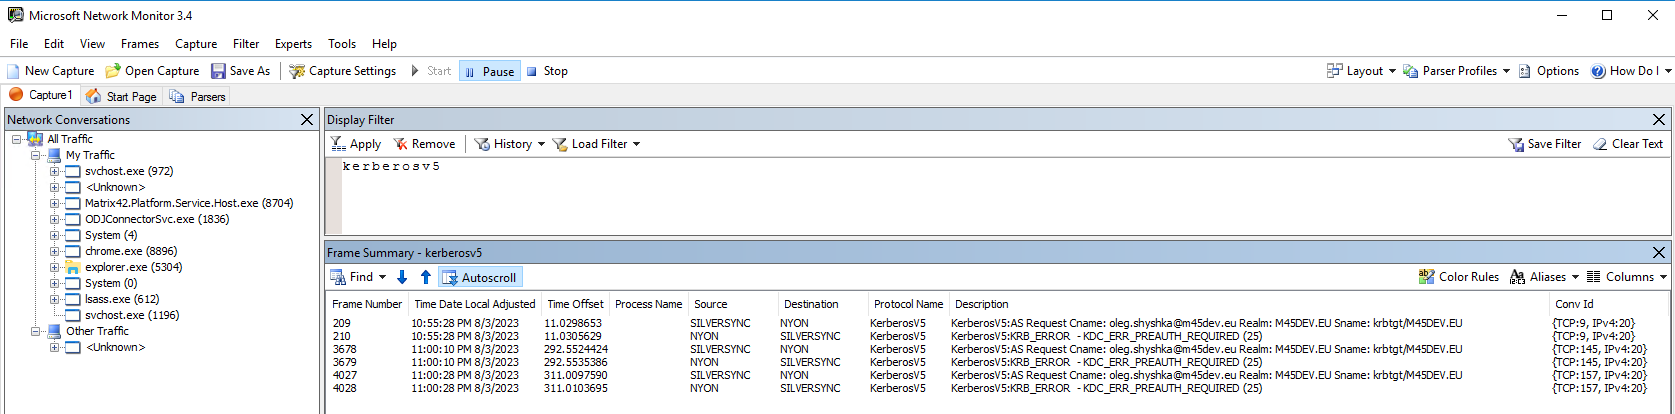
Microsoft Network Monitor and Kerberosv5
Another step is to check the Kerberos flow between your Domain Controller / Key Distribution Center (KDC) and the Silversync Server using Microsoft Network Monitor with a filter set to kerberosv5. Please note that the Pre Auth error isn't a root cause. From here you can check if Silversync is requesting the access to the share with the correct user. Check the Request Cname and the Response Cname. You can expand additional information in the Details frame.
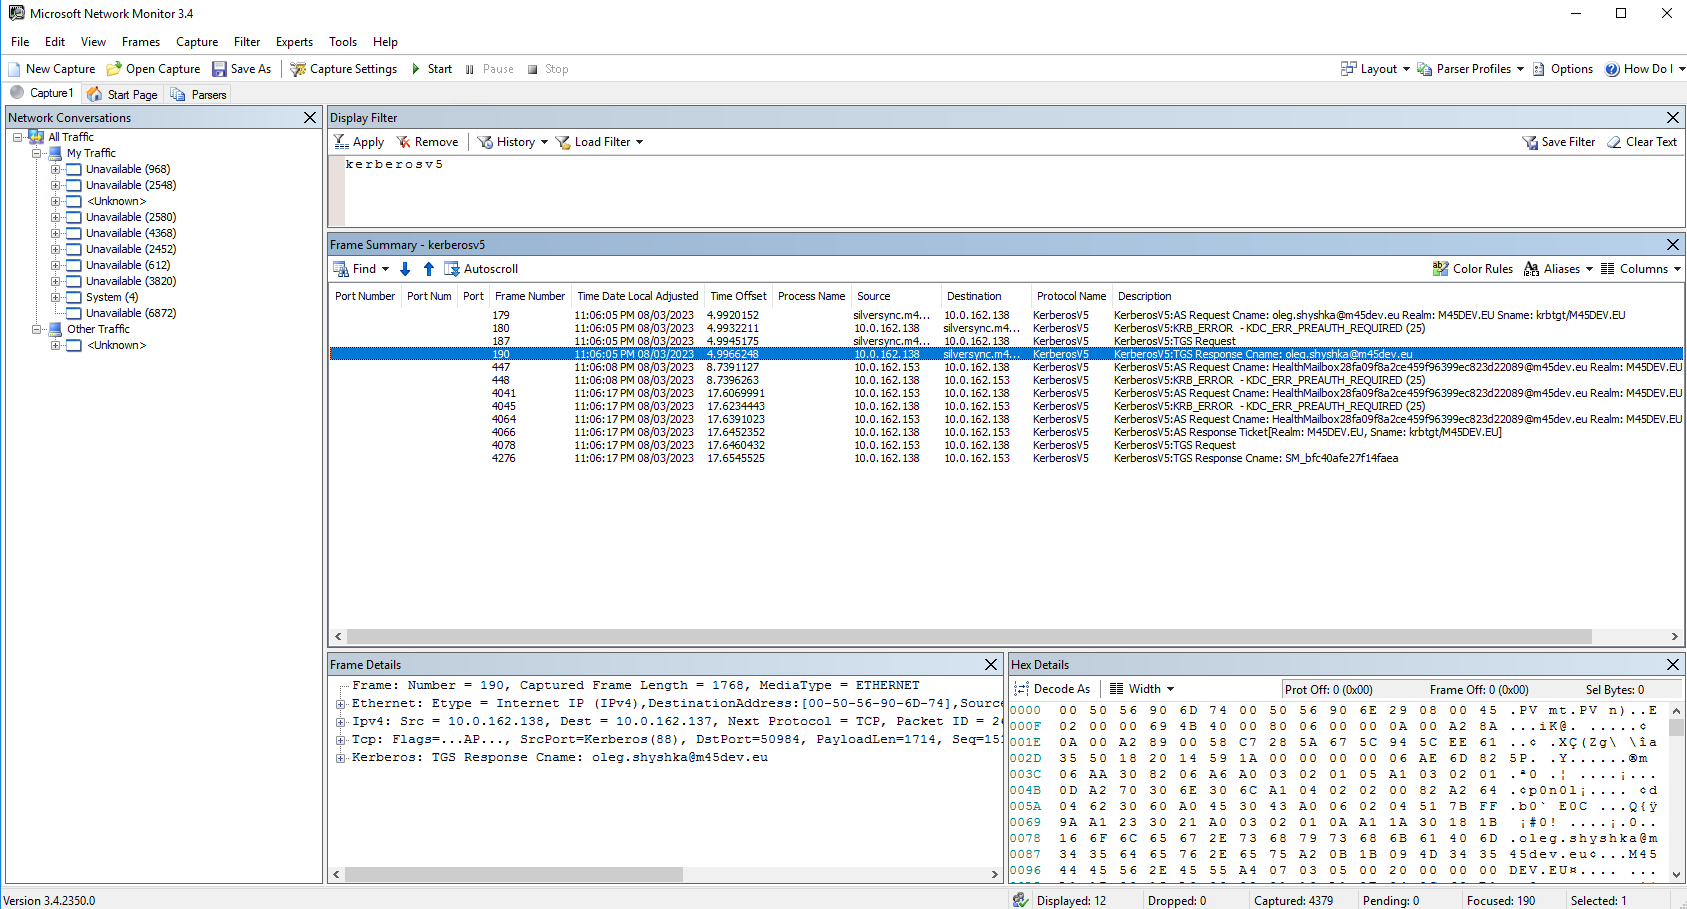
You can also review the same from your Silversync Server.
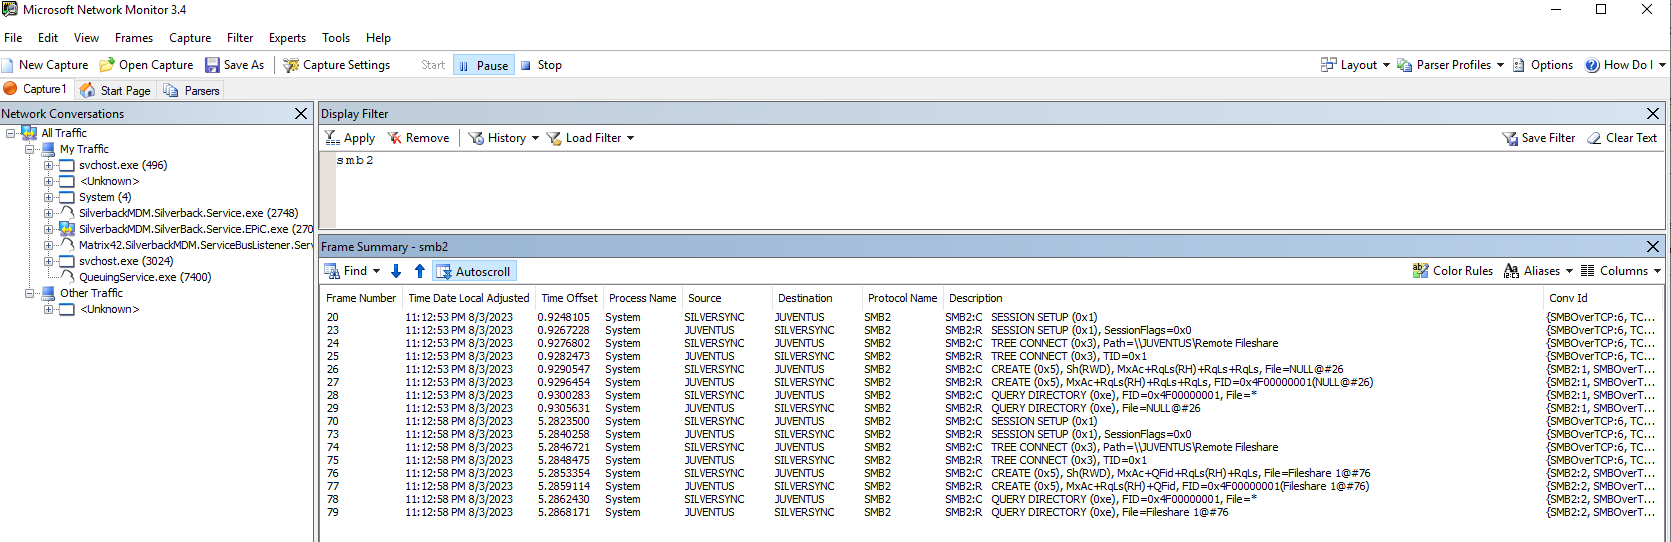
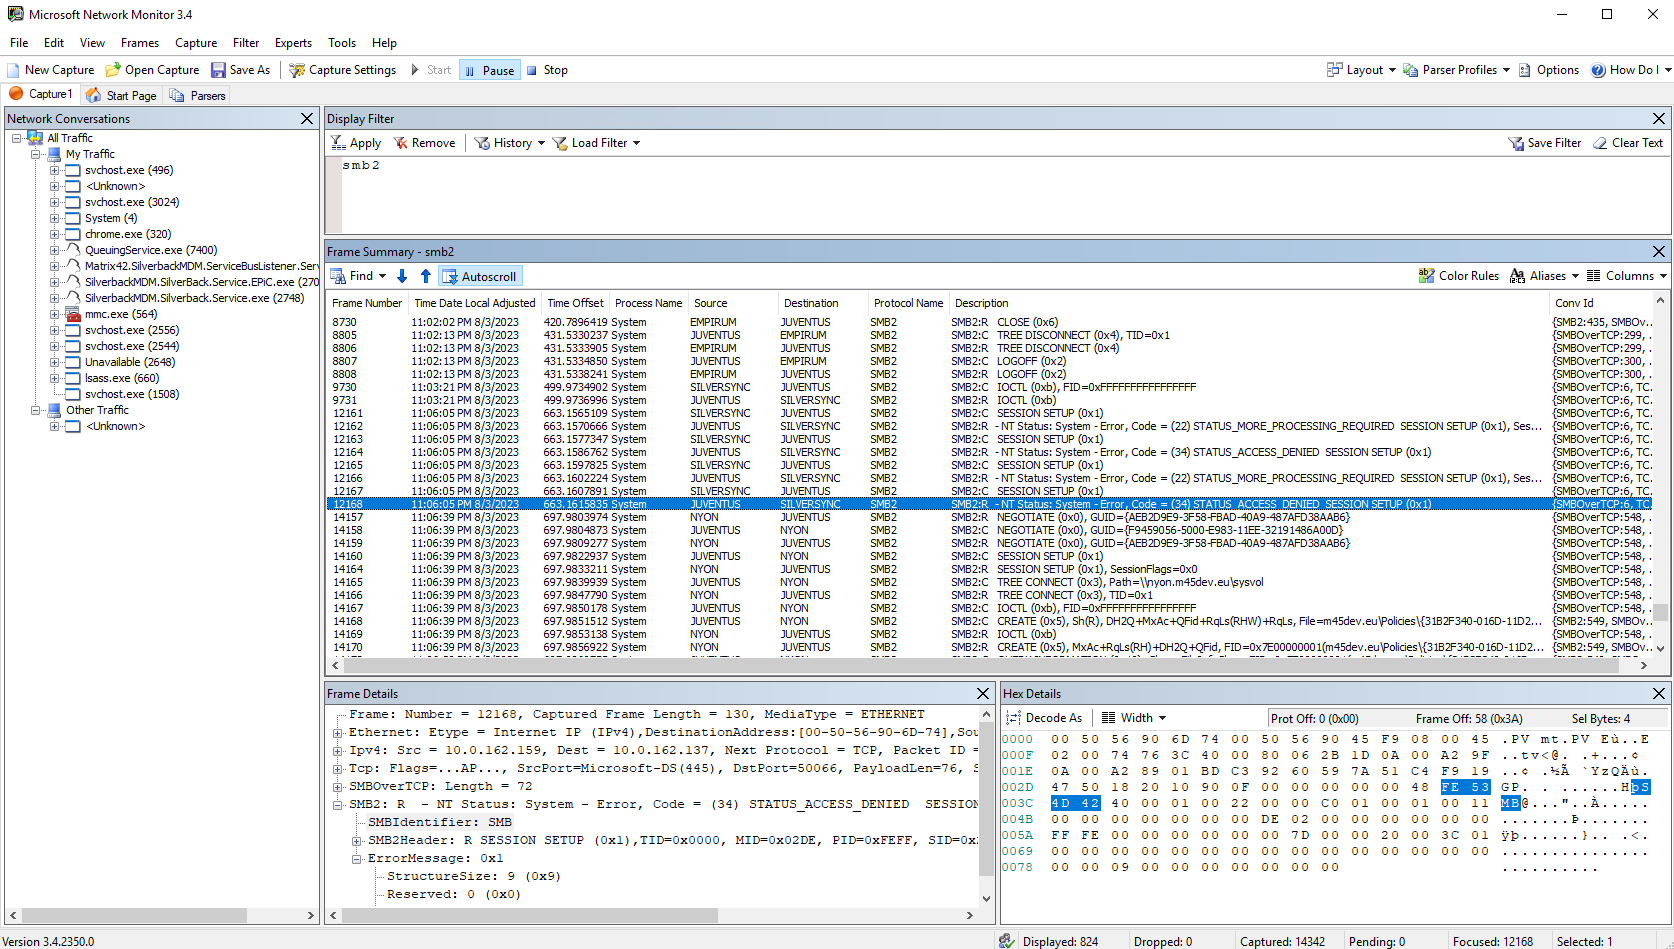
Microsoft Network Montor and smb2
While accessing a remote share with the Matrix42 Documents applications, entries for smb2 should be visible. The first example shows a successful connection flow while the second one shows an Access Denied.
Analyse Traffic with Wireshark
Review the Firewall Rules and capture the traffic with Wireshark and filter to your Silversync and/or Remote Share server and get in touch with your Network and/or Firewall administrator. Please refer to Display Filters for additional filter examples.

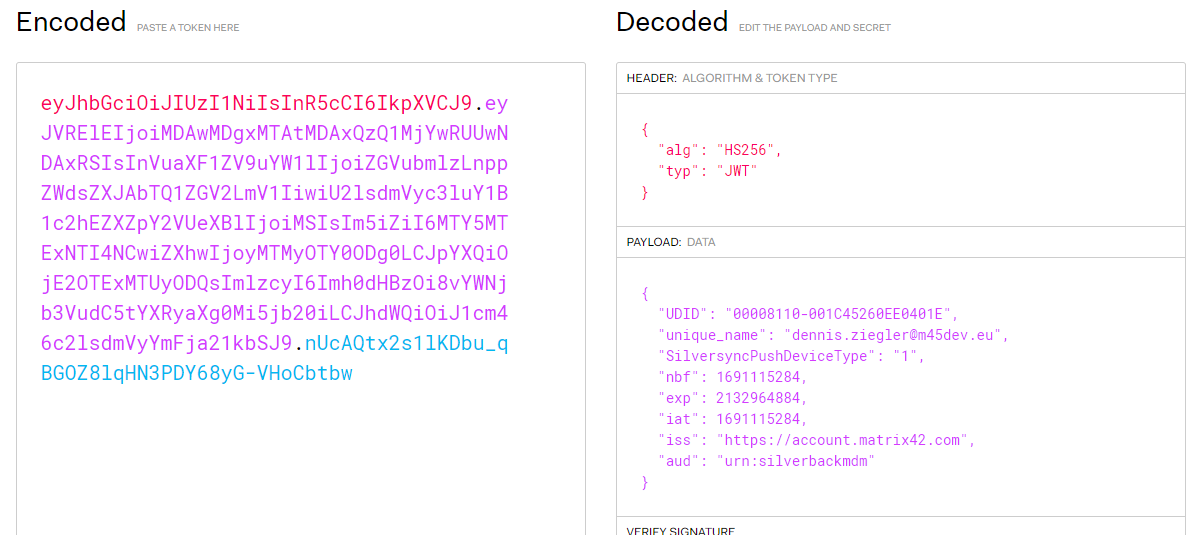
Check Refresh Token (On-Premise only)
As a last step you can review in your database the connection settings that the Matrix42 documents applications receives. Review the Device ID in the Silverback Management Console and perform the following query after replacing the Device ID and your database name.
SELECT TOP (1000) [DeviceRefreshTokenId]
      ,[DeviceId]
      ,[RefreshToken]
      ,[AppId]
      ,[CreatedDate]
      ,[Active]
      ,[M42PushTag]
  FROM [Frankfurt].[dbo].[DeviceRefreshTokens] where DeviceId = 8515
- Locate for an entry with com.matrix42.M42Content
- Copy the Refresh token into your clipboard
- Open https://jwt.io/
- Paste the content into the encoded field
- Review the Username that will be decoded
- The output should look like the screenshot below:
Re-Installation of Silversync
- If the analysis so far has not led to any success, please try a new installation of Silversync according to the description in the Update Guide.