Android Enterprise I: Set up your Android Enterprise
Setting up Android Enterprise
Android Enterprise is a Google-led initiative to enable the use of Android devices and apps in the workplace. The integration of Android Enterprise into Matrix42 Silverback enables you to enroll, configure and manage private and corporate-owned Android devices, including the provisioning and configuration of applications. At this point, we recommend that you familiarize yourself with the key terms and before you start section relating to Android Enterprise before you proceed with the integration.
Requirements
- Before you start, ensure to have administrative access to your Matrix42 Silverback Management Console
- During the creation of your Android Enterprise you will also need your Matrix42 Account with the role/group Mobile Management Administrators. Without that role, the process for activation will fail due to insufficient rights
- Either you are the Matrix42 corporate account holder and you can assign the role to yourself or you need to contact the responsible person to assign the required role
- Login to https://myworkspace.matrix42.com/ with an Administrator Account
- Click Administration on the left bottom
- Select Groups
- Select Mobile Management Administrators
- Click +
- Choose Users
- Search for the user you want to grant permissions
- Click Add Users
Initiate the activation Process
Silverback offers two ways for the Android Enterprise integration and we recommend to use the faster automatic (redirection) process and to use the manual process that contains additional steps only in case you are facing challenges with your browser configuration or any other problems with redirections.
Automatic Redirection
For the automatic activation ensure that your browser configuration is set to allow pop-up and redirects. E.g for Chrome navigate to Settings > Privacy and security > Pop-up and redirects. To activate Android Enterprise with automatic redirections, proceed with the following steps:
- Open to your Silverback Management console and login as an Administrator
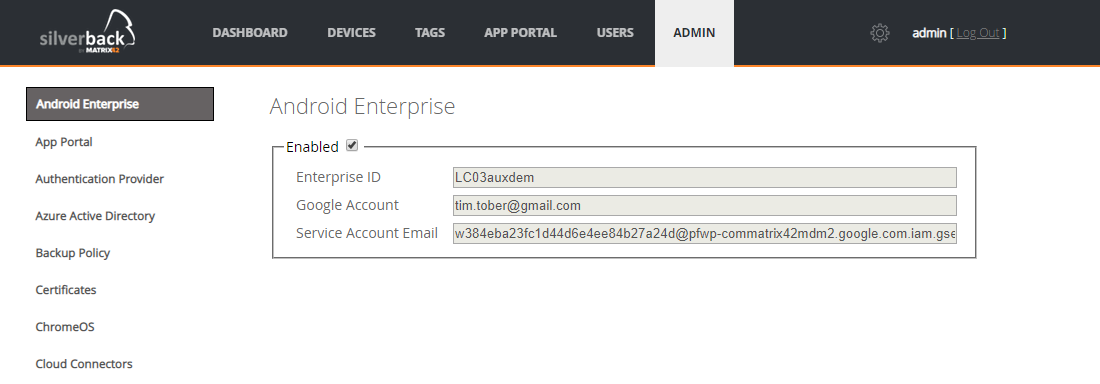
- Navigate to Admin > Android Enterprise.
- Mark the Enabled checkbox
- Click the activate button
- You will be redirected to Android Enterprise Sign-Up page (check your pop-up blocker)
- Proceed with Create an admin account and register your company
Manual Process
The following description is for initiating the manual activation of Android Enterprise with your Silverback instance through the Mobile Portal.
- Login with your Matrix42 Account into the Mobile Portal
- Navigate to Android Enterprise
- Press Activate
- You will be redirected to Android Enterprise Sign-Up page (check your pop-up blocker)
- Proceed with Create an admin account and register your company
Create an Admin account and Register your Company
After Silverback or the Mobile Portal has provided Google with a sign-in and callback URL to create your Android Enterprise account, the following section covers the process required on Google's site. The difference between the three available options is the account you use for the process. You can either use a personal Gmail account to register your organization, or you can use your business email address and create during the process a Google Workspace account, or you can use an existing Google Workspace administrator account. Select your preferred account option to proceed:
- Use your personal Gmail account
- Sign in with a business email address that does not yet have a Google Workspace account
- Log in with an existing admin account for Google Workspace
Use your personal Gmail account
By using your personal Gmail account, you are already ready to create your organization for the Android Enterprise integration. We must emphasize at this point that Google recommends that you use a work email address to register. However, you are allowed to use a personal Gmail account but if you have an Google account with a custom email address (i.e. Google accounts with a non-Gmail email address that are not part of an enterprise) you will have the option to convert your account to an enterprise account after the email verification as an additional step. To start with using your personal Gmail account, proceed with the following steps:
- At the Create Admin Account site, enter your personal Gmail account, e.g tim.tober@gmail.com
- Press Next
- You should see now an information that your account looks like a personal email address
- Select Sign up in the Android only section
- Press Sign in at the Bring Android to Work screen
- Now Login with your personal Gmail account
- After the login, press Get Started
- Enter your domain name or business name
- e.g. Imagoverum
- Press Next
- Enter contact information about your Data Protection Officer (optional)
- Enter contact information about your EU Representative (optional)
- Accept Managed Google Play agreement and proceed with Confirm
- Depending on your selected Activation Process, you will either be now returned back to the Silverback Management Console and the integration process is finished or you need to press the Complete Registration button to download a AFWSettings.json that you will need to Import into Silverback to finish the integration
- When everything is accomplished, proceed with Google Play Admin Console
Sign in with a business email address that does not yet have a Google Workspace account
During this process, you can register your Android Enterprise organization with your corporate email account for a free subscription to Google Workspace. In general, Google Workspace is a collection of cloud computing, productivity and collaboration tools, software and products developed and distributed by Google, consisting of various collaboration and productivity applications such as Gmail, Contacts, Drive, etc. for business-related purposes. With your corporate address, you can create a Google Workspace account and register your Android Enterprise without purchasing any of the subscriptions that Google offers around Google Workspace. If you use a Microsoft Identity Account available in Microsoft Entra ID, you can use that account to create your Google Workspace Admin account, but the process is slightly different from registering with non-Microsoft Identity Accounts.
Sign-in with a non Microsoft identity account
- At the Create Admin Account site, use an e-mail address with your company domain (e.g.: tim.tober@imagoverum.com) to register.
- You will then receive a verification email from Google
- Confirm your e-mail address by clicking on the link in the e-mail
- Enter afterwards the following information:
- First name
- Last Name
- Company Name
- Country
- Press Continue
- At the next, screen review that Android Enterprise with Matrix42 is already included and free of charge
- Add optional subscriptions to your Google Workspace (optional)
- Press Next
- Enter a password for your Google Workspace admin account
- Press Agree and Continue
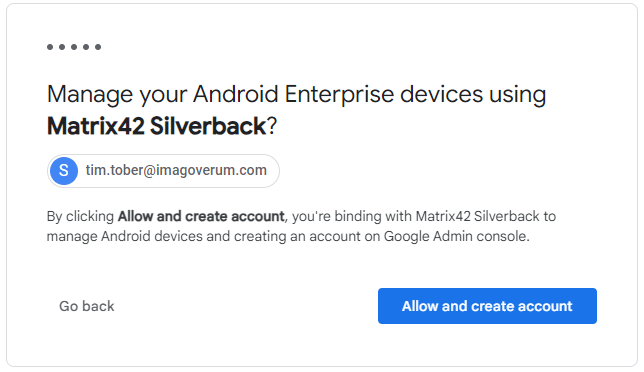
- At the Manage your Android Enterprise devices using Matrix42 Silverback, press Allow and create account
- Finally, you will see a loader that should only take a minute
- Depending on your selected Activation Process, you will either be now returned back to the Silverback Management Console and the integration process is finished or you will need to download a token (AFWSettings.json) and Import the file into Silverback to finish the integration.
- At that point, in addition to the enterprise record that is created, you also has a new Enterprise Google Account with which you are already logged in. You can now access other Google services (such as admin.google.com) with your new account, from where you can Review and Manage Bindings and Providers.
Sign-in with a Microsoft identity account
If your account is being managed by Microsoft, you can use your existing work account to sign up and sign in to your Google Admin console. You will see a popup with the content "Looks like tim.tober@imagoverum.com is being managed by Microsoft."
- Press Sign-In with Microsoft
- Or use the option to create an account with a password (optional)
- Login with your Microsoft identity account
- Press continue in case you will see a do you trust imagoverum.com
- Accept the requested permission for Google Workspace
- Now enter your Company Name
- Select your Country
- Select your communication preferences and press Continue
- At the next, screen review that Android Enterprise with Matrix42 Silverback is already included and free of charge
- Add optional subscriptions to your admin account (optional)
- Press Next
- Press Agree and Continue
- At the Manage your Android Enterprise devices using Matrix42 Silverback, press Allow and create account

- Finally, you will see a loader that should only take a minute
- You will be redirected to the Admin console and now you need to sign-in again with the same account
- Press Next
- Depending on your selected Activation Process, you will either be now returned back to the Silverback Management Console and the integration process is finished or you will need to download a token (AFWSettings.json) and Import the file into Silverback to finish the integration.
- At that point, in addition to the enterprise record that is created, you also has a new Enterprise Google Account with which you are already logged in. You can now access other Google services (such as admin.google.com) with your new account, from where you can Review and Manage Bindings and Providers.
Log in with an existing admin account for Google Workspace
- Enter your Google Workspace administrator account, e.g. administrator@imagoverum.com
- Press Next
- At the Sign in page, press Next
- Enter your password and finish the sign-in process with the verification process
- At the Add Android Enterprise screen, press Continue to Admin Console

- Now press Checkout to add your Android Enterprise subscription
- Press Place Order finish the subscription process
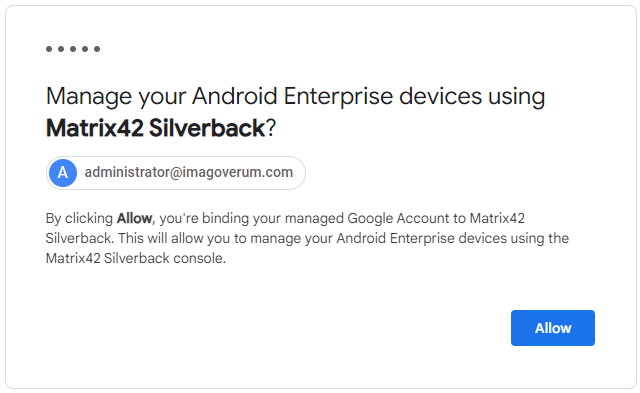
- At the Manage your Android Enterprise devices using Matrix42 Silverback, press Allow
- Depending on your selected Activation Process, you will either be now returned back to the Silverback Management Console and the integration process is finished or you will download a AFWSettings.json that you will need to Import into Silverback to finish the integration.
- Proceed with Review and Manage Bindings and Providers
Import Token
- Open your Silverback Management Console
- Login as an Administrator
- Navigate to Admin
- Navigate to Android Enterprise
- Click Choose File
- Import your downloaded .json
- Mark the checkbox Enabled
- Click Save
- Confirm your Android Enterprise Activation
- Now your activation is completed and your window should look like this.
Review and Manage bindings and Providers
If you created during the Android Enterprise integration an Google Workspace Admin Account, you can review now your organization details in the Google Admin console. From the administrative console you can also
- Open https://admin.google.com
- Login with your recently created Google Workspace admin account
- From the home section, select Devices
- Expand Mobile & endpoints > Settings and select Third-party integrations
- Locate the Android EMM section
- Press the entry and expand the view
- Review your Bound EMM Providers. Each created organization is listed with an Organization ID and Matrix42 Silverback as the provider.
- Press Manage EMM Providers
- Note for the future that here is a opportunity to remove the bindings and delete your organization.
- A new window will open to remove one of your bindings
- In addition, note that your account is eligible to create multiple Android Enterprise organizations. This means you could create for a migration scenario from a different MDM solution a new organization for Silverback with the same Google Workspace Admin Account. This also leverages you, to add multiple Silverback instances within your account.
- Proceed with Google Play Admin Console
Google Play Admin Console
The Google Play Admin Console allows you to view your managed applications and some organization information and, depending on the account used for the integration of Android Enterprise, further information can be updated or the entire organization can be deleted.
- Open Google Play Admin Console
- Press Sign In and sign in with your recently account that you used to activate Android Enterprise
- After the login, navigate to My Managed Apps
- This section should be empty and you can start now to add your first Managed Play application from your Silverback Management Console
- Review Android Enterprise IV: Mobile Application Management for additional information
- We recommend to add one application for testing purposes and review the availability under My Managed Apps afterwards and then proceed with this guide
- Now navigate to Admin Settings and review the following notes:
- If you have setup during the integration process an Google Workspace Admin Account, you can review in this sections only your Organization name and your Organization ID
- If you have used during the integration a personal Gmail account, you can review your Organization information, modify contact details, invite additional administrators or delete your organization.
- If your organization has already multiple bindings, you don't have the possibility to review or change something in the Admin Settings.
- Proceed with Next Steps
Next Steps
- Enroll your first corporate-owned device to become managed with Android Enterprise and Matrix42 Silverback
- Enroll your first personal owned devices or corporate owned devices with personal enablement
- Add and configure additional applications
- Enhance and automate the enrollment process with the Android Enterprise Deployment Programs
- Get the maximum out of OEM Configurations