Windows 10/11 Working with Firewall Rules and Remote Desktop
Working with Firewall Rules and Remote Desktop
With Silverback 21.0 Update 3 and newer, Administrators can configure a Remote Desktop Profile for Windows 10 and Windows 11 device. This profile includes to allow or prevent remote access to computer by using Remote Desktop Services and prevent or allow mapping of clients drives in a Remote Desktop Services session and many other options. During the implementation and quality assurance phase, we encountered some stumbling blocks that we would like to share with this knowledgebase article, as you are likely to face the same challenges sooner or later. Probably you want to simply disable Remote Desktop Service and use a third-party tool of your choice or Matrix42 Remote Control instead, but anyway, this guide is intended to demonstrate user interface obstacles when enabling or disabling Remote Desktop and how to configure and review applied firewall rules for Windows 10 or Windows 11 devices.
Remote Desktop Configuration and Obstacles
Before we start it is already at this point is very helpful to understand what will happen when you enable the Allow users to connect remotely option in the Remote Desktop Profile. When the configuration will be applied on the device, the current button status will be shown in the same way as it was configured previously by default (for new devices), by a user or by an Administrator. This means against the expectation that the Enable Remote Desktop switch can't be "set" by an MDM solution like Silverback. Instead, it will be displayed in the way as it was before applying the Remote Desktop Profile with Silverback. In the following scenario, we want to demonstrate the different Remote Desktop User Experiences, when Remote Desktop set to disabled on the device and afterwards the Remote Desktop Profile will be applied on the device.
Enable Remote Desktop
First, you should create a new Tag, assign it to a device before we dive deeper.
Create a Tag
- Open your Silverback Management Console
- Login as an Administrator
- Navigate to Tags
- Create a new Tag
- Enter a Name, e.g., Remote Desktop Configuration
- Enter a Description (optional)
- Enable Profile as Feature
- Enable Windows as Device Types
- Press Save
Configure Remote Desktop Profile
- Navigate to Profile
- Select Remote Desktop
- Enable Remote Desktop Settings
- Ensure to keep Allow users to connect remotely as not configured
- Enable Do not allow drive redirection
- Press Save and Confirm with OK
Assign Tag
- Navigate to Devices
- Select one of your test devices and assign the Tag to this device
Review Profile Installation
- Open Device Overview and press Refresh
- You can also perform a manual sync on the device by open Settings > Accounts > Access work or School > Profile > Info > Sync
- Open Pending Commands from the Device Overview
- Locate the RemoteDesktopServices command, it should have the command status successful
Press first Refresh and then perform a manual sync on the device, it is the fastest way to apply profiles.
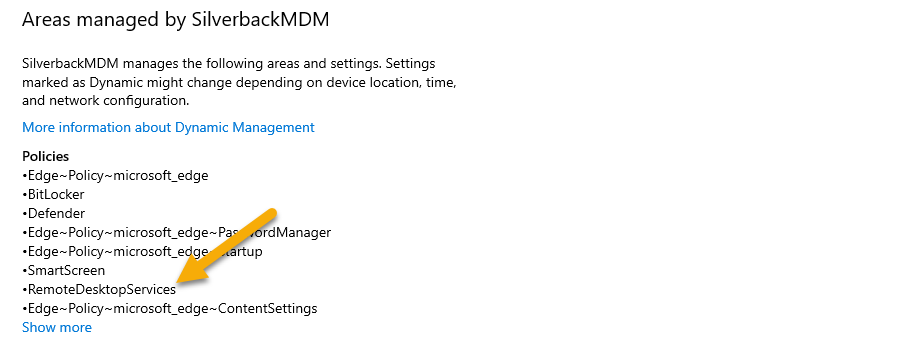
- After a successful profile installation, review the MDM Profile on the device
- Under policies you should see a Remote Desktop Services entry
User Experience
As you have now created and assigned a Tag with the Remote Desktop Profile, we will demonstrate in this section the User Interface obstacles, depending on what configuration has been made before the Remote Desktop Profile will be applied on the device. At this point it is very simple to get confused due to the different UI behaviours. Basically, you can repeat the shown steps by changing the Allow users to connect remotely configuration back and forth from Not Configured to Enabled and by enabling and disabling Remote Desktop Services manually when it's set to Not Configured in your Profile. To review the User Experience for each step, perform the following:
- On your Windows 10 or Windows 11 devices, open Settings
- Select System
- Select Remote Desktop
- Review with the following screenshots and explanations, the User Interface
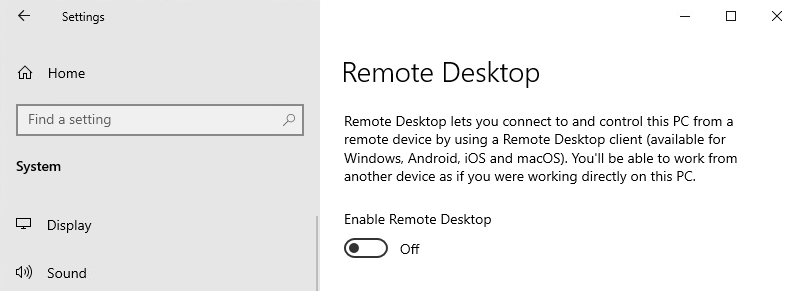
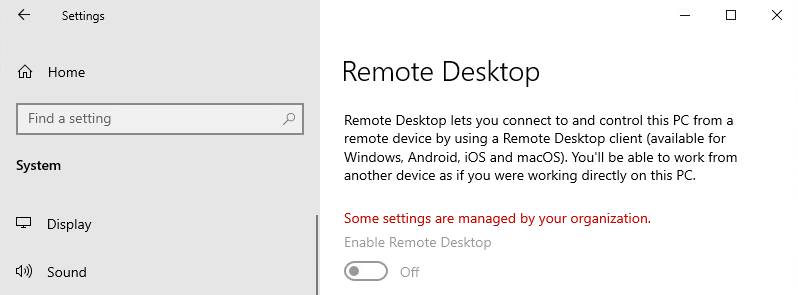
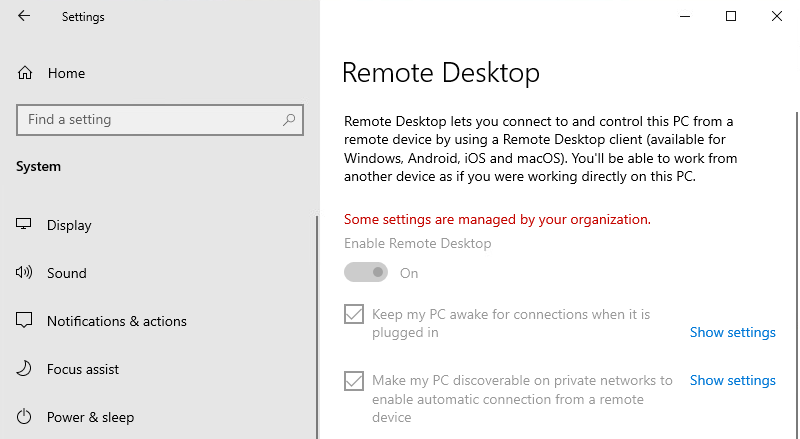
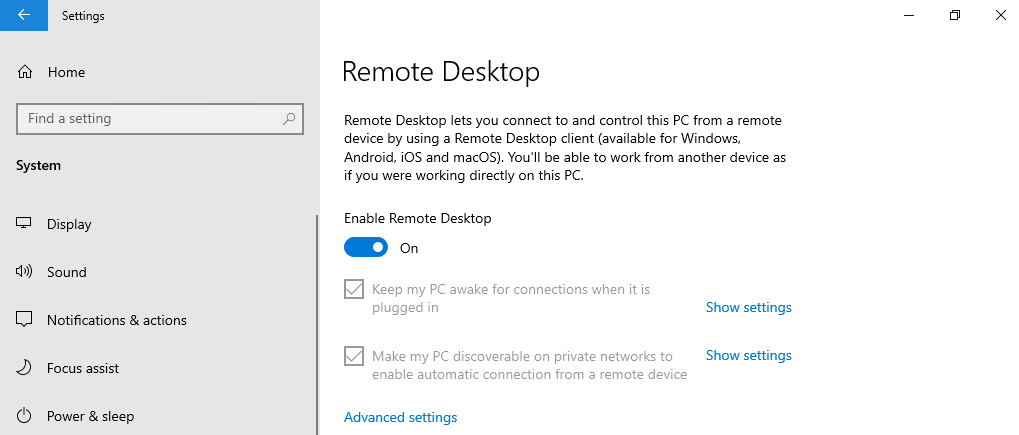
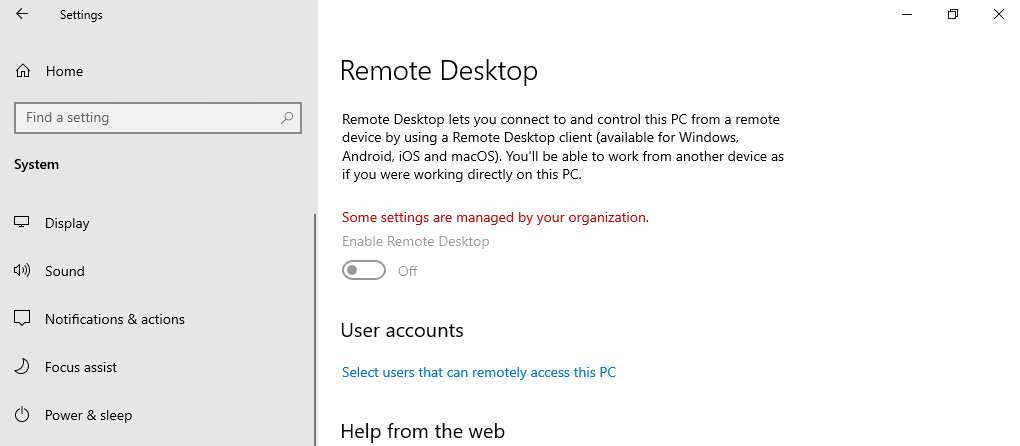
| Remote Desktop is before set to Disabled and in Remote Desktop Profile set to Not configured. You won't see Some settings are managed by your organization and the button status is set to Off. Users can change the configuration. | Remote Desktop is before set to Disabled and in Remote Desktop Profile set to Enabled. The setting is now managed by your organization and users can't change the status. With this view it suggests that Remote Desktop is disabled, but it is enabled. |
 |
 |
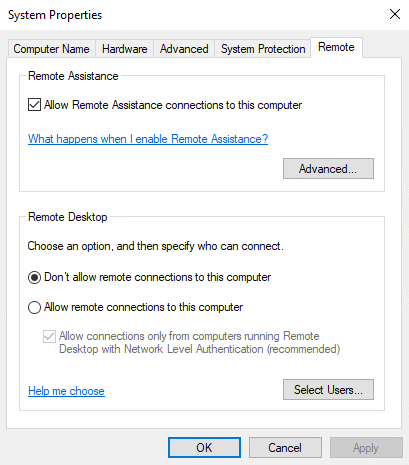
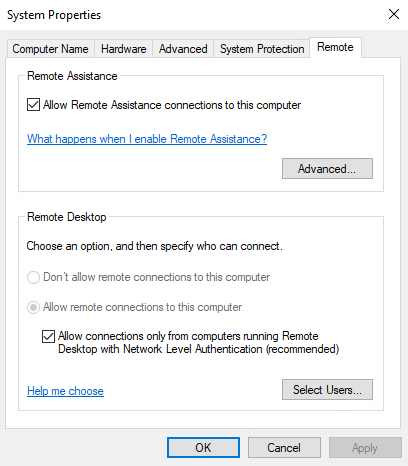
A difference will already be shown when we use the View advanced system settings (sysdm.cpl)
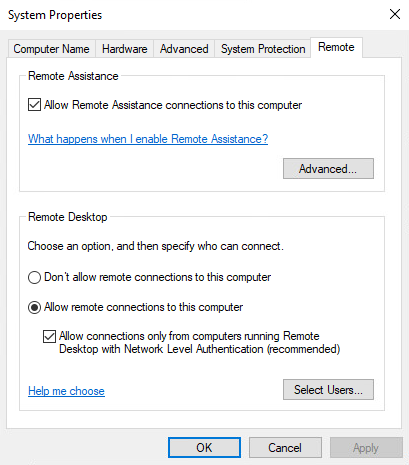
| Remote Desktop is before set to Disabled and in System Properties it's set to Don't allow remote connections for this computer. Users can change the configuration. | Remote Desktop is before set to Disabled and in Remote Desktop Profile set to Enabled. In System Properties it's set to allow remote connections to this computer. Users won't be able to change the configuration. |
 |
 |
Now let's try to enable first Remote Desktop and then let Silverback apply the profile to let users not to change it and set the status to enabled.
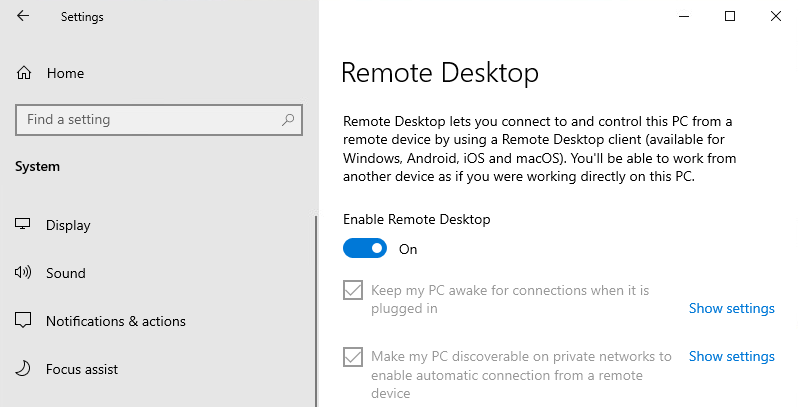
| Remote Desktop is before set to Enabled and in Remote Desktop Profile set to Not configured. | Remote Desktop is before set to Enabled and in Remote Desktop Profile set to Enabled. In this situation now, Remote Desktop is enabled now as well in this UI. |
 |
 |
And again, we will review the advanced system settings (sysdm.cpl)
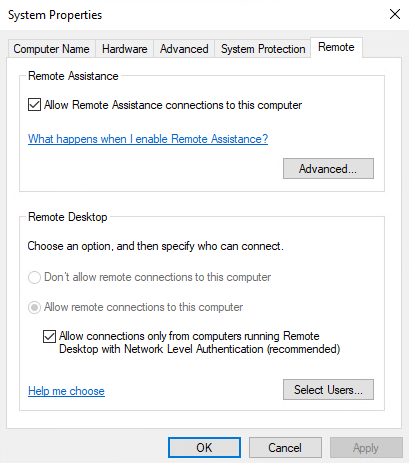
| Again, users can change the configuration and remote connections are allowed | Again, users can't change the configuration and remote connections are allowed as configured with Silverback. |
 |
 |
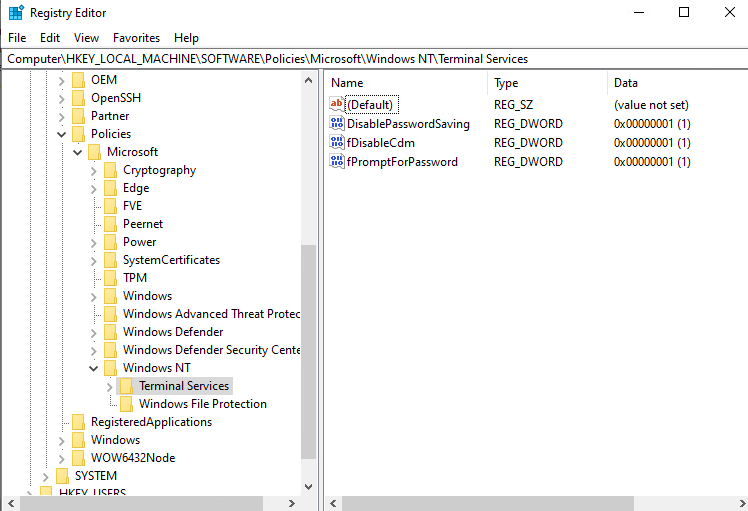
As we understand now that we need to take a deeper look into the configuration, we want to provide another method for reviewing the configuration. For that, open the Registry Editor and navigate to HKEY_LOCAL_MACHINE\SOFTWARE\Policies\Microsoft\Windows NT\Terminal Services. Depending on your Remote Desktop Profile configuration you will see here different entries like the following:
And as a finale note we want to mention when Remote Desktop Service is enabled on the device and you set Allow users to connect remotely to disabled, then the indicator will switch from enabled to disabled.
 |
 |
Connection Issues and Firewall Configuration
Probably you researched this article due to Connection Issues when connecting via RDP and your Remote Desktop Profile is set to enabled in Silverback. At this point you might have been already found out the above explained obstacles regarding the User Interface. But there is an additional topic that needs to be explained and configured and this is the Windows Firewall. Here we are facing a similar expectation issue as for the Remote Desktop Profile. Before we start with the explanation, we will take a deeper look into the Windows Defender Firewall with Advanced Security Management Console (wf.msc)
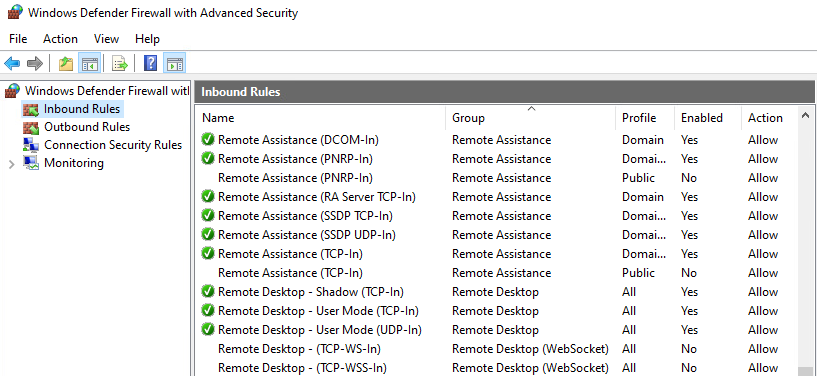
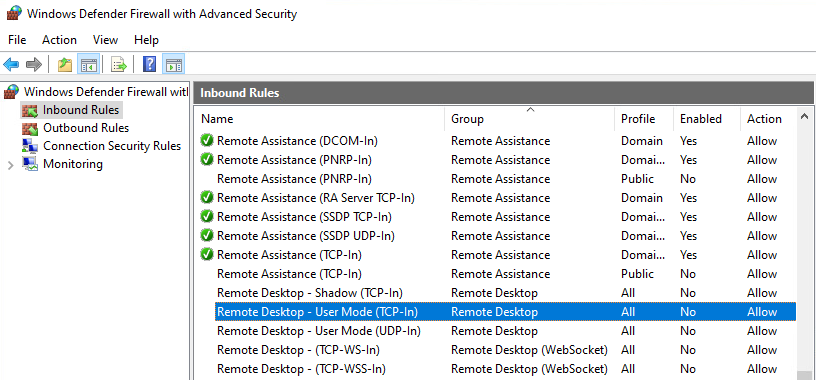
When users or administrators enable the Remote Desktop option, corresponding Firewall Rules are enabled automatically by the system. When the Remote Desktop option is disabled and you apply the Remote Desktop Profile with enabled Allow users to connect remotely in Silverback, then these Firewall rules aren't applied automatically as shown in the following screenshots. So, what we need to do now is to create our custom Firewall Rule for Remote Desktop - User Mode (TCP-In) with Silverback.
| Remote Desktop is enabled by users or administrators and Firewall Rules are enabled. | Remote Desktop was disabled and remotely enabled via Silverback. Firewall Rules are not enabled |
 |
 |
Enable and Configure Firewall
Head over to your Silverback Management Console and create a new Tag, enable the Defender Firewall Profile, and add your custom Defender Firewall rule.
Create a Tag
- Navigate to Tags
- Create a new Tag
- Enter a Name, e.g., Defender Firewall
- Enter a Description (optional)
- Enable Profile as Feature
- Enable Windows as Device Types
- Press Save
Enable Defender Firewall
- Navigate to Profile
- Select Defender Firewall
- Enable Defender Firewall Settings
- Press Save and Confirm with OK
Now we have enabled the Firewall Profile with default settings. It will enable by default the Firewall for Domain, Private and Public Network. You can later modify option buttons and now we will add our Firewall Rule.
Add Defender Firewall Rule
- Press New Defender Firewall Rule
- Enable Rule Settings
- Enter as Name e.g., Remote Desktop - User Mode (TCP-in) via SB
- Add a description, e.g., RDP TCP Port 3389
- Change Direction to In
- Select as Application File Path
- Enter as File Path %SystemRoot%\system32\svchost.exe
- Change Protocol to TCP
- Enter as Local Ports 3389
- Press Save and Confirm with OK
- Press Save
Whenever you change something in the Defender Firewall Profile, ensure to press Save or Save & Close to apply changes. When you as an example enable or disable a Rule in the Profile and refresh the browser you will see that the rule will be enabled or disabled, but to confirm changes, you are required to Press Save or Save & Close.
Assign Tag
- Navigate to Devices
- Select your test device and assign the Tag to this device
Review Profile Installation
- Open Device Overview and press Refresh
- You can also perform a manual sync on the device by open Settings > Accounts > Access work or School > Profile > Info > Sync
- Open Pending Commands from the Device Overview
- Locate the AddDefenderFirewall and AddDefenderFirewallRules command, they should have the command status successful
Press first Refresh and then perform a manual sync on the device, it is the fastest way to apply profiles.
- After a successful profile installation, review the MDM Profile on the device
- Under policies you should see a Defender entry

User Experience
As you have now created and assigned a Tag with the Defender Firewall Configuration, we want to highlight another obstacle in the User Interface. You might assume after the successful profile installation to review the created Firewall Rules in the Windows Defender Firewall with Advanced Security Console under Inbound or Outbound Rules, but they are not listed there as shown in the following screenshot.
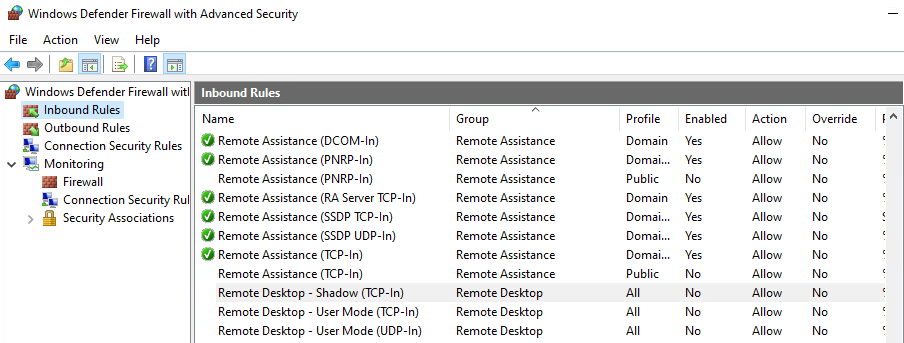
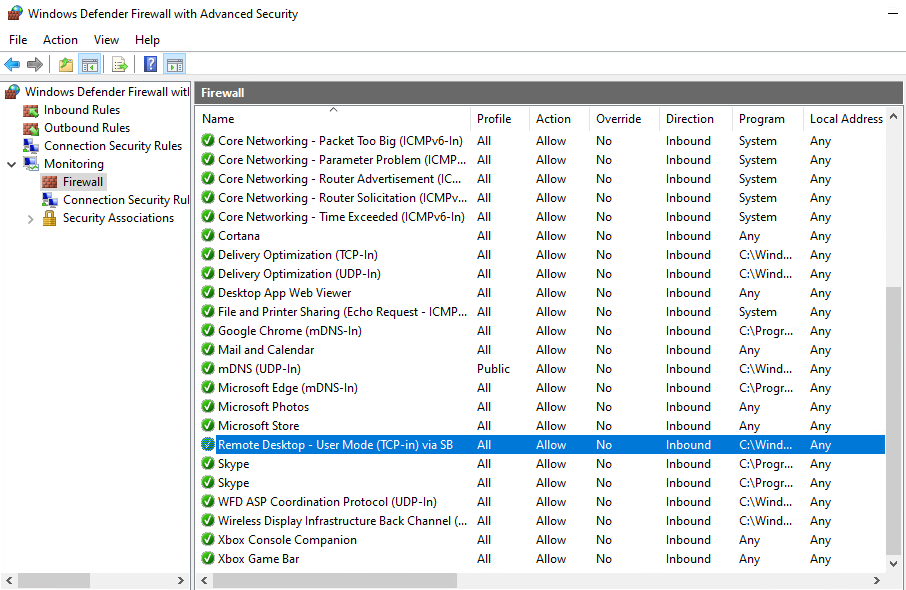
Instead, you can review your created and applied Firewall Rules with Silverback under Monitoring > Firewall
Additionally, you can open Registry Editor and navigate to the following path:
Computer\HKEY_LOCAL_MACHINE\SYSTEM\ControlSet001\Services\SharedAccess\Parameters\FirewallPolicy\Mdm
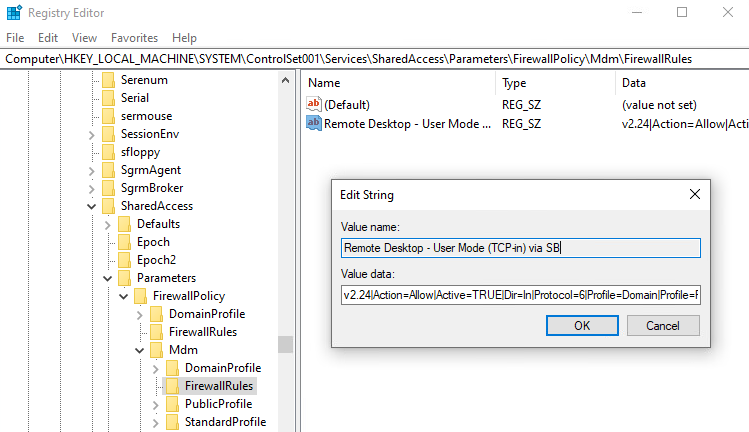
Configured Firewall Settings will appear here as well (Review Domain, Public or Standard Profile)
Now we know that the Remote Desktop Settings will be applied successfully, and Firewall Rules are created.
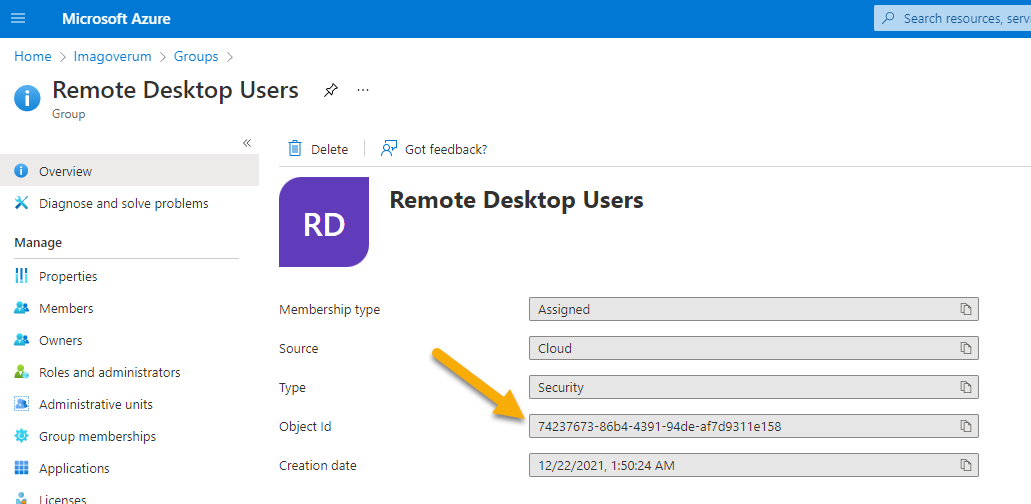
What about Accounts
At this point you might face another challenge when you want to connect via Remote Desktop to your devices and this is the needed account for the connection. As this profile is not yet present in Silverback, you might take the workaround with a Custom Profile, as explained in Windows 10/11 Create custom profiles. When the device is joined to your Domain or to your Azure Active Directory, you can create a custom profile that contains only the Add Account to Group sequence, but please take into account, that the group membership are difficult to update via a custom profile. Please make some tests before rolling out the custom profile.
<GroupConfiguration>
    <accessgroup desc = "Remote Desktop Users">
        <group action = "U" />
        <add member = "Imagoverum\Administrators"/>
        <add member = "AzureAD\tim.tober@imagoverum.com"/>
        <add member = "S-1-12-1-111111111-22222222222-3333333333-4444444444"/>
    </accessgroup>
</GroupConfiguration>
In case you want to add one Azure Group as Local Administrators and a different Group for Remote Desktop Users, use the following XML.
<GroupConfiguration>
    <accessgroup desc = "Administrators">
        <group action = "U" />
        <add member = "S-1-12-1-1179547499-1235016649-3910725513-169749963"/>
    </accessgroup>
    <accessgroup desc = "Remote Desktop Users">
        <group action = "U" />
        <add member = "S-1-12-1-111111111-22222222222-3333333333-4444444444"/>
    </accessgroup>
</GroupConfiguration>
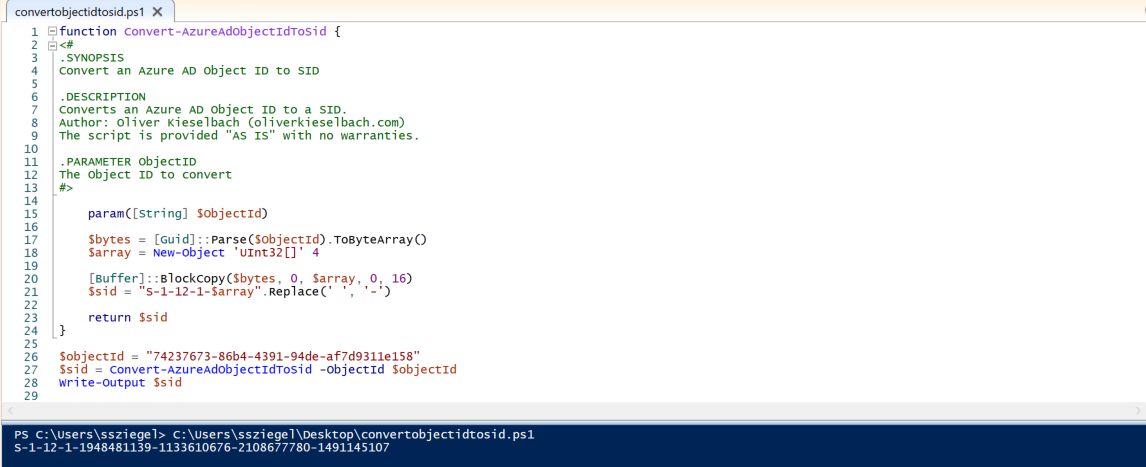
To get the specific Security Identifier (SID) from Azure Group Object IDs, you can run this script from Oliver Kieselbach: GitHub