User Management
User Access Level
FireScope SDDM has three access levels which allows users the necessary accessibility for their assigned tasks.
Following are the access roles listed from least access to most access:
- Service Analyst
- FireScope Administrator
- Configuration Administrator
Service Analyst
Service Analyst is a Read Only user access level. This user does not have the privilege to create, edit, delete, or save anything from any page in the Configuration, Administration or Settings functions.
FireScope Administrator
FireScope Administrator can edit settings that affect users, groups or properties that have impact on accessibility. Batch configuration functions such as Blueprint linkage and Migrate CIs require this level of access. FireScope Administrators has access to all Service Groups, Logical Groups and CIs. They can also administer other users Reports.
Configuration Administrator
Global Settings that affect all configurations and evaluations within the account require this level of access. Limit this user access level to those only those that require the ability to change global settings. Configuration Administrators have access to all Service Groups, Logical Groups and CIs. This level of access can also administer other users Reports.
| Services Analyst |
FireScope Administrator |
Configuration Administrator |
|
| My Services | |||
| Dashboard | ✔ | ✔ | ✔ |
| Service Maps | ✔ | ✔ | ✔ |
| Inventory | ✔ | ✔ | ✔ |
| Explore Network Traffic | X | ✔ | ✔ |
| Explore Network URL | X | ✔ | ✔ |
| Explore Service Entry Point | X | ✔ | ✔ |
| Network Topology | ✔ | ✔ | ✔ |
| VMware Topology | ✔ | ✔ | ✔ |
| VMware Explorer | ✔ | ✔ | ✔ |
| Configuration | |||
| Run Set Up Wizard | X | ✔ | ✔ |
| Edge Devices | X | ✔ | ✔ |
| Edge Assignment Rules | X | ✔ | ✔ |
| Explore Network Traffic | X | ✔ | ✔ |
| Explore Network URL | X | ✔ | ✔ |
| Explore Service Entry Point | X | ✔ | ✔ |
| Services | |||
| Service Group | X | ✔ | ✔ |
| Dependency Editor | X | ✔ | ✔ |
| Discovery | |||
| Credentials | X | ✔ | ✔ |
| Network Discovery | X | ✔ | ✔ |
| Discovery Rules | X | ✔ | ✔ |
| Topology Discovery | X | ✔ | ✔ |
| Virtual Discovery | X | ✔ | ✔ |
| Inventory | |||
| Configuration Item | X | ✔ | ✔ |
| CI Type | X | ✔ | ✔ |
| Attributes | X | ✔ | ✔ |
| Blueprints | X | ✔ | ✔ |
| Batch Blueprint Linkage | X | ✔ | ✔ |
| Value Map | X | ✔ | ✔ |
| Logical Group | X | ✔ | ✔ |
| Administration | |||
| Integration Overview | X | ✔ | ✔ |
| Cherwell Federation | X | ✔ | ✔ |
| Agent | |||
| Agent Management | X | ✔ | ✔ |
| Agent Upgrades | X | ✔ | ✔ |
| Utilities | |||
| Export CIs/Blueprints | X | ✔ | ✔ |
| Import Cis / Blueprints | X | ✔ | ✔ |
| Migrate Cis | X | ✔ | ✔ |
| User Management | |||
| Users | X | ✔ | ✔ |
| User Group | X | ✔ | ✔ |
| AD User Configuration | X | ✔ | ✔ |
| External Authentication | X | ✔ | ✔ |
| Report | |||
| Audit Log | X | ✔ | ✔ |
| Edge Device Scorecard | X | ✔ | ✔ |
| System Messages | X | ✔ | ✔ |
| Config and Usage Statistics | X | ✔ | ✔ |
| Administrative Notification | X | ✔ | ✔ |
Create User
To Create a SDDM User:
- Log in to FireScope SDDM as a FireScope or Configuration Administrator.
- Click Administration > Users > Create and the New User page will be displayed.
Enter User Information
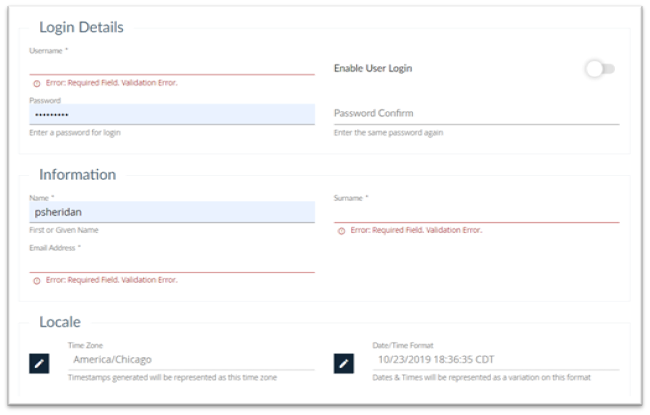
Login Details
- Username: Enter a user’s login name (username). This entry must be unique.
- Password: Enter a login Password
- Password Confirm: Enter the login password again to confirm password.
- Enable User Login: If you want this login available immediately then click on the toggle
Information:
- Name: Enter user’s name, this field is required for display.
- Surname: Enter user’s last name, this field required for displays.
- Email Address: Enter the email address for this user
Locale:
- Timezone: Click on the Change button to change the Country and time zone. A drawer will slide out from the right that provides the necessary time zone fields
- Date/Time Format: Click on Change button to change the time and date format. A drawer will slide out from the right that provides the necessary date and time fields.
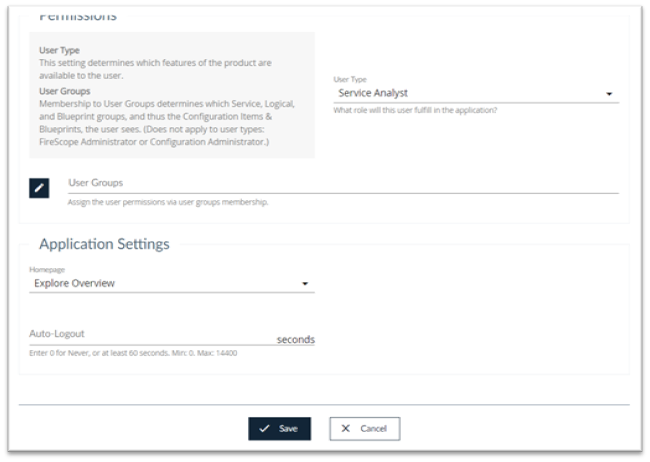
Permissions
- User Type: Select the appropriate user type for this particular user. User types are Service Analyst, Configuration Administrator and FireScope Administrator and are described above.
- User Group: Click on the change button to select an appropriate User Group for this user. When you click on the change button a list of valid User Groups will appear in the drawer to the right of the screen.
Application Settings
- Homepage: Select the home page that you would like this user to see at login
- Auto-Logout: Enter the number of seconds that a user will be inactive prior to logging out the user. Enter 0 for Never, a minimum of 60 seconds or a maximum of 14400 seconds.
Save / Cancel – Click Save to save changes.
To Update or Edit a SDDM User: Log in to FireScope SDDM as a FireScope or Configuration Administrator.
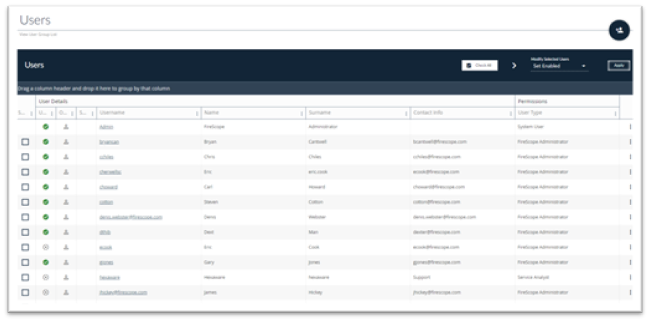
Click Administration > Users > List and the Users Page will be displayed with a list of the current Users, their online status, username, contact details and User Type.
- Click on user’s Username. The Edit User page will be displayed.
- Alternatively, you can click on the three dots on the far right of the line with the username you are interested in and select Edit User
- Make necessary changes.
- Click the Save button.
To Disable a SDDM User:
Log in to FireScope SDDM as a FireScope or Configuration Administrator.
Click Administration > Users > List. The Users page will be displayed with list of the current Users, their online status, username, contact details and User Type.
The column headers can be used to group or sort the list.
- Click on the three dots on the far right of the line with the username you are interested in on Users screen and select Disable User
- Click confirm to disable.
To Delete a SDDM User:
Deleting a User requires some considerations. If this user is in Active Directory , deleting this user will simply cause the user to be recreated in the next synchronization.
Additionally, consider the reassignment of any objects that may belong to this user. For example, you may choose to reassign ownership and persist and pass control to another user.
To Delete a SDDM User: Log in to FireScope SDDM as FireScope or Configuration Administrator.
- Click Administration > Users > List. The Users page will be displayed with list of the current Users, their Online Status, Username, Contact Details and User Type.
- Select a user from the list,
- Click on the three dots on the far right of the line with the username you are interested in and select Delete User
- Click Confirm to confirm the deletion.
User Groups
User Groups are used to manage access for a group of Users. They are commonly used to represent a team within an organization that shares common responsibilities or tasks related to managing the IT assets. While User Group membership determines which assets are accessible to Users, User Group Permissions determines the level of access rights (read-only, read-write) the user has to those assets.
User Groups linked to a Service Group – will allow users access to all Logical Groups, CIs and related elements (Attributes) under that Service Group & its Logical Groups.
User Groups linked to a Logical Group – will allow users access to all CIs and related elements (Attributes) under that Logical Group.
User Groups linked to a Blueprint Group – will allow users access to view and edit Blueprint Groups and their associated Blueprint elements.
Creating and Managing a User Group
Note: Although Users can belong to more than one User Group, it is easier to manage permissions by NOT overlapping user and group memberships with complex Service and Logical group assignments. Log in to FireScope SDDM as a FireScope or Account Administrator.
- Click Administration > User Groups > Create and the New User Group page will be displayed..
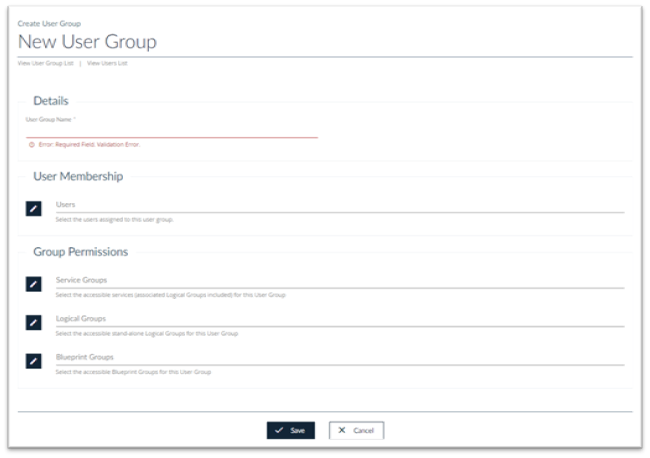
Enter New User Group Data
- User Group Name: Enter a name for your User Group.
- User Membership: Add users here by clicking on Edit button. Existing Users will be displayed in the drawer to the right of the screen (see example below)
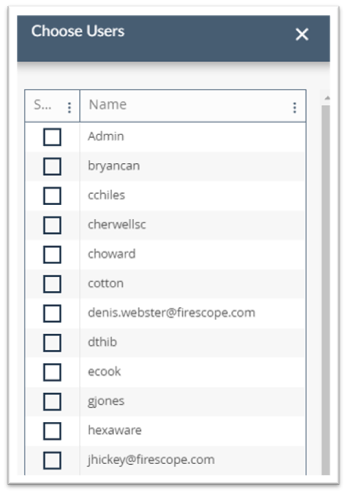
- Click on the check box next to the username you wish to add to the group, and you will see the users added to the User Membership area
- Group Permissions: Select the appropriate Group Permissions as described above by clicking on the edit button
- Service Groups
- Logical Groups, or
- Blueprint Groups
- Click Save to save your changes.
User Authentication
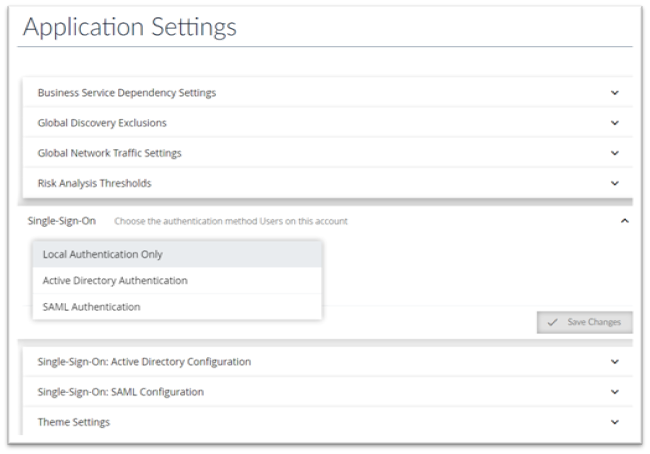
FireScope provides three different ways to authenticate users
- Local Authentication Only: This is the default authentication. It authenticates against local users only. This method does not require any type of integration with other authentication sources or organizations within the company. This type of authentication uses the values entered on the Create User page as described above. Note: Enabling Local Authentication will disable Active Directory Authentication.
- Active Directory Authentication: This is a method that authenticates against local users and Windows Active Directory. This method requires FireScope cloud to have access to the Windows Active Directory to verify user credentials. It also requires configuration provided by Active Directory and users should be already imported through AD User Configuration. The Active Directory may be provided by a different organization within your company.
- SAML Authentication This is a method that authenticates against local users and SAML. SAML authentication is a method to authenticate users against a remote service, known as a SAML Identity Provider (IdP), instead of authenticating against FireScope SDDM which is the SAML Service Provider (SP). SAML Identity Provider may be provided by a different organization within the company.
To Select the type of Authentication that you want, go to Settings > Single Sign-On and select the type of Authentication / Sign-on that you desire as shown on the page below;
Active Directory User Configuration
FireScope SDDM allows the user to configure access to Windows AD from a deployed Edge device which provides users a more secure method to access user information to setup accounts in SDDM cloud. The connection is assigned to a single Edge device which is already deployed within the user’s network and utilizes an already open connection between the Edge device and the SDDM cloud to deliver the user data.
Log in to FireScope SDDM as a FireScope or Account Administrator.
- Click Settings > Single Sign-On: Active Directory Configuration and the Active Directory Configuration page will be displayed.

Click on Server Connection to display Server Connection page;
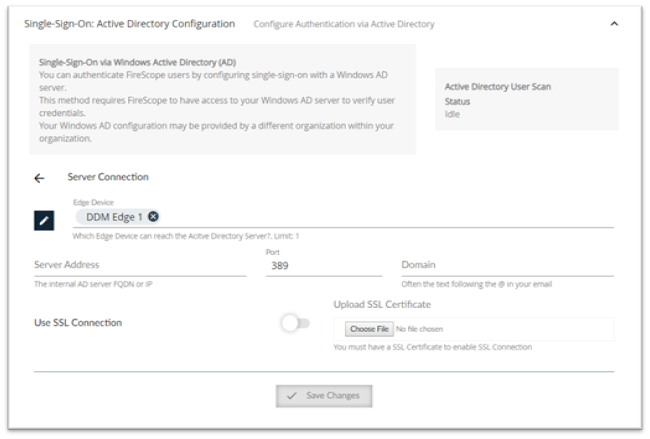
- Edge Device: Click on Change Edge Device button to select an Edge Device to designate the data collection or operation target. Note: Changing the Edge device setting will require configuration update to move the access to your data from one Edge to another.
- Windows AD Connection:
- Server Address: Enter your internal AD server such as ad.company.com or 10.0.0.123.
- Port: Enter the Port number. Note: Default port is 389
- Domain: Your Domain, often the text following the @ in your email, such as company.com
- Use SSL Connection: should be toggled on and you must upload an SSL certificate to enable SSL connection.
- Press Choose File to select your SSL certificate if SSL is selected
- Press Save Changes to save your changes
- Return to the AD Configuration Screen and select Server Authentication
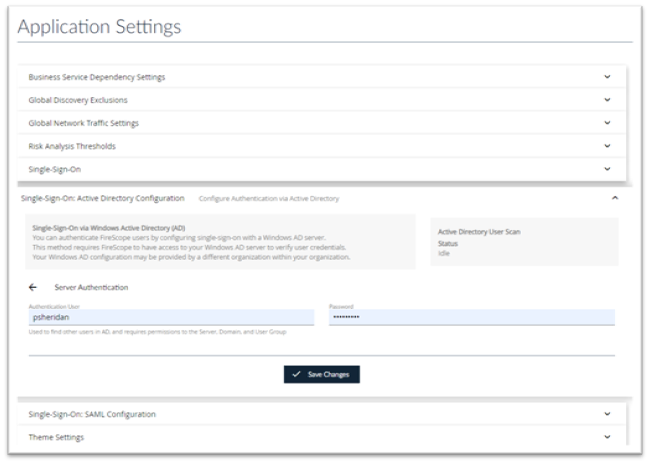
- Authentication User: Enter the Authentication User
- Password: Enter the Password
- Press Save Changes to save your updates.
Note: Make sure the AD account user you enter here has visibility to the users you wish to import.
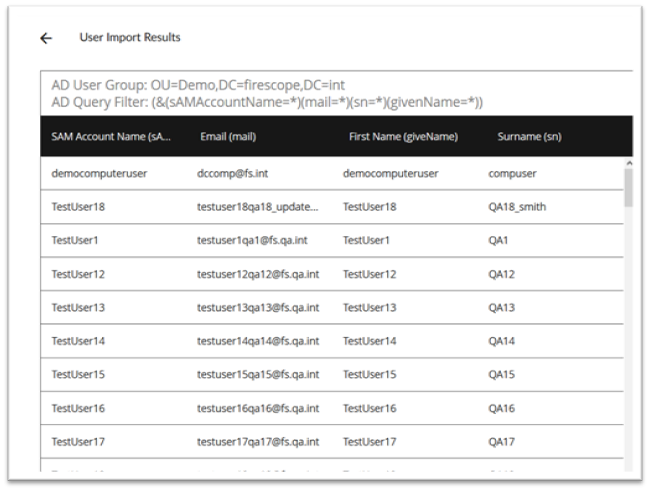
Return to the AD Configuration Screen and select User Import Criteria to display the page below
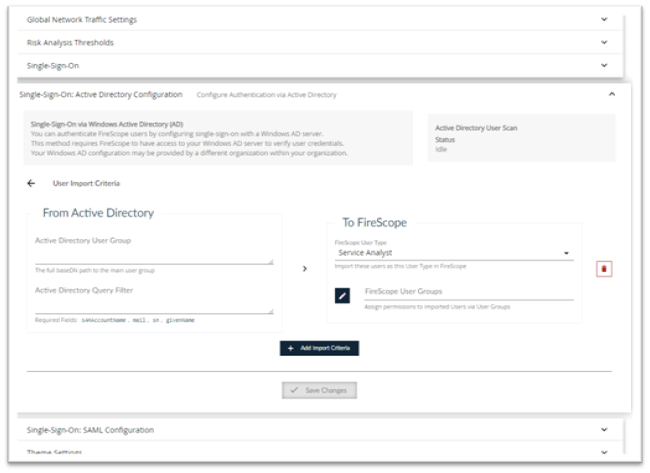
- AD User Group –This is the actual location of the User. The full baseDN path the main user group ‘OU=Demo Users,OU=Demo,DC=mycompany,DC=int’
- Query Filter: This is utilized to narrow the user list down to the ones you wish to import with this rule. Query filter to select users to import Fields sAMAccountName, mail, sn, givenName are all required for valid users. How-to guide on writing filters https://technet.microsoft.com/en-us/library/aa996205(v=exchg.65).aspx
Note: Consult your security administrator and test the search filters with AD administrative tools before trying it in FireScope SDDM. - FireScope User Type: You can select the user access level for the imported or updated user from the drop down list. Note: If the user is part of multiple rule results, the highest level will be granted.
- FireScope User Groups: –You can select the user group of which the imported or updated user will become a member. Note: This is additive only. When a user does NOT match a user group assignment, the update import will NOT remove the user from any group or groups.
Examples: view msdn reference
| Simple: | ‘(&(objectCategory=person)(sAMAccountName=*)(mail=*)(sn=*)(givenName=*))’ |
| Members of a group: | ‘(&(objectCategory=person)(sAMAccountName=*)(mail=*)(sn=*)(givenName=*)(memberOf=CN=FireScope,CN=Users,DC=companyname,DC=int))’ |
| Members of multiple groups: | ‘(&(objectCategory=person)(sAMAccountName=*)(mail=*)(sn=*)(givenName=*)(|(memberOf=CN=IT,CN=Users,DC=companyname,DC=int)(memberOf=CN=Central,OU=SecurityGroups,DC=companyname,DC=int)))’ |
Click Add Import Criteria and Save Changes
Return to the AD Configuration page and select User Import Scan and Schedule
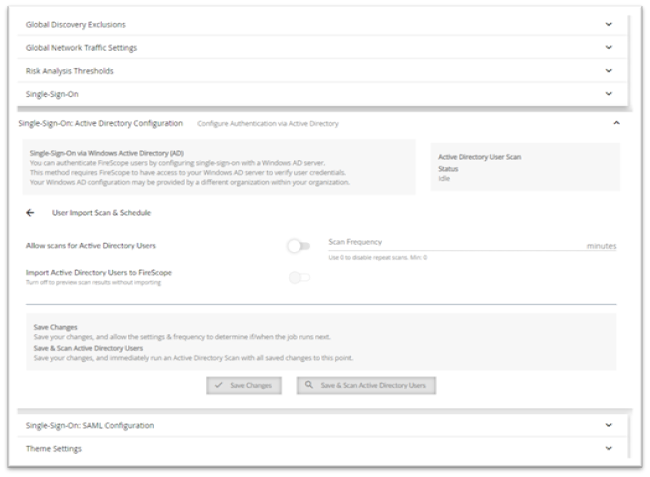
- Allow Scans for Active Directory Users: toggle on if desired
- Scan Frequency: Specify the scan frequency in minutes
- Import Active Directory Users to FireScope: Toggle this on to import AD users
- Click Save Changes or Save & Scan Active Directory Users as desired.
Return to the AD Configuration Screen and select User Import Results to see the results of the input job
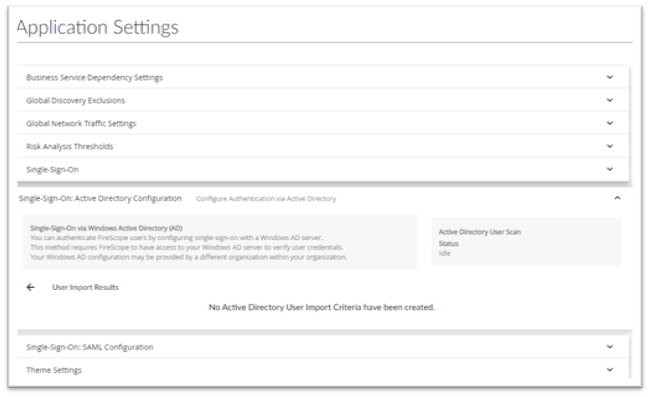
Last Scan Summary–Displays the record of updated and imported users. Click on Results to see detailed view.
External Authentication
If you have SAML Identity Provider or Windows Active Directory deployed in your organization for user access management, you can utilize FireScope’s External Authentication to use the same credentials as the organization’s login credentials.
Click on Settings > Application Settings> Single-Sign-On: SAML Configuration the Configuration Authentication via a SAML ID Provider page will be displayed.
Successful SAML authentication requires the following:
- FireScope SDDM cloud to have access to your SAML Identity Provider.
- Configuration and exchange of SAML metadata between FireScope SDDM and your SAML Identity Provider.
- Changes to the customer’s authentication server (idP ie PingID) and to the customer’s account in FireScope SDDM (SP).
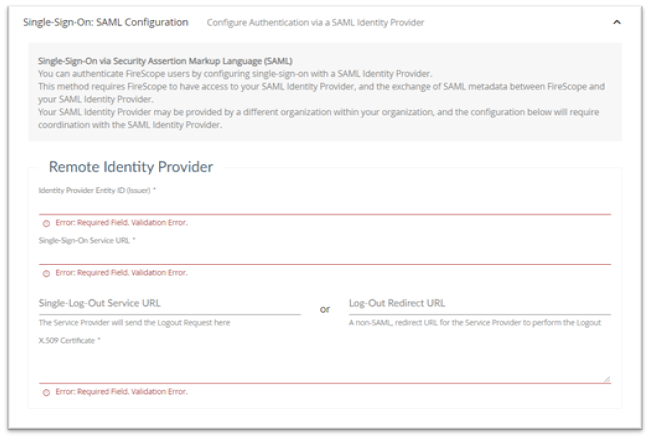
Remote Identity Provider: complete this section if appropriate
- Identity Provider Entity ID (Issuer): This information must be provided by your Remote Identity Provider. Coordinate SAML configuration with your Remote Identity Provider.
- Single-Sign-On Service URL: URL target of the IdP where the SP will send the Authentication Request Message
- Single-Log-Out Service URL: or Log-Out Redirect URL: URL where the SP will perform a simple non-SAML redirect.
- X.509 Certificate: IdP public certificate used in verifying signed SAML responses
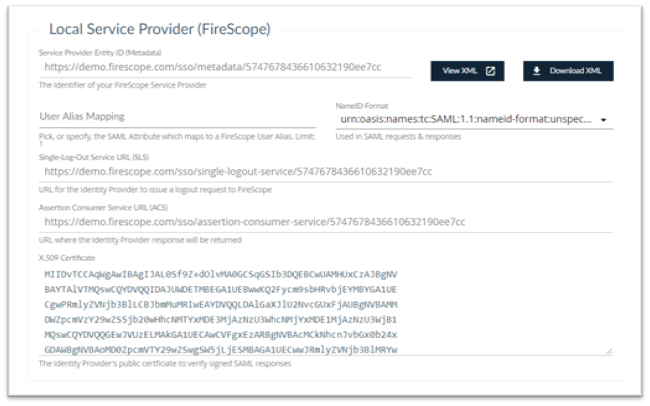
- Local Service Provider: (FireScope)
- Service Provider ID (Metadata): Click Download XML to download the appropriate XML details.
- User Alias Mapping: Click and select the appropriate mapping
- NameID Format: Click and select the appropriate NameID Format
- Single Log-Out Service: URL for the Identity Provider to issue a logout request to FireScope
- Assertion Consumer Service URL (ACS): Displays the ACS URL.
- X.509 Certificate: IdP public certificate used in verifying signed SAML responses
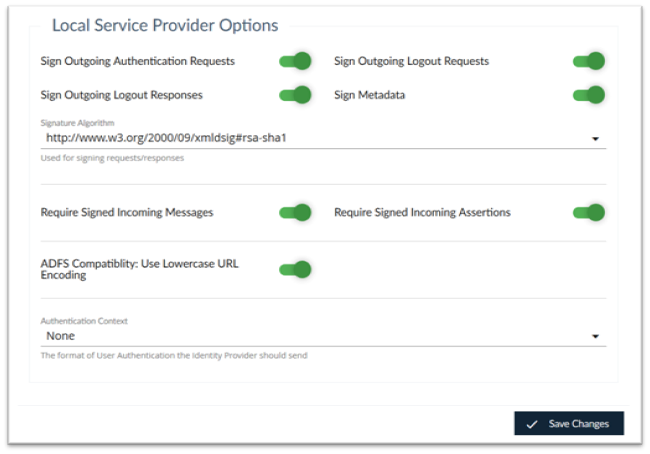
Local Service Provider Options
This section has additional SAML configuration which must match your Remote Identity Provider configuration. Coordinate SAML configuration with your Remote Identity Provider.