ServiceNow Integration
Overview
This article describes the required ServiceNow plugins and roles necessary for the integration to function properly: Activate the following plugins with the help of ServiceNow instance administrator
- Integration – Common Components (com.snc.integration.common)
- ECC Queue Retry Policy (com.glideapp.ecc_retry_policy)
CMDB Outbound to ServiceNow
Outbound – Creating CIs into ServiceNow CMDB with linkage to actively monitored CIs in SDDM will provide the 360° view to your IT assets. Use filtering and mapping rules to select and target your CMDB. Enable connectivity between SDDM and your ServiceNow instance.
- Select CIs and Service Groups for synchronization.
- Create filter and mapping rules to create CIs into common CMDB data type definitions in ServiceNow.
- Review and commit from your outbound staging view.
Before You Begin
Before you enable the CMDB integration feature in SDDM, review the data in your ServiceNow configuration. SDDM provides customizable filtering rules that allow you to configure the CIs in SDDM successfully. These filtering rules can use common Attributes such as IP address, DNS domain, department, category, or any custom fields you enter to identify the CIs for proper configuration. Since CI synchronization and filtering are processed similarly to batch federation, it is a good idea to review the CMDB CIs and their Attributes prior to updating your filtering rules. For example, make sure all the CIs you intend to monitor have the correct IP address values in the CMDB. Once these CIs are synchronized into SDDM, the IP address, as well as some other Attributes, can only be updated through the CMDB.
Review this checklist above prior to configuring your integration and predetermine your CI mapping and data collection methods available to your SDDM. Verify permissions required for ServiceNow access as well as your device access for performance monitoring.
CI Configuration
Once your CMDB integration is enabled and active, you will find your CMDB CIs created, linked, and fully functional in SDDM. To maintain configuration control from a single source, you can only update (and delete) the main properties of these CIs (name, IP Address, Serial Number, Contact, etc.) in CMDB. Continuous synchronization will update SDDM accordingly.
Other than the main CI settings, you can configure the CI just like any other CI in SDDM. For example, if you did not use integration rules to apply Blueprints to CIs, you can still change Blueprint association from within SDDM to manage data collection. You can also take advantage of features such as Virtual Center Discovery where SDDM will automatically associate the virtual infrastructure found with CIs from your CMDB.
Throughout SDDM, you will find specialized displays and links associated with linked CIs that will display live data from CMDB. Utilize your CMDB management views in SDDM to view configuration and performance reports for the integrated CIs.
SDDM uses a CI’s IP (or DNS) as the unique key for matching an existing CI in SDDM to create an association to a CI from CMDB.
Service Groups
With the Business Service link enabled, SDDM creates, maintains, and mirrors Business Services from CMDB as Service Groups in SDDM.
You cannot edit or delete these Service Groups from SDDM, because their memberships are controlled by the relationships defined for the linked services in CMDB. However, you can create Policies and eventually SLAs in SDDM for these Service Groups to monitor and measure actual performance and availability metrics.
Configuring connection settings to ServiceNow CMDB
FireScope SDDM requires network connectivity to your ServiceNow instance to fetch the data necessary to perform synchronization and live data views.
Before You Begin
You must update your security settings to allow all outbound communications through to your ServiceNow environment. All of the following IPs must have network access to your ServiceNow instance:
- SDDM App servers
- SDDM Web servers
- Any future servers enabled for your SDDM deployment
Authenticated accounts in ServiceNow must have access to all CIs (to be synchronized), including and extending CIs from the base type of cmdb_ci. Business service synchronization requires access to the cmdb_ci_service data type (listed as Business Services in your ServiceNow application) and the relationships forming the members of that service.
To configure connection settings to the ServiceNow CMDB: Log in to FireScope SDDM as a FireScope or Configuration Administrator.
- Click Administration > Federation and Integration > ServiceNow and the ServiceNow CMDB Management page will be displayed.
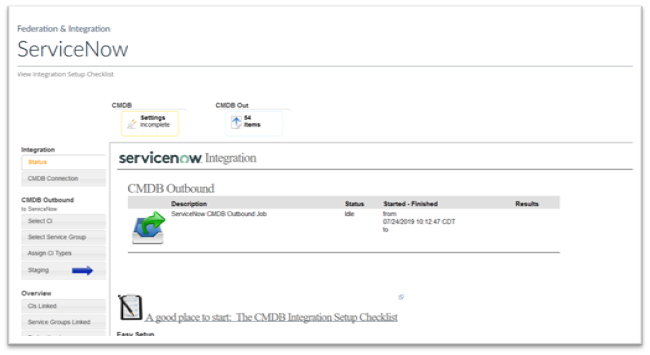
- In the left-hand menu, click on CMDB Connection and the connection settings page will be displayed.

- Connection: Enter the URL for ServiceNow Instance.
- Authentication: Enter the username and password
- Browser Quick Link URL: Provide the URL to your ServiceNow instance to open a new browser view of the CI by ID. For example, enter “https://instancename/nav_to.do?uri=cmdb_ci.do?sys_id=“ We will add the CI sys_id to the link to view a specific CI. See http://wiki.servicenow.com/index.php?Title=Navigating_by_URL for more information. Note: You will have to authenticate with CMDB to view the browser page.
- Summary Fields to Display: Enter a list (comma separated) of field identifiers, for a summary view of the CI to be deployed in FireScope. Leave empty to NOT get summary information from your ServiceNow instance.See http://wiki.servicenow.com/index.php?Title=JSON_Web_Service for information on how to access and display default and custom fields from a CI.
- Click Save.
CIs and Service Groups Selection
Outbound CMDB
- Select CI
- Select Service Group
- Assign CI Type
Select CI
Choose CIs by either selecting available CIs directly or choose Logical Groups. All CIs within selected Logical Groups will be evaluated on each outbound synchronization for CIs that are not yet linked. If you have numerous CIs in your system, it may be easier to organize them into Logical Groups prior to selecting them for export.
- In the left-hand menu, click on Select CI and the Select CI page will be displayed.

- Configuration Items:
- Select the CI to Export from the Available column and click on the Add button.
- Selected to Export box shows a list of Current CI’s you have selected to export into ServiceNow.
- Synchronized CI’s : CI’s that have been linked to ServiceNow
- Logical Groups: Here you can view and select Logical Groups to export into ServiceNow.
- Available: box shows a list of Logical Groups to export into ServiceNow.
- Select Logical Group and click on the Add button.
Note: All CIs in the selected group will be exported - Selected to Evaluate: box shows a list of Current Logical Groups you have selected to export into ServiceNow.
- Click on the Save button.
Select Service Group
Choose Service Groups to create as Business Services in ServiceNow. By selecting a Service Group, the CIs and a corresponding Business Service will be created in ServiceNow with some dependency information. The relationship between the CIs and the Business Service will correspond to their membership in SPM.
If you update members of a Service Group, by adding either Logical Groups or CIs, select the Service Group again to re-evaluate for newly added CIs. Outbound staging preview should reveal any additional CIs found.
- In the left-hand menu, click on Select Service Group and the Service Group page will be displayed.
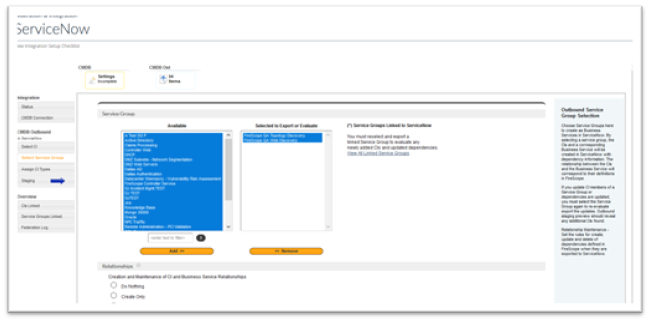
- Service Group
- Available: Select Service Group from the Available CIs box to export into ServiceNow.
- Selected to Export or Evaluate: box shows the list of CIs selected to export to ServiceNow.
- Service Group Linked to ServiceNow: shows a lists of already synced Service Groups.
- Relationships
- Make a selection on how you want to create and maintain CI and Business Service Relationships
- Click on the Save button.
Assign CI Type
Note: Requires successful retrieval of CI Types information from ServiceNow.
Use filters to identify and select basic ServiceNow CI types to be assigned to CIs as they are created during outbound synchronization. (Verify that the target types are defined in your ServiceNow CMDB.) These CIs will appear as the assigned types in your CMDB model then as administrators, you can reassign CIs manually after creation.
Example:
- Filter = “os” LIKE “linux”
- Action = CI TYPE= “ConfigServer”
The default assignment will be used for all selected CIs that does not meet your other filters.
In the left-hand menu, click on Assign CI Types and the Assign CI Types page will be displayed.
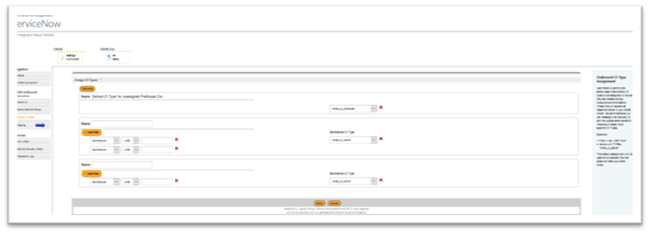
- Name: You can name the CI type filter anything you want for example Windows
- Add Filter: For the filter you can select many different types of ways to filter what you want the CI type to be assigned as. For example: you want to get all CIs that are windows so you would use: OS LIKE Windows
- ServiceNow CI Type: This is the ServiceNow CI type you want to assign to the results of the filter
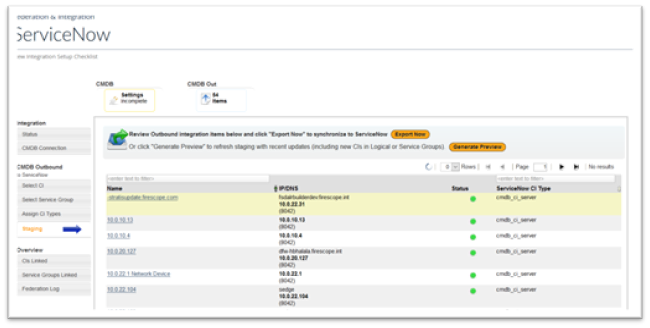
Staging
Staging gives you an opportunity to:
- Review Outbound integration items.
- Acknowledge and approve applying the changes from SDDM to ServiceNow.
- Refresh staging with recent updates (including new CIs or Service Groups).
In the left-hand menu, click on Staging. The Staging page will be displayed.
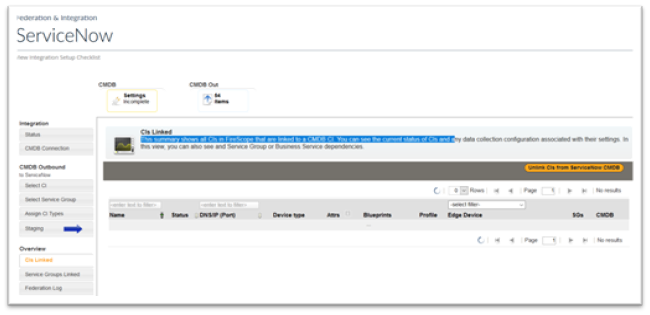
CIs Linked
CIs Linked shows a summary of all CIs in SDDM that are linked to a CMDB CI. It provides a high-level view of the correct and incorrect configuration committed by your sync rules. You can see the current status of Attributes associated with each CI. You can also view the Blueprint associations and if Network Discovery was used to detect the CI.
In the left-hand menu, click on CI’s Linked and the CI’s Linked page will be displayed.
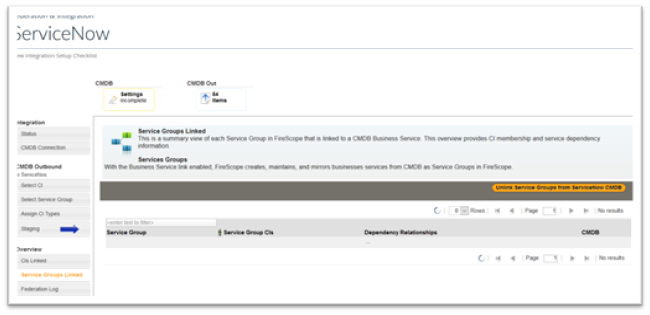
Service Groups Linked
Service Groups Linked is a summary view of each Service Group in SDDM that is linked to a CMDB Business Service. This overview provides CI membership information defined for that service.
In the left-hand menu, click on Service Groups Linked and the Service Groups Linked page will be displayed.
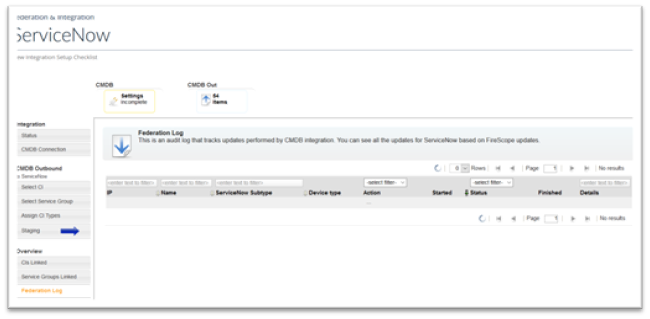
Federation Log
This is an audit log that tracks updates performed by CMDB integration. You can see all the updates from ServiceNow that affected your SDDM configuration. This is especially useful if you have CMDB integration on automatic mode.
In the left-hand menu, click on Federation Log and the Federation Log page will be displayed.