Cherwell Integration
Overview
CMDB Integration is a feature which facilitates CMDB population and updates in a few easy steps. You can create CIs in the Cherwell CMDB with linkage to actively monitored CIs in SDDM, which will provide an updated view to your IT assets. Service Groups can also be federated into your CMDB with relevant dependency information between CIs and the services they support.
CMDB Preparation
Before you enable the CMDB integration feature in SDDM, review the data in your Cherwell configuration. SDDM provides customizable filtering rules that allow you to configure the CIs in SDDM successfully. These filtering rules can use common Attributes such as IP address, DNS domain, department, category, or any custom fields you enter to identify the CIs for proper configuration. Since CI synchronization and filtering are processed similarly to batch federation, it is a good idea to review the CMDB CIs and their Attributes prior to updating your filtering rules. For example, make sure all the CIs you intend to monitor have the correct IP address values in the CMDB. Once these CIs are synchronized into SDDM, the IP address, as well as some other Attributes, can only be updated through the CMDB.
Prerequisites
- Cherwell Service Management version 8.00 or greater.
- Admin login credentials to Cherwell.
- Cherwell Service Management (CSM) Administrator Tool & desktop client
- To download both visit: http://<cherwell-instance>/cherwellautodeploy/
- FireScope mApp Cherwell Integration plugin.
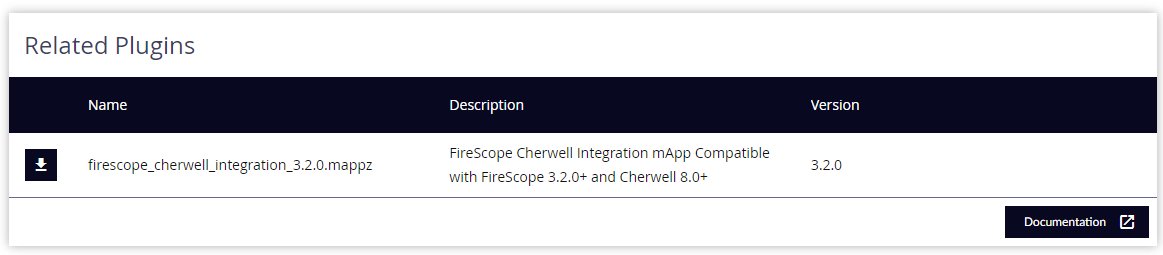
- Download from your Firescope Instance. Integration Manager> Cherwell Settings > Connection tab. Select the mappz file from the "Related Plugins" section.
- FireScope SDDM with Admin credentials
- Since Cherwell is completely customizable, in order for FireScope to integrate properly a certain minimum set of configuration must be present:
- Cherwell business objects and their minimum set of fields:
- Configuration Item
- Cherwell relationships:
- CI links Downstream CIs
- CI links Upstream CIs
- Configuration Item Group Links Configuration Item Group
- Cherwell business objects and their minimum set of fields:
Backup
Perform a Cherwell backup before making any changes to the system. If the mApp install fails for any reason, the Cherwell System Restore Tool can be used to revert the system to this backup state.# Navigate to Database > Export Data
- Choose export entire system and export all data, select an output file and press OK.
Users
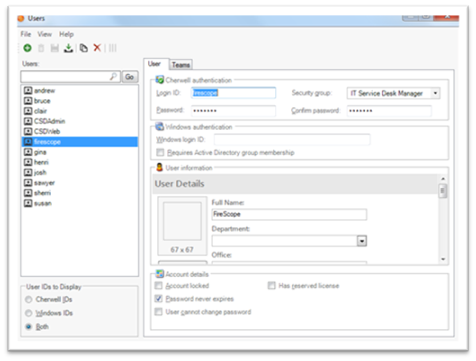
A Cherwell user needs to be created for FireScope to use when connecting to Cherwell’s remote API. Since each system is unique, users should be set up on-site in conjunction with the Cherwell Administrator. It is recommended to create a user with the security group IT Service Desk Manager to provide the appropriate permissions out of the box. To create a User, in the CSM Administrator Tool:# Navigate to Security > Edit Users > Create new user
- Create a user named Firescope as pictured below and Save.
- Enter the user & password on the Cherwell CMDB page in FireScope SDDM.
Rest API Configuration
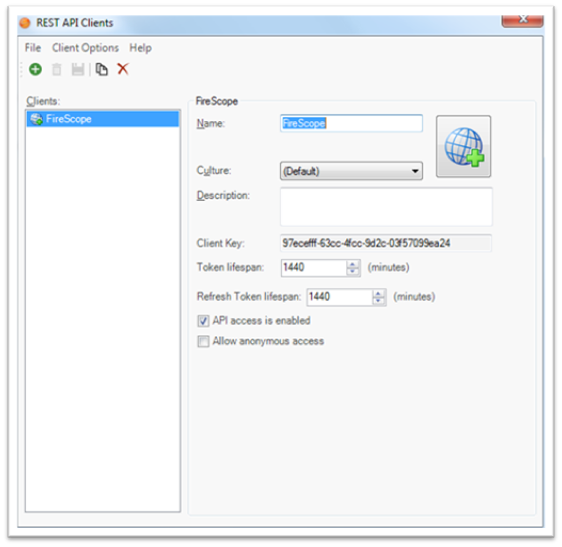
A client token for FireScope must be generated in the CSM Admin Tool:# Navigate to Security > Edit REST API client settings
- Create a Rest client named fireScope as pictured below and save.
- Note the token lifespan can be changed depending upon security needs.
- Enter the client key on the Cherwell CMDB connection pages in FireScope SDDM.
Install the FireScope Mergeable App (mApp) into Cherwell
In order for FireScope to integrate with Cherwell Service Management, the FireScope mApp must first be installed and configured in Cherwell. The FireScope mApp makes the necessary modifications to Cherwell Service Management to support the ability to import CMDB information from FireScope. After configuring Cherwell, make note of the user and system information that you setup below to configure the connectivity information in FireScope as part of the "Connectivity" step.
To apply the FireScope mApp in the CSM Administrator Tool:
- Navigate to mApps > Apply a mApp
- Open the FireScope mApp file.
- Ensure CMDB Integration is enabled in the wizard.
- Progress through the install wizard without changing any other defaults until it finishes.
- On the Blueprint page, confirm changes if needed and choose Publish Blueprint.
- Leave the default options and click Publish.
- Select a file to store a rollback Blueprint.
- It will scan for errors and if no errors are found click OK to complete.
Connectivity
Firescope SDDM requires network connectivity to your Cherwell instance to fetch the data necessary to perform synchronization and live data views. You must update your security settings to allow all outbound communications through to your Cherwell environment.
All SDDM servers (App servers and Web servers) must have access to Cherwell instance.
Note: Any future servers enabled for your SDDM deployment will require access as well.
Authenticated accounts in Cherwell require access to all CIs (to be synchronized),including and extending CIs from the base type of Configuration Item. Business service synchronization requires access to all Business Services (to be synchronized) and the relationships forming the members of that service (reference Cherwell Administrator application, Security category: User settings, Security group Admin and Rest API Settings).
Enable connectivity between FireScope SDDM and your Cherwell instance
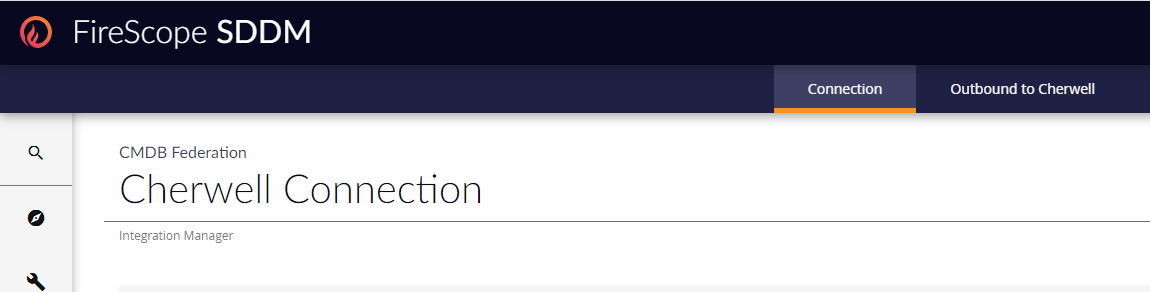
- Click on Integration Manager > Cherwell > Settings > Connection tab.

- Connection Method: Select "API"
- Connection URI:
- Enter the URL used to access your Cherwell instance (include http:// or https:// and port, if required )
- Authentication:
- Username: Enter username used to access your Cherwell instance.
- Password: Enter password used to access your Cherwell instance.
- Client Key: Enter Client Key found in your Cherwell Instance. As created in the Cherwell Administrator application as part of the prerequisites.
- Connect & Fetch Cherwell Configuration Item Types on save: Make sure that the switch is toggled to the green ON position. On save, SDDM will connect and retrieve Cherwell CI Types and attributes for mapping options which are required for continuing with export.
Configuration
In the "Outbound to Cherwell" tab can be found nine expandable sections that provide an orderly method to set up rules, mappings and methods to select items to be federated to Cherwell.
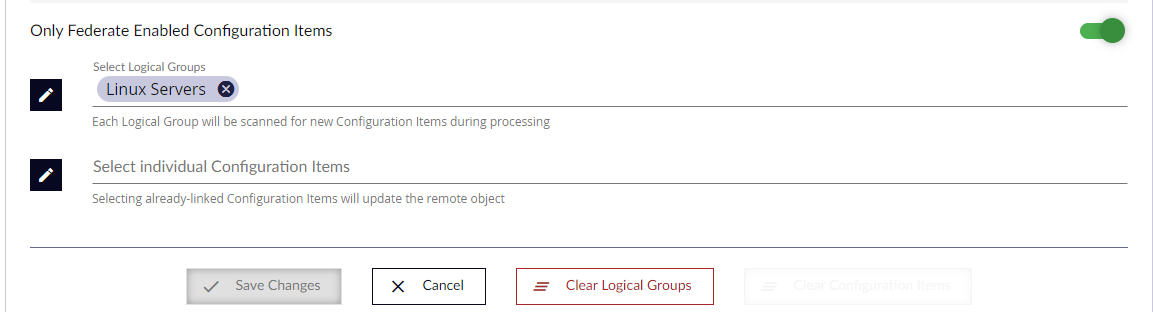
Configuration Item Selection
Choose CIs by either selecting available CIs directly or choose Logical Groups. All CIs within selected Logical Groups will be evaluated on each outbound synchronization for CIs that are not yet linked. If you have numerous CIs in your system, it may be easier to organize them into Logical Groups prior to selecting them for export.
- Expand the Configuration Item Selection section and the outbound CI selection page will be displayed.
- Only Federate Enabled Configuration Items: This toggle switch controls whether unmonitored CIs will appear in the federation selection lists.
- Select Logical Groups: Here you can view and select Logical Groups to export into Cherwell.
- Select the edit icon to display a list of Logical Groups to export into Cherwell.
- Checking the box next to a group name automatically adds it to the selection list.
Note: All CIs in the selected group will be exported
- Select Individual Configuration Items: As with Logical Groups, click the edit icon to view and select individual CI records to federate.
- Click on "Save Changes" if you want to retain your settings and move on to the next step.
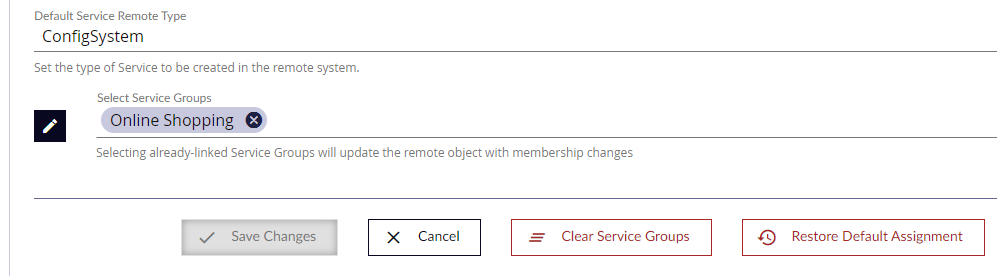
Service Group Selection
Back in the Outbound to Cherwell function list, expand "Service Group Selection". Choose Service Groups here to create as Business Services in Cherwell. By selecting a Service Group, the CIs and a corresponding Business Service will be created in Cherwell with some dependency information. The relationship between the CIs and the Business Service will correspond to their membership in SDDM.
If, at any time, you update members of a Service Group, by adding either Logical Groups or CIs, select the Service Group again to re-evaluate for newly added CIs. Outbound staging preview should reveal any additional CIs found.
- Default Service Remote Type: Selecting a Cherwell CIType here creates a new CI of that type in the CMDB when a FireScope Service Group is federated.
- Under Select Service Groups, use the edit icon to select groups to federate to the CMDB.
- Click "Save Changes" to retain your settings and move on to the next step.
Remote Type Assignments
Note: Requires successful retrieval of CI Types information from Cherwell.
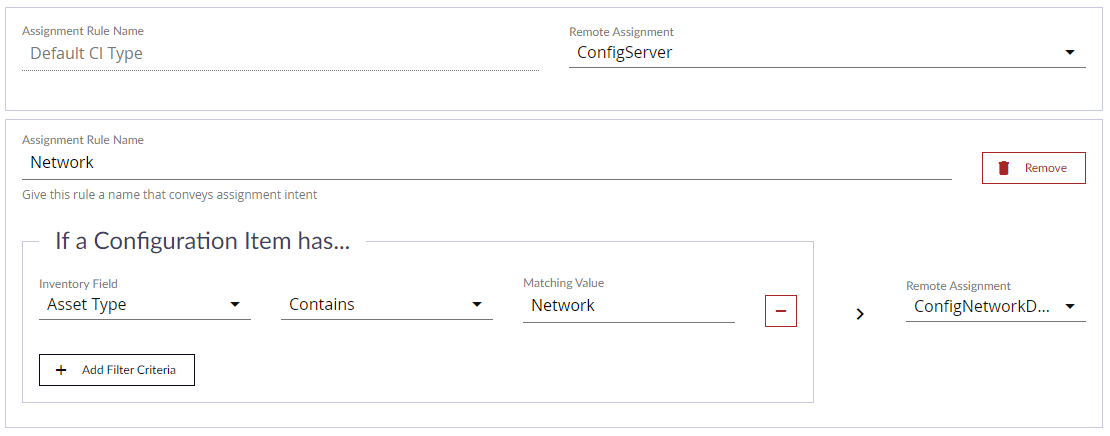
This section allows you to determine how FireScope CIs are created in Cherwell, based on the FireScope DeviceType. Use filters to identify and select basic Cherwell CI types to be assigned to CIs as they are created during outbound synchronization.
- Refresh RemoteTypes: This button retrieves the latest CI Types and related fields from Cherwell.
- Default CI Type: The CIType to apply if no other rule fits.
- Remote Assignment: From the dropdown, select a Cherwell CIType to create based on this rule.
Click the "Add Assignment Rule" button at the bottom of the existing rules when you are ready to add a new rule.
- Assignment Rule Name: This could be related to the FireScope devicetype, the Cherwell CIType or any other way to wish to label it.
- Inventory Field: The first part of the rule criteria is to select a FireScope CI field on which to base the rule.
- Operation: Choose from between "Contains", "Does Not Contain", "Is Empty", "Is Not Empty" as an option for how to judge the value in the next field.
- Matching Value: One possible value of the selected inventory field that would qualify it as the selected Remote Assignment CIType.
- Remote Assignment: If the preceding expression proves to be true, this is the Cherwell CIType that should be applied to the new CI once federated.
- Add Filter Criteria: You can add multiple expression lines to any rule to create more sophisticated assignment criteria.
Restore Default Assignments: Resets [Assign Service Type], [Map CI Information] and [CI Matching Rules] with defaults.
Configuration Item Field Mappings
Note: Requires successful retrieval of CI Types information from Cherwell.
For each CIType found in Cherwell, SDDM will import the fields for that CIType and make them available for mapping. You can map common Attributes such as name, operating system, hardware, vendor, contact information, serial number, and mac address to the associated Cherwell fields for quick access. Some field mappings are required for matching CIs in both systems.
You can use the default mapping or update it to match your organization’s CMDB usage standards. You can make multiple assignments any field, and during synchronization, SDDM will search for the best match by data availability.
In the Outbound to Cherwell tab, click on Configuration Item Field Mappings. Map CI Information page will be displayed.
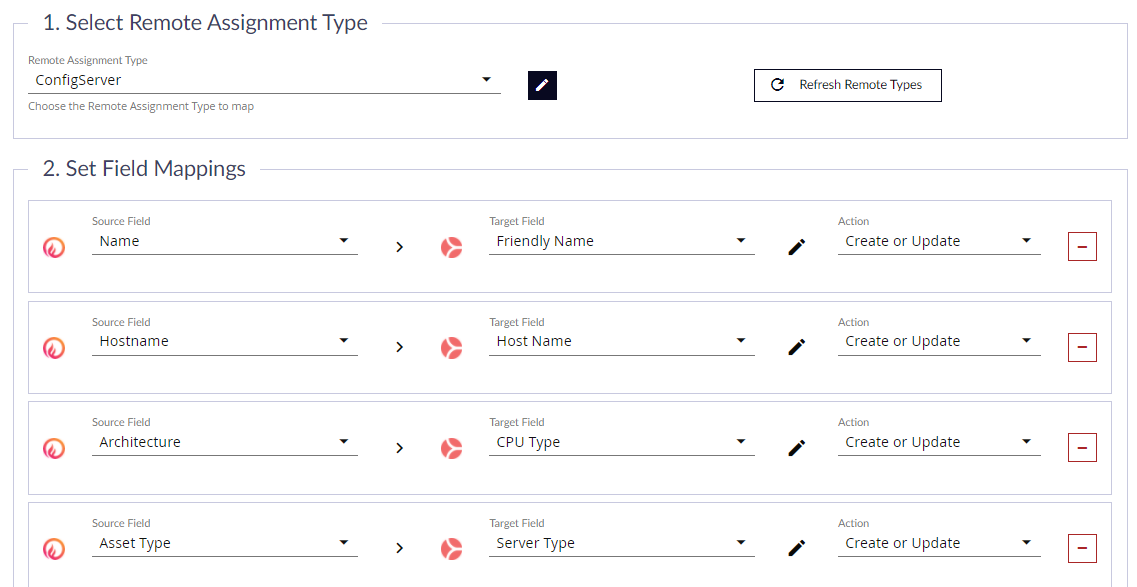
- Refresh RemoteTypes: Clicking this button will retrieve CI Types and Attributes from Cherwell.
- Select Remote Assignment Type: Select CIType for which you be defining field mapping from SDDM into Cherwell.
- Set Field Mappings: Lists the Default mapping of the selected CItype.
- Source Field: The FireScope field to map.
- Target Field: The Cherwell field to be populated.
- Action: For this mapping, the action dictates whether the target field will be overwritten or left alone.
- Click on the Save Changes button to save your settings and move on to the next section.
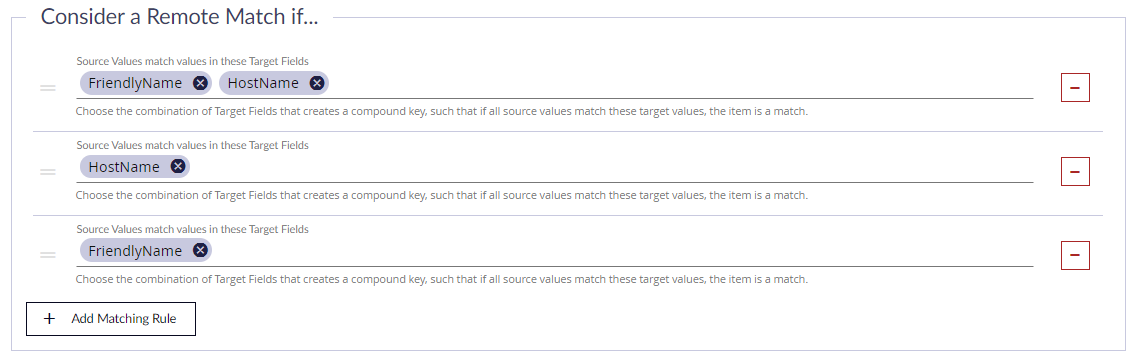
Configuration Item Matching Rules
Matching rules define whether a target CI record gets created or updated. If any existing CMDB record matches a CI from FireScope using any of the matching criteria, that existing record will be updated. If the first set of fields do not match, the following sets will be tried in order. If no matches are found, a new CMDB record will be created from the FIreScope CI data.
Synchronization Settings
This section controls the overall behavior of how the Cherwell CMDB is updated when changes are detected. All scans are based on deltas (updates) since the last change.
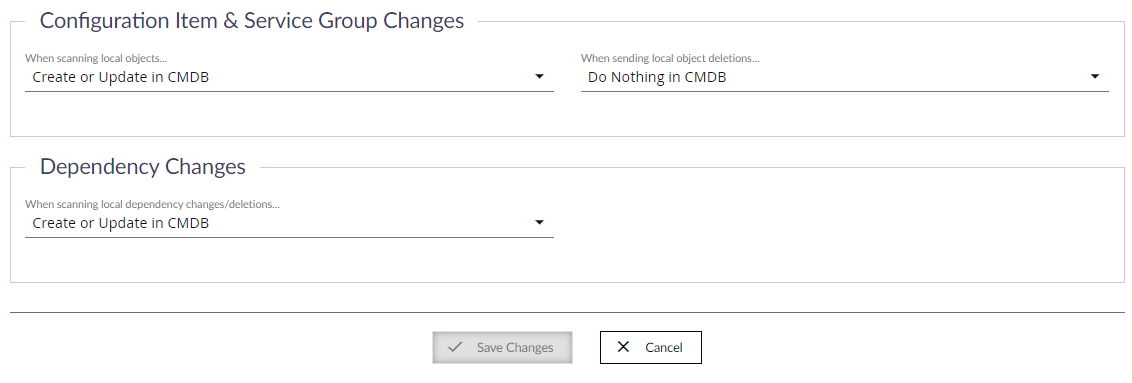
Configuration Item & Service Group Changes
There are several options of what can happen to Cherwell CIs when CI records are created or updated in SDDM:
- Do Nothing in CMDB – No change will be made in Cherwell.
- Create if Missing in CMDB – The CI or Business Service will be created only.
- Create or Update in CMDB – The CI or Business Service will be created and/or replaced.
There are several options of what can done with relationship records in Cherwell when dependency records are created or updated in SDDM:
- Do Nothing in CMDB – No change will be made in Cherwell.
- Create if Missing in CMDB – The CI or Business Service will be created only.
- Create or Update in CMDB – The CI or Business Service will be created and/or replaced.
Deleted CIs and Service Groups
CIs or Service Groups deleted in SDDM will have no effect on the relative CIs in Cherwell. CI deletion from the CMDB must be performed manually to ensure CMDB integrity.
Preview and Send Outbound Job
This section controls staging, or the opportunity to:
- Review Outbound integration items.
- Acknowledge, approve and apply the changes from SDDM to Cherwell.
- Refresh the preview with recent updates (including new CIs or Service Groups).

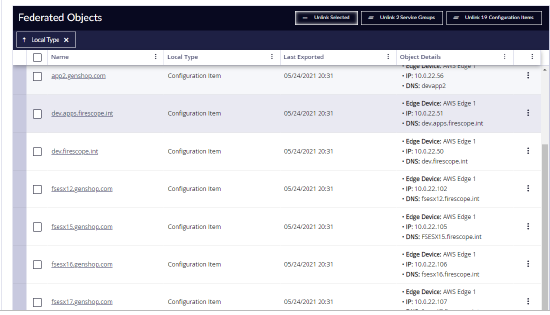
View Federated Objects
CIs Linked shows a summary of all CIs in SDDM that have been previously linked to a CMDB CI. It provides a high level view of the correct and incorrect configuration committed by your sync rules. You can see the current status of Attributes associated with each CI. You can also view the Blueprint associations and if Network Discovery was used to detect the CI.
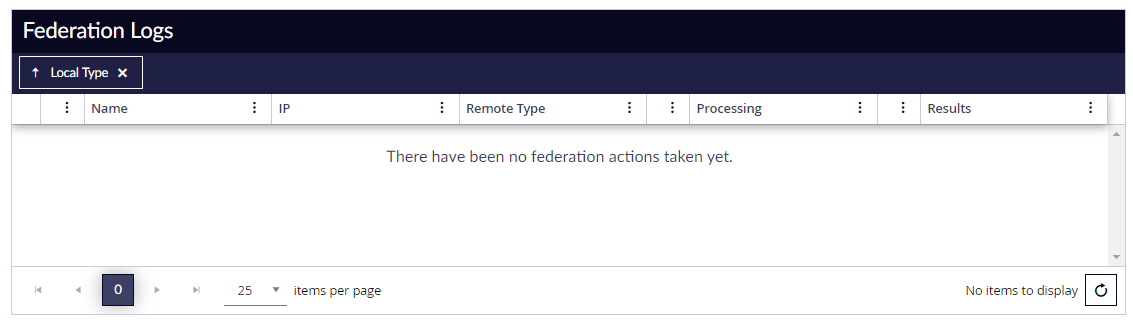
View Federation Logs
This is an audit log that tracks updates performed by CMDB integration. You can see all the updates from Cherwell that affected your SDDM configuration.