Admin Guide Part III: Admin Tab
Admin Tab
The Admin Tab allows the Administrator to configure some of the core settings of Silverback installation like:
- Customize the Look and feel of specific elements, such as the Self Service Portal or the App Portal icon.
- Create and configure users and give those individual users different levels of access to the Silverback Management Console.
- Configure the Device Types Silverback is aware of.
- Capture a list of Serial Numbers and Usernames associated with them.
- Setup and Enable Advanced System Settings.
- View Device or Server Logging Information.
- View Important License Information.
- Enable connections to Android Enterprise, Apple Device Enrollment Program, Apple Volume Purchase Program and Windows Autopilot.
- Add a Custom Authentication Provider to login with your Azure Active Directory Identities.
Content
Android Enterprise
With Android Enterprise, Google offers a technology platform to manage corporate and personal owned devices, settings and applications. In this section, Android Enterprise can be integrated into Silverback and will provide you afterwards information about your registered enterprise. Please review the Android Enterprise Integration Guide for additional information about the benefits and key terms for Android Enterprise.
| Setting | Setting | Description |
|---|---|---|
| Enabled | Enabled or Disabled | Enables or Disables Android Enterprise. |
| Automatic Activation | Activate | Starts the automatic integration into Android Enterprise. |
| Manual Activation | Choose File | Upload here your Android Enterprise activation token. |
| Enterprise ID | e.g. LC04f8o5j9 | Your listed Organization or Enterprise ID for Android Enterprise. Will be created automatically during Activation. |
| Service Account Email | e.g. w841714cc9a537f667abad359d7810@pfwp-...iceaccount.com | Your listed Service Account Email for Android Enterprise. Will be created automatically during Activation. |
| Google Account | e.g. tim.tober@gmail.com | Displays the used Google account during activation process. |
App Portal
The App portal offers users access to enterprise applications and third-party applications via an web clip icon on iOS, iPadOS and Android devices. Administrators can decide which available App Portal applications will be visible and installable for users on a Tag based level. If the access to public app stores will be disabled for users through restrictions, the App Portal on users devices represents the only available source for applications, also named as your organizations or corporate app store. On Android Enterprise, the App Portal should be used only to provide enterprise applications to corporate owned devices, as the Web Clip approach has shifted to Managed Play.
In this section a customization of the App Portal can be applied to all managed devices with the following options:
| Setting | Options | Description |
|---|---|---|
| App Portal Label | e.g Imagoverum | Customize the Header Text within the Silverback App Portal Website. |
| App Portal Icon Text | e.g. Company App Store | Customize the Shortcut name associated with the App Portal. |
| Precomposed Icon | Enabled or Disabled | Adds the gloss effect to the icon when displaying on the device. |
| Full Screen | Enabled or Disabled | Makes the App Portal appear Full Screen in Safari. (*iOS only) |
| Icon | Choose File |
Upload your preferred icon in *.png format. The file will be optimized to 59x60 pixels. |
Authentication Provider
Please check our Identity Provider Guide for Integration of a SAML2 based Authentication Provider.
Authentication Provider Settings
Most of the Authentication Provider Settings will be filled automatically after importing the Identity Providers Metadata. Additionally, you can configure the visibility settings for the Self Service Portal and Management Console login.
| Setting | Options | Description |
|---|---|---|
| Direct Forwarding | Enabled or Disabled | Enables a direct forwarding to the IDP on the Self Service Portal. User will not need to click on the Authentication Provider button. |
| Show on Login Page | Enabled or Disabled | With this checkbox a second button appears on each login page. Configuration of the button takes place in the Authentication Provider Button Settings area on this site. |
| Disable classic sign-in | Enabled or Disabled | By enabling users will only have the possibility to choose the Authentication Provider button. |
| Service Provider | e.g. silverback.imagoverum.com | Contains the unique identifier of the service provider (Silverback) and will be filled automatically when you import the Metadata URL or file. |
| X.509 Certificate Thumbprint | e.g. 5C547048DC931BFF488324388A82B3F696010703 | Contains the certificate thumbprint for signing the payload and the assertion. This field will be filled automatically when you import the Metadata URL or file. |
| Identity Provider | e.g. https://accounts.matrix42.com | Contains the unique identifier of your identity provider (e.g. MyWorkspace, Azure Active Directory or Ping Identity). This field will be filled automatically when you import the Metadata URL or file. |
| Saml SSO Redirect URL | e.g. https://accounts.matrix42.com/issue/...31c3/saml2/sso | This is the URL where Silverback will send the SAML2 requests. This field will be filled automatically when you import the Metadata URL or file. |
| Saml SLO Redirect URL | e.g. https://accounts.matrix42.com/issue/saml2/slo | This is the URL where Silverback will send the SAML2 Logout requests. This field will be filled automatically when you import the Metadata URL or file. |
| Dynamic User Creation | Enabled or Disabled | By Enabling User Creation Silverback will create for each SAML2-based login a local user account. This enables you to configure all authorized users within your Identity Provider. |
Authentication Provider Button Settings
This sections covers the customization for the Authentication Provider Button for the Self Service Portal and the Management Console login.
| Setting | Options | Description |
|---|---|---|
| Title | e.g. MyWorkspace | Defines the text content of the additional button on Administrator and Self Service Portal Login. |
| Icon | Choose File | Defines the icon which will be shown left of the Title. Supported file types are *.jpg, *.png and *gif. |
| Color | Pick your color | Defines the background color. It enables you to easily pick a basic or configure a custom color. |
Backup Policy
Administrators have the ability to allow or deny iOS and iPadOS devices to be restored from backup and maintain access to corporate information. If this setting is disabled and when a managed or blocked device is restored from backup, Silverback will detect the restoring and will send a Delete Business Data command to the device which ensures to remove all corporate data. Unmanaged devices are automatically removed after restoring the backup, regardless of this setting. Please refer to Backup Policy for iOS and iPadOS devices for additional information, valid use-cases and other mechanism to prevent backups.
| Setting | Options | Description |
|---|---|---|
| Allow Restore from Backup | Enabled or Disabled | Will prevent or allow that users can restore backups with their MDM profile while the device was managed or blocked at the backup creation point. |
Certificates
This section provides you important information about your Signing Certificate, your Apple Push Notification Service certificate and the Companion Push Notification Service certificate. Ensure to renew your certificates to avoid any service interruptions according to the expiration displayed period.
Signing Certificate
Displays the Expiration Date of the Profile Signing Certificate
| Certificate | Expires | Description |
|---|---|---|
| Common Name | e.g. *.imagoverum.com | Display the common certificate name used as Signing certificate. |
| Expires | e.g. 01 July 2020 | Display the expiration date of your SSL certificate which is linked under Settings Admin > MDM Payload. |
| Thumbprint | e.g. C38565344A68ECC9A3515EE5D2B2722AD7C3C7B | Displays the certificate thumbprint. |
Apple Push Notification Service
An Apple Push Notification Service (APNS) certificate is required for Silverback to manage iOS, iPadOS, tvOS and macOS devices. After you add the certificate to Silverback, your users can enroll their devices. When a push certificate expires, you must renew it. When renewing, make sure to use the same Apple ID that you used when you first created the push certificate.
- The creation process is listed in the following Guide: Getting Started - Apple Guide I : Basics
- To renew the certificate please check the following knowledge base article: APNS Renewal process
| Setting | Options | Description |
|---|---|---|
| Push Topic | e.g. com.apple.mgmt.External.10356f6a-8dda-40e5-89ff-47c537d76410 | Topic that Silverback listens to for push notifications. |
| Expires | e.g. 09/07/2020 10:14:04 AM | Certificate expiration date. |
| Thumbprint | e.g. C38565344A68ECC9A3515EE5D2B2722AD7C3C7B | Certificate thumbprint. |
| Request Certificate |
|
Generates a signed CSR for a new certificate. |
| Upload Existing Certificate |
|
Provides the ability to upload a new certificate. |
| Download copy |
|
Provide a copy of the current certificate with a generated password. |
Companion Push Notification Service for iOS & iPadOS
Companion Push Notification Service for iOS & iPadOS is the certificate used for Matrix42 Companion application on iOS or iPadOS devices to create or send push notifications. It will be provided and delivered with any Silverback installation. The certificate is valid for 1 year and will be replaced by a new one during Silverback updates. In the case that the certificate will expire and you are not able to update to a newer Silverback version, check the following knowledge base article: Companion Push Certificate Update
| Setting | Options | Description |
|---|---|---|
| App Identifier | com.matrix42.silverback.companion | Bundle ID for Matrix42 Companion app. |
| Expires | e.g. 02/01/2020 11:31:33 AM | Certificate expiration date. |
| Thumbprint | e.g. CB18565344A68ECC9A3515EE5D2B2722AD7C3C8C | Certificate thumbprint. |
| Upload Existing Certificate |
|
Provides the ability to upload a new certificate. |
| Download copy |
|
Provide a copy of the current certificate with a generated password. |
Cloud Connectors
Cloud Connectors are used for customers that wants to connect a cloud instance from an On-Premise network via HTTPS to use LDAP, Certification Authority or Exchange Protection services. This section displays connected and active Cloud Connectors with additional information like the IP Address, the last connection time and the Client Machine Name.
| Setting | Information | Description |
|---|---|---|
| ID | e.g. 1 | Displays the Cloud Connector ID. |
| IP Address | e.g. 65.50.150.90 | Displays the Connected IP Address. |
| Version | e.g. 21.0.3.63 | Displays the installed and used Cloud Connector version. |
| Client Machine Name | e.g. Server-001 | Displays the Machine Name where Cloud Connector is installed. |
| Last Seen | e.g. 17/09/2018 18:37 | Displays the Last connection time. |
Companion
This section offers configuration for the Companion client on devices. Mostly this section is designed to enable the Device Modification Detection, Notifications and the configuration whether users are able to unenroll the device from the application. Please note that the Companion application is not required for the Device Management itself on iOS and iPadOS devices as these platforms are supporting a clientless management with an OS built-in MDM client. For iOS and iPadOS, the Companion is mostly useful for having a jailbreak detection in place. In the past, this section was also used to upload the *.ipa file for the Companion application on iOS and iPadOS. This option has been deprecated as the Companion can be distributed in the meanwhile as an App Store app or an Volume Purchase Program application.
| Setting | iPhone, iPad, iPod | Android, Samsung Knox | Description |
|---|---|---|---|
| Device Modification Detection |
|
|
Enables Jailbreak or Root Detection and actions taken after detection. |
| Alert Administrators | Enabled or Disabled | Enabled or Disabled | If enabled, Administrators will receive an information if a Device Modification has been detected. |
| Allow user to unenroll | Not available | Enabled or Disabled | Will activate or deactivate the unenroll functionality inside Companion. We recommend to review for this purpose additionally the following Knowledge Base article Prevent unenrollments and factory wipe. |
| Notification Interval |
|
Not available | Defines how often the end user will receive a notice to launch Companion for an integrity check. |
| Grace Period |
|
Not available | The maximum allowable time a device has to perform an integrity check. |
| Grace Period Failure Action |
|
Not available | Action to be performed if grace period is exceeded. |
| Companion Client IPA File | Choose File | Not available | *Deprecated |
| Companion Client PLIST File | Choose File | Not available | *Deprecated |
| Allow key generation for Managed Devices | Enabled or Disabled | Not available | *Deprecated |
| Client visible in App Portal | Enabled or Disabled | Not available | If set to enabled, the Companion client will be displayed in the App Portal on users devices. |
| Check for Companion Updates | Not available | *Deprecated |
Console Permissions
Console Permissions allows to configure several access and device privacy settings.
Access
In addition to the normal permissions granted by the role based access, some additional settings can be configured from this section.
| Setting | Target | Option | Description |
|---|---|---|---|
| Managed Applications | Super Helpdesk | Enabled or Disabled | When enabled, it provides the Super Helpdesk role the ability to Manage Applications. |
| Assign Tags | Super Helpdesk | Enabled or Disabled | When enabled, it provides the Super Helpdesk role the ability to Assign Tags to devices. |
| Create Pending Enrollments from Console | Require LDAP user | Enabled or Disabled | When enabled, local user accounts cannot be used to authorize pending enrollments. An LDAP account must be used. |
Device Privacy
Silverback allows to control visibility of applications installed on devices and control the permissions for administrative users to view applications lists and perform factory resets.
| Setting | Options | Descriptions |
|---|---|---|
| Privacy | ||
| Enable Application List Privacy | Enabled or Disabled | When enabled, you can configure that e.g., not managed apps are not visible for Administrators or Help Desk users in the device overview. This will increase privacy for end users. |
| Application List Privacy for Ownership Type |
|
Defines the scope for the application list privacy. If personal devices is selected, non managed applications will not be visible for devices flagged with a personal ownership. If Corporate and Personal is select, non managed application will not be visible for both Ownership types. |
| Minimum Role Allow to View Application List |
|
Defines which minimum role has the ability to view the installed application list on devices. If Helpdesk is selected, all three listed roles will have access. If Super Helpdesk is selected, the Super Helpdesk and Administrator role is eligible to view the non-managed application lists. |
| Permissions | ||
| Minimum Role to Factory Reset Corporate Devices |
|
Define which Silverback role has the ability to factory wipe corporate devices. When you select Super Helpdesk, then Super Helpdesk and Administrator will have the ability. |
Device Enrollment Program
Apple’s Device Enrollment Program can be managed from this section in the Admin Tab. The Device Enrollment Program allows you to have devices enroll into Silverback on first setup, rather than having the user navigate to the Silverback website after the out-of-the-box experience. Please review our Apple Deployment Programs Integration guides for further information.
Overview
The main page provides an overview of the status and information related to your Device Enrollment Program account. The organization and server information is displayed after a successful import of your token. The Account Overview section indicates how many devices are currently in your DEP account and how many are currently enrolled in Silverback.
Devices
The Devices section lists the devices in your DEP account and an associated username after enrollment. The table shows a list of all users in your DEP program, regardless of whether they are enrolled in Silverback. The list can also be exported by clicking the Export button. In addition, the devices overview offers additional actions to Assign Profiles and to disown devices to remove devices from your Device Enrollment Program. Please refer to Apple Deployment Programs III: Configure DEP in Silverback for additional information.
General Settings Section
The Settings section allows you to configure your integration with Apple’s DEP program and to determine the device behavior. Please refer to Apple Deployment Programs III: Configure DEP in Silverback for the full overview of settings.
Additional Profiles
With additional profiles you are able to assign specific profiles to specific devices. This will help as an example to configure the out-of-the-box experience for all iPhones in a different way as for iPads. Click new Profile to create a new profile and assign the profile in the Devices section. Please refer to Apple Deployment Programs III: Configure DEP in Silverback for additional information.
Logs
Clicking the Logs button will export a *.csv file of actions that have been performed specifically on the Device Enrollment Program. This covers changes made by administrators and also events that are related to the Silverback connection to Apple. The file will contain the following information: Log ID, Date, User Name, Action, Action Destination , Http Code, Http Text
Device Types
Each type of device can be mapped to a description for easy reading and categorization. By default, known device types are already mapped by Silverback. More device types can be added manually as they become available. If a device enrolls into the system and Silverback does not recognize its model number, the model number will be added to the system with a blank description, allowing the Administrator to define it later. In this case the new device model number will be listed in the Device Types Overview with a description as Unknown. By editing this model number, you can assign an appropriate Device Type and Description. Please refer to Missing Device Models: Overview and Missing Device Models: Add a new model for getting insights about device types and how to add or update new device models.
| Setting | Option | Description |
|---|---|---|
| Type | e.g. Samsung Knox | Defines the Operating System platform the the known device. |
| Model No. | e.g. SM-J530F | Each device models gets his Model number from the Hardware Vendor. In our example the Galaxy J5 could have more then 1 Model No. due to Market or region specific changes. |
| Description | e.g. Galaxy J5 | The description will be shown in Devices area as the "Model" to identify Device Names. |
| Edit |  |
Edit an existing device type mapping by clicking on the edit button. |
| Remove |  |
Remove a device type mapping by clicking on the remove button. |
Exchange Protection
Thi section represents the configuration for the Exchange Protection Integration.
| Setting | Options | Description |
|---|---|---|
| Exchange Protection | Enabled or Disabled | Enables the Exchange Protection. |
| Server Version |
|
Defines the used Exchange Server Version. |
| Server Address | e.g. http://eas.imagoverum.com/powershell/ | Endpoint to access for the Exchange Protection. |
| Username | e.g. IMAGOVERUM\silverback_exchange | Service Account for Access. |
| Password | e.g. Pa$$w0rd | Service Account Password. |
| Client Access Policy Name | e.g. Default | Corresponding to the default or created Client Access Policy on Exchange Server. |
| Auth Mechanism |
|
Used authentication mechanism to connect to the API. |
| Application (client) ID | e.g. e9e621e9-cc90-4b48-a9d4-43ee7e6c4e4b | Defines for the Modern Authentication the identifier of your registered application in your Azure Active Directory. |
| Organization Name | e.g. Imagoverum.onmicrosoft.com | Defines for the Modern Authentication your organization name that will be used for the authentication. Be sure to use your .onmicrosoft domain name. |
| Matching Criteria | e.g. {UserName} | By default Silverback search on your Exchange server the users' mailbox or the identity by the username attribute. In some scenarios, e.g., when using non personalized account names like B23115 as Usernames, the mailbox or the identity can not be found on the Exchange Server. In this scenario, adjust the Matching Criteria from the default {UserName} to any other System Variable, e.g. {UserEmail} or to a mixed input like {firstname}.{lastname}@imagoverum.com. |
| Certificate | e.g. ExchangeOnlineSilverback.pfx | Used for Modern Authentication. Cloud customers can upload here their self signed certificate for the connection to Exchange Online. |
Email Templates
Email Templates section lets you modify the emails that are sent to users and administrators, and also modify the SMS text that will be sent to end users. Every email generated by Silverback is available in the list. By clicking on Edit, you can customize what the email templates contain. This includes adding images, modifying the text and input system variables. Please refer to Customize Email and SMS Templates for additional information.
Hardware Authentication
Hardware authentication is a part of access control, which ensures that only pre-authorized devices are allowed to become a managed device, e.g. only corporate owned devices that are issued and are fixed assets of your organization. During the enrollment process, Silverback will verify the serial number and/or IMEI of the device against the pre-authorized list and o only known devices will get to the managed status. Unknown devices will remain as blocked. Within this section, you define the list of devices that are allowed to be fully managed in Silverback. To enforce the Hardware Authentication compliance, you need to configure the Lockdown Policy Enforce Hardware Authentication within an Tag that will be applied to devices during or after the enrollment. Please refer to Allow only pre-authorized devices to become managed for adding your devices into the Hardware Authentication. Additionally, you can use the Hardware Authentication to predefine the device ownership, a label, and a visibility flag for each device.
| Detail | Example | Description |
|---|---|---|
| Id | e.g. 1 | Database ID for the item. |
| Serial Number | e.g. F17M9VN8FFG8 | Serial number of the device. |
| IMEI | e.g. 35303609258938 8 | IMEI number of the device. |
| Username | e.g. tim.tober@imagoverum.com | Displays the associated user to this device when it is enrolled. |
| Ownership |
|
Displays the pre-defined ownership for this device and will overwrite whatever end users are choosing from Self Service Portal. |
| Device Name | e.g. Imagoverum-iPad-001 | Displays the pre-assigned device name. |
| Label | e.g. Marketing | Displays the currently associated Label. |
| Visibility Flag | e.g. Executive Board | Displays the currently associated Visibility Flag. |
| Edit | |
Edit the selected device id. |
| Remove | |
Removes the selected device id. |
Licenses
The Silverback License information is important as it will display you how many devices are enrolled into Silverback and how many licenses are remaining. It will also display how many Silversync licenses have been consumed and when your Maintenance Period will expire.
| Information | Example | Description |
|---|---|---|
| License ID | e.g. 2500 | License ID given by Matrix42. |
| Customer | e.g. Imagoverum | Customer behind the License. |
| Maintenance Expires | e.g. 31 January 2025 | Display the expiration date of your Maintenance. Once this has expired, you will need to renew your Support Contract to regain access to the latest Silverback Upgrades. |
| Current Software Version | e.g 18.0.3.22 | Displays your current installed Silverback Version. |
| Status | e.g. Valid | Displays the License Status. |
| Silverback Device Quantity | e.g. 50000 | Displays the corresponding License amount of devices for Silverback. |
| Silverback Device Used | e.g. 25000 | Displays the corresponding License amount of devices already in use with Silverback. |
| Silverback Devices Remaining | e.g. 25000 | Delta between Silverback Device Quantity and Device Used. |
| Silversync Device Quantity | e.g. 50000 | Displays the corresponding License amount of devices for Silversync. |
| Silversync Devices Used | e.g. 25000 | Displays the corresponding License amount of devices already in use with Silversync. |
| Silversync Devices Remaining | e.g. 25000 | Delta between Silversync Device Quantity and Device Used. |
| Companion Device Quantity | e.g. 50000 | Displays the corresponding License amount of licenses for Companion. |
| Companion Devices Used | e.g 25000 | Displays the corresponding License amount of devices already in use with Companion. |
| Companion Devices Remaining | e.g. 25000 | Delta between Companion Device Quantity and Device Used. |
| Remove Duplicate Device Info | Enabled or Disabled |
Remove Duplicate devices will attempt to detect if a device enrolling already exists, and remove it. This is because some devices do not provide a unique identifier. If this setting is enabled, Silverback will attempt to match existing data, such as IMEI number, serial number and remove the previous entry if it detects one. |
| Maximum Devices Per User | e.g. 3 |
Set a limit on the number of devices an individual user can enroll into Silverback. If users has too many devices enrolled they will met a warning on the Self Service Portal when trying to create a new Pending Enrollment. |
| License Key |
|
Here you can enter after your Silverback installation your License Key provided by Matrix42. |
Lockdown Interval
Lockdown Interval will determine how often Silverback asks each device that is enrolled to perform a Check in to ensure it is still complying with corporate policy. Silverback will automatically stagger these calls out, so that not all devices are asked to check in at the same time, so keep this in mind if you are seeing some delay between different devices. If the device is unable to connect to the Internet, or communicate with Silverback or Cloud Messaging Services (Apple & Android) then the device isn't able to check in – but should do so as soon as it is introduced to a connection where these services are available. Take as well into consideration that the Check In process may have an impact on device battery and data consumption, so set these to sometime sensible.
Allow Automated Unblocking: Allows the system to automatically unblock a device if it no longer violates policy. By default, unblocking requires Admin intervention. By configuring this, if the device checks in and the system detects that a blocking policy is no longer violated, the user will be unblocked automatically, with one exception; admin initiated blocked. These still require the Administrator to manually unblock the device.
| Setting | iPhone, iPad, iPod, macOS | Android, Samsung Knox | Windows |
|---|---|---|---|
| Audit Interval | e.g. 720 Minutes | e.g. 720 Minutes | not available |
| Allow Automated Unblocking | Enabled or Disabled | Enabled or Disabled | Enabled or Disabled |
| Number of initial pools | not available | not available | not available |
| Initial poll interval (Minutes) | not available | not available | not available |
| Number of Secondary polls | not available | not available | not available |
| Secondary poll interval (Minutes) | not available | not available | not available |
| Interval of remaining polls (Minutes) | not available | not available | not available |
Logs
Administrators have the ability to export the error logs from Silverback. These logs could contain either any error messages generated by Silverback or any Action Audit details performed by Administrators and Help Desk users. Administrators can filter the results based on date, using the Start Date and End Date parameters. Simply select the date range and the log generated will return the information within that date range.
Retention Period
The retention period sections lets you configure the number of days Silverback will keep logging information.
| Retention Period | |
|---|---|
| Number of days to retain logs | The number of days Silverback should keep logging information. A value of 0 sets the the time period to infinite. Supported values are 0-99999. |
| Save | Saves the number of days to retain logging. |
Services, Audit and Cloud Connector
This section provides quick links to several sections in the Log area of Silverback.
| Services, Audit and Cloud Connector | |
|---|---|
| Volume Purchase Program | Provides a quick link to the Volume Purchase Program log section. |
| Device Enrollment Program | Provides a quick link to the Device Enrollment Program log section. |
| Android Enterprise | Provides a quick link to the Android Enterprise log section. |
| Services | Provides a quick link to the Services log section. |
| Audit | Provides a quick link to the Audit logs section. |
| Cloud Connector Traffic | Provides a quick link to the Cloud Connector traffic section. |
Export Error and Audit Logs
Silverback manages its enrolled devices through a series of commands that are sent and received by these devices over either a Wireless or Cellular connection. If for any reason one of these devices responds with an error, Silverback will log it in this error log for the Administrator to find.
| Export Error and Audit Log | |
|---|---|
| Type | The type of log to export (Error Log or Audit Log). |
| Start Date | Specifies the Start Date of the Exported Log. |
| End Date | Specifies the End Date of the Exported Log. |
| Export Log | Generates the log files in CSV format. |
The Error log is generated with the following headers:
| Header | Example | Description |
|---|---|---|
| DeviceId | e.g. 1001 | Unique device ID . |
| UserName | e.g. maria.miller@imagoverum.com | Username associated with the device that generated the error. |
| LdapFirstNameUserField | Maria | Users First Name as read from LDAP. |
| LdapSurnameUserField | Miller | Users Surname as read from LDAP. |
| MdmCommand | e.g InstallProfile | MDM Command Silverback tried to send. |
| MdmErrorChainId | e.g 346 | Unique Number for this error in Silverback. |
| MdmDeviceCmdId | e.g. 105558 | Unique Number ID for this error encountered by Silverback. |
| Mdm_ErrorCode | e.g. 1000 | MDM Error Code as documented by Apple. |
| Mdm_ErrorDomain | e.g. MCProfileErrorDomain | MDM Error Message as documented by Apple. |
| Mdm_USEnglishDescription | e.g. The profile “Lock Screen Message” is invalid. | Error Message displayed in English. |
| Mdm_LocalizedDescription | e.g. The profile “Lock Screen Message” is invalid. | Error Message displayed in the Local Regional Language (as configured on the device). |
| CreatedDate | 02/01/2019 15:46:19 | Recorded error date and time. |
The Audit Logs will help Silverback Administrators keep a track of which user performed which action within the Silverback Management Console. The Audit Log is generated with the following headers:
| Header | Example | Description |
|---|---|---|
| ID | e.g. 5461 | Unique Action ID Number. |
| ActionTime | e.g. 02/01/2019 14:11:26 | Time when the action was performed. |
| ActionUser | e.g. admin | Username of the Silverback Administrator that performed the Action. |
| ActionAddress | e.g. 10.0.0.101 | IP Address of the Computer that the action was performed on. |
| ActionAction | e.g. ModifyTagSettings | Action that the User tried to perform. |
| ActionDestination | TagAdd,198 | Device the action was performed against OR, the TAG/Setting that was edited by the user. |
Vendor Specific
This section offers vendor specific options like getting an activation lock bypass code or the quick link to download Windows Diagnostics archives requested from Windows 10 or Windows 11 devices.
| Activation Lock Bypass | For iOS, iPadOS and macOS devices, it’s possible to unlock devices by bypassing an enabled Activation Lock with a bypass code. To bypass the Activation Lock, click Export Bypass Codes from the Logs page and refer to Activation Lock Bypass for additional information. |
|---|---|
| Windows Diagnostics | Provides a quick link to download Windows Diagnostics archives requested from Windows 10 or Windows 11 devices. Please refer to Windows 10/11 Diagnostics and Logs for additional information. |
MDM Settings
This section contains settings that are specific for certain platforms. As of today, you can configure specific support information that are present under the MDM profile on Windows 10 and Windows 11 devices and you can configure the default lock PIN for policy actions on macOS devices.
Windows
| Setting | Example | Description |
|---|---|---|
| Support phone number | e.g. 069 69696969 | Will be displayed under the Work account under Settings. |
| Support website | e.g. https://www.matrix42.com | Will be displayed under the Work account under Settings. |
| Support email address | e.g. tim.tober@imagoverum.com | Will be displayed under the Work account under Settings. |
macOS
| Setting | Example | Description |
|---|---|---|
| Default PIN for Policy Actions | e.g. 12345678 | When the system automatically locks a macOS device, this is the default PIN that will be set. It is mandatory that a PIN be provided when locking or wiping the device, and this will be the value that is set. |
Microsoft Entra ID
Connects your Microsoft Entra ID to Silverback to unleash additional Management Options for Windows Autopilot, Microsoft Entra join, and App Protection Policies.
Mobility and MDM
| Setting | Description |
|---|---|
| Enabled | Enables the connection to Microsoft Entra ID. |
| Tenant ID | This is you Directory ID (Azure > Microsoft Entra ID > Manage > Properties > Tenant ID). |
| Application ID | This is your Mobility (MDM and WIP) Application ID, created in Azure. |
| Application Key | This is your Mobility (MDM and WIP) Application Key, created in Azure. |
App Protection
| Setting | Description |
|---|---|
| Enabled | Enables the Synchronization of App Protection Policies and allows to create App Protection Policies remotely in Microsoft Intune. |
| Period to refresh App Protection Policies (min) | Defines the synchronization interval for App Protection Policies. E.g. if a App Protection policy is created in Microsoft Intune, this value defines the time when the policy will appear in Silverback. Created policies within the Silverback Management Console will be created immediately in Microsoft Intune. |
| Last updated | Displays the last synchronization time stamp. |
Windows Store for Business
| Setting | Description |
|---|---|
| Enabled | Enables the synchronization of Windows Store for Business applications into the Silverback Management Console. This setting is mandatory to distribute Windows Store for Business Applications to Windows 10 devices. |
| Period to refresh Store for Business Apps (min) | Defines the synchronization interval for Windows Store for Business applications into the Silverback Management Console. |
The Microsoft Store for Business has been discontinued by Microsoft. Since January 2024, the private store tab and associated functionality was removed from the Microsoft Store for Business and Education portal. This includes the ability to add apps to private groups and to download and install apps from the private store. With this change, the functionalities described in this document are no longer possible and we will remove the functionalities in a future version of Silverback. You can continue to distribute applications via the App Portal or the Unified Endpoint Management Agent as usual.
Azure Blob
Windows 10 and Windows 11 devices allowing several methods to collect diagnostics and logs locally or remotely. For the collect remotely logs option, you are required to add in this section your Azure Blob SAS Url to create a remote location for storing the collected logs. If the Azure Blob is set to enabled and a Blob SAS Url (Shared Access Token) is provided, the Request Diagnostics device action will be enabled that is used to trigger devices to gather troubleshooting data into a zip archive file and upload that archive to the configured Azure Blob storage. Please refer to Windows 10/11 Diagnostics and Logs for additional information.
| Setting | Description |
|---|---|
| Enabled | Enables the collecting remotely logs option for Windows 10 and Windows 11 devices. |
| Blob SAS URL | Enter here your Azure Blob Shared Access token to provide the storage location for the remotely requested Windows Diagnostics. |
Terms & Conditions
During Autopilot enrollments or during the Join to Microsoft Entra, users are presented with Terms & Conditions. After entering the credentials, they are required to accept these Terms & Condition which can be customized within this section. You can replace the default title, the default description and the Matrix42 logo to your customized one. By pressing the Preview buttons, you can take a sneak peak upfront from your Silverback Management Console to the new User Experience for your users during the enrollment. As of today, the white theme will be shown for Microsoft Entra joins, when the device will be joined after the out-of-the-box experience and the dark theme during enrollments through the out-of-the-box-experience. Themes are currently not related to Windows 10 or Windows 11, but this might change in the future. For additional information please refer to Windows 10/11 All about Windows Autopilot.
| Setting | Description |
|---|---|
| Title | Enter here the title of your Terms & Conditions page. |
| Description | Enter here the content of your Terms & Conditions. |
| Logo | Upload here your custom *.png image. |
Pending Commands
Pending commands section will let you enable Managed App Feedback Collection for iOS and iPadOS devices, display all outstanding send commands to iOS, iPadOS, tvOS, macOS, Android, Samsung Knox and display concurrency statistics (if enabled).
Managed App Feedback Collection for iOS
With iOS 7 and above, application developers can add information to their applications that a third party system like Silverback can retrieve. Enabling this setting will make sure that managed applications will be checked for application feedback. The application feedback is viewed from the Device Information Popup.
Pending Commands Overview
iOS, iPadOS, macOS, tvOS, Samsung Knox and Android devices have pending commands stored in a form of queue. This means when a device checks in to the system, the system will find commands for that device in the queue and execute them. The table shows what pending commands exist in the system and also let you search and sort them, or delete them.
The various elements of the Pending Commands table contains:
| Information | Description |
|---|---|
| DeviceID | Unique device ID to which the command belongs to. |
| Username | Username of the user who’s device has the command queued. |
| Platform | The OS type of the device, e.g. iOS, macOS, Samsung Knox, Android. |
| Command | Actual command that is queued. You will notice patterns here, for example if you click “Refresh” on a device from the Devices Tab, you will see a certain set of commands appear in this list for that device. |
| Queued | Date and time that the command was queued. |
| Now Now | If the device is not ready for a command, generally in the case of iOS it will reply with a “Not Now”, meaning that its not ready. This could be for example if you attempt to install an application on the device, but the screen is locked. |
| Delete | Delete the command from the table. |
- Click Refresh to update the pending command list
- Select outstanding pending commands and click delete selected (not recommended)
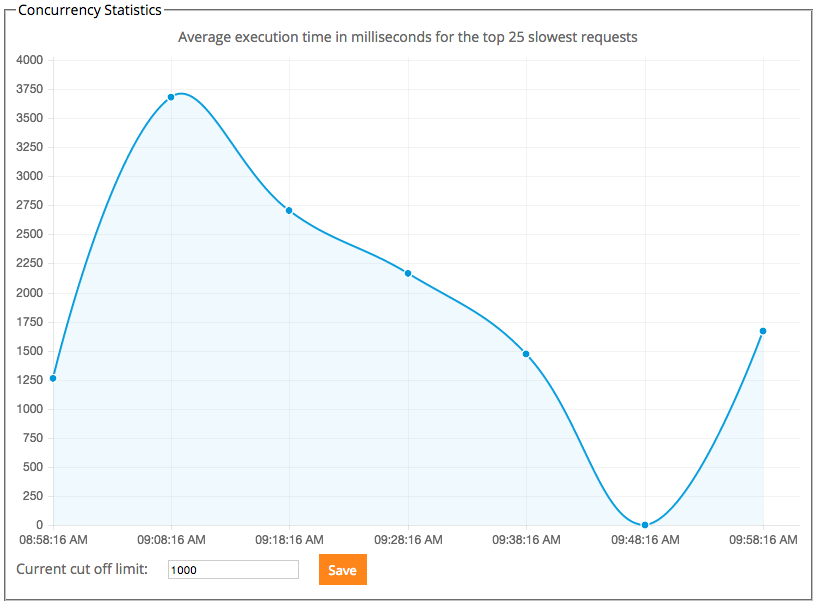
Concurrency Statistics
Concurrency Statistics gives you an overview of how long commands are taking to execute in your environment. The graph will display the average execution time for the top slowest requests. The “Current cut off limit” is the maximum number of devices that can connect to the system at any one time (this excludes enrolling devices). In large deployments, this means that a steady load can be achieved on the server. When a device attempts to connect and this number is consumed, the device will be told to “go away”, and attempt to connect later. Use the average execution time in the graph to determine your system limit. If the times are getting too high, reduce the cut off limit.
These settings will only be visible if the settings for concurrency in the Settings Administration page allow it. See the Settings Administration guide for enabling this.
Self Service Portal
End users interface with Silverback through the Self-service portal. The self-service portal can be customized to provide a recognizable look and feel for end users. With the Require Policy Agreement setting enabled the user must agree to a Corporate Policy before they are able to begin the enrolment process. Enabling this policy will change the layout of the Self Service Portal to include an agreement checkbox with an additional, customizable text that is displayed under the Self Service Portal Window. Please refer to our Getting Started Guide Company Branding for additional information.
Front End
| Setting | Options | Description |
|---|---|---|
| Use default text and graphics | Enabled or Disabled | Login Pages will be shown with default settings. |
| Use Banner | Enabled or Disabled | Choose between Banner or Logo. |
| SSP Banner | Choose File | Change to your customized banner. |
| Require Policy Agreement | Enabled or Disabled | Enables a checkbox which needs to be accepted before users can create an enrollment token. |
| Policy Agreement Text | e.g. Terms and Conditions | Changes the name of the optional checkbox. |
| Policy Agreement File URL | e.g. https://www.matrix42.com | Create a hyperlink to your Terms and Conditionals. |
| Additional SSP Text | e.g. Welcome to Matrix42 Silverback | Add a footnote to Login Pages. |
| Show Ownership | Enabled or Disabled | If disabled, the ownership selection will not be displayed. |
| Set Personal Ownership to default | Enabled or Disabled | If enabled, Personal is set to default. |
| Detect country code by IP | Enabled or Disabled | Will detect the country code automatically (e.g +49). |
| Configure presets | e.g. +49 | Will set a default phone number. |
| Define placeholder | e.g. +49 17012345678 | Create a hint how users phone number could look like. |
One Time Passwords
| Setting | Options | Description |
|---|---|---|
| OTP Expiry |
|
Define the expiration date of created OTPs. |
| OTP Length |
|
Defines the length of created OTPs. |
| OTP Strength |
|
Defines the complexity of created OTPs. |
| Allow Multiple Pending Enrollments | Enabled or Disabled | Allows users to have multiple pending enrollments. |
| Activate Bulk Staging Mode | Enabled or Disabled | Should be activated if your plan to use service accounts for devices. |
| Set OTP Expiration Date to unlimited | Enabled or Disabled | Will expose OTP expiration dates for selected bulk stating mode users to unlimited. |
| Select users for Bulk Staging Mode | e.g. tim.tober@imagoverum.com | Define your staging users. |
Simple Enrollment
Disabling the Simple Enrollment will result in users being prompted to enter their generated or received OTP on the Activate page to receive and download the Mobile Device Management Profile (Apple) or to finish the enrollment process. While disabling the Simple Enrollment, you can prevent the Enrollment for certain device types configured in the Device Types section in the Web Settings.
| Setting | Options | Description |
|---|---|---|
| iOS Simple Enrollment | Enabled or Disabled | Allows a direct enrollment from the device without entering a OTP via enrollment link. |
| macOS/iPadOS Simple Enrollment | Enabled or Disabled | Allows a direct enrollment from the device without entering a OTP via enrollment link. |
| Android/Samsung Knox Simple Enrollment | Enabled or Disabled | Allows a direct enrollment from the device without entering a OTP. |
| Android Simple Enrollment SSP with OTP | Enabled or Disabled | Allows a direct enrollment from the device by opening the enrollment link. |
| Android Simple Enrollment SSP with SMS | Enabled or Disabled | Allows a direct enrollment with the use of a received SMS. |
| Use QR-Code | Enabled or Disabled | Displays a QR-Code for Enrollments and enables all Simple Enrollment methods. |
| QR-Code Logo | Choose File | Change the QR-Code Logo Icon. A recommended size is 48x48 pixel. |
Silversync
On a high level this sections lets you add, configure, enable and disable Silversync Servers for Silverback. Silversync is the Mobile Content Management Solution of Silverback and lets users remotely gain access to internal files. Please refer to the Silversync Installation and Configuration Guide for additional information. The iOS Application tab lets you define applications for iOS to gain access to internal files. These will be prefilled from Matrix42 and in usual cases you will not have to configure something additional here.
User Management
The User Management section provides Administrators an overview of all existing accounts and their corresponding roles. New Users can be created, visibility flags can be set and API Tokens can be generated. Under the Active Directory tab Administrators have the ability to define LDAP Groups, so that all members of this group are able to login as an administrative user with their specific role into the Management Console. Please refer to Create a new System User for additional information.
| Setting | Options | Description |
|---|---|---|
| ID | e.g. 1 | Displays the ID of the system user. |
| Username | e.g. admin | Display the username of the system user. |
| Roles | e.g. Administrator | Displays the specific role set for the system user. |
| e.g. admin@imagoverum.com | Displays the corresponding email address set for the system user. | |
| Time Zone | e.g. (UTC+01:00) Amsterdam, Berlin, Bern, Rome, Stockholm, Vienna | Displays the configured time zone for the system user. |
| Edit | |
Use the button to edit the corresponding user and details. |
| Remove | |
Removes the corresponding system user. |
Volume Purchase Program
Apple’s Volume Purchase Program program is a service that Apple provides, where purchased applications and licenses through the Apple Business or Apple School Manager can be dynamically assigned and revoked to users and/or devices. Silverback handles the assignment (invitations) of users and devices to the Volume Purchase Program automatically when users enroll devices into the system. Purchased applications and licenses are retrieved and synchronized with Apple and applications will be automatically populated into the App Portal, to be ready to get assigned into Tags. Licenses are assigned to users or devices when Volume Purchase Program applications are present in a Tag that has been assigned to a device and licenses will be revoked when either the application or the device is unassigned from a previously assigned Tag. For troubleshooting purposes, a detailed logging can be enabled and reviewed under the general Log information. For integration of Volume Purchase Program please refer to: Apple Deployment Programs Integration Guide.
Overview
The Overview Section provides a high level view of your VPP Account, lets you enter the company token and configure VPP Settings.
| Item | Description |
|---|---|
| Last modified | Shows the last time Silverback retrieved updated information from Apple. |
| Organization Name | The name associated with your VPP Account. This is provided when you sign up for the VPP Program. |
| Token Expiry Date | The date that the VPP Token will expire. New tokens can be retrieved from the VPP Program website from Apple. The token can be managed from the Settings Section. |
| Total Users | Total users that have been added to your account, whether the user has associated themselves or not. |
| Associated Users | Users that are assigned to VPP and have also accepted and associated their iTunes account with your VPP Program. |
| Total Licenses | Total licenses purchased for your VPP account, whether assigned to users or not. |
| Associated Licenses | Total number of licenses that are assigned to users in your system. |
| Total Assets | The number of applications in the system (regardless of the number of licenses per app). |
Settings
| Settings Name | Description |
|---|---|
| Un-assign licenses from external users | Will instruct Silverback to automatically remove licenses from users it’s not aware of. This is helpful when migrating from another solution that managed VPP for you, without you needing to manually un-assign all licenses. |
| Period to refresh VPP data | Time in minutes before VPP information should be updated. We recommend to sync twice a day. |
| Country code | Country code of the VPP apps you wish to install. |
| Language code | Language code of the VPP apps you wish to install. Note this should be the same as Country code. |
| VPP Operation Mode | Allows you to determine the default behavior when assigning VPP apps to devices or users. This can be overridden on an individual app from the App Portal Tab also. Please refer to Volume Purchase Program: Operation Modes for additional information. |
Logs
| Settings Name | Description |
|---|---|
| Enable detailed logging | Will enable a detailed logging for Volume Purchase Program. This will create a separate section for VPP logs in the Silverback Logs area (e.g. https://silverback.imagoverum.com/admin/logs) . |
Assets
The assets section provides a list of all VPP applications in the system. Silverback displays the following application information: Asset ID, App (Name), Asset ID, Total Amount of Licenses, Total Assigned Licenses , Total Available Licenses, Retired Licenses, Is Irrecoverable, Product Type
Users
User section displays information about VPP users and the offers possibility to export the list of users in the system.
| Item | Description |
|---|---|
| Export Users | Allows you to export the list of users in the system. |
| VPP User ID | Silverback’s ID for the user. |
| Client ID | The unique identifier for the user in your VPP account. |
| The email address of the user entry in your account. | |
| Status |
The status of this user in your system: Registered – The user has been added to your account, but the user has not yet associated their iTunes account. Registered users will not receive VPP App Licenses. Associated – The user has been added to your account and also associated their iTunes account. Associated users are eligible to receive VPP Applications. |
| Invite URL | If the user isn’t associated, you can see the invite URL here. Users should be invited automatically, but you can also distribute this URL to the user to let them enrol in the system. |
| Actions | Retire user. This will remove the user from the VPP account and release all licenses. This is not permanent; the user can be re-invited to your system at a later date. |
Users Export
The CSV export for users contains the following fields: VPP User ID, Client ID, Email , Status.
Licenses
The licensing section allows you to view the users, devices and licenses associated with your account. The main view is a table which shows you the licenses in your account, and the information associated with it. You can also export a list of licenses, and manually assign and un-assign licenses from users.
| Item | Description |
|---|---|
| Export Licenses | Allows you to export the list of licenses in the system. |
| VPP License ID | Silverback’s ID for the license. |
| License Id | The unique identifier for the license in your VPP account |
| App Name | Displays the (iTunes) Application Name. |
| User Email | The email of the user who owns the license, if associated. |
| Serial | If the user isn’t associated, you can see the invite URL here. Users should be invited automatically, but you can also distribute this URL to the user to let them enrol in the system. |
| Asset Id | The asset ID number for the app (check Assets). |
| Status |
The status of this license in your system. Available – The license is not in use by any user, and is available to be assigned. Associated – The license is assigned to a user. |
| Actions |
Lets you manually assign or un-assign a license. When clicking assign, only valid users and devices will be selectable from the list. |
Assign Licenses
When you click the icon in the action column on a license that is assigned, the license will be removed from the user or device. If the action button is to Assign, you will be given a pop-up to assign the license. By default, you will see the valid users that this can be assigned (if available) to and choose one. When you click Devices, you will see valid devices this license can be assigned to.
Licenses Export
The CSV export for licenses contains the following fields: VPP License ID, License Id, Adam ID (Asset ID), Status, User Email, Serial
Import
Within the import section, you can select your default values for importing applications to the App Portal from the Volume Purchase Program. In case you have updated one of these values, you can update all current existing applications or just save the new values which will then be applied only to newly imported applications. Please take into account that the logic for this settings applied inside a Tag will not be changed by performing a change in the import section. The import settings will only affect the default import settings for the App Portal itself.
| Setting | Description |
|---|---|
| Automatically Push to Managed Device | Installs the App on the device when enrolled into Silverback If the Allow App Store restriction has been disabled, App Store Apps will not be automatically pushed to Managed Devices. |
| Remove App when MDM Profile is removed. | Removes the App from the device when MDM Profile is removed from Silverback. |
| Prevent Backup of App Data | Prevents iTunes from backing up any information from this client to a computer when tethered. |
| Take Management if the app is already installed | Take management of the application if the user installed this themselves outside of management. This is silent for supervised devices and will normally prompt the user. |
| Ignore Metadata for Device Families |
By enabling this option, given Metadata for Volume Purchase Program applications will be ignored by Silverback and flagged iPhone applications will be automatically added as iPad applications in the App Portal. With enabling this option, you acknowledge that some available iPadOS application might not be installable on iPadOS devices even if they are listed in the App Portal. These scenarios will be out of support. |