Matrix42 File Storage Services
Overview
Matrix42 File Storage Services is a package to expand the default Matrix42 files upload and storage capabilities. It provides an ultimate facility to integrate external object storage providers to upload files, attachments, and other assets.
Matrix42 File Storage Services includes a Default SQL Server storage provider out of the box and multiple cloud providers available for further configuration. It is also well-designed and handy to accept more custom providers if required.
Matrix42 File Storage Services require an outgoing Internet connection for successful installation and operation:
-
The application server must be unblocked to establish outgoing connections required to generate valid upload and download URLs to a custom BLOB storage (if configured).
-
Similarly, client machines must be able to directly access such URLs to view, upload, or download the files.
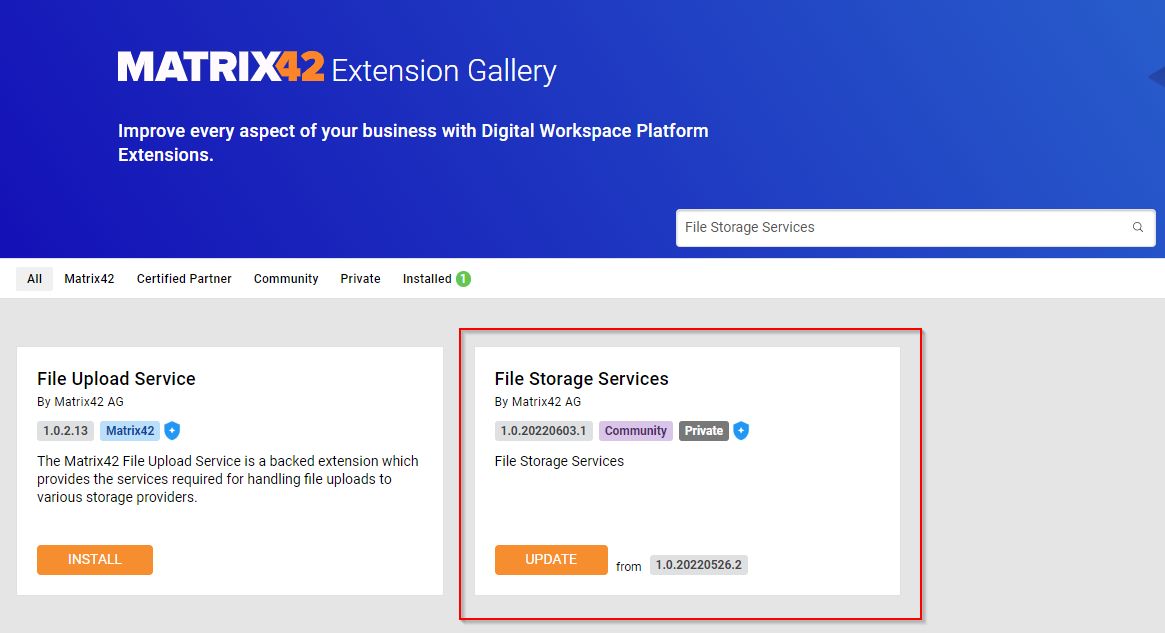
Matrix42 File Storage Services extension is published and available in the Extension Gallery. To view and install it, follow the next steps:
- Go to Administration application
- Go to Extension Gallery menu item
- Search for Matrix42 File Storage Services extension
- Click on Install
Once the installation process is complete, the new menu item and dialog are available for the further services configuration. To access it, go to Administration application → Integration → File Storage Services:

Default SQL Server storage provider is enabled and set as default.
Creating a new File Storage Service
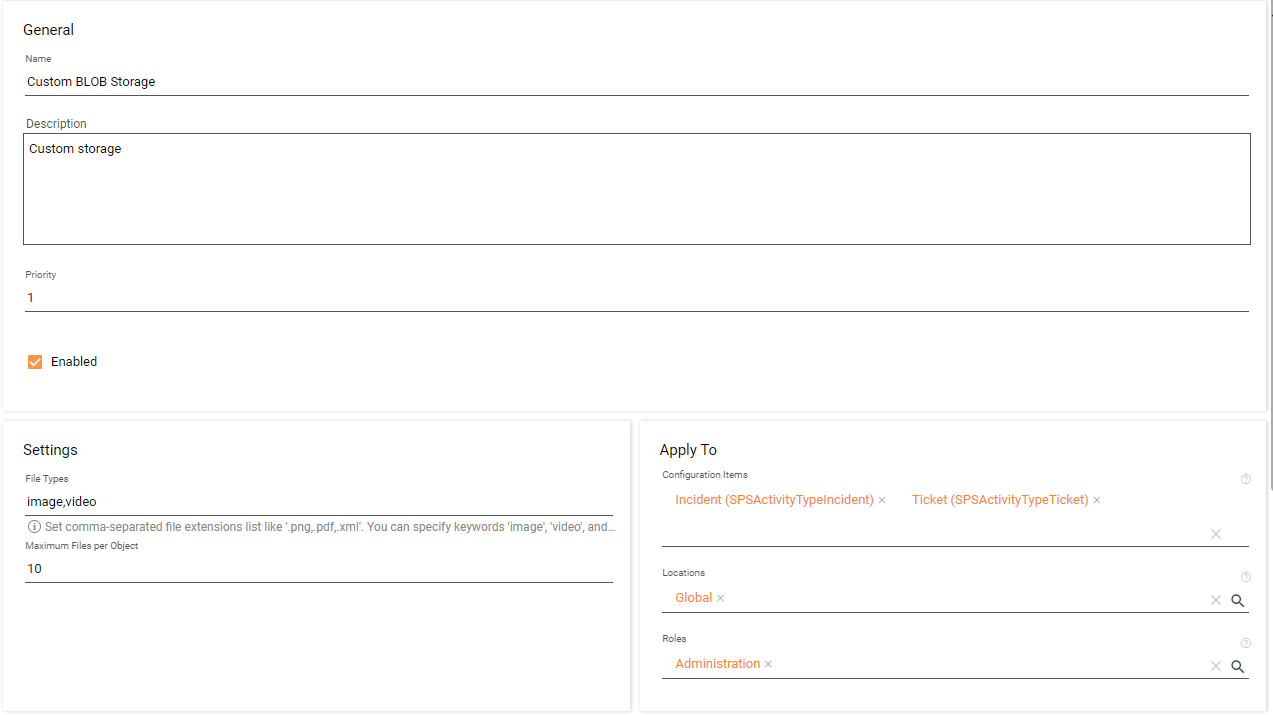
To add a new provider, click on Add File Storage Service action located above the grid. The following screen with the following settings should appear:
.png?revision=1&size=bestfit&width=1000&height=560)
General
General section is dedicated to the basic settings:
- Name: the name of the storage service
- Description: the description of the storage service
- Priority: the priority of the storage service. Default is 0. Priority field value must be numeric and unique. The priority field is used when determining the storage service on file uploading. The bigger value means the higher priority. Default checkbox is read-only. To change the default provider, go to the list of providers in Administration application → Integration → File Storage Services → select the desired storage service → click Set as Default Storage in the preview dialog:

- Default: identifies whether storage service is default or not. Default is false.
- Enabled: identifies whether storage service is active or not. Default is true.
Settings
Settings section is dedicated to the additional settings.
-
File Types: the list of file types to be accepted for storage. This is a comma-separated list of extensions, i.e. .png, .jpg. Alternatively, the group of files can be entered to whitelist the entire group, i.e. image, video, and audio. By default is empty (all files are accepted).
-
Maximum Files per Object: the maximum number of files allowed to be added to the object. By default is empty (unlimited).
Apply To
Apply To section is dedicated to allocating the service to a particular Location, Roles, or Configuration Items.
- Locations: the list of locations. Default is empty.
- Roles: the list of roles. Default is empty.
- Configuration Items: the list of Configuration Items. Default is empty.
Empty values mean the service is active throughout the application for all objects while uploading the files. Allocating it to a particular Location, Role, or Configuration Items makes it actual for the selected criteria only. Using this approach, it becomes feasible to use multiple storages. As an example, it is getting easy to use different storages for i.e., Tickets and Incidents. It’s enough to set Configuration Item Ticket (SPSActivityTypeTicket) for one storage and Incident (SPSActivityTypeIncident) for another one. Depending on the object the user has created (ticket or incident) the appropriate storage will be selected.
Please note, if Apply To values are empty or the same for multiple storages, the Priority is used to determine the best matching storage provider (see General section).
Storage
Storage section is dedicated to set connection properties for the selected provider:
-
Type: the type of storage.
Depending on the selected storage type the rest of the fields may vary, details are listed below.
By default, Matrix42 File Storage Services extension has the following types of storage:
- MS SQL Server database: uploads files to SQL Server database
- Azure Blob (authorize with EntraID): uploads files to Azure Blob Storage
- Azure Blob (authorize with Shared Key): uploads files to Azure Blob Storage
- Matrix42 Cloud Storage: uploads files to internal Matrix42 Cloud storage
MS SQL Server database
To configure MS SQL Server database set the following properties:
- Connection string: the connection string to MS SQL database (mandatory field)
- Storage container: the name of the storage container to bind the files to (optional field)
- Max File Size (MB): the maximum file size in megabytes allowed for uploading (mandatory field). The maximum file size that can be uploaded is 2048 MB.

Azure Blob (authorize with Entra ID)
Authorization with Microsoft Entra ID provides superior security and ease of use over Shared Key authorization. Microsoft recommends using Microsoft Entra authorization with your blob applications when possible to assure access with minimum required privileges.

To configure Azure Blob set the following properties:
- Storage Account Name: the name of the Storage Account
- Storage container: the storage container to store the files. It is recommended to specify the container name explicitly, otherwise the System sends all files to default "$root" container (make sure it exists).
Service Connection
A service connection allows you to establish access to Microsoft Azure Storage and obtain data from it without sharing the credentials. A service connection is configured once and then can automatically use a service for obtaining data.
The File Storage add-on contains an "Azure Storage" capability for the Microsoft Entra ID service. This capability is needed for creating a service connection to Microsoft Azure portal.
To create a service connection, take the following steps:
- Configure "App Registration" in the Azure Portal for Azure Storage authentication.
- Create a new one or reuse an already existing application in "App registration" Azure Portal
- Authorize access to your Azure Storage for the created Application by assigning it to the Azure built-in role "Storage Blob Data Contributor"
- Configure Azure Storage Account Resource Sharing (CORs) to allow the Application Server to access the File storage
- Create a Tenant in Enterprise Service Management for Service "Microsoft Entra ID"
- Create a Service Connection for service "Microsoft Entra ID - Azure Storage" and "Setup Authentication"

- Assign the created Service Connection to the File Storage Service


Azure Blob (authorize with Shared Key)
To configure Azure Blob set the following properties:
- Connection string: the connection string to Azure Storage Account (mandatory field)
- Storage container: the storage container to store the files (mandatory field)
- Max File Size (MB): the maximum file size in megabytes allowed for uploading (optional field). The maximum file size that can be uploaded is not limited.

While configuring Azure Blob, the connection string and storage container name should be obtained from the Azure portal (https://portal.azure.com).
To get the connection string, go to Storage Account → Access Keys → Show Keys → Copy the Connection String:

The container name must be taken from containers in Storage Account → Containers:

Matrix42 Cloud Storage
To configure Matrix42 Cloud Storage set the following properties:
- Service Connection: the name of Matrix42 Service Connection
- Region: the region of the Blob storage to be used
- Storage container: the container name of the storage
- Max File Size (MB): the maximum file size in megabytes allowed for uploading (mandatory field). The maximum file size that can be uploaded is 1 ТВ.

Configure File Access Security
Depending on the type of the File Storage the System provides various security mechanism to guarantee the file protection and disable the unauthorized access to the file.

Shared Access Signature
To download the file attachments stored in Azure Blob storage or in Matrix42 Cloud, the ESM for each individual end-user request generates a unique link which is immediately distributed to the client browser. Using this link the client can download the file directly from Azure, bypassing the Application Server authorization process. The link is protected with the unique Shared Access Signature (SAS) with a limited lifetime, which is used for authorizing access to the file in Azure.

Authorize each request
To ensure proper authorization, requests to download files are handled by the Application Server. This involves the server acting as a proxy between the client and Azure, controlling authentication and authorization processes, and receiving and redirecting file content from Azure to Client. Such an approach improves a little a security compare with "Shared Access Signature", but it increases the network traffic on the Application Server and disables the feature Attachments Inline Preview Feature

How to create a custom storage type
Matrix42 File Storage extension supports custom storage types to be integrated into the package. Having installed Matrix42 File Storage extension, there are 3 types of storage provided by default:
- MS SQL Server database
- Azure Blob
- Matrix42 Cloud Storage
The list above can be extended by creating a new type with its own set of settings required to establish the connection to the new storage. It can have any amount of fields and related UI controls to manage all the settings in the database.
In the scenario below, we’ll review how to create the type from the scratch and make it available in the storage type list.
Creating a new storage type
Assume we are aiming to create a custom storage type named Large Files Storage. For example, the new storage should have a connection string, schema, and table name. Thus, while setting up the Large Files Storage, we must enable users to provide these properties.
Schema: Data Definition
To create a new storage type, follow the next steps:
- Go to the Administration application
- Go to Schema → Data Definitions
- Click on Add Data Definition (see also Data Definition page for more details)
- Provide the internal and display name:

- Go to Attributes
- Add the fields listed above with the required data types: connection string, schema, table

- Click on Save and reload the application
Schema: Configuration Items
For the next steps, let’s create a Configuration Item like shown in the example below:
- Go to the Administration application
- Go to Schema → Configuration Items
- Click on Add Configuration Item (see also Configuration Item page for more details)
- Provide an internal and display name:

- Click on the Data Definitions view
- Add File Storage Account Class Custom Entity to the main class type
- Add Large Files Storage to the additional definitions:

- Click on Create Configuration Item
- Click on Build User Interface:

- Click on Define Objects To Be Created view:

- Select Create Dialog and Create Data Query with Large Files Storage Data Definition
- Click on Summary
- Click on New Management Area
- Register the just created File Storage Configuration Item in "File Storage Pickup Type" (DWPFileStoragePickupType). The value can be added either by installing a package or by direct access to Database
Once the process of a new management area is complete, the related dialog Large File Storage Dialog is created. The layout of the created dialog includes all the fileds we have created for the Data Definition. If additional customization is needed for the layout, it can be easily modified.

To ensure the new Large Files Storage is now available in the storage types, reload the application.
To verify Large Files Storage, go to Administration → Integration → File Storage Services → click on Add File Storage Service → try to select Large Files Storage from the storage type dropdown.
The following dialog should be displayed with all fields (connection string, schema, table) listed and available to accept the settings for the new type:

Troubleshooting
Interrupted File Upload
Uploading large files to File Storage may take a significant amount of time and can be interrupted for various reasons. The most common scenario is when the browser (or the specific browser tab) responsible for the upload is closed during the upload process.
To ensure data integrity in the system, the File Storage Uploads Reviewer engine runs every hour and verifies the status of all ongoing file uploads. If an upload has not been completed within the time period defined in the setting Matrix42.FileStorage-MaxUploadTimeInHours (default: 24 hours), the engine treats the upload as failed.
In such cases, the system:
-
Removes the corresponding File Info record from the database, and
-
Sends an email notification to the user who initiated the upload, using the "Inform User about Failed File Upload" template. The email notifies the user that the file was not uploaded and requests them to reopen the object and repeat the upload.
How to implement custom storage providers
Following the topic of How to create custom storage type, it is time to see how the custom provider can be built using the real sample provided below.
The template of the project is located in the following repository: Matrix42 File Storage Template. It contains all the major components described below:
- API controller (see Matrix42.LargeFilesStorage.Services.LargeFilesStorageAccountController)
- Custom provider (see Matrix42.LargeFilesStorage.BizLogic.LargeFilesStorageProvider)
- Client-side custom provider (see Matrix42.LargeFilesStorage.Workspaces\src\providers\large-files-storage-provider.ts)
For web developers, this should become a handbook to start writing their own implementation.
The template is intended to provide a very basic overview of how to create and register client-side and server-side providers. All the controller and provider names are given just for learning purposes and do not necessarily mean to be used in production.
Getting started
To get started with the template, please review README to ensure all prerequisites are met and obligatory steps are executed to compile and run solutions.
To demonstrate the attachment control design and the relations of its components, please, review the following diagram:
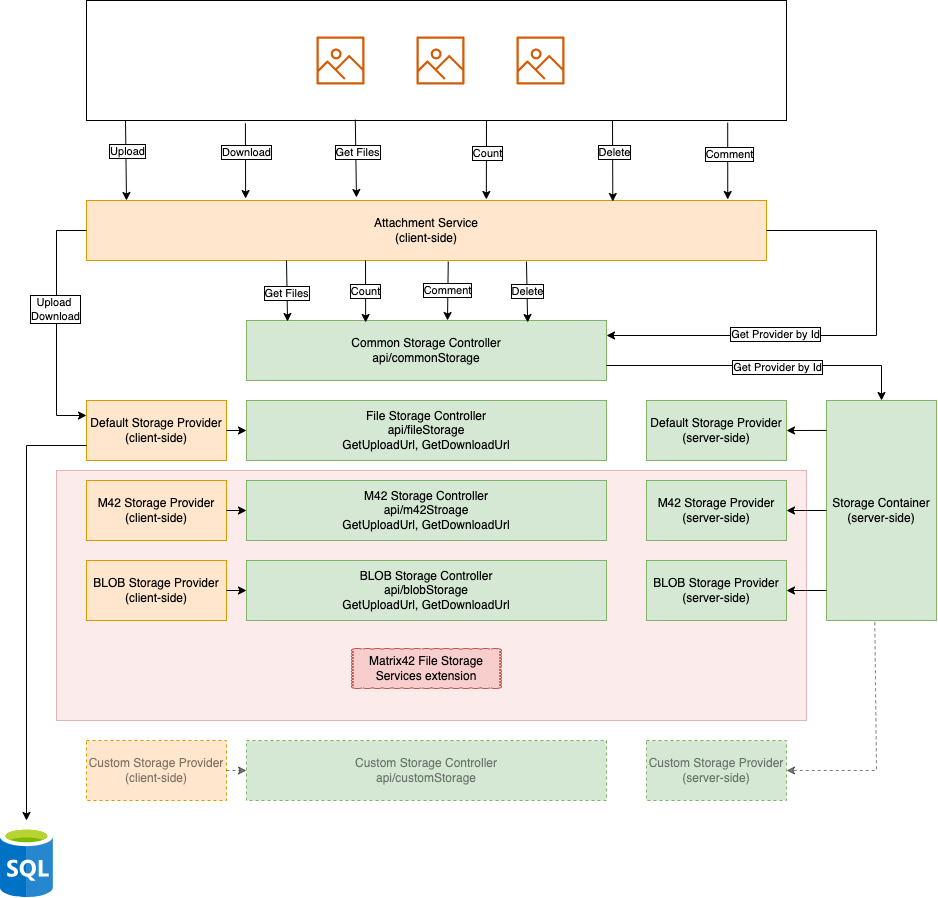
The attachment control is designed in a way to handle the following operations:
- Upload: uploads the file to the storage
- Download: downloads the file from the storage
- Get Files: gets the list of the files from all storages
- Count: counts the amount of the files on all storages
- Comment: comments the file
- Delete: deletes the file from the storage
The attachment control is built based on several core components required to handle attachments:
- Attachment Service and client-side providers
- Storage Container, server-side providers, common storage API
Attachment Service and client-side providers
Attachment Service is a service to manage client-side providers. It allows to register new providers and store them in the local underlying collection. The conceptual role that stands behind the Attachment Service is to:
- Register any number of custom providers that implement IAttachmentProvider interface
- Identify the right provider to execute core operations: Upload and Download the file
- Support other common operations: Get Files, Count, Comment, Delete
While uploading or downloading the files, in fact, we must directly interact with the 3rd party storages (i.e., Azure Blob, Google Drive, Dropbox, etc.). This imposes an additional obligation on the service to provide a custom mechanism to build custom HTTP requests (the requests may vary depending on the external storage). Therefore, client-side providers are introduced to flexibly handle core Upload and Download operations by adding custom headers, etc.
Core operations: Upload and Download the file
Both core operations require signed URLs to be used. Due to security reasons, the authorization for the external storages must not happen in the foreground. Thus, the corresponding API controllers must be implemented to serve GetUploadUrl and GetDownloadUrl endpoints to return signed URLs.
Other operations: Get Files, Count, Comment, Delete
However, the rest of the operations do not require standing communication with the external storages. This can be achieved using the meta-information the system pre-saves internally for every file ever uploaded to the external storage. The meta-information for the single file contains:
- File name
- File size
- Thumbnail
- Comment
- Object Id
- Storage Id
Using the approach above, the system could easily perform Count, Get Files, and Comment operations. All common requests are performed against the local MS SQL database and meta information is stored DWPFileInfo table. The common API controller is intended to process listed operations.
API controller
The role of the common API controller is wider and includes a few more objectives:
-
Get the best-matching provider: this is required when multiple providers are registered
-
Delete the file: determines the provider and deletes the file from external storage and cleans up the meta-information for the file
The best-matching provider is determined using Priority and Apply To criteria for the enabled providers.
For the clean system, the Default Storage Provider is initiated and included in the Attachment Service as a single provider to be used when processing attachments. By default, MS SQL database is used to store the files (see Files table).
Storage Container
Storage Container is a container to manage server-side providers. By analogy with the Attachment Service, the server must include the corresponding set of providers which implements IStorageProvider interface (see Matrix42.StorageService.Contracts.IStorageProvider for more details).
The provider is aimed to serve the following operations on the server side:
- Delete
- Download
- Upload
Optionally, the provider can also implement ISignedUrlStorageProvider interface to support GetUploadUrl and GetDownloadUrl. If that is the case, the custom controller could use the provider injected to deliver GetUploadUrl and GetDownloadUrl API endpoints accordingly.
The custom provider must be registered to the Storage Container as shown below:
public void Register(IDependencyContainer container, IDependencyResolver resolver)
{
    // Register IStorageProvider and ISignedUrlStorageProvider types
    container.RegisterType<IStorageProvider, CustomStorageProvider>("CustomProvider");
    container.RegisterType<ISignedUrlStorageProvider, CustomStorageProvider>("SignedUrlProvider");

    // Register provider in storage container
    var storageProviderContainer = resolver.Get<IStorageProviderContainer>();
    storageProviderContainer.Register(() => resolver.Get<IStorageProvider>("CustomProvider"));
}
How to move files between storages
Matrix42 File Storage extension supports data transferring between the storages. To get this option enabled you must have non-empty storage with the files loaded to it via the application. Otherwise, the feature is not activated due to empty storage.
Make sure you have already installed and configured Matrix42 File Storage extension.
Moving files
Assuming we have created an empty Matrix42 Cloud Storage and already have uploaded some assets to Default SQL Server storage.
To move the files, follow the next steps:
- Go to the Administration application
- Go to Integration
- Go to File Storage Services
- Select Default SQL Server Storage
- In the preview, click on Move Files

- The following screen will be showing up providing the amount of the files to be transferred:

- Enter the Target storage account to move the files to. In the example above, files are moved from Default SQL Server to M42 Cloud Storage.
- To confirm the operation, click on Move Files.
Files moving operation could take some time depending on the amount and sizes of the files.
A long-running background operation will be created to reflect the current operation progress. To access it, go to the header navigation area → Notifications Monitor → Operations in Process:
