Barcode Label
This Marketplace App has been designed to allow the user to:
- generate and assign consecutive and unique Number Codes, e.g. for usage in serial numbers of assets
- design label layouts for CIs that may contain images and data represented as text or barcode
- generate labels following that specified design and store them as attachment to the corresponding object
- print such labels using a self-defined printer configuration
- embed the highly configurable custom ASP-Control "ScanLoop" into own controls or pages
- use a barcode scanner to automatically execute one or more of the following actions to
- each scanned object:
- (Re-)Create the label and print it
- Set a previously configured set of attributes
- Run a custom Workflow with configurable parameters
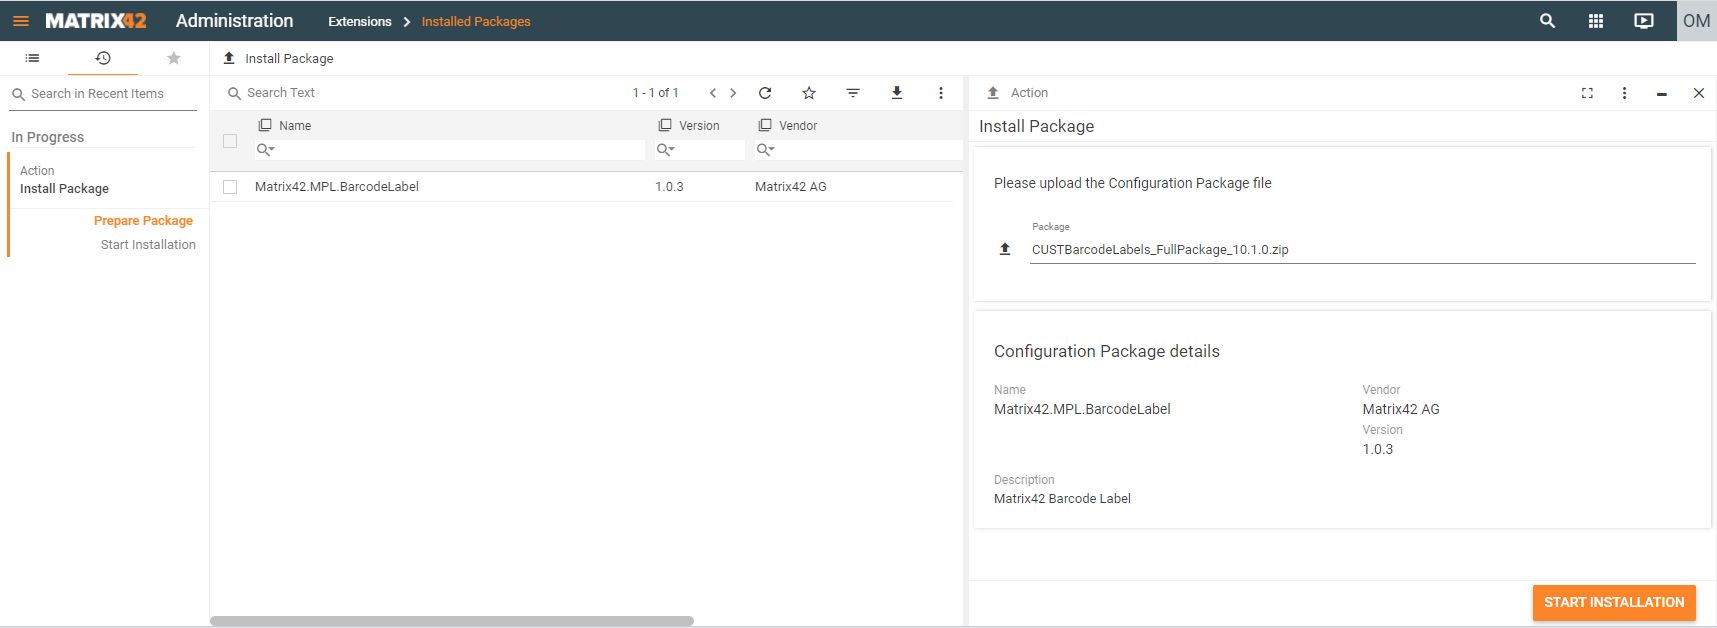
Installation
This package is a configuration package and can be installed over the UUX UI Administration > Extensions > Installed Packages.
A certificate for "M42CDEVBarcodeLabel" must be purchased and copied into the /<root>/Certificates folder in order to use the functionality. The installation will work without
a certificate.
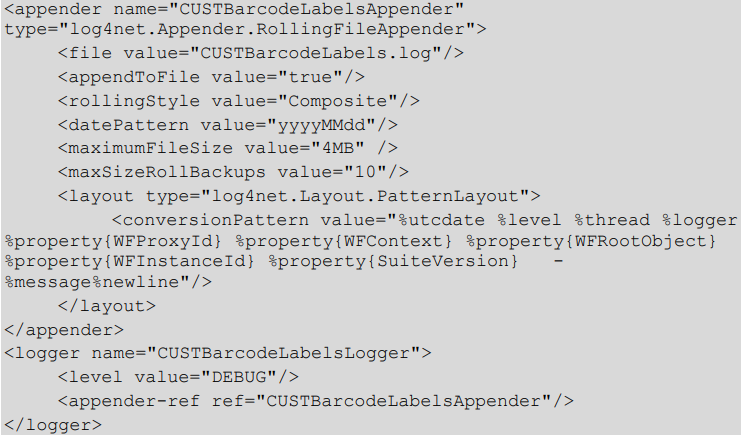
Configuration
After the package has been installed you may want to configure the logging configuration to dump all log messages for this App to a separate file. In that case you need to open the file /<root>/bin/Matrix42.log.config and add the following lines:
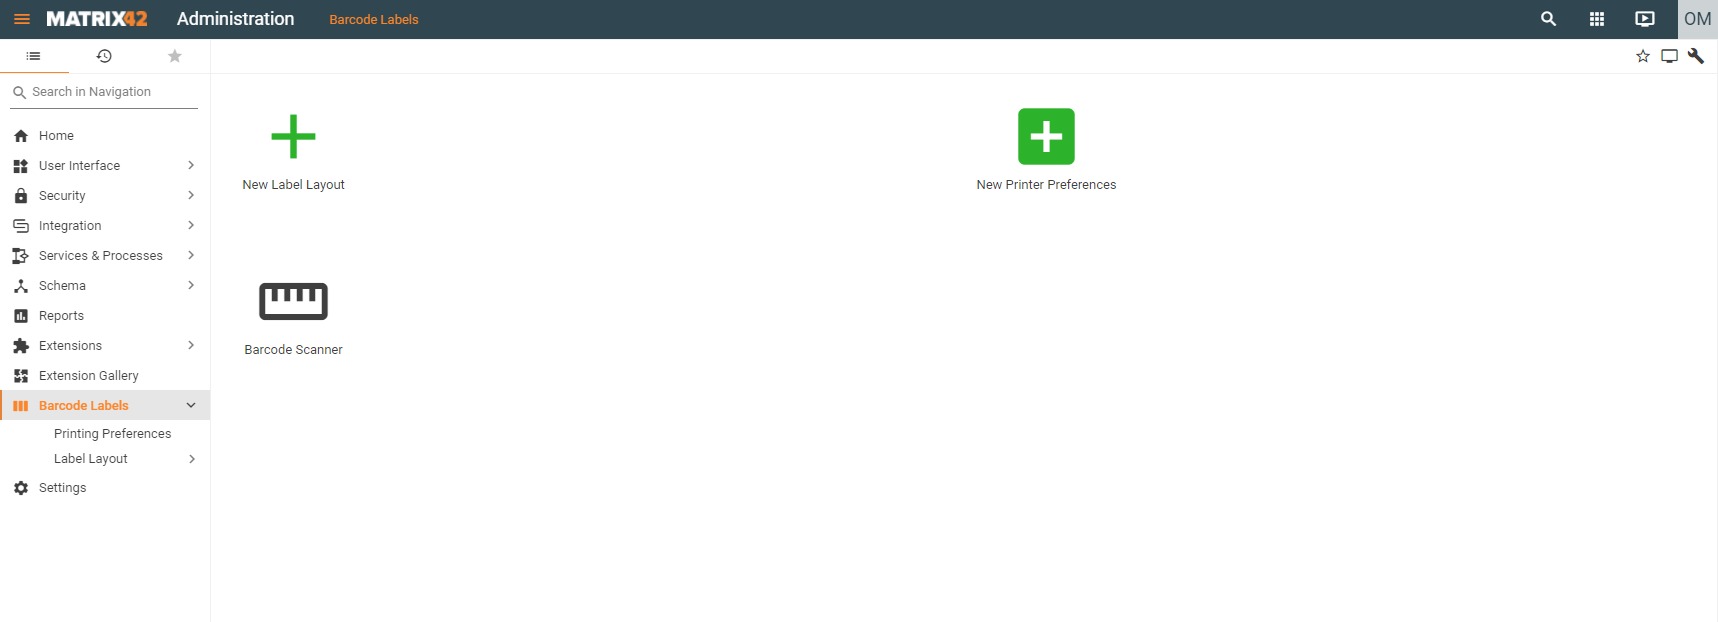
Navigation
A new navigation item Barcode Labels will appear in the administration application offering quick start elements and sub navigation items for overviews of the created objects.
Configuration Items
Label Layout
Dialog Page : General
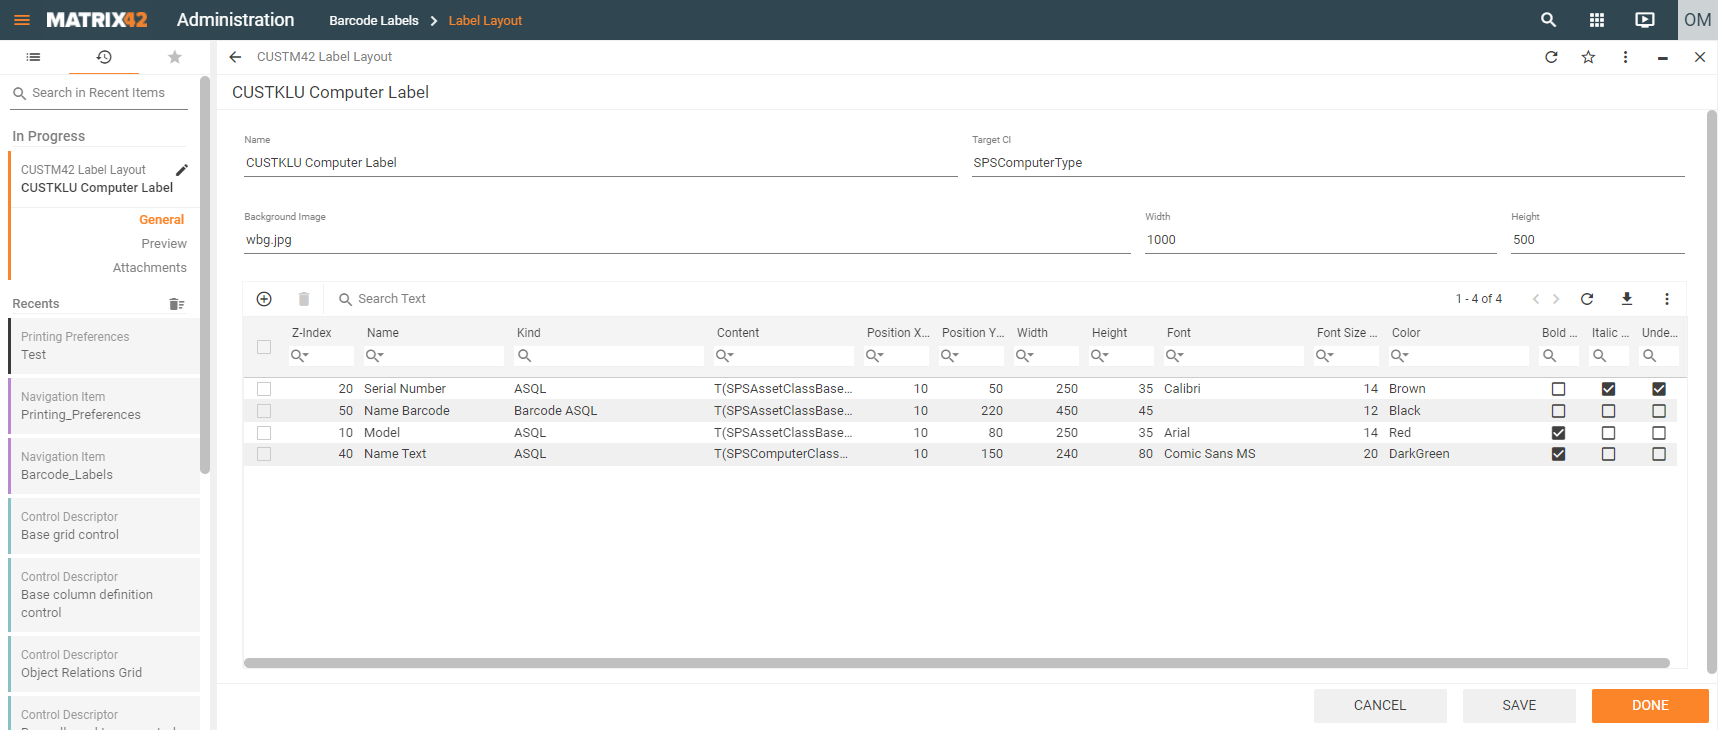
| Field Name | Description |
| Name | Set an arbitrary name for this layout here, so you can recognize it later |
| Target CI | The internal name of the CI for which this layout should be used. Only one CI may be entered per layout. Do not refer to the same CI in more than one layout! |
| Background Image | The name of the image that will be used for the background of the label. An image with this exact name must be uploaded as attachment to this object. The size of this image ( in pixels) will define the size of the resulting label if not both width and height are set below! If both are given, the background image will be stretched to fit. Leave empty to use a blank (white) background. |
| Width | Width of the resulting label image, if both width and height are set. |
| Height | Height of the resulting label image, if both width and height are set. |
| Visual List | These visuals will be rendered on top of the background. Double-clicking a row will open its edit dialog |
Multifragment Dialog: Visual
When adding or editing a single Visual via double-click, the following dialog will open up:
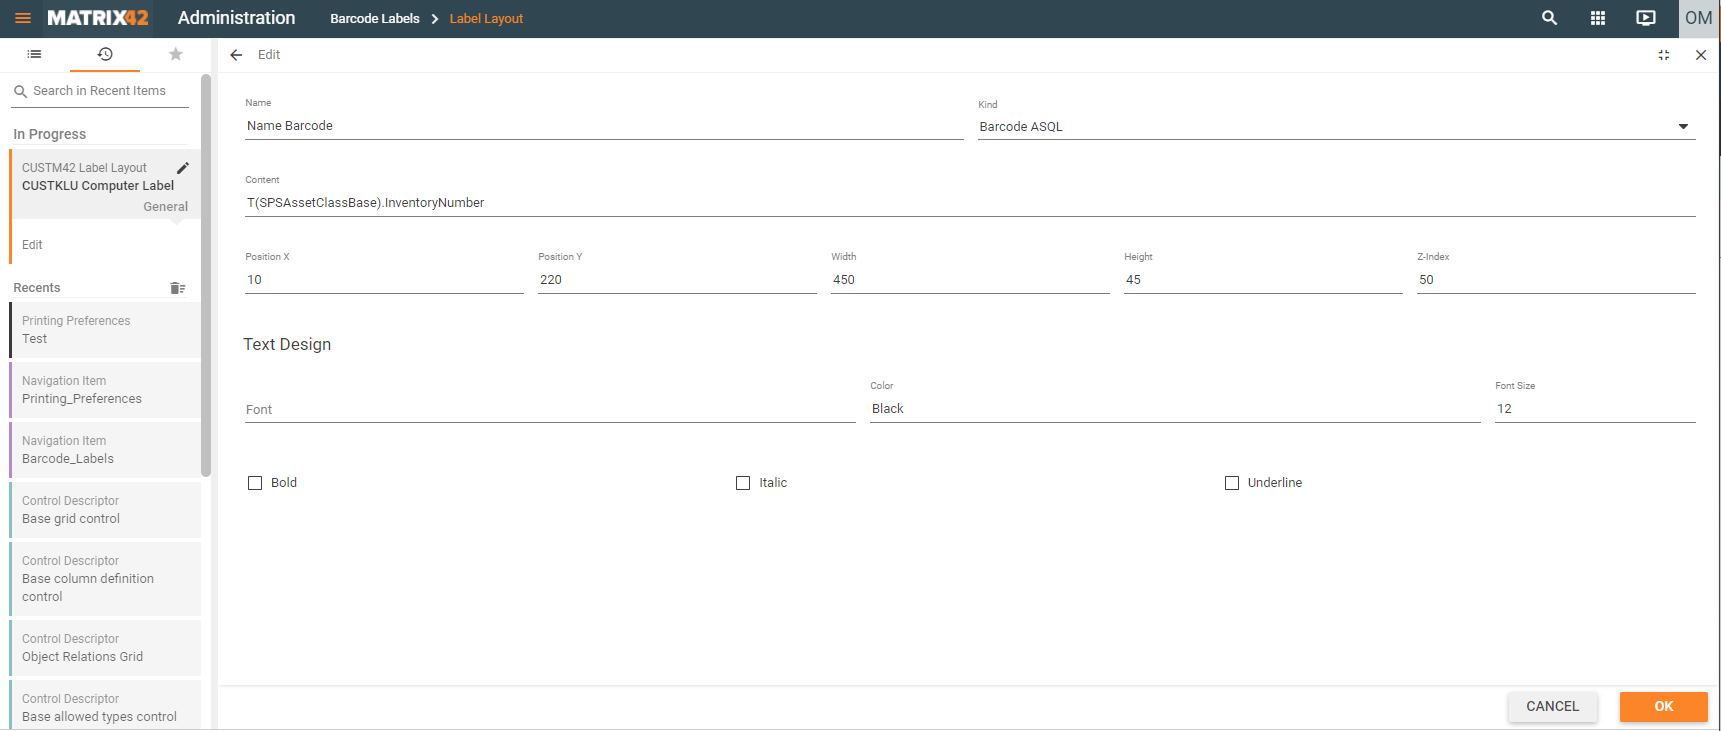
| Field Name | Description |
| Name | Set an arbitrary name for this layout here, so you can recognize it later. |
| Kind | Specify what type of visual this will be. See the meaning of the different values explained in the 'Content' explanation below. |
| Content | For kind 'Text' simply enter a string that will rendered as text as it is provided. For kind 'ASQL' enter an ASQL-expression that will be evaluated for each target object. This may be a path to the desired value (starting from the SPSCommonClassBase) or any valid concatenation of values, functions and constants. For details about what ASQL can do, please see the ASQL-documentation. For kind 'image', set the name of the file that needs to be uploaded as attachment to this layout object. Same as for the background image. For kinds containing the additional word 'Barcode' the corresponding rules as mentioned above apply, but the resulting value will be rendered as Barcode-Image and not as text. |
| Position X | Left side of the rendered visual will start in this distance (in pixels) to the left side of the background. |
| Position Y | Top side of the rendered visual will start in this distance (in pixels) to the top side of the background. |
| Width | Width of the rendered visual in pixels. |
| Height | Height of the rendered visual in pixels. |
| Z-Index | In case of visuals taking the same spot, this index defines which will be above or below other visuals. Higher indexes will be on top, lower ones in the background. |
| Text Design | Use these fields to set some of the typical styles of rendered text visuals. To see which font and color names are available please refer to the MSDN library |
Dialog Page: Preview
The Preview page shows what this label would look like for a given sample ObjectID:
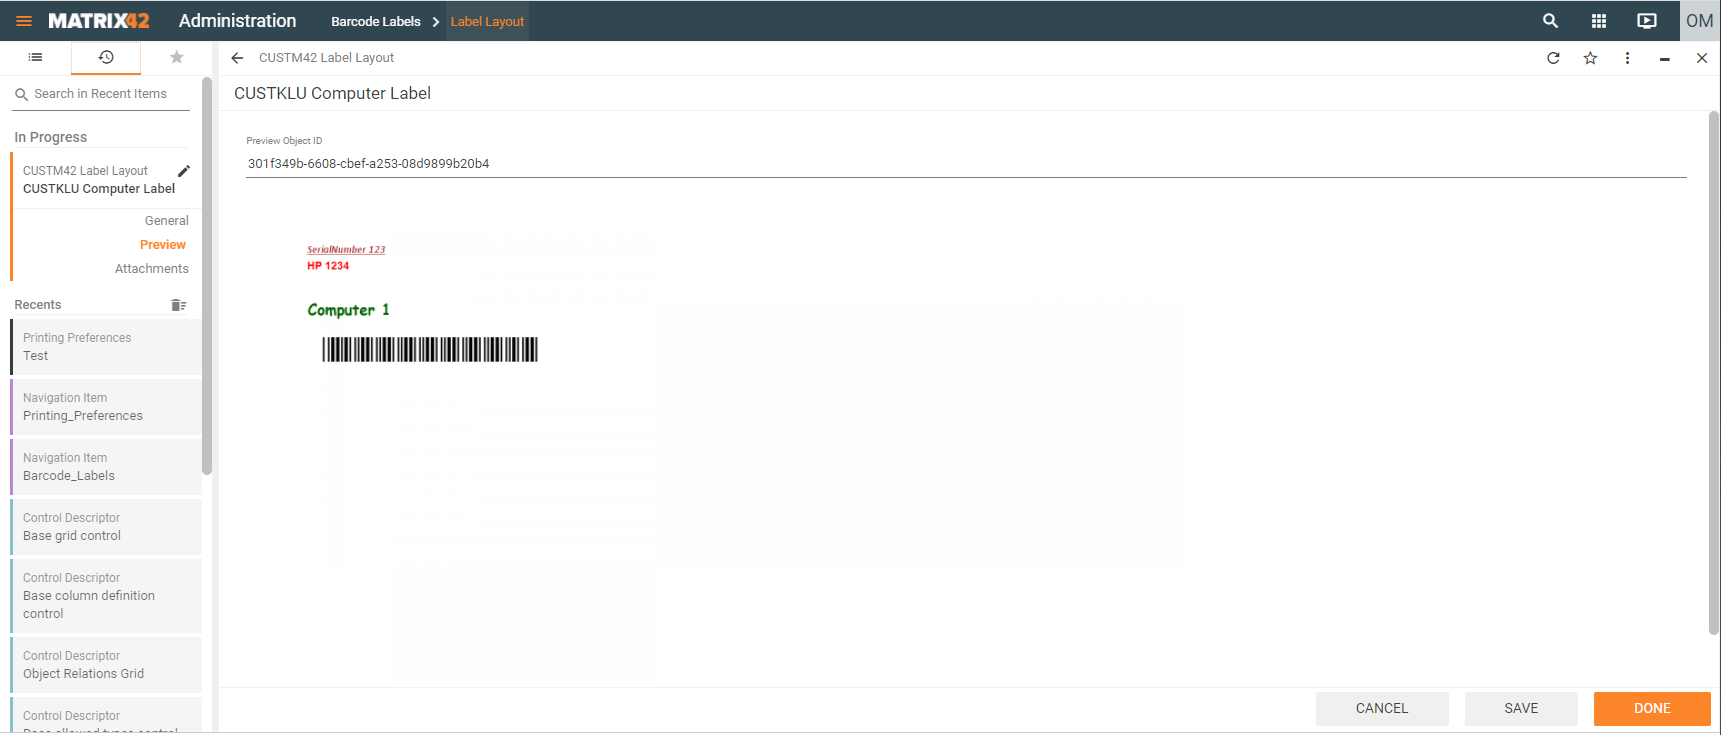
You may need to save changes made before to see the current outcome.
Printing Preferences
In this CI you may save configurations of a selected printer with a special set of settings that will be used each time when printing with these preferences.
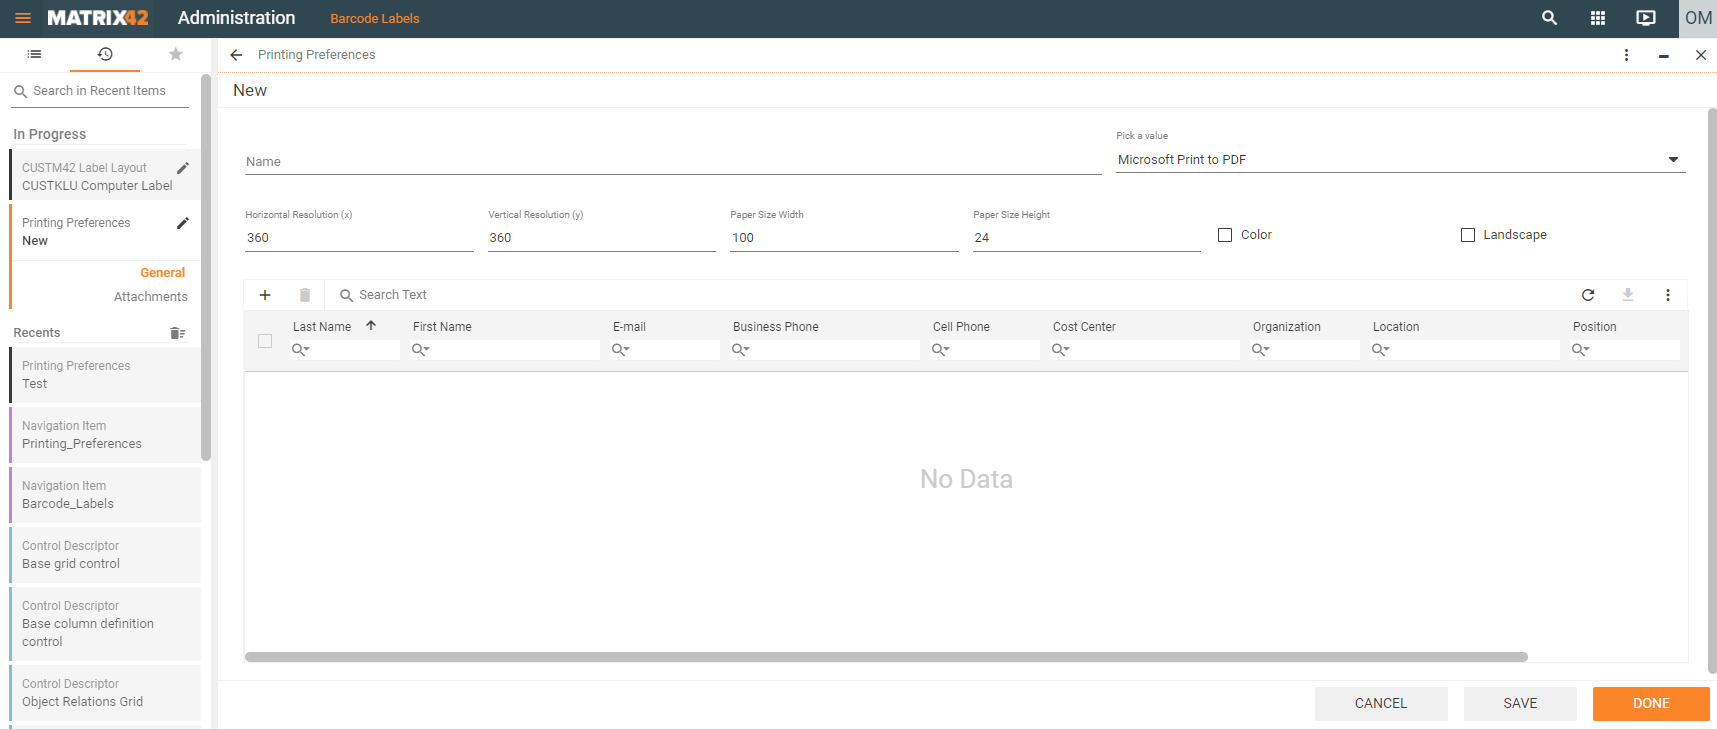
Most attributes should be pretty self-explanatory. Give this configuration a speaking name, select one of the printers installed on the M42 Application Server and choose whether to use color or black/white and landscape or portrait format.
You may add users to the list below. Whenever the 'Barcode Scanner' wizard is opened the preferred printing configuration of the currently logged in user will be automatically preselected (if not overridden by a specially configured default).
Barcode Scanner Wizard
This wizard offers different functionalities in combination with a barcodescanner or manually typed values. The input field for a barcodescanner is configurable for different keycodes (https://developer.mozilla.org/de/docs/Web/API/KeyboardEvent/keyCode).for the suffix in order to delegate an event to the wizard to use one or many functionalities after the scan.
The 'ASQL Matching Expression' is the field to set the filter which object should be searched in the database. This filter expression is always addicted from the SPSCommonClassBase . e.g. You want to get a computer object by its inventory number then the expression T(SPSAssetClassBase).InventoryNumber would be it.
The following radio buttons where it can be selected if the scans should be added to a list for a later execution of all scanned items or directly executed on the configured functions.
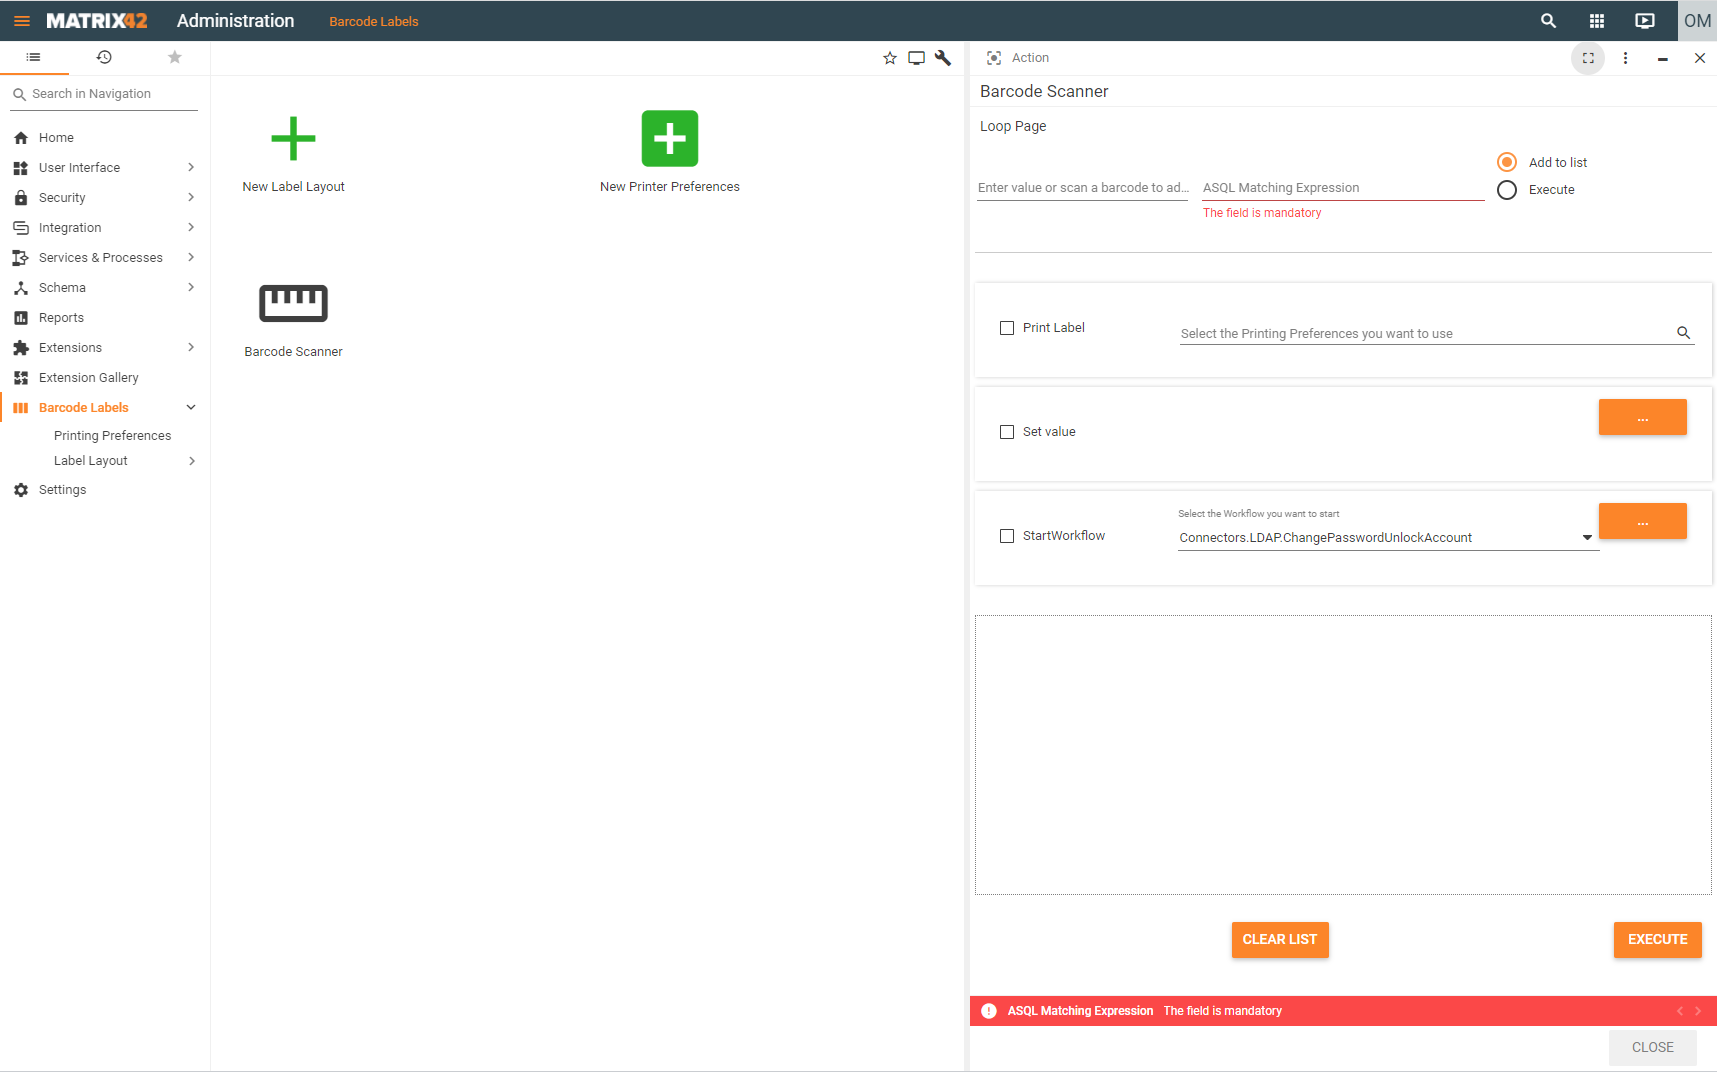
There are three functionalities which can be executed on a scanned object.
- Print Label : This will print a Label of the scanned object(s) on the selected printer and set an attachment of the barcode label for this object.
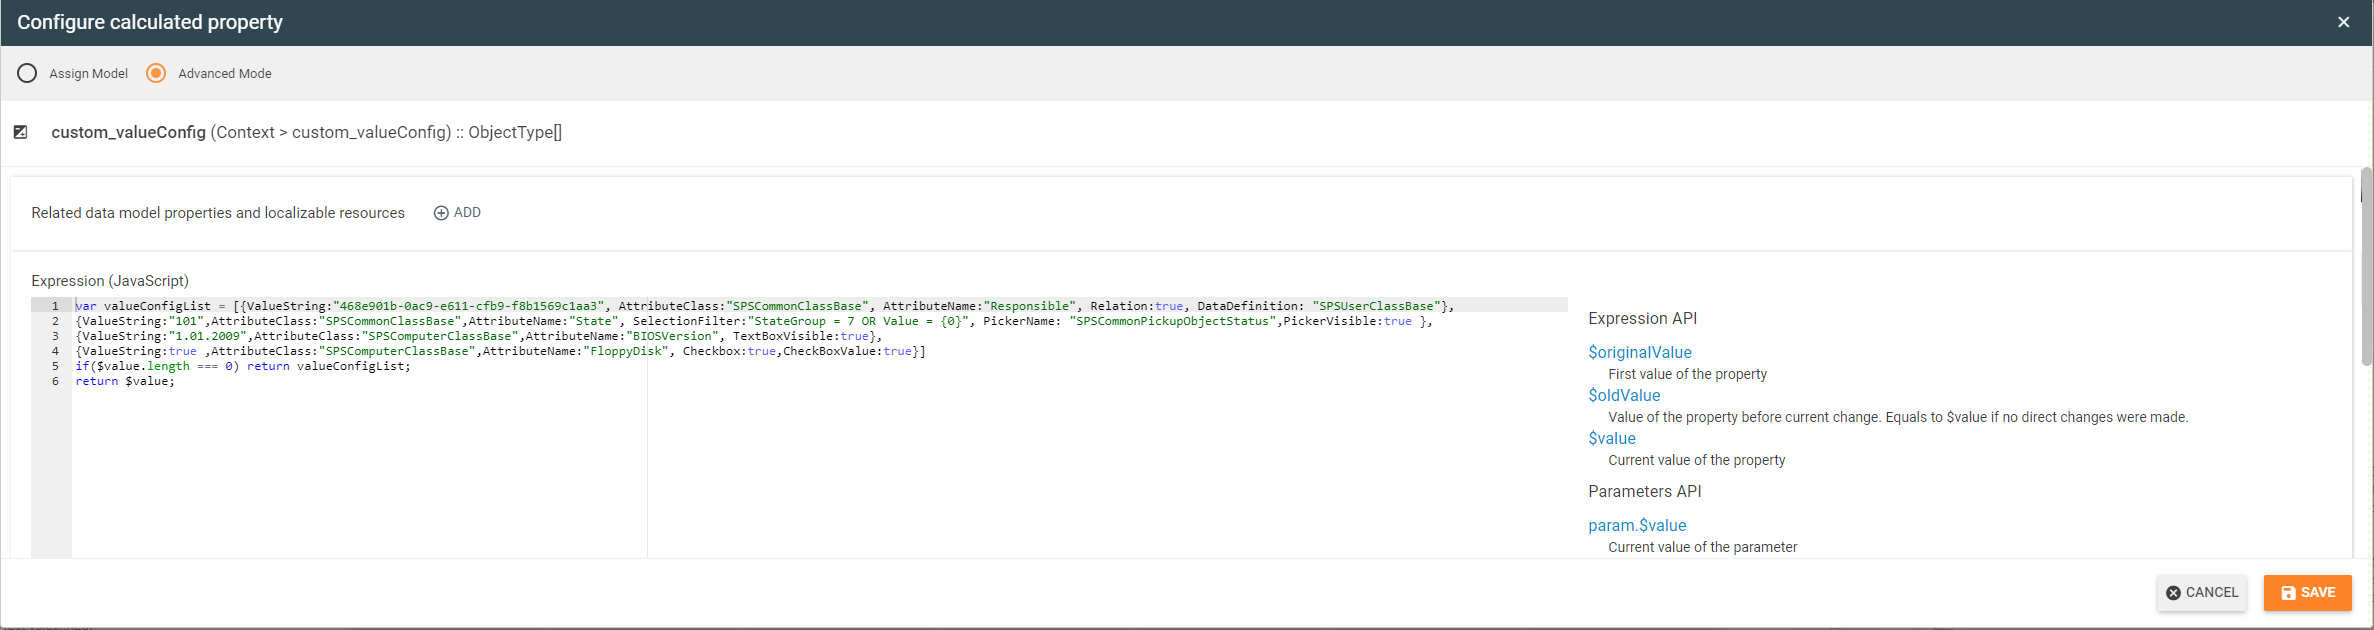
- Set value :This will set different values which are configured in the layout configuration in a context parameter "custom_valueConfig"
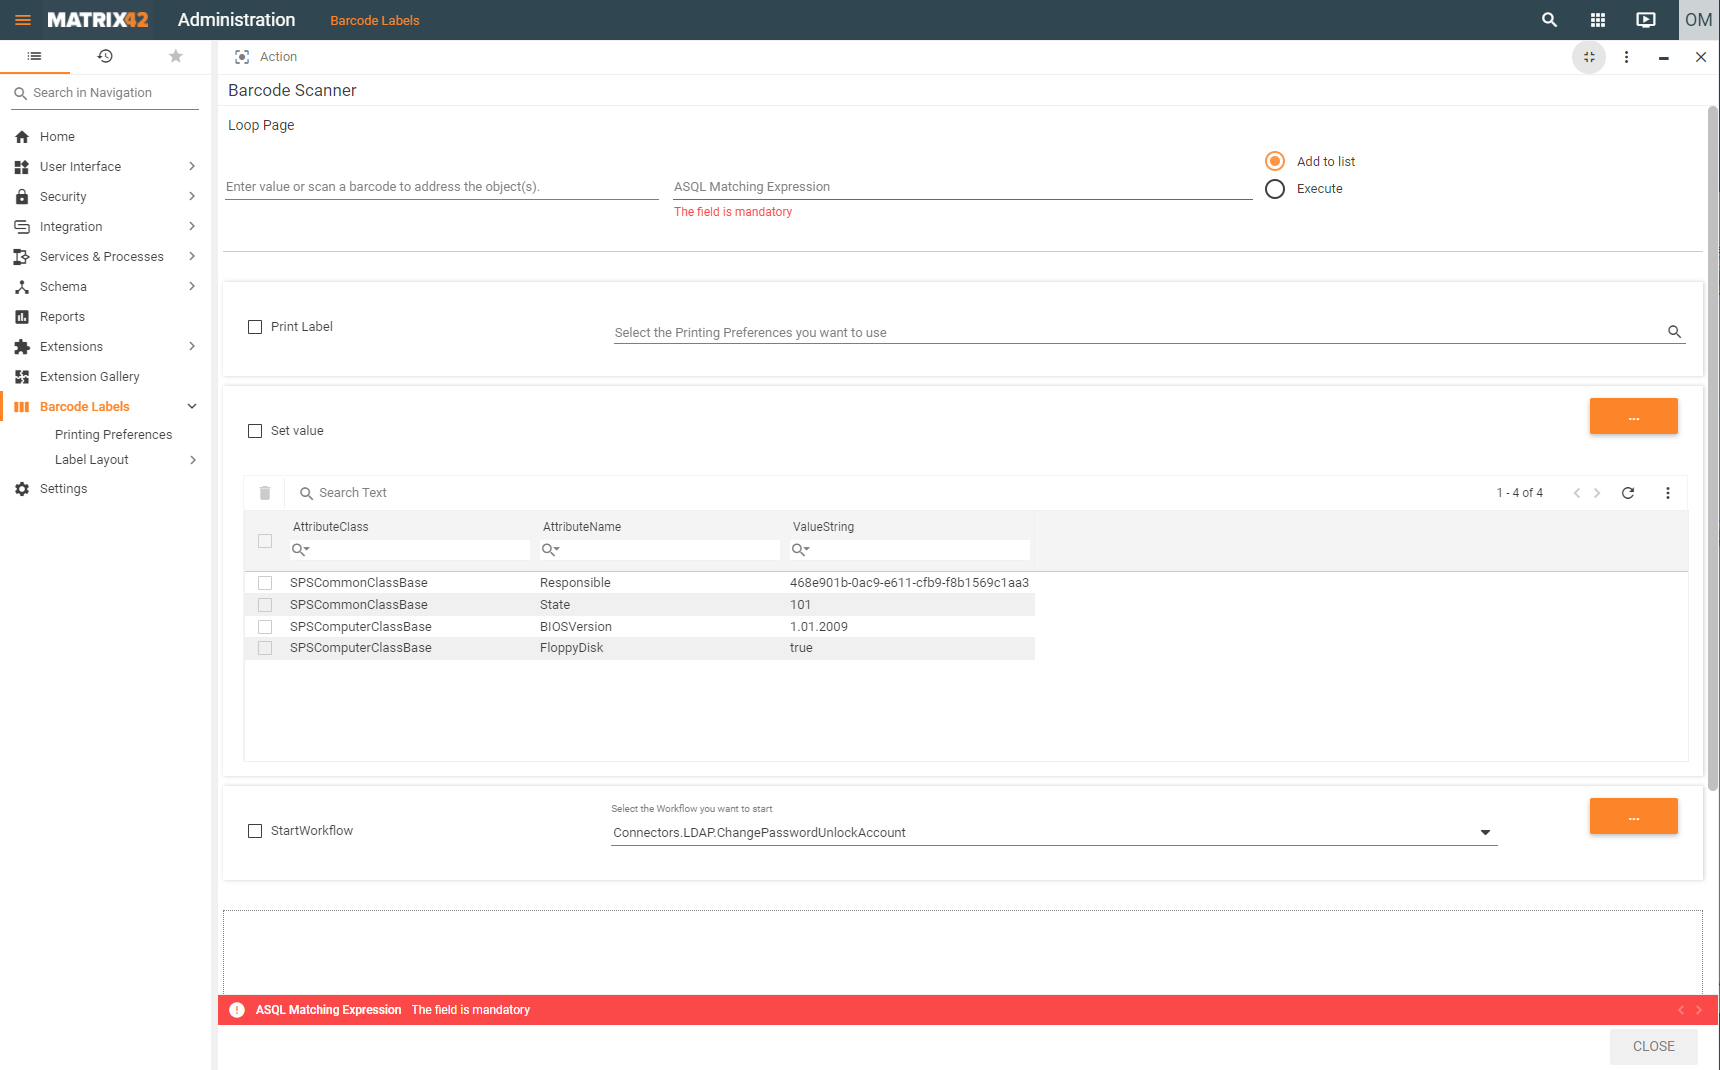
By double clicking on each row the values can be set. Depending which type of value is expected and configured the selection will be different. e.g. dropdown for pickups, objectlink for relations or textbox for strings


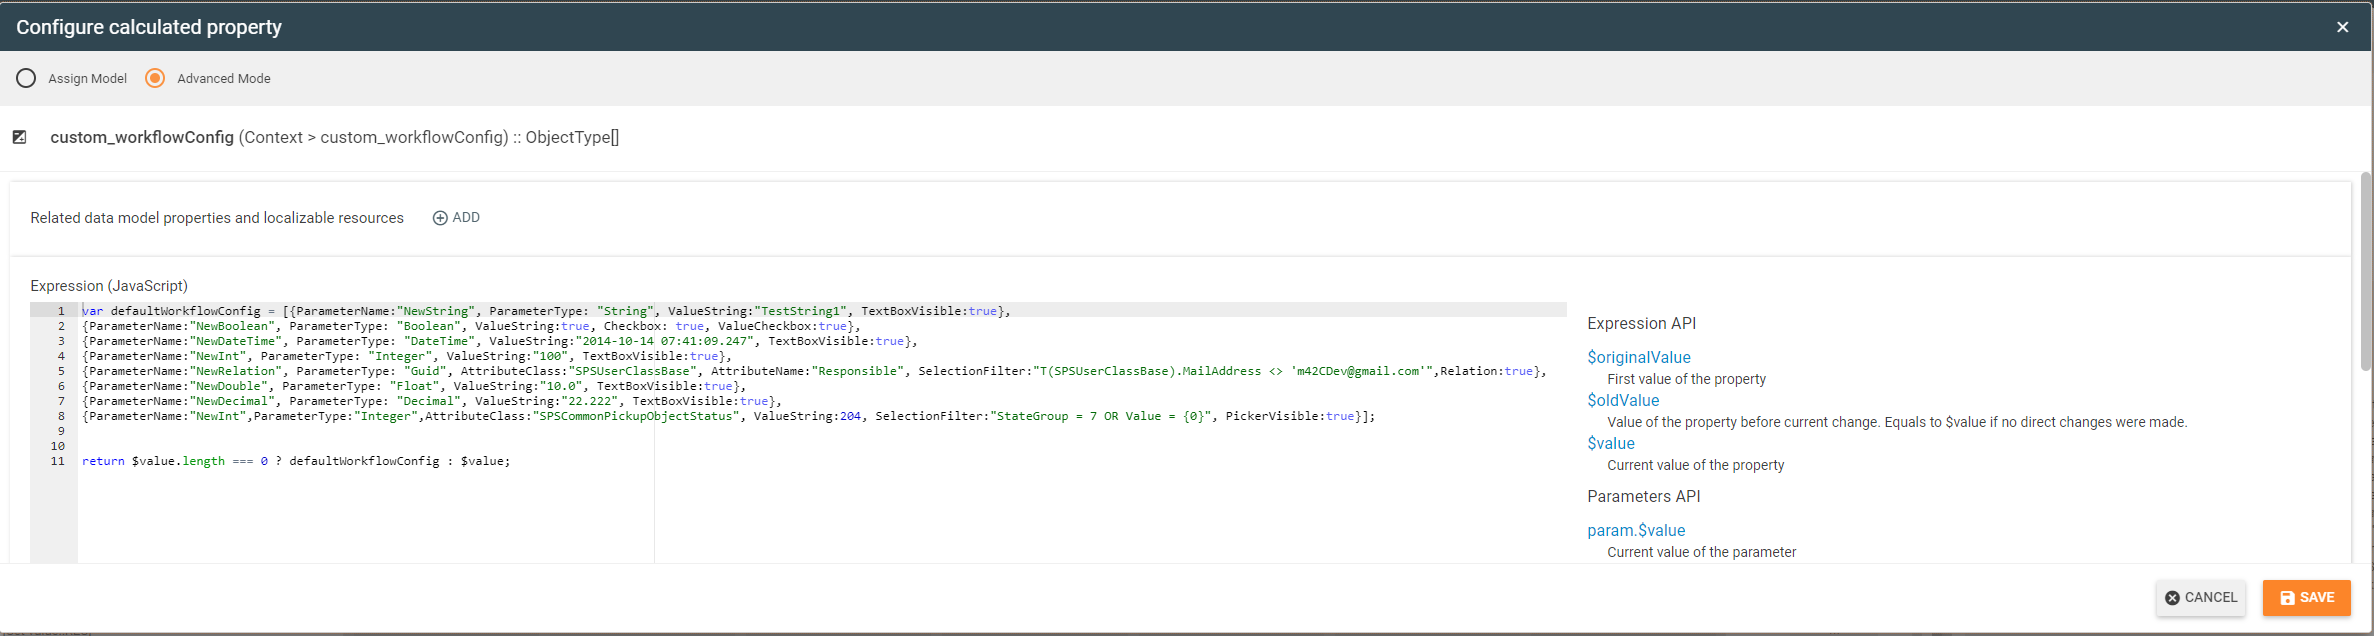
- Start Workflow : This functionality will start a selected workflow with a parameterized configuration which can be configured in the layout in a context parameter "custom_workflowConfig"
The values of the configuration can be be set analog the value set configuration.
The button "CLEAR LIST" clears the list of the scanned objects. The other button "EXECUTE" executes the scanned objects list with the selected and configured functionalities described before.
Barcode Scanner Wizard configuration
The barcode scanner wizard can be customized for more and less functionalities. Matrix42 recommends to copy this wizard, combine with an action and customize the copied wizard for the functionalities which are expected.
Following context parameters are for the configuration of the wizard important:
custom_valueConfig and the custom_workflowConfig is an object array where the configuration lists of the "Set Value" and "Start worklfow" functionality can be adapted. For each kind of value there is an example in the context parameters e.g. pickup, text,relation, checkbox.
The barcodeScanExecuteModel input paramter for the custom_ScanBarcode webservice can be adapted if some of the functionalities ar not needed or has to be extended. If this input parameter has changes thorough the watchers which are added the the webservice will be executed.
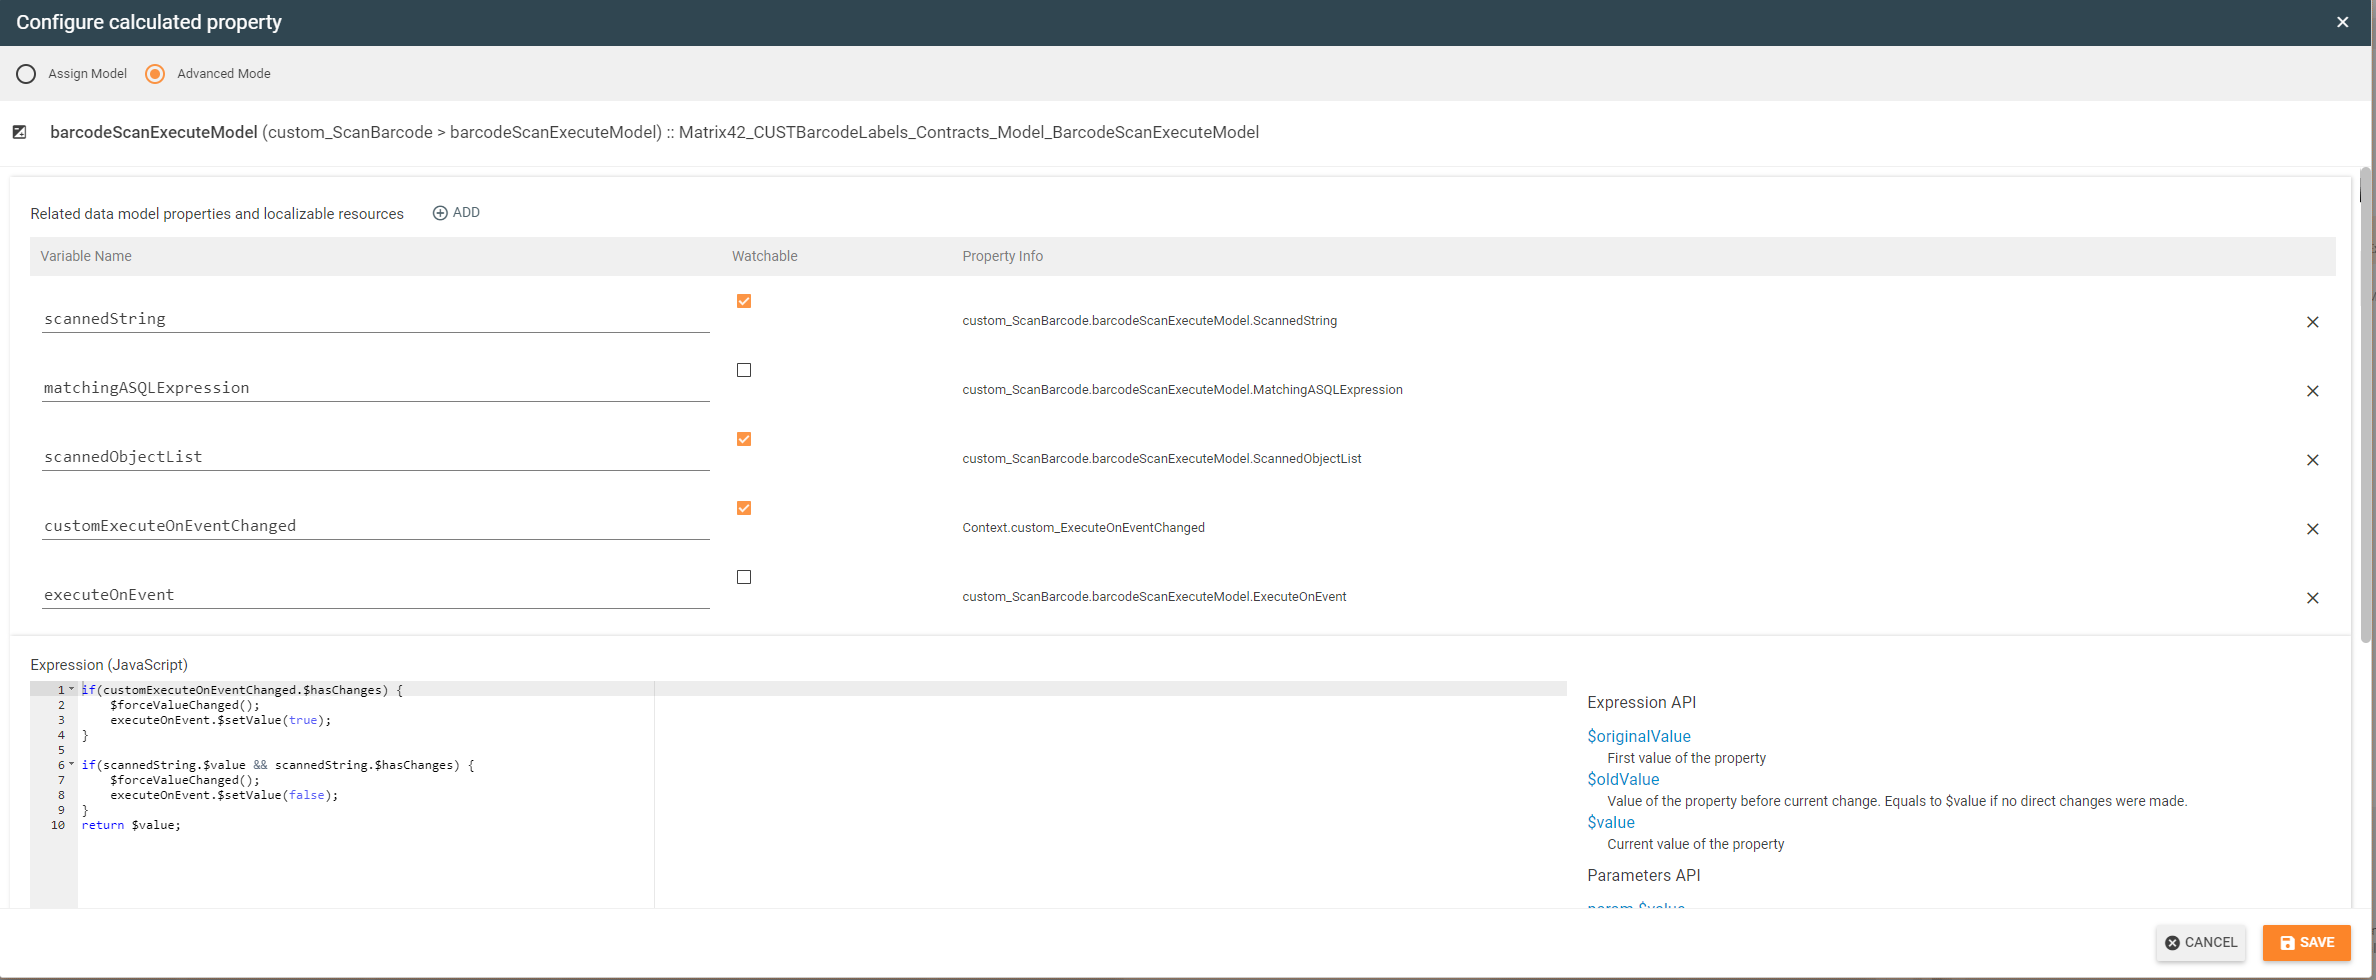
The customScannedObjectList is responsible how the list is filled for the webservice which executes the functionalities for this list.
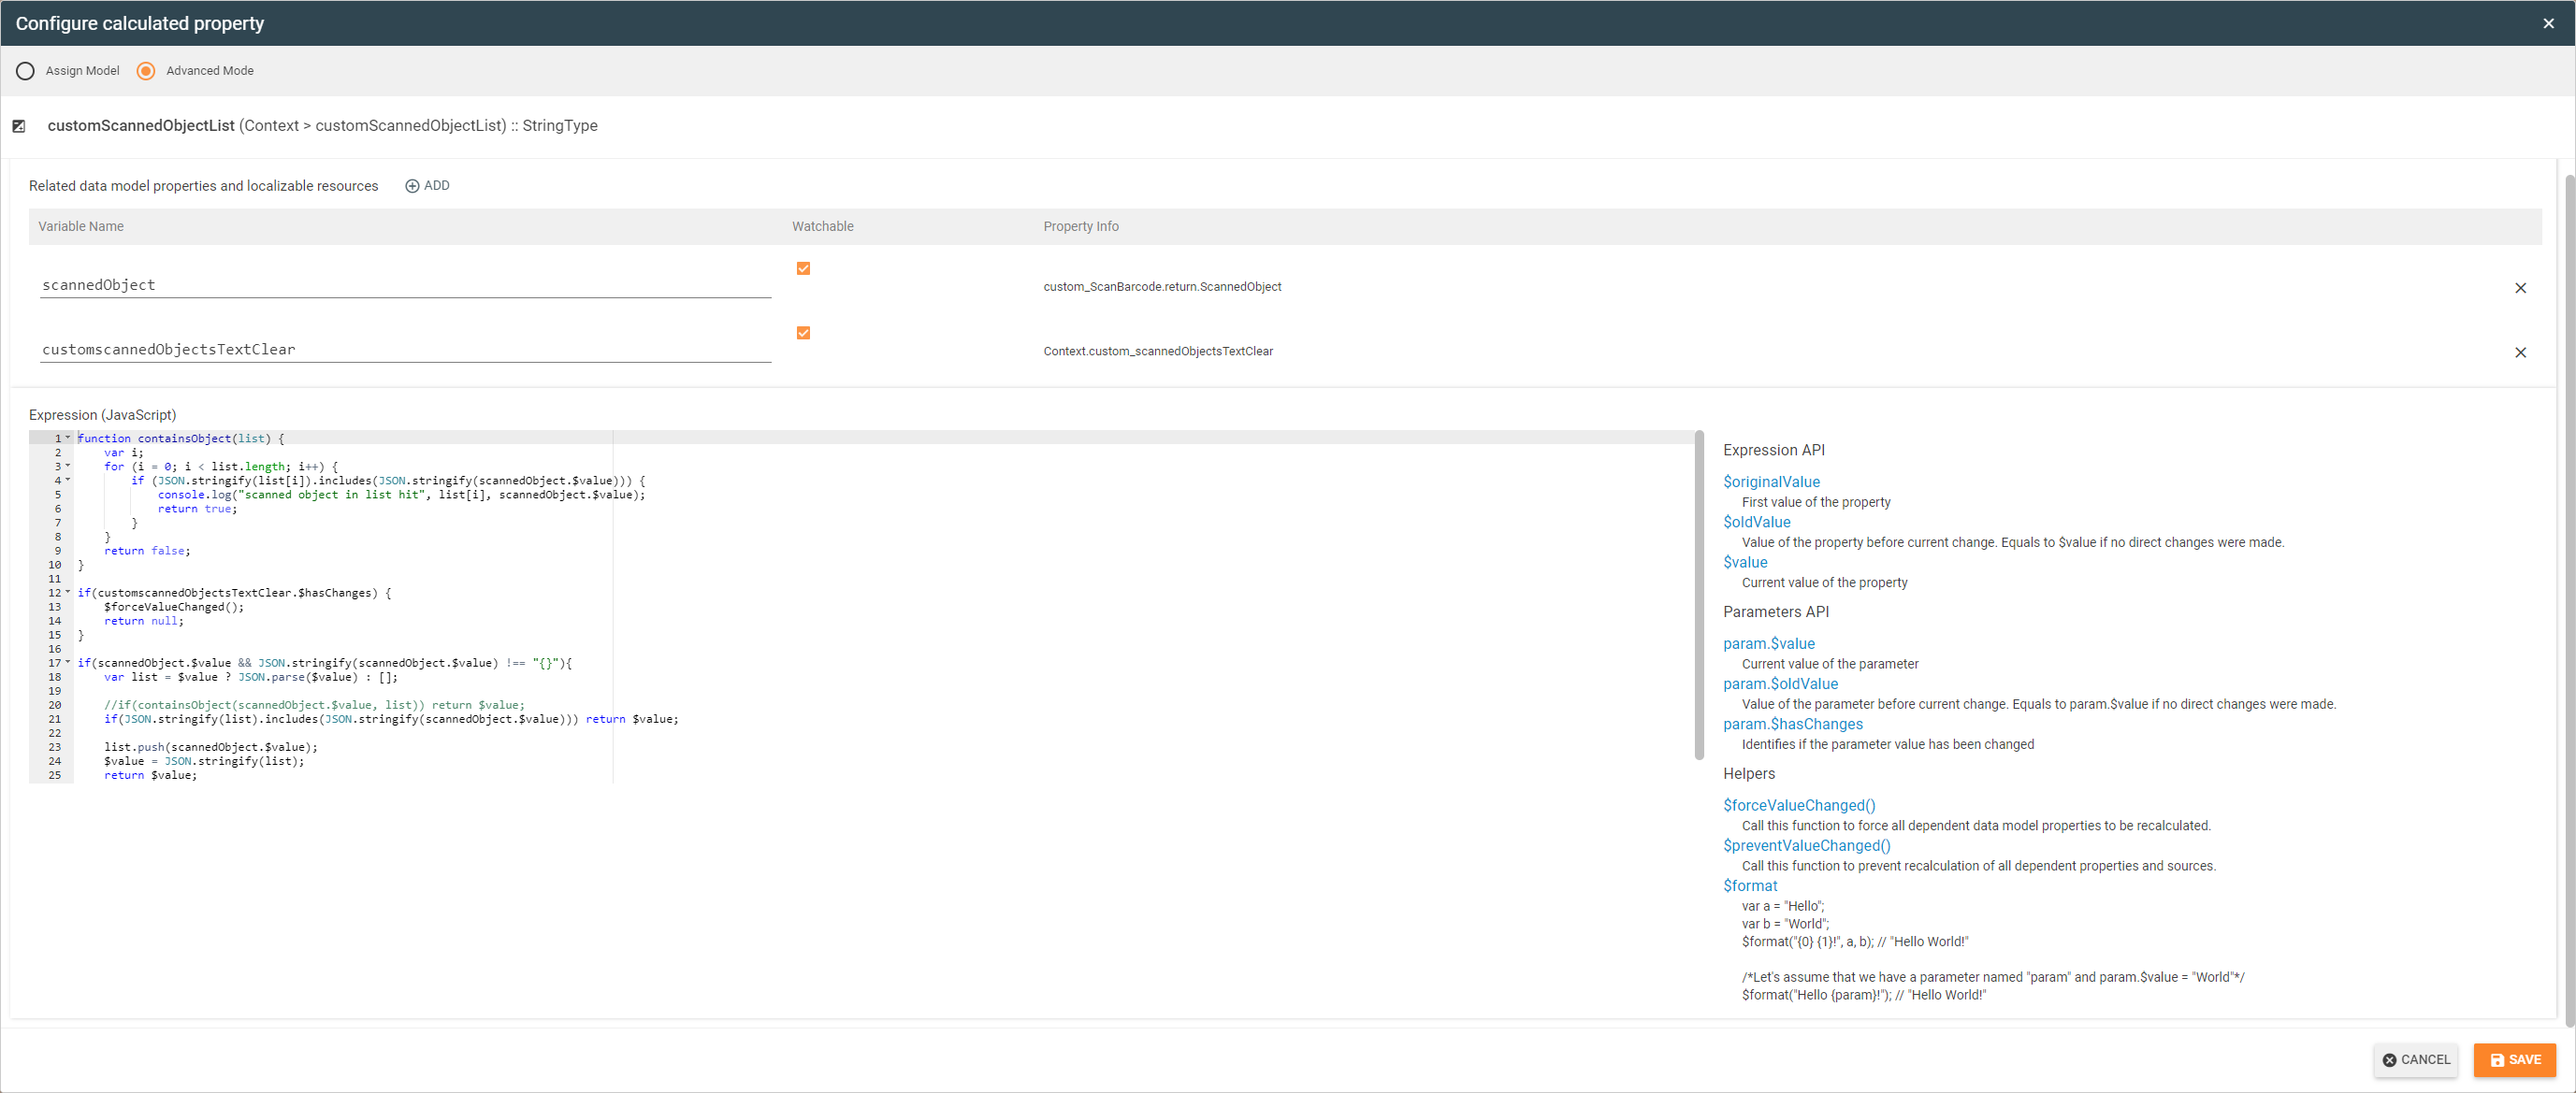
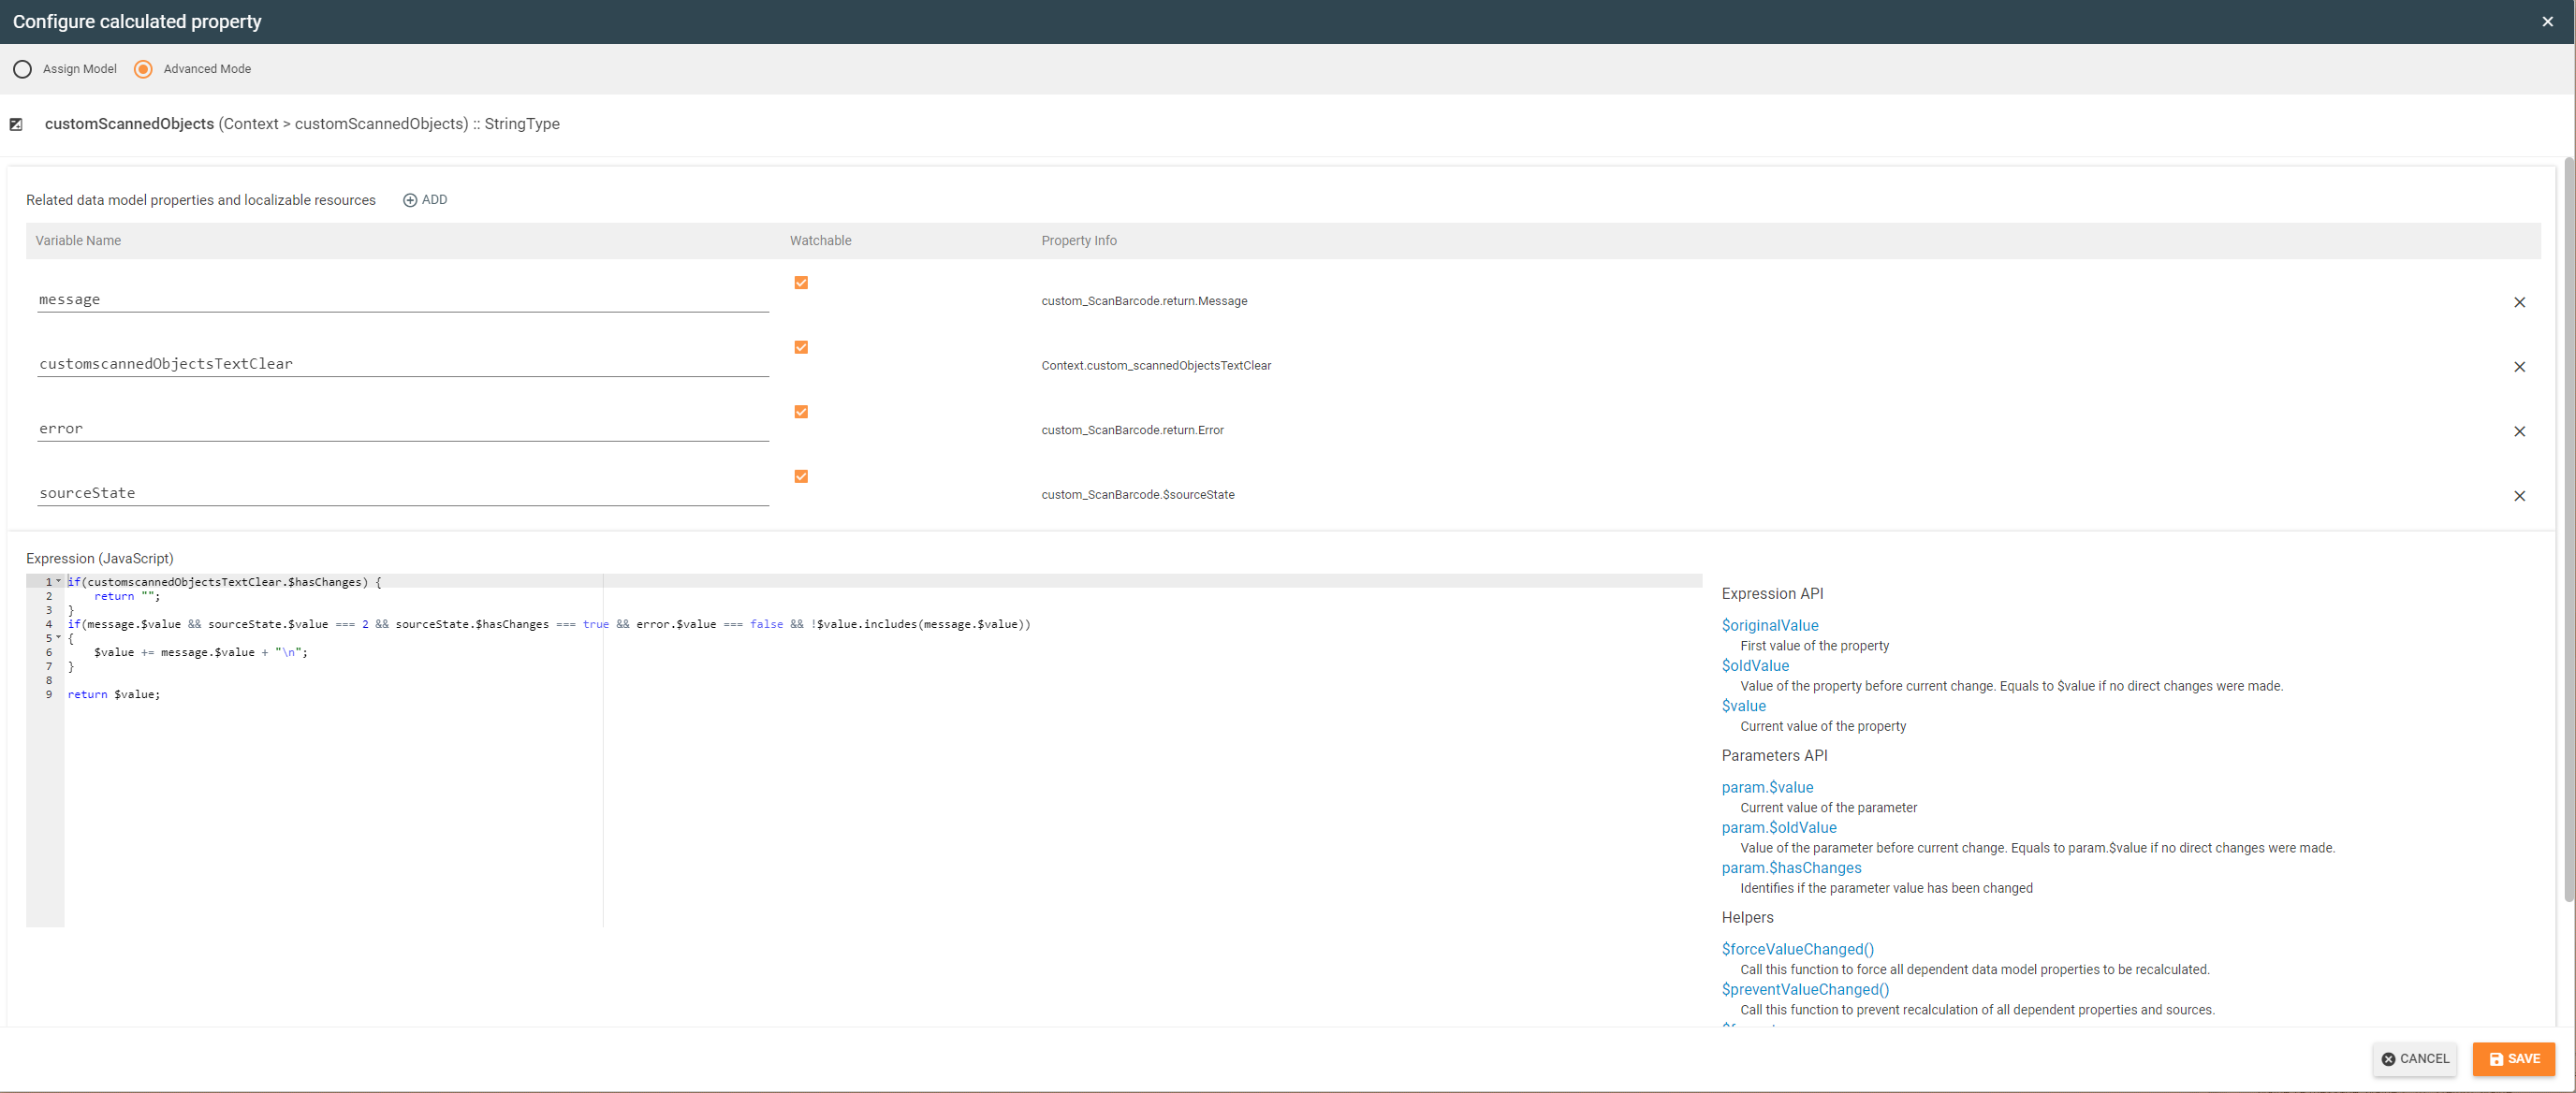
The customScannedObjects parameter is responsible for the list of success messages of the scans and executions.
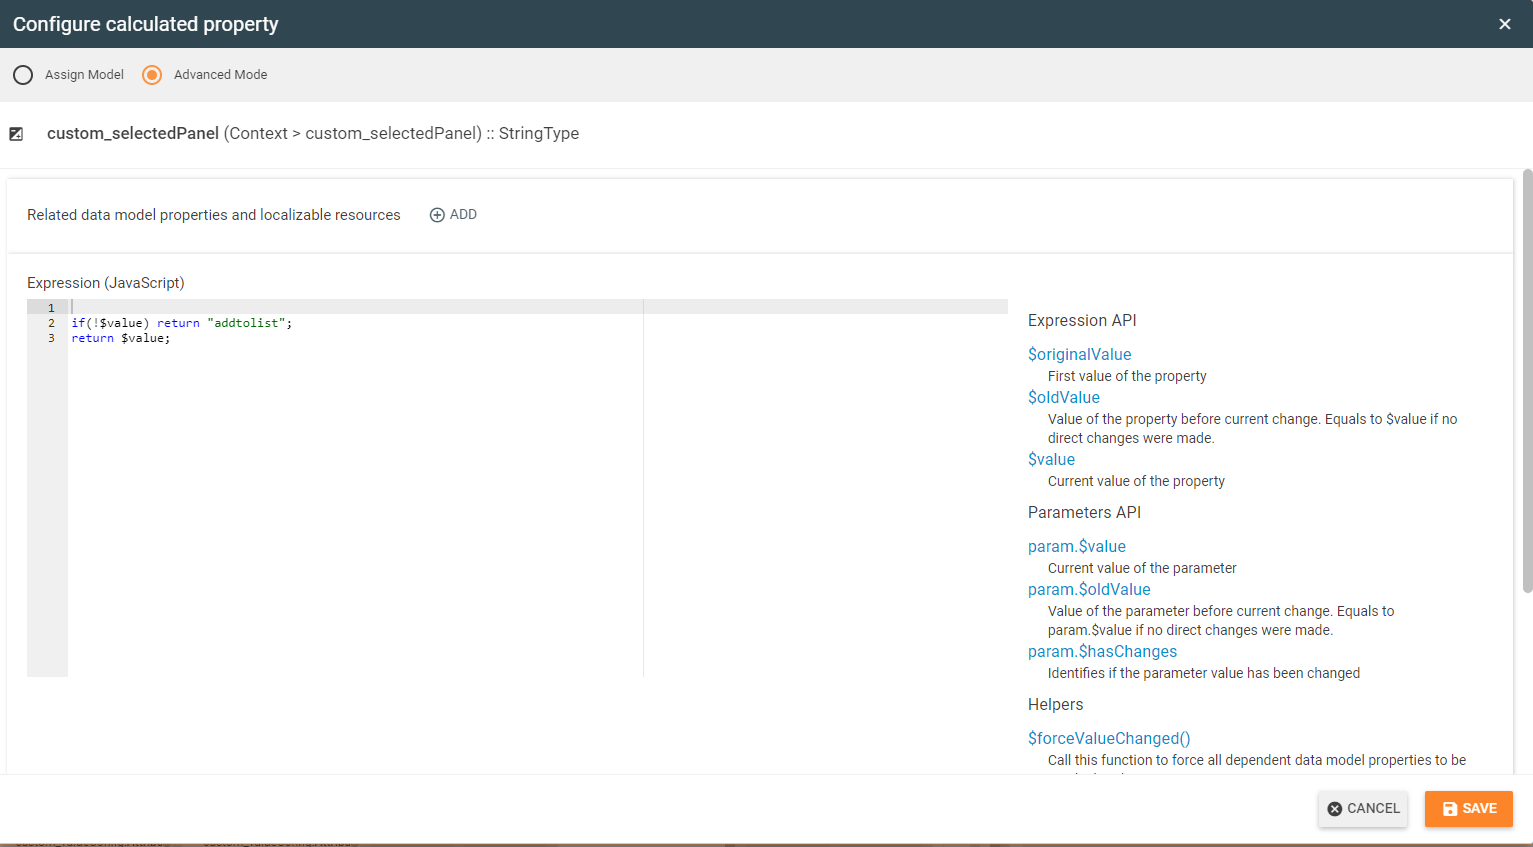
The custom_selectedPanel parameter is responsible for the radio buttons, if You want to set it invisible and just use one of the events then you have "addtolist" or "execute" to set as default.
If You want to use the wizard in an action with context like select an object in an overview then it is recommended to remove the scan input control and set the "ScannedString" parameter of the barcopdeScanExecuteModel from the webservice with the ObjectId of the context parameter and set the ASQL matching expression on T(SPSCommonClassBase).[Expression-ObjectID].
Workflow execustion example
The picture below shows the corresponding definition example of a custom Workflow in the Matrix42 Workflow Studio:
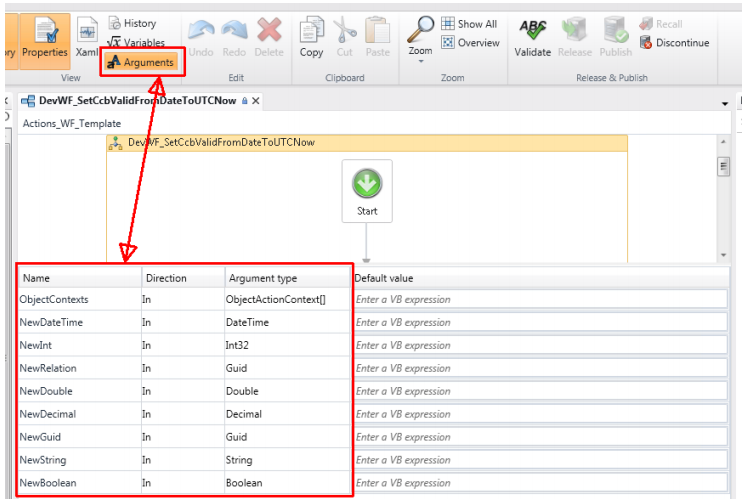
It is important that Name, Direction=In and ArgumentType match the definition of the custom control property PresetWorkflowParameters.
And this is what a started Workflow with custom parameters looks like in the tracking mode of the Matrix42 Workflow Studio:
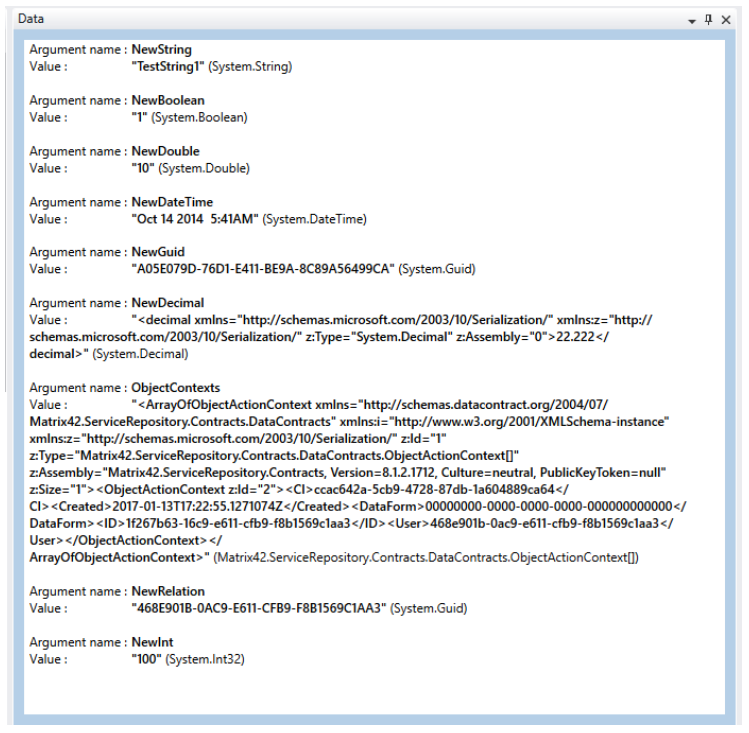
Pay special attention to the parameter 'ObjectContexts', which has not been configured but is a result of the set of scanned objects - just like any other Workflow of integration context.