Change Object Value
Installation
This Add-On is provided via Matrix42 Extension Gallery. It can be added as an extension via it's product page.
For a detailed instruction on how to install Add-Ons from the Extension Gallery see Installing an Extension.
Feature
With Change Object Value, you can easily Change multiple objects without much time and without the creation of various web services.
What are the benefits of this feature?
You can quickly setup your wizard for your needs. No matter how many attributes, pages or purposes. ChangeObjectValue empoweres you to change as many
When to use this feature?
Use this feature to extend the functionality of your Matrix42 Workflow Studio for a better link between your data and your workprocesses.
License Key (certificate)
An activation key is required:
M42CDEV6ActionChangeObjectValue
It's possible that this license is already installed. To check if the license already exists, open the folder “..\Matrix42 Workplace Management\Certificates”. If not, copy the license file into the Certificates folder.
Configuration
Example #1
In this first example we will use Change Object Value to Change the last name of a person.
First step:
Creation of a wizard that does not perform any operation.
(App Administration -> Layouts -> Wizards)
Second step:
In the preview of the new created wizard, click on Configure ChangeObjectValue.

Third step:
In this dialog you must add the attributes that should be changed.
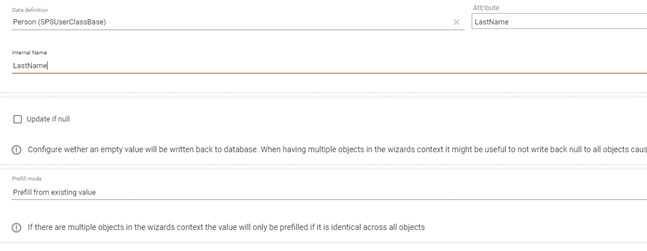
The Attribute in the top right has to match the actual attribute name in the Classbase. The internal name can be named to whatever you are comfortable with identify it in the layout designer.
Additional step -
If you want to add journal entries you can do this with the latest version of Change Object Value. To make use of the feature, you have to bind “VisibleInPortal” and “Comment” to the layout designer, the other attributes will be filled without your help. Its mandatory to bind “Comment” via the Rich Text Box control.
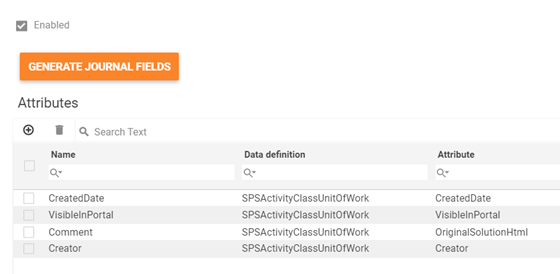
The configuration will be empty on creation. If you press the button “Generate Journal Fields” the mandatory fields to create a journal entries will be generated.
You need to add those fields like other attributes in the layout designer.
Fourth step:
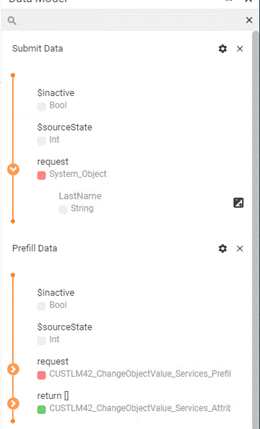
Now you must add the attributes you want to change in the layout designer.
As you can see in the following picture, the attributes you just selected are listed at Submit and Prefill Data.
Fifth step:
After adding the attributes, you need to create an action that calls this wizard.
(App Administration -> User Interface -> Action)
Of course, you can use the action for several objects at the same time.
It is very important to use or authorize the action only where the objects match the selected attributes. For example, in our case we cannot use the action for changing the last name in the SPSAssetType.
Otherwise an error message will be shown there.
Example #2
The second example is about how to use Change Object Value with an Prefill ASQL Expression to take over an asset by one click.
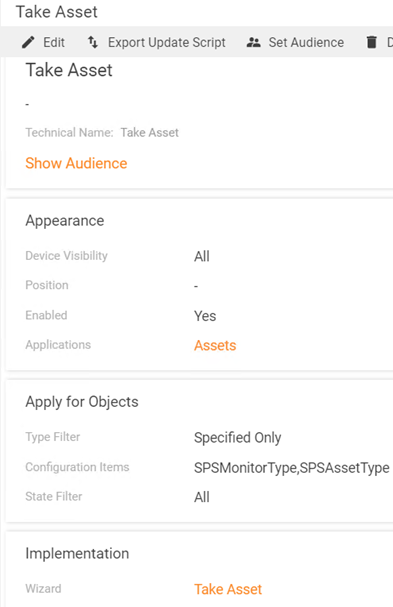
As in the first example, you need to create a Wizard and an Action which runs the Wizard.
In this case they are named Take Asset.
Now you must push Configure ChangeObjectValue at the Wizards Preview Dialog.
For this task we need to take the AssignUser attribute from the SPSAssetClassBase.
And now you have to change the Prefill mode to Prefill from ASQL expression and place your ASQL. In this case “CurrentUserID()”.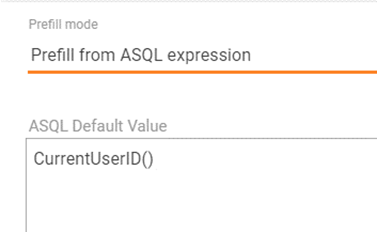
At least you have to Customize your wizard.
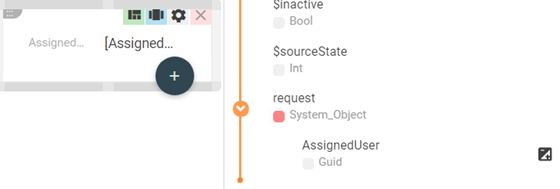
As you can see in this picture, you just must drag and drop the Assigned User attribute from the request as a literal into the dialog.
If you now click on the action take asset, the logged in user is automatically set.
With the same path you can also automatically set the AssignedUser or other attributes to NULL by typing NULL in the ASQL Expression.