Email Robot Extended
With the Email Robot Extended Add-On for UUX you can create new users upon incoming e-mails from unknown addresses and assign them to the newly created ticket.
Installation
This Add-On is provided via Matrix42 Extension Gallery. It can be added as an extension via it's product page.
For a detailed instruction on how to install Add-Ons from the Extension Gallery see Installing an Extension.
What are the benefits of this feature?
More flexible and detailed creation of new users from email with variables and constant values.
When to use this feature?
If you want to add new users by email automatically.
How to use?
After the installation the original email robot engine is replaced but still available. The original one can be identified by the name suffix "Original".

Add Config File - CUSTMailRobotExt.config
The configuration for the user creation process can be done by adding the config file "CUSTMailRobotExt.config" to the "...\Web\User\Configs" folder within your Matrix42 Workspace Mananagment installation folder. The file is mandatory up to Version 11.
With Version 11, the config file has a visual representation. You can find it under Service Desk Settings > Email Robot Extended.
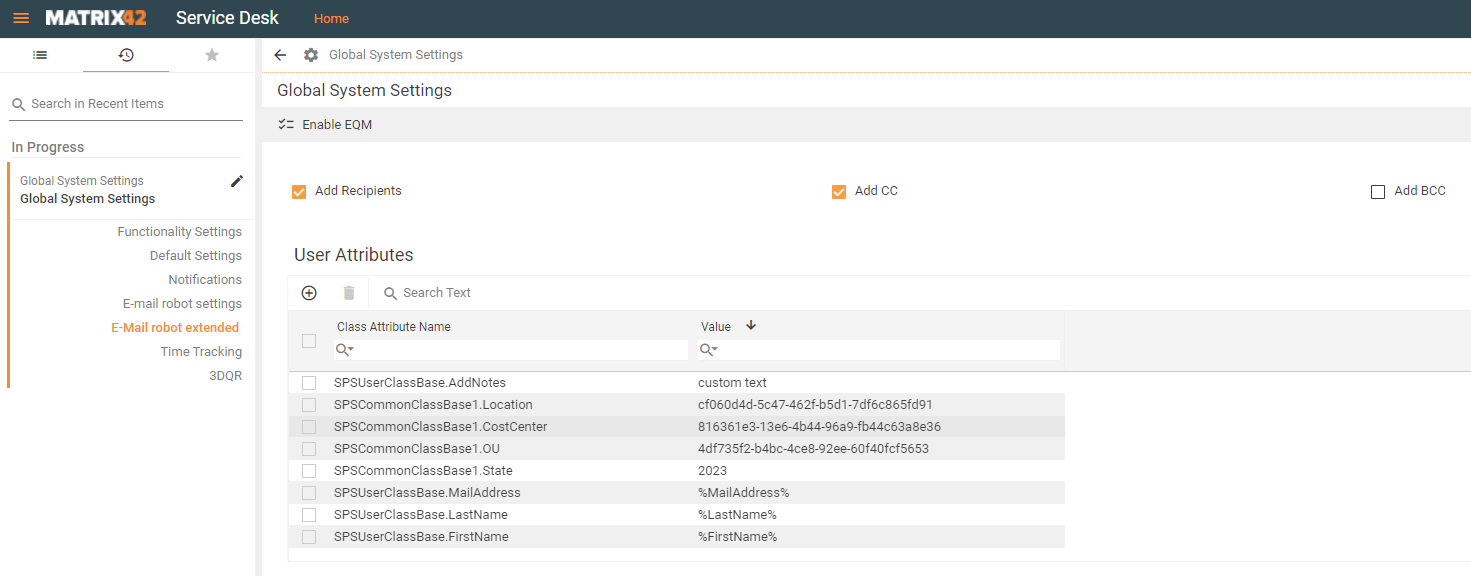
Via the user interface, you can add the user attributes with their class names (<class name>.<attribute name>) and set the default value.
For support, a sample file which is also attached to this article (CUSTMailRobotExt_Ref.config) is added during installation to the configs folder.
If the email engine does not work after adding the configuration file, try restarting the Windows service "Matrix42.SPS.Engine.Common".
In the following you can see the sample configuration. You can decide whether to add the recipients, CC and BCC from the email. The configuration of the user creation process can be done by adding classes and attributes from "SPSUserType" with their internal names.
List of available placeholders:
- %FirstName%
- %LastName%
- %DisplayName%
- %MailAddress%
<?xml version="1.0" encoding="utf-8" ?>
<config>
  <initiatorMapping AddRecipients="True" AddCC="True" AddBCC="False">
    <class Name="SPSUserClassBase">
      <attribute Name="FirstName">%FirstName%</attribute>
      <attribute Name="LastName">%LastName%</attribute>
      <attribute Name="DisplayName">%DisplayName%</attribute>
      <attribute Name="MailAddress">%MailAddress%</attribute>
      <attribute Name="AddNotes">Created from Mail via Customized Mail-Robot Engine</attribute>
    </class>
    <class Name="SPSCommonClassBase">
      <attribute Name="State">2023</attribute>
      <attribute Name="CostCenter">816361e3-13e6-4b44-96a9-fb44c63a8e36</attribute>
      <attribute Name="Location">cf060d4d-5c47-462f-b5d1-7df6c865fd91</attribute>
      <attribute Name="OU">4df735f2-b4bc-4ce8-92ee-60f40fcf5653</attribute>
    </class>
  </initiatorMapping>
</config>