The Send E-Mail action
Overview
This page describes how to configure and send e-mails manually from the Matrix42 Software Asset & Service Management platform.
Prerequisites
- Enable e-mailing: enable e-mail sending option and specify the basic e-mailing configuration in the global system settings of the Administration application.
- E-mails processing mode: choose the e-mails processing mode in the global e-mail settings in order to have all processed e-mails listed in the Administration application → Services & Processes → E-mails menu → E-mail page.
- Senders: specify the default sender e-mail addresses in the Service Desk Notifications settings. The set e-mail addresses are used for corresponding Configuration Items. If the sender is not set the system uses the Default Sender e-mail address from the global system settings.
Default Configuration Items
With the help of Matrix42 you can send emails manually directly from one of the following Configuration Items:
- Task
- Incident
- Problem
- Change Request
- Service Request (UUX only, if activated in the System Settings)
- Ticket (UUX only, If activated in the System Settings)
Default applications
The list of applications where the Send E-mail action is available by default is as follows:
- Service Desk
- Service Catalog
- Administration
- Assets
How to Send an Email
In the application choose necessary Configuration Item, click the Send E-mail action and fill out necessary fields.
For instance, in the Service Desk application:
- open Incidents;
- select any item in the Dataset view to open the Preview page;
- in the Actions panel, click Send E-mail. An input window containing the following fields opens:
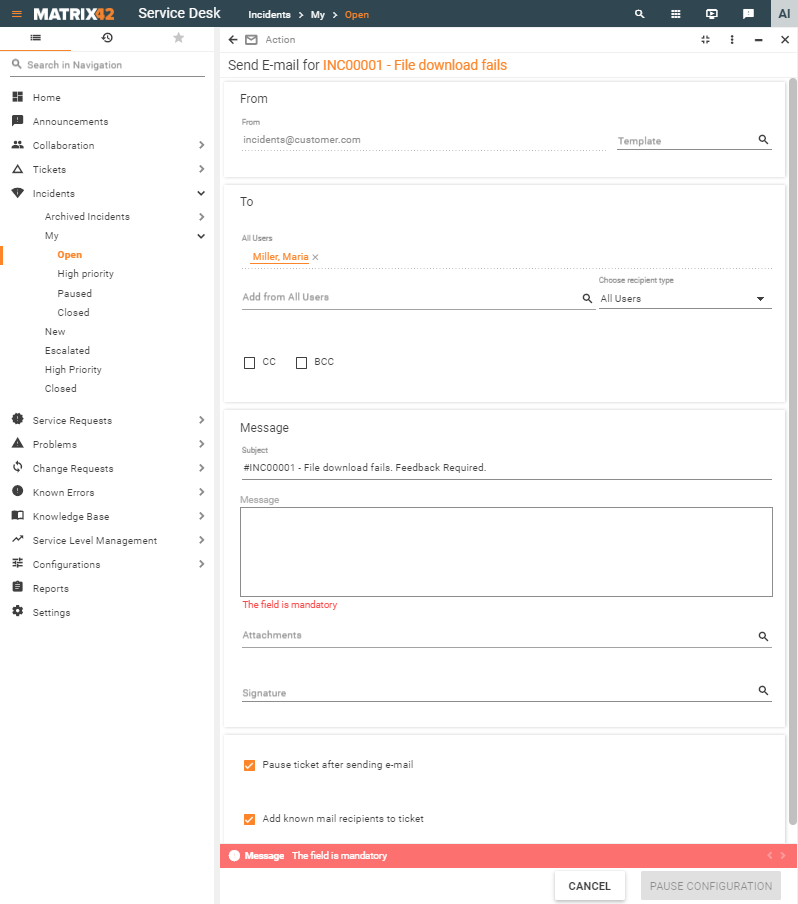
- From:
- From: a predefined e-mail address of the sender. The address is not editable and is automatically retrieved from the Service Desk Notifications, or, if not defined, from the Default Sender field of the global system settings.
- Template: select an email template to use the predefined subject and message text that it contains. You can edit them later.
- To:
- To: define the recipient from one of the supported Recipient types:
- All Users
- Related Users
- Business Contacts
- Business Partners
- User Roles
- Emails
The end-user who reported the ticket is automatically added as a recipient.
- CC: select the checkbox and specify the address where the copy of the e-mail should be sent. The received message explicitly states that the e-mail was also sent to the specified CC address.
- BCC: select the checkbox and specify the address where the blind copy of the e-mail should be sent. The received message does not include the BCC e-mail address in the header.
- To: define the recipient from one of the supported Recipient types:
- Message:
- Subject: the subject line of the email.
- Message: the body of the email.
- Attachments: select one or several attachments from the ticket that should be sent with this email. You can add further attachments to the respective ticket and select them for sending by using the magnifying glass icon.
- Signature: select a signature that will appear at the end of the email.
It is possible to select only those signatures for which the Send Mail checkbox is selected and which you are authorized to use. For more information, see Creating Email Signatures.
- Other options:
- Pause ticket after sending e-mail check-box options are available for Tasks, Service Requests, Incidents, and Problems:
- selected (default): click the Pause Configuration button (which replaces the Send E-mail button when the Pause Ticket After Sending checkbox is selected) to set the activity status to On Hold. Use this functionality if you need feedback for further ticket editing. Keep in mid that the email will not be sent when you click the Pause Configuration button.
- disabled: proceed with the Send E-mail button
- Add known mail recipients to ticket: select the check-box if necessary.
- Pause ticket after sending e-mail check-box options are available for Tasks, Service Requests, Incidents, and Problems:
Click the Send E-mail button at the bottom of the wizard to send the email.
The email information is saved in the journal and will be automatically marked as Visible in Portal if the main recipient of the email is the customer who reported the ticket (change or incident). If the E-Mail Robot is active and the recipient replies to this email, the reply is automatically assigned to the ticket and saved in the journal as well.