Configuring Microsoft Azure settings for the E-mail Robot service connection
Overview
If you wish to set up the E-mail Robot that will connect to an Exchange Online (previously Exchange / Office 365) or Microsoft Graph (previously Exchange / Microsoft Graph) mailbox, you need to configure the access to the Microsoft Azure portal.
The configuration steps are as follows: previously
- Setting up the authentication and authorization for ESM in Microsoft Azure portal.
- Creating a tenant in Enterprise Service Management.
- Adding a capability for the Microsoft Entra ID service in ESM.
- Create a service connection in Enterprise Service Management.
Configuring the authentication and authorization in Microsoft Azure portal
To configure the integration settings in Microsoft Azure portal, you will need to register your Enterprise Service Management application on the portal.
Registering an application
Information about required permissions to create and manage a Registered App in Azure is available here (external link).
- On the Microsoft Azure Portal home page, go to the Azure services or use the Search resources search bar and open App registrations.

Microsoft Azure Portal: App registrations
- On the opened page, run the New registration action.
- Configure your application:
- Provide a name for the application integration. The DWP users will see the display name when applying the Setup Authentication for the configured Service Connection.
- Choose Supported account types.
- Add a Redirect URI: select Web and enter Redirect URI (in the following format: https://{your_domain_name}/wm/externalAuth/redirect.html).
- Click Register.
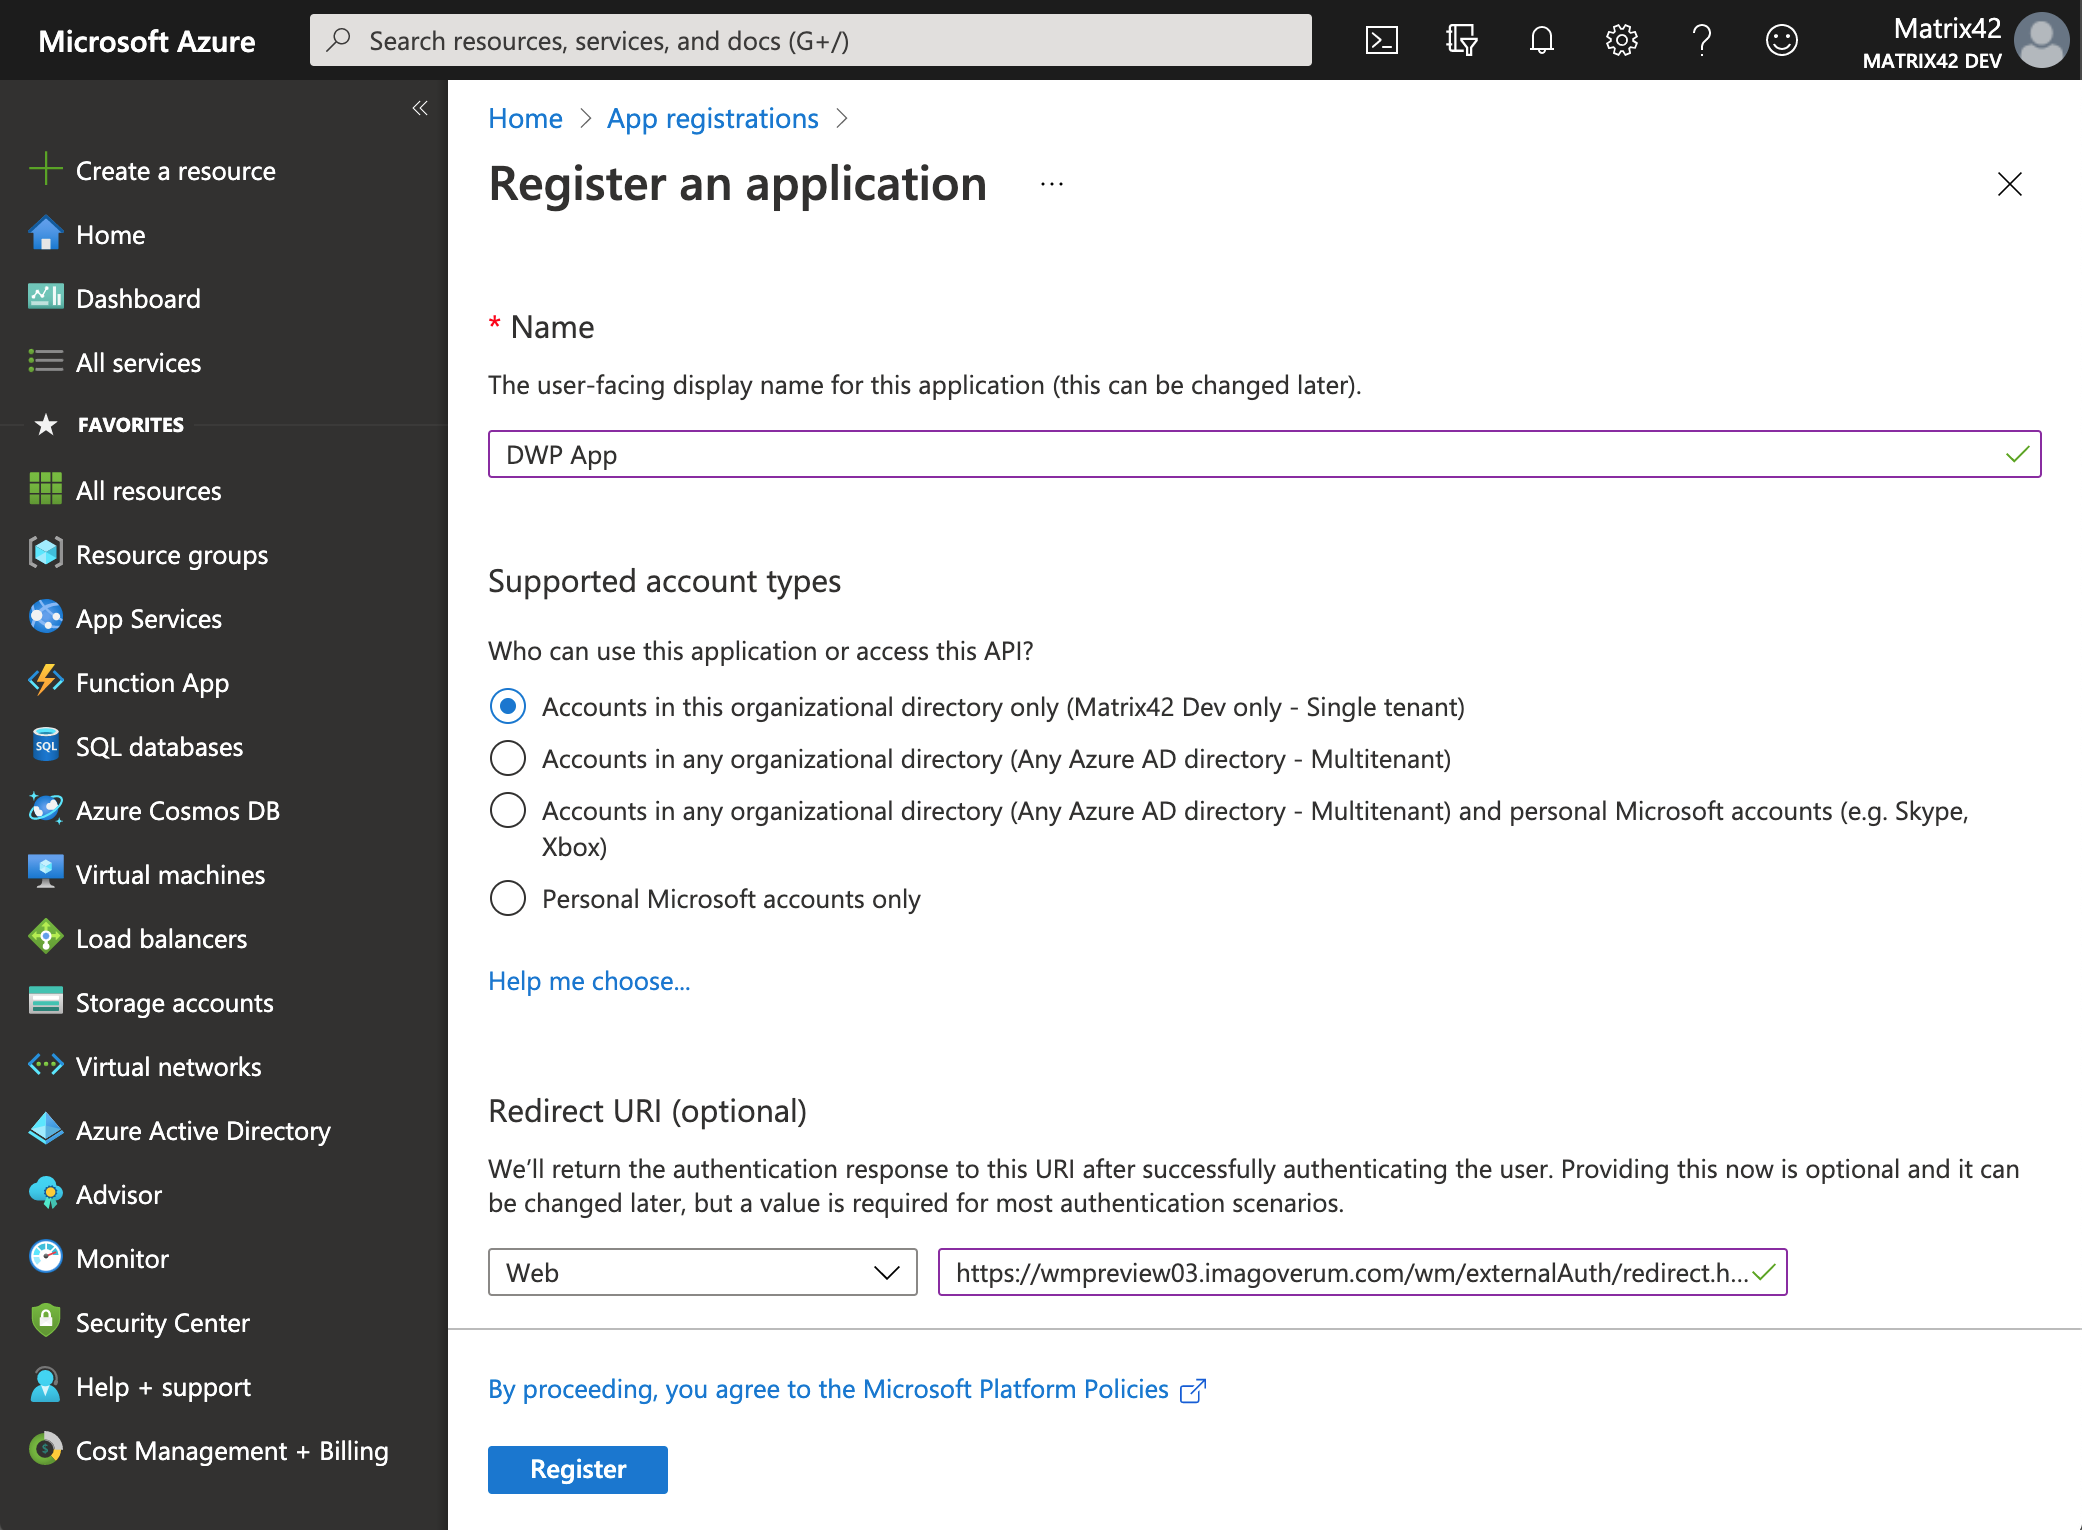
Microsoft Azure Portal: Register an application
Assigning permissions
Permissions of two types can be granted in Azure for data access:
- Delegated permissions (access on behalf of a user)
- Application permissions (access independent from a user)
Please make sure you understand the impact of each permission type and configure the type of permissions that suits you best. Specific information provided by Microsoft is available here (external link).
For all "delegated" permissions you have granted to the registered App, it is required that the user who authenticates the created Service Connection in Enterprise Service Management needs to have the corresponding access rights in Azure.
For all "application" permissions you have granted to the registered App, the access rights of the authenticating user are not effective.
Only Application permissions can be used with direct E-mail Robot configuration (without using a service connection). For details, please refer to Mail box settings.
If a service connection is configured using application permissions, any mailbox of any user in the company can be accessed by E-mail Robot. However, this can be remedied by limiting application permissions on Azure via PowerShell (external link).
Granting permissions for the Exchange Online connection type
Microsoft is currently phasing out Exchange Web Services (EWS) support for Microsoft 365 Exchange (Exchange Online) in favor of Microsoft Graph, so Microsoft Graph connection is recommended for E-mail Robot connection to Microsoft 365 mailboxes.
Starting February 2025, Microsoft restricted usage of EWS permissions that allow accessing any mailbox of the Azure (Entra ID) tenant. The recommended way is Application-only premissions and implementing resource-scoped access using Role-Based Access Control (RBAC) for Applications in Exchange Online. Learn more in Exchange Team Blog and Microsoft 365 Help.
Alternatively, this type of mailbox can be used via direct connection (not using service connection), or, starting with ESM version 12.1.3, with a service connection using different Microsoft Entra ID service capability (see Adding Capability... section below).
Azure Portal does not provide Microsoft 365 Exchange Online permissions in the permission list for new application registrations. To assign such permissions, you need to edit Application Manifest manually.
Delegated permissions
Delegated permissions are no longer supported for Exchange Online via EWS.
Application permissions
- In your registered application, go to Manifest , locate the requiredResourceAccess property in the manifest and add the following code inside the square brackets ([]):
{
    "resourceAppId": "00000002-0000-0ff1-ce00-000000000000",
    "resourceAccess": [
        {
            "id": "dc890d15-9560-4a4c-9b7f-a736ec74ec40",
            "type": "Role"
        }
    ]
}

- Click Save, go to the API permissions section and check that the full_access_as_app permission is listed.
- Then click Grant admin consent for <organization> and accept the consent dialog.
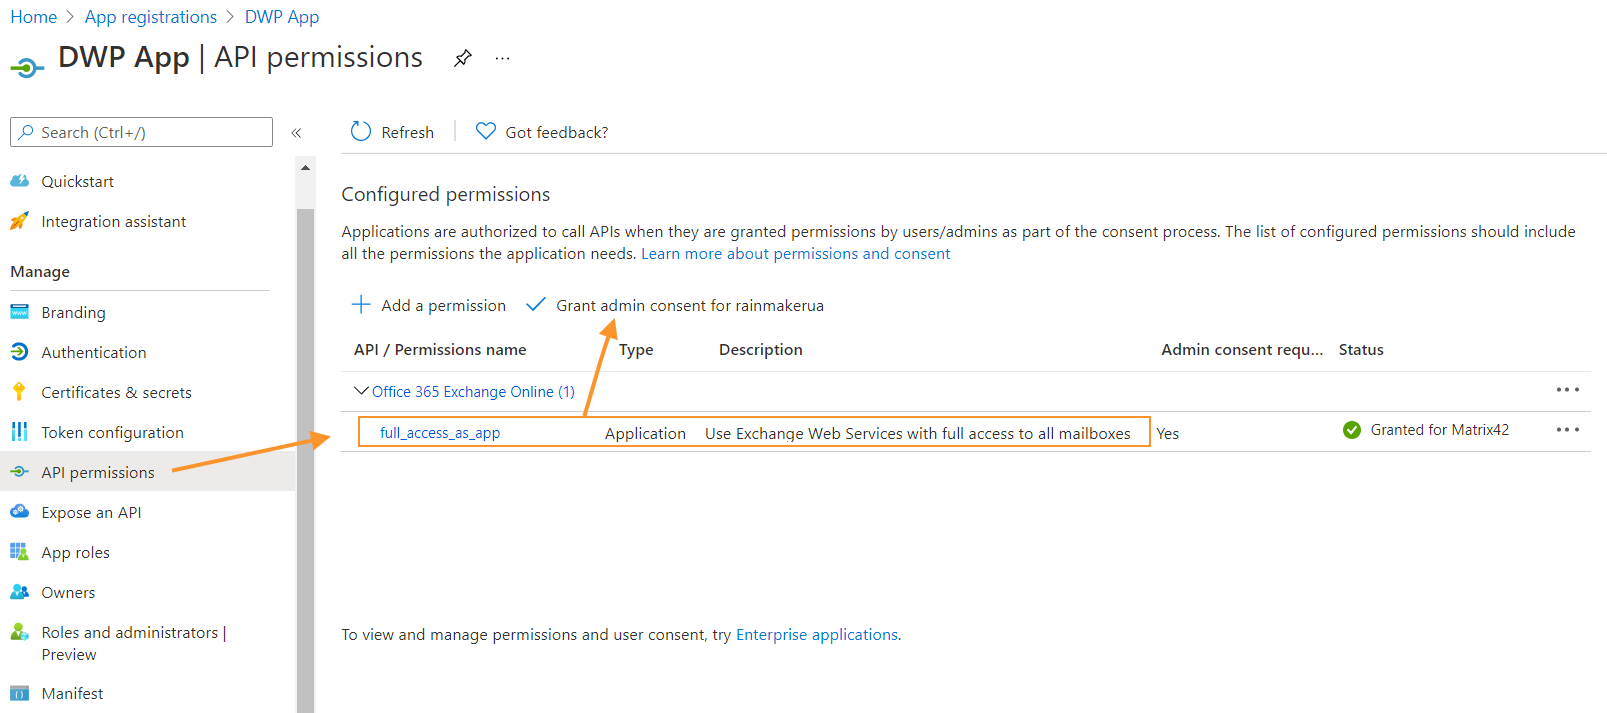
Granting permissions for the Microsoft Graph connection type
Delegated permissions
- In your registered application, go to the API permissions section and click + Add a permission.
- Choose Microsoft Graph > Delegated permissions and add the following permissions:
- Mail.ReadWrite.Shared (or Mail.ReadWrite if you do not require the E-mail Robot to access shared mailboxes)
- offline_access
- User.Read
- Then click Grant admin consent for <organization> and accept the consent dialog.
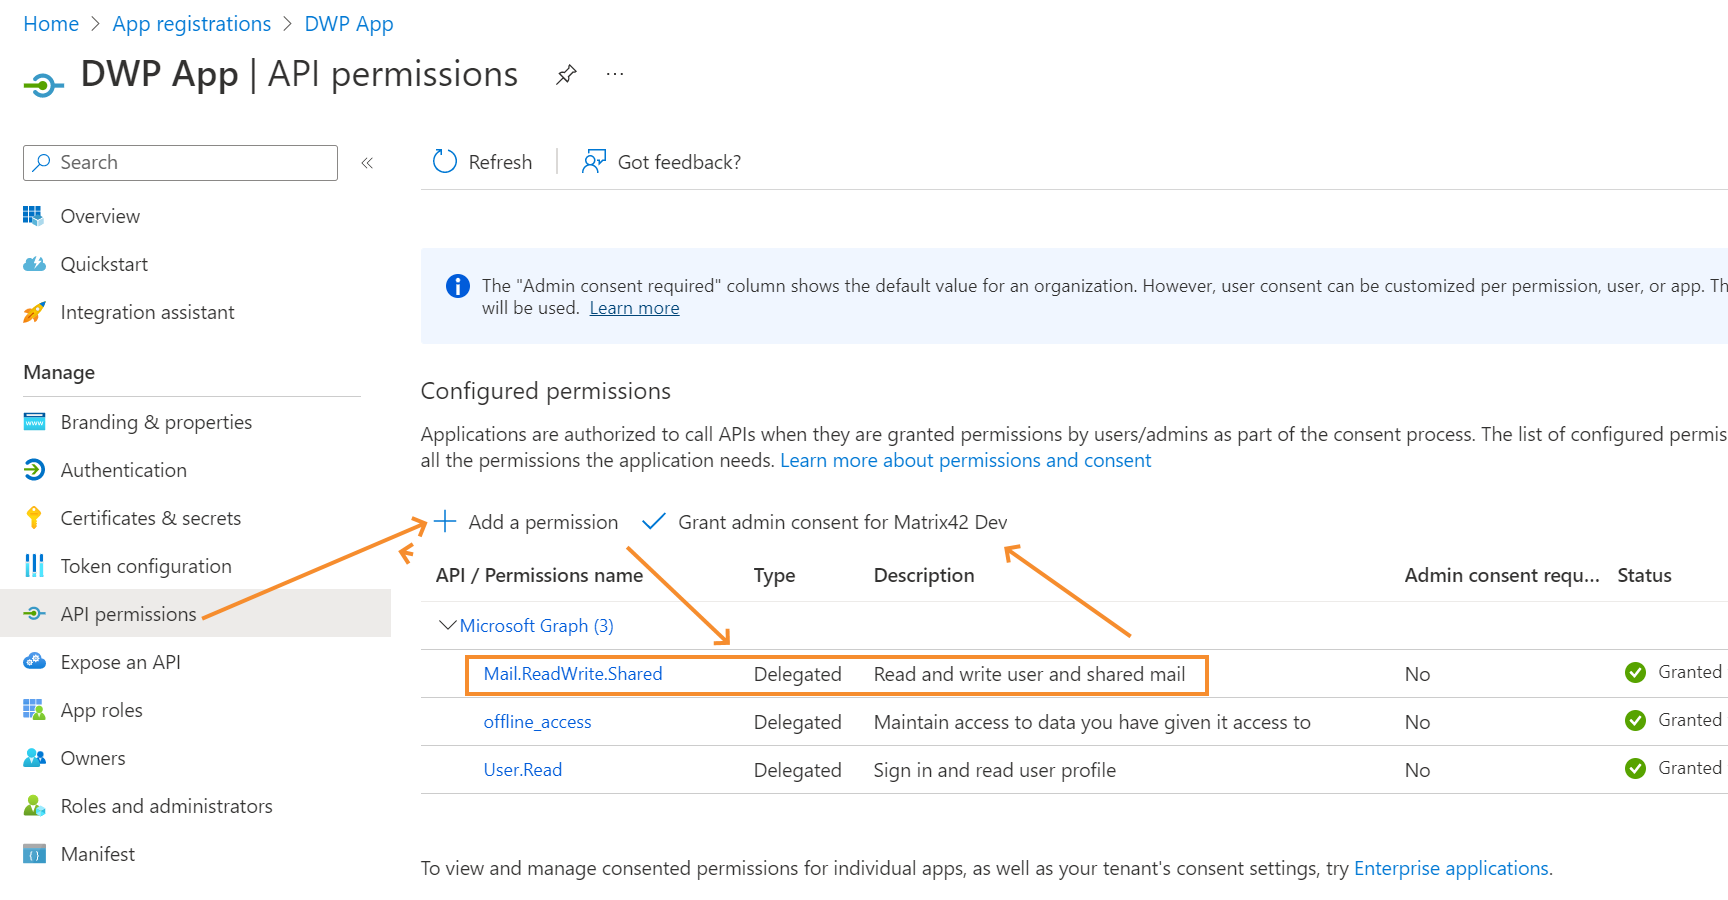
The Microsoft Graph connection with delegated permissions can only access mailboxes (personal and shared) which are available to the user who is authenticated for the Service Connection (the user logged in while performing "Setup Authentication" action before saving Service Connection).
Application permissions
- In your registered application, go to the API permissions section and click + Add a permission.
- Choose Microsoft Graph > Application permissions and add the Mail.ReadWrite permission.
- Then click Grant admin consent for <organization> and accept the consent dialog.

Creating a secret key
- Go to the Certificates & secrets section of the new application.
- Run the New client secret action to create a secret key.
- Provide the description and expiration date for the key and click Add.
- After a new key is displayed, copy its value immediately. Later it will be encrypted.
Save the secret key value. It will be used to create a service connection in Matrix42 Enterprise Service Management.
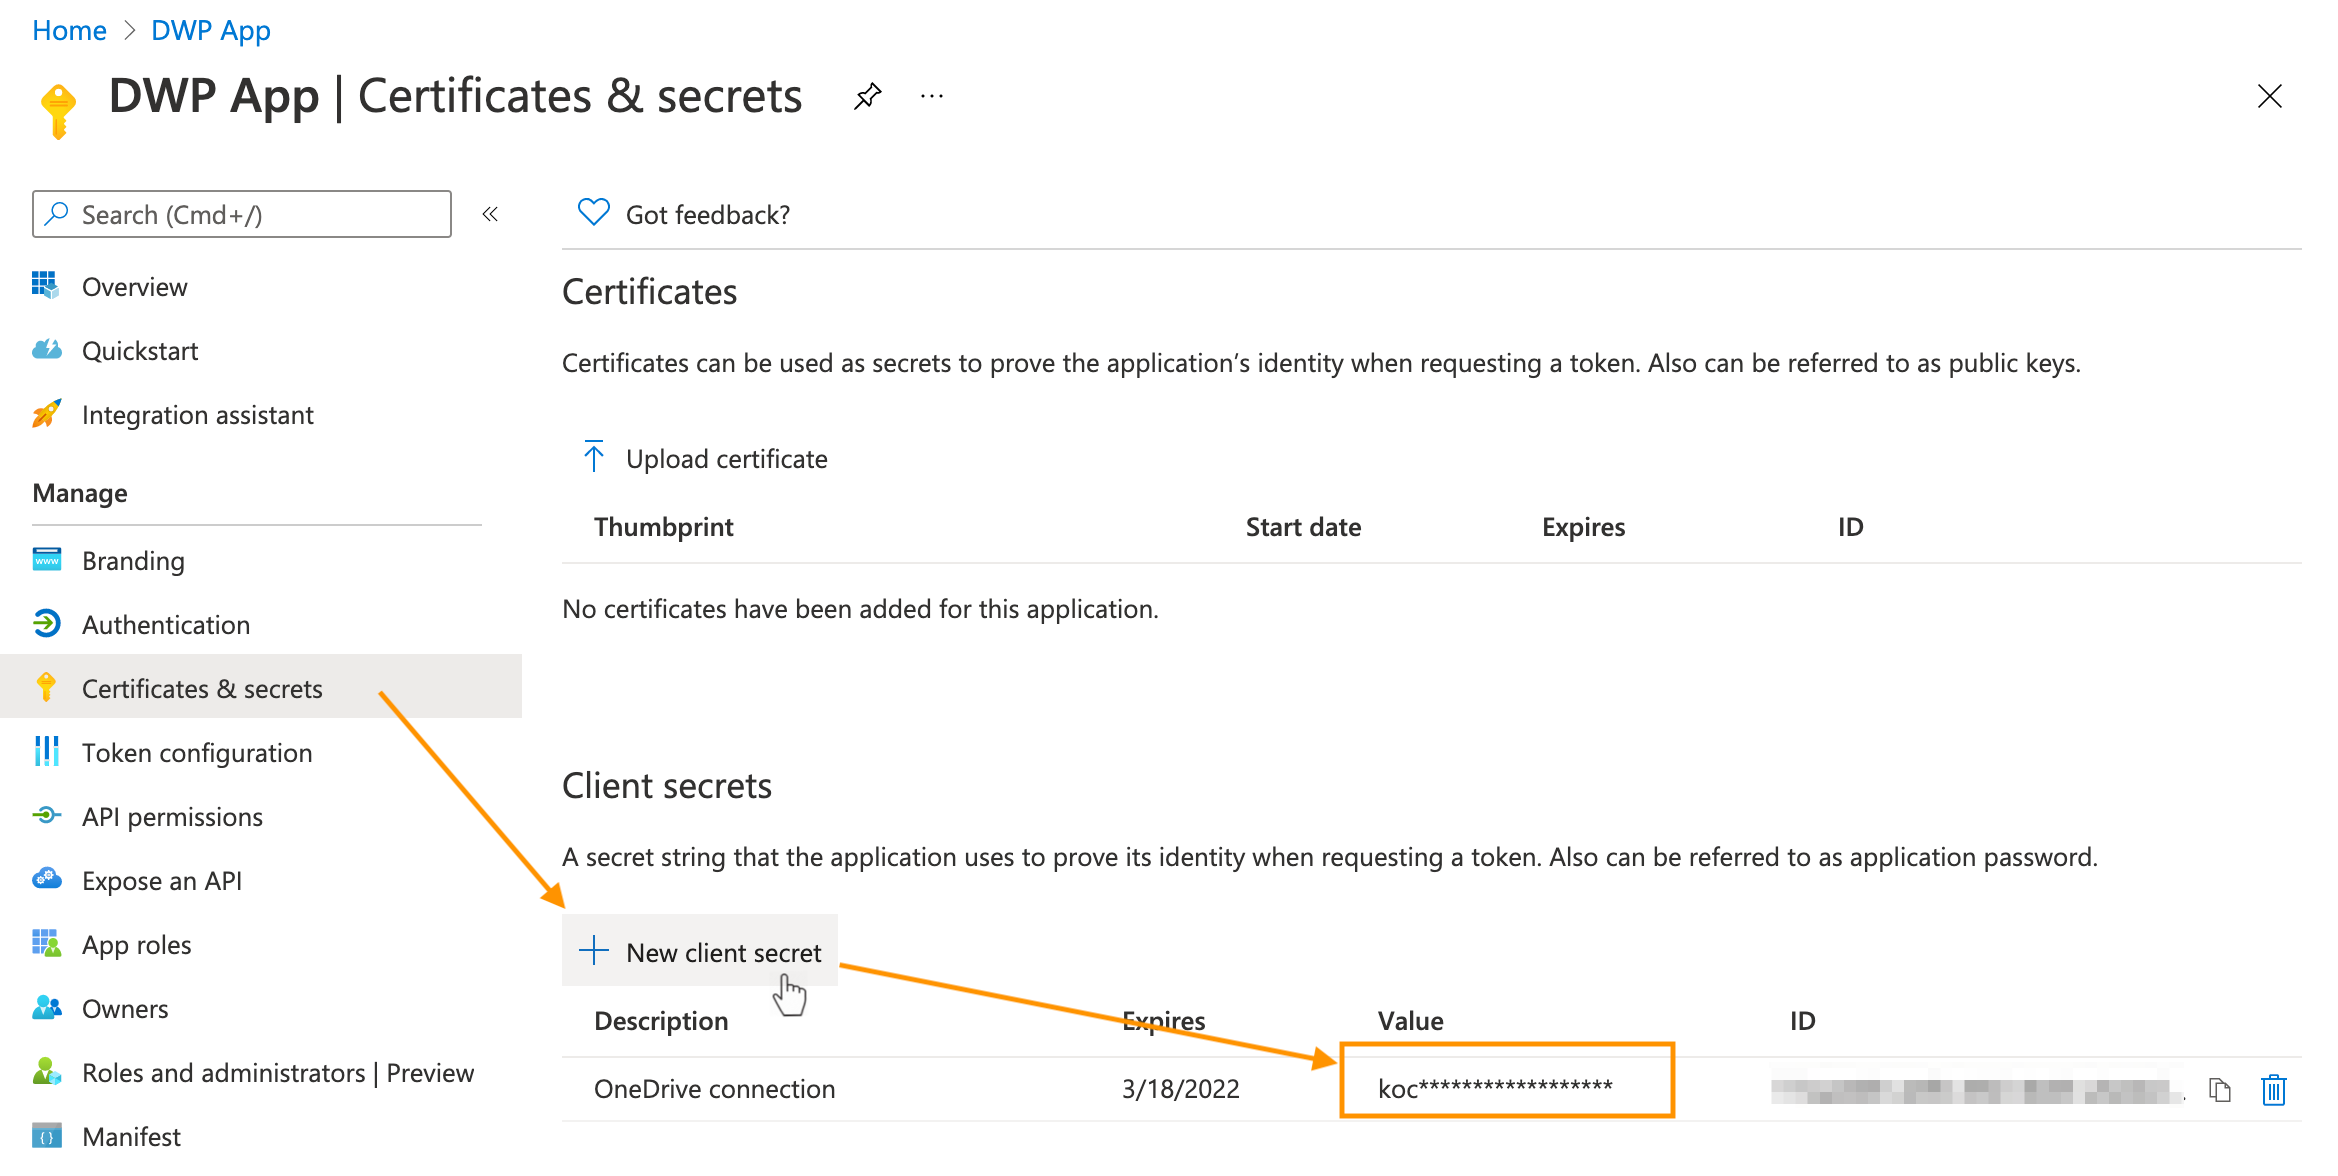
Retrieving the client ID and tenant ID
Client ID and tenant ID of your registered application are required for creating a service connection. You can find these values in the Overview section of the registered application.
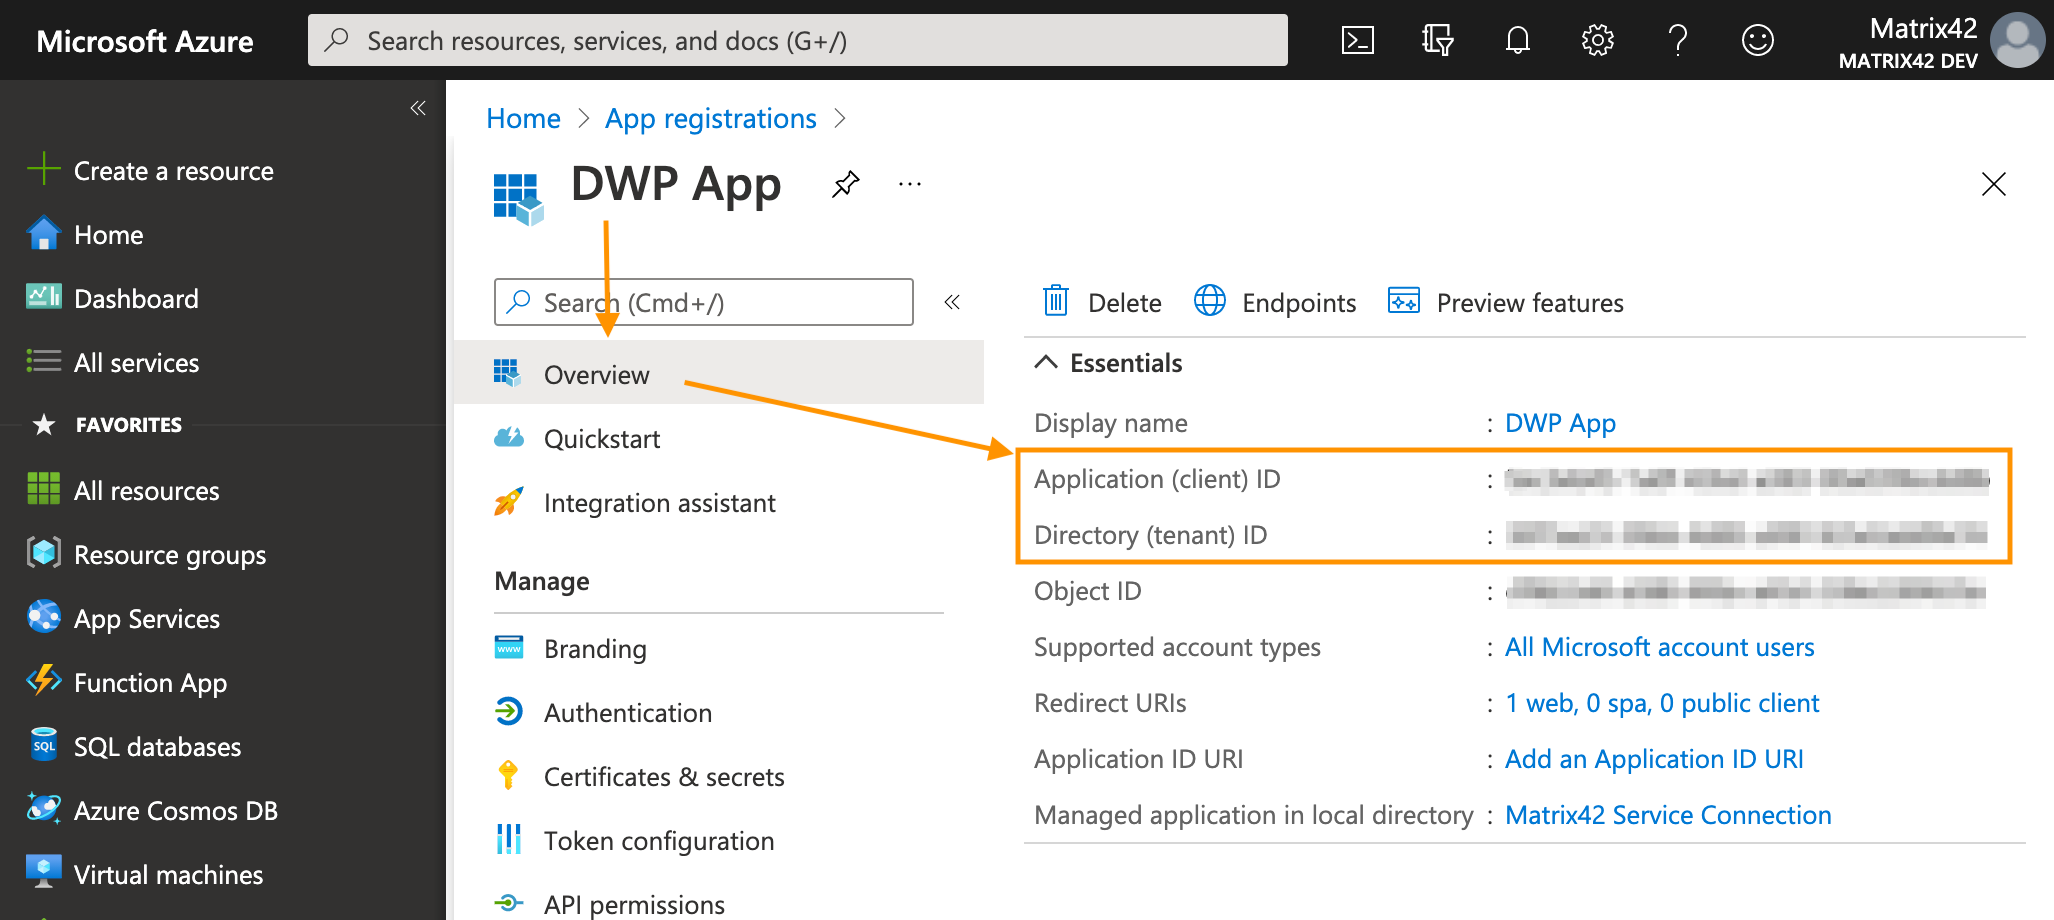
For more information about app registration, see also Microsoft Documentation Quickstart: Register an application with the Microsoft identity platform.
Creating a tenant
In Matrix42 Enterprise Service Management, you need to create a tenant for the service connection.
- Go to the Administration application and open the Integration > Service Connections > Tenants navigation item.
- Run the Add Tenant action. A new tenant dialog opens.
- Provide an appropriate name for your tenant from the Microsoft Azure portal.
- Select Microsoft Entra ID in the Service field.
- Fill in the Client ID, Tenant and Client Secret fields with the data from Microsoft Azure.
- Save the dialog.
Adding a capability for the Microsoft Entra ID service
To set up delegated permissions in Matrix42 Enterprise Service Management, you need to add a capability for the default Microsoft Entra ID service. If you wish to use application permissions, skip this step.
To add the capability:
- Go to the Administration application and open the Integration > Service Connections > Services.
- Find and open for editing the Microsoft Entra ID service.
- For Microsoft Graph connection, in the Capabilities grid, add a record with the following values:
- Scope: offline_access+User.Read+Mail.ReadWrite.Shared (replace ReadWrite.Shared with Mail.ReadWrite if you do not require the E-mail Robot to access shared mailboxes)
- Validate Uri: https://graph.microsoft.com/v1.0/me
- Alternatively, for Exchange / Office 365 connection with Application permissions use
- For Exchange Online add a record with the following values:
- Scope: https://outlook.office365.com/.default
- Grant Type: Client Credentials
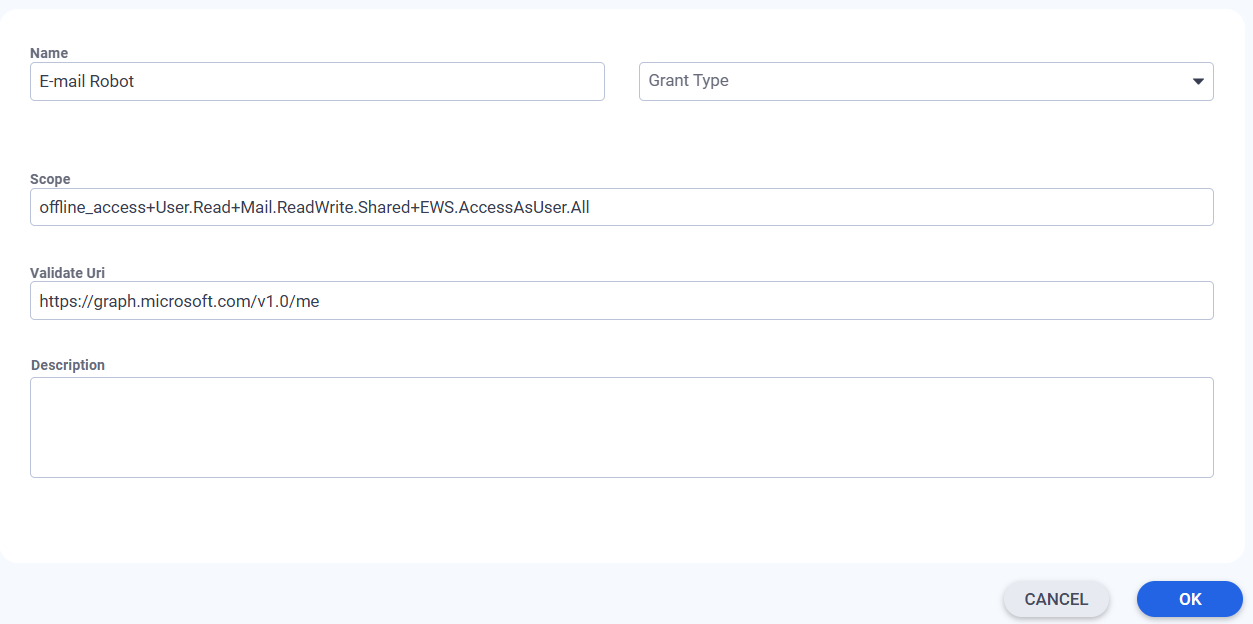
- Save changes for the capability and the service.

For additional information on how to add a scope, see also Microsoft Documentation Quickstart: Configure an application to access a web API.
Creting a service connection
Next, create a service connection to your company's Microsoft Azure portal.
- In the Administration application, go to Integration > Service Connections > Connections.
- Run the Add Service Connection action. A new connection dialog opens.
- In the Service field, select Microsoft Entra ID - E-mail Robot for delegated access or Microsoft Entra ID - Microsoft Entra ID (Application) for application access.
- In the Tenant field, select the tenant record that you have created earlier.
- Click Setup authentication.
- Provide the credentials for your company's Microsoft Azure portal and save the dialog in case of delegated access. The application based access will be authenticated immediately.
The user account that is used for authenticating needs to have a M365 license.
This service connection can now be used when configuring Mail box settings for the E-mail Robot.