Configure WinPE
This chapter contains a "step by step" guide for using Matrix42 OS Deployment - based on WinPE.
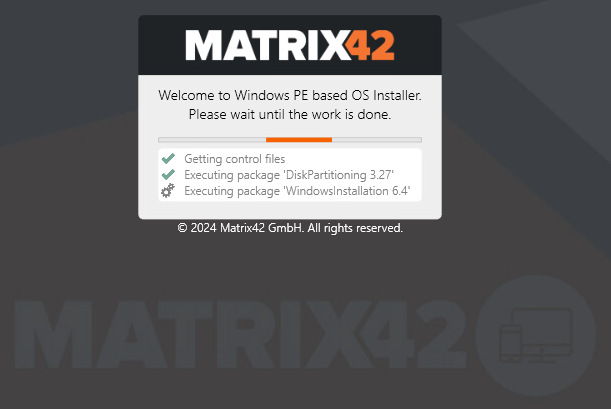
In general, this variant of the deployment is based on a WinPE-based PXE boot image, which starts the Matrix42 Universal Agent Framework when booting. The Matrix42 Universal Agent Framework then ensures that the booting computer connects to the assigned Empirum Server and executes the assigned Matrix42 PreOS packages. The information in the selected agent template is used for the connection to the Empirum Server.
The WindowsInstallation package is one of these Matrix42 PreOS packages and contains the functionality to perform a Windows installation. It contains additional variable definitions that control the installation behavior. The WindowsInstallation package relies on the DiskPartitioning package, which must be executed before the WindowsInstallation package. In addition, the PxeOffAndReboot, DomainJoin, and EmpirumAgentSetup packages must be executed after the WindowsInstallation package.
The Matrix42 PreOS packages can be imported via the depot configuration of the Matrix42 Management Console and are then available as a special software package in Empirum. This allows you to assign the Matrix42 PreOS packages to a computer via the administration as usual, which then executes them during a WinPE boot process.
Integrate current WinPE PreBoot version
First, a current WinPE preboot version must be integrated. There are two ways to do this:
The first option - via Matrix42 Management Console - automatically downloads the latest WinPE support package, unpacks it into the Empirum structure and integrates the packages into the Matrix42 Management Console.
The second option - via Marketplace - requires all steps to be carried out manually.
Via Matrix42 Management Console (preferred)
- Start the Matrix42 Management Console, go to Configuration > Boot Configurations and click on
 in the upper right corner to download the latest WinPE support package (the green dot means that there is a newer version than the one already integrated).

- Click on Yes.
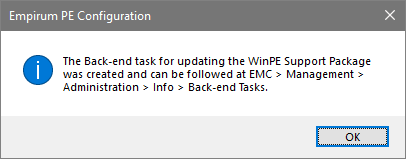
- Click on OK.
- If you switch to Management > Administration > Menu Info > Back-end Tasks in the Matrix42 Management Console, you will see a corresponding entry in the Back-end Task Queue tab.

And in the back-end task log the download and integration process.

- The Matrix42 PreOS packages are now available in the Matrix42 Management Console and can be assigned in the middle tree.
Via Matrix42 Marketplace
A Matrix42 PreOS package can be imported like a software package via the Matrix42 Management Console and is thus available in Empirum.
- Download the current WinPE PreBoot version from the Matrix42 Marketplace.
- Log in to the Matrix42 Empirum Master Server with an administrative account and copy the archive to a local folder (Temp) on the Empirum Master Server.
- Execute the file WinPE_PreBoot_Support_x.x.x.exe (run as administrator if UAC is enabled). The archive is unpacked in the same directory in the Empirum folder.
- Move (cut) the Empirum folder to the location where your Empirum installation is located, e.g. to D:\ if your Empirum installation is located in D:\Empirum. Confirm the folder merge with Yes and Move and Replace all requested files.
Old or unneeded PreOS packages should be deleted from the EMC and locally from the hard disk.
Regularly check the existing PreOS packages in the Matrix42 Management Console (EMC) in the Configuration > Software Management > Depot > Matrix42 PreOS Packages tab and delete all unneeded or obsolete PreOS packages.
Locally, you can then delete the PreOS packages of the same name from the hard disk in the directory"%EmpirumServer%\Configurator$\PackageStore\PreOSPackages".
- Start the Matrix42 Management Console (EMC), go to Configuration > Software Management > Depot in the navigation bar.
- In the tree view, expand Registers, right-click Matrix42 PreOS Packages and select Import/Export > Import Package.
The dialog for importing software packages opens.

- Click Next.
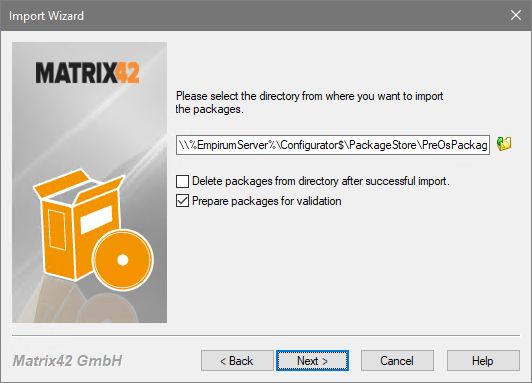
Prepare packages for validation:
This function starts a back-end task to update the hash file used by the UEM agent for the package download. Click the directory button and select the \\%EmpirumServer%\Configurator$\PackageStore\PreOsPackagesdirectory.
Do not select the Delete packages from directory after successful import option to keep the Matrix42 PreOS packages in the source directory.
- Click Next.
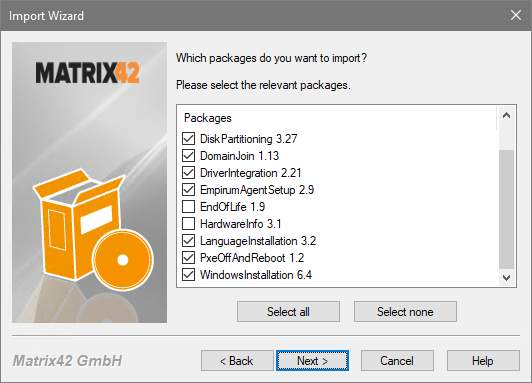
- The Import Wizard displays all detected OS software packages. Select the latest packages from the list for DiskPartitioning, DomainJoin, DriverIntegration, EmpirumAgentSetup, LanguageInstallation, PxeOffAndReboot and WindowsInstallation.
- Click Next.
If the Matrix42 PreOS package already exists, the Import Wizard will ask if the package should be imported anyway. If the import is performed, an error will occur.
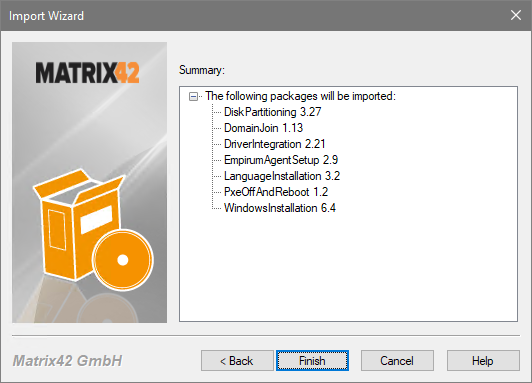
- The Import Wizard shows a summary of which packages will be imported afterwards. Click Finish to complete the import.
- After the successful import, the Import Wizard closes and the previously selected packages are displayed in the Matrix42 PreOS Packages tab.

This is also the order in which the packages are executed later in the boot process.
Matrix42 PreOS packages are always imported into the register that is specified in the configuration file (EmpirumPackageData.xml) of the package. This behavior is differs from the behavior when importing software packages. If you start the import via a special register (e.g. software), the software packages to be imported are also stored in this register.
If no Matrix42 PreOS packages are available yet, the order of the packages is set based on the specification in the configuration file (EmpirumPackageData.xml) .
If a version of a Matrix42 PreOS package already exists, then its position in the register is first determined during the import and transferred to the new package to be imported. The new version of the package is then displayed directly below the existing version.
It is very helpful if you first configure the required PreOS packages for the respective action via Configuration > View Designer. They can then simply be assigned to a group using drag & drop.

Description of the PreOS packages
The individual PreOS packages are described in alphabetical order.
Via the Matrix42 Marketplace (Add-ons button) you can download a set of variable configurations for the OS Installer and customize them for your environment.
BiosUpdateTemplate
A detailed description of this PreOS package can be found here.
Bitlocker
This PreOS package can be used from WinPE Support Package 1.9.10 in conjunction with Empirum v25.0.1 to manage the Bitlocker functionality on clients to be installed. The packages WindowsInstallation (to deploy the operating system) and PxeOffAndReboot (to send PXE off to the Empirum server and to reboot the client into the operating system installation) are needed.
The following functions are provided via this package:
- Activation of Bitlocker on TPM2.x capable clients
- Deactivating the (automatic) Bitlocker activation
- Storage of the recovery key in the AD
Activation of Bitlocker on TPM2.x capable clients
The basic requirement is an active (firmware/bioss setup) TPM2.x hardware on the client. This requirement is the same that Microsoft currently also provides for unmanaged clients and Bitlocker activation.
When using the Empirum Bitlocker package with the configuration "BitlockerActivation=TPM", the technical requirements on the client are checked and a possible problem is displayed in the WinPE logs.
If all requirements are met, this setting activates Bitlocker on the system volume after the operating system installation.The system volume is then automatically unlocked and made available via TPM at boot time. The default setting here is also the dynamic encryption of all newly written files, such as logs, registry, user settings, user files, and so on.
Deactivation of automatic Bitlocker activations
With the latest Windows 11 releases, Microsoft activates Bitlocker on the system volume on unmanaged clients (e.g. workgroup / non-domain) by default. This can be prevented in future with the setting "BitlockerActivation=Prevent".
Storage of the recovery key in the AD
In certain cases, data must be restored outside the client hardware / TPM context. In this case, access to a Bitlocker recovery key outside the client TPM is necessary. The Empirum Bitlocker package offers a mechanism for storing the recovery key in the customer's AD.
The setting for this is "BitlockerRecoveryKey=AD/GPO". To save Recovery Keys, the customer must extend their AD via a Group Policy.
Variable definitions from the Bitlocker package:
The collection of computer variables 'Bitlocker' must be used for configuration.
| Variable | Description | Control element | Default value |
|---|---|---|---|
| BitlockerActivation | Defines whether and how Bitlocker should be activated. TPM: Activates Bitlocker encryption on the assigned client. Prevent: Prevents Bitlocker encryption on the assigned client. NoChange: There is no change on the assigned client. |
Extended dropdown box | |
| BitlockerRecoveryKey | Specifies how the Bitlocker recovery key is to be saved. AD/GPO: The Bitlocker recovery key is saved in the AD. none: The Bitlocker recovery key is not saved. |
Extended dropdown box |
Integrate Bitlocker with Active Directory Domain Services
The following brief instructions are helpful here:
DiskImageCreate
This PreOS package can be used to create an image from the hard disk of a computer that can be used as a master image for disk imaging. The collection of computer variables 'M42_INTERNAL_OS_IMAGING_CREATION' must be used for configuration.
| Variable | Description | Control element | Default value |
|---|---|---|---|
| USERNAME | User used to access the network share (e.g. domain/user). | Text | |
| PASSWORD | Password for the USERNAME variable to access the network share. | Password | |
| SHARE | UNC path to the network share to store the VHD file (e.g. \\<ServerName>\EmpInst$). Also used to open the network connection for the first time. | Text | |
| SOURCE | Source of VHD content.
|
Text | |
| DESTINATION | The VHD file path (e.g. \\<ServerName>\EmpInst$\DiskImages\Win_10_22H2-24-01_ENT_x64_EN_GPT.vhd). The VHD files must be stored in the DiskImages folder! | Text | |
| DOSYSPREP |
This option is currently not used for WinPE! Option to activate the SysPrep mode for the Empirum VHD Create package.
|
Extended Dropdown box |
For the subsequent rollout, make sure that the user used has access to the target path and that the path specified under DESTINATION (including all subdirectories) is actually created and accessible.
DiskImageDeploy
This PreOS package can be used to install a disk image (a VHD created by DiskImageCreate) on the hard disk of a computer. The target disk must be the same size or larger than the source disk image. Check both the PXE log and the disk image log (if available) to ensure that the disk image installation was successful.
The collection of computer variables 'M42_INTERNAL_OS_IMAGING_SETTINGS' must be used for configuration. The client configuration is supported by the DiskImageDeploy package variables.
Variable definitions of M42_INTERNAL_OS_IMAGING_SETTINGS:
| Variable | Description | Control element | Default value |
|---|---|---|---|
| IMAGEFILE_MBR | Name of the VHD file used for disk imaging with an MBR-based partition scheme (e.g. Test_MBR.vhd without path; the root path for images is \%EmpirumServer%\EmpInst$\DiskImages\). | Text | |
| IMAGEFILE_GPT | Name of the VHD file used for disk imaging with an GPT-based partition scheme (e.g. Test_GPT.vhd without path; the root path for images is \%EmpirumServer%\EmpInst$\DiskImages\). | Text | |
| ADDRESS | The IP multicast address (IPv4) to be used.
|
IP address | 239.42.42.42 |
| PORT | Defines the original port of the communication channel.
|
Number | 9000 |
| CLIENTTHRESHOLD | This variable is the trigger between unicast (0) and multicast (> 0). Number of clients required for the transmission, e.g. (5).
|
Number | 0 |
| STARTTIMEOUT | Defines the timeout until the start of the multicast transfer, even if the maximum number of clients has not yet been reached.
|
Number | 300 |
| JOINTIMEOUT | Time period that is waited after the client threshold has been reached to allow further clients to join the group.
|
Number | 180 |
| TTL | "Time to live", i.e. validity period of the multicast packet. Defines the maximum number of router hops (intermediate stations).
|
Number | 2 |
| CLIENTTIMEOUT | Waiting time in seconds until a non-responding client is removed from the server.
|
Number | 120 |
| PACKAGESIZE | Size of the transmitted multicast packet.
|
Number | 65200 |
| PAGESIZE | Number of multicast packets per page (packet count).
|
Number | 1024 |
Variable definitions from the DiskImageDeploy package:
| Variable | Description | Control element | Default value |
|---|---|---|---|
| LocalUserName | Defines the name of the local account to be created. | Text | LocalAdmin |
| LocalUserPassword | Defines the password of the local account to be created. | Password | |
| LocalUserDisplayName | Defines the display name of the local account to be created. | Text | Local Admin |
| SetupUILanguage | Defines the language to be used in Windows Setup and Windows Deployment Services (e.g. en-US). | Combo box | en-US |
| InputLocale | Specifies the input language and the input method for input devices, such as keyboard layout (e.g. en-US). | Combo box | en-US |
| SystemLocale | Specifies the default language to be used for non-Unicode programs (e.g. en-US). | Combo box | en-US |
| UILanguage | Specifies the language to be installed, which is used as the default system language for displaying elements of the user interface (UI) (e.g. menus, dialog boxes and help files) (e.g. en-US). | Combo box | en-US |
| UserLocale | Specifies the settings per user that are used for formatting the date, time, currency and numbers in a Windows installation (e.g. en-US). | Combo box | en-US |
DiskPartitioning
The DiskPartitioning package is responsible for partitioning the hard disk. The configuration of the partitioning is controlled by the package variables.
Executing the DiskPartitioning package switches the package status of all previously installed packages to YELLOW, even if they were still GREEN shortly before. As the hard disk is completely erased, the previously determined status can no longer be correct.
Two variants are available for partitioning (absolute / fixed or relative / percentage partitioning), which are controlled via the variable DiskPartitioning.InterpretSizeInputAsPercentage. If the value is set to 1, the information in DiskPartitioning.SizeDataPartition and DiskPartitioning.SizeSystemPartition is interpreted as percentage information.
As of the WinPE PreBoot Support 1.9.5 package, the partitioning sizes and the order of the partitions have been adapted to the current Microsoft specifications.
The MSR partition was reduced to 16 MB, the EFI partition was enlarged to 250 MB and the WinRE partition was enlarged to 1024 MB and moved to the end of the disk.
If the default values are used, the whole thing looks something like this.

The hidden MSR partition can then also be displayed via the diskpart output.

| Variable | Description | Control element | Default value | |||||||||||||||
|---|---|---|---|---|---|---|---|---|---|---|---|---|---|---|---|---|---|---|
| SizeSystemPartition |
The value entered here specifies the partition size of the system partition in gigabytes for an absolute / fixed partitioning variant. |
Number | 100 | |||||||||||||||
| SizeDataPartition | Specifies the partition size of the data partition in gigabytes for an absolute / fixed partitioning variant. If the specification is relative / percentage, SizeSystemPartition must be less than 100%. | Number | 0 | |||||||||||||||
| InterpretSizeInputAsPercentage |
If relative / percentage specifications is to be used for partitioning, the value must = 1. The DiskPartitioning package will abort with an error if the disk is too small to create the absolute partition sizes. |
Number | 1 | |||||||||||||||
| MinimumSystemPartitionSizeInGB | If a relative / percentage partitioning method (InterpretSizeInputAsPercentage=1) has been selected, this variable can be used to specify a minimum system partition size that will not be undercut during partitioning. | Number | ||||||||||||||||
| SizeWinREPartitionInMB |
If space is to be reserved for a Windows recovery partition (created at the end of the disk) during partitioning, the size can be defined in MB using this variable. If the value of the variable is empty or 0, no Windows Recovery Partition is created. The minimum size is 674 MB. The WinRE partition is not automatically activated during partitioning. |
Number | 1024 | |||||||||||||||
| PreferFastDisk |
There are often several hard disk drives of different designs in the client. In most cases, it would be preferable to install the operating system on the fastest hard disk drive. |
Number | 0 | |||||||||||||||
| SizeEfiPartitionInMB | In EFI-based client scenarios, this variable defines the size of the EFI partition to be created in MB. By default, this is created with 200 MB. It may also be defined larger for EFI-based recordings, but not smaller. This variable is ignored for older MBR-based client scenarios. |
Number | 250 | |||||||||||||||
| SizeMsrPartitionInMB | In EFI-based client scenarios, this variable defines the size of the "Microsoft Reserved Partition" to be created in MB. By default, this is created with 16 MB. It may also be defined larger for EFI-based recordings, but not smaller. This variable is ignored for older MBR-based client scenarios. |
Number | 16 | |||||||||||||||
| PreserveDataPartition | With WinPE-based deployment, the entire disk is deleted beforehand by default. This behavior is preconfigured via the value = 0. WinPE-based deployment can also be used to create a data partition on the system disk. This is usually deleted when the disk is reinstalled. If an Empirum-compliant system disk (a system partition with the name "Windows" and exactly one data partition with the name "Data") is to remain untouched when restoring, this can be set with the value = 1. If you want to leave one or more non-Empirum-compliant data partitions on a system disk untouched during a installation or reinstallation, you can configure this with the value = 2. |
Number | 0 | |||||||||||||||
| ConfigurationFileForAdditionalDisk |
You can use this variable to specify a configuration file that is used to partition a data disk (in addition to the system disk). Exactly one additional disk with up to four partitions and the NTFS file system is supported. Percentage partitioning can also be performed with less than 100% in total, absolute partition sizes, however, must match the complete target disk exactly to 1GB.
|
Number | ||||||||||||||||
| ClearAllDisks | You can use this variable, which you must add yourself, to clean up all hard disks when executing the DiskPartitioning package. To do this, you must add the variable "ClearAllDisks" as a number to DiskPartitioning in EMC > Administration under "Tools > Variable definitions" and set this to 1. |
Number | ||||||||||||||||
| ForceUEFI | This variable, which you must add yourself, forces a UEFI-based installation of the client with a GPT-based partitioning, regardless of how the client was booted. To do this, you must add the variable "ForceUEFI" as a number to DiskPartitioning in EMC > Administration under "Tools > Variable definitions" and set this to 1. |
Number |
Example of a variable configuration:

Example of a configuration file with a percentage partitioning with two partitions named Data2-1, Data2-2 and a total of 66% disk space usage:
{
  "Disks": [
    {
      "Comment_Disks": "----------- 1. Additional Disk -----------",

      "Comment_PartitionSizeAsPercentage": [
        "PartitionSizeAsPercentage specifies if the partition size values should be interpreted as percentage values or GB values:",
        "- true: Interprets the partition size values as percent values",
        "- false: Interprets the partition size values as GB values"
      ],
      "PartitionSizeAsPercentage": true,

      "Comment_PreserveMode": [
        "The PreserveMode value specifies the handling of already existing partitions:",
        "- 0: All partitions will always be removed and recreated",
        "- 1: The partition will be keeped if it was made by empirum (or will be created if not exists).",
        "     Partition sizes and labels must match the configuration to be retained."
      ],
      "PreserveMode": 0,

      "Comment_Partitions": "The list of all partitions of the first disk",
      "Partitions": [
        {
          "Comment_Partitions": "----------- 1. Partition -----------",
          "Comment_PartitionSize": "Partition size in GB value or percentage",
          "PartitionSize": 33,
          "Comment_PartitionLabel": "Label of the partition",
          "PartitionLabel": "Data2-1"
        },

        {
          "Comment_Partitions": "----------- 2. Partition -----------",
          "PartitionSize": 33,
          "PartitionLabel": "Data2-2"
        }

      ]
    }
  ]
}
DomainJoin
This PreOS package is used to add a computer to a domain or a workgroup. If Domain is not selected (no check mark), then no domain join is executed even if the Matrix42 PreOS package DomainJoin is assigned and the computer is added to the specified workgroup.
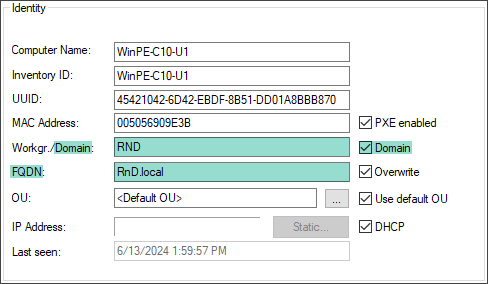

The variables FQDN and ORGANIZATIONAL_UNIT (OU), which can be configured via the computer properties dialog, are used by this package.
If a computer is configured for a domain, make sure that the FQDN value is set in the properties of the computer (here in the properties of the computer or via the FQDN variable). This value must be specified for the domain join.
If Windows updates or ISO images were used for operating system installation after October 11, 2022, the changes introduced by Microsoft through KB5020276 for a domain joining will take effect. As of the DomainJoin package 1.12, there is a variable "DisableLegacyDomainJoin" to prevent the obsolete domain join if this is set to 1.
Starting with DomainJoin Package 1.14, an AES256 encrypted password can be used for domain join via the variable "DomainJoinCredentialsPasswordAesEncrypted".
The following packages are required for this:
- WindowsInstallation (to provide the operating system)
- PxeOffAndReboot (to send a PXE off message to the Empirum server and restart the client after the operating system installation)
Variable definitions
| Variable | Description | Control element | Default value |
|---|---|---|---|
| DomainJoinCredentialsUser | Name with domain of the domain user to be used. | Text | |
| DomainJoinCredentialsPassword | Password of the user to be used. | Password | |
| DomainJoinErrorAction |
Error handling during the login process. Warning: Error: |
Extended Dropdown box | Error |
| DomainJoinAuthority | Defines whether the AD or Empirum controls the logon process. An existing client can only be moved to another OU if Empirum has been selected here. | Extended Dropdown box | AD |
| DomainJoinOptionFlags | Defines a customer-specific NETSETUP OptionFlag bitmask with which the join process can be executed before or instead of the Empirum DomainJoin. Empty values (default), decimal values or hexadecimal values in the format "0x0000" are permitted here. Further information: https://docs.microsoft.com/en-us/windows/win32/api/lmjoin/nf-lmjoin-netjoindomain |
Text | |
| DomainJoinOptionFlagsOnly | If DomainJoinOptionFlags is defined, the DomainJoinOptionFlagsOnly value can be used to determine whether a DomainJoin should only be executed via OptionFlags (value "1") or whether a standard Empirum DomainJoin should still be executed in the event of failure (value "0" or empty). | Number | |
| DisableLegacyDomainJoin | Due to the KB5020276 introduced by Microsoft, the obsolete domain join (0 or empty) or the new domain join (1) can still be used here. Default is empty (not equal to 1). | ||
| DomainJoinCredentialsPasswordAesEncrypted | Use this variable to define a manually AES256 encryted domain join password (use EmpCrypt.exe to encrypt). If this variable is set, the DomainJoinCredentialsPassword value will be ignored. | Text |
The "Move to another OU" function is only available from the OS installation of Windows 10 and from build version 1809!
DriverIntegration
The DriverIntegration package provides the contents of the assigned driver archive / folder on a hard disk that has been prepared for this step by the DiskPartitioning package. The following WindowsInstallation package then uses these prepared files for the device driver installation during the installation of the operating system. Therefore, the DriverIntegration package depends on the DiskPartitioning package.
On the other hand, the WindowsInstallation package can be used without the DriverIntegration package - if no additional device drivers are required for the operating system installation.
For driver integration, the required drivers must be available as an archive (CAB or ZIP file) or as a folder structure. These files must be located on the server under \\%EmpirumServer%\Configurator$\Packages\Matrix42\OsPackages\Drivers\. If there is no Drivers folder, this must be created first.
As of WinPE PreBoot Support 1.8.16, drivers in EXE format from Dell can also be integrated. Please note that these driver files are up to 4 GB in size - the RAM on the computer on which this driver package is to be installed must be correspondingly large (8 GB).
EXE files from other manufacturers can also be integrated.
For this, the "ExeUnpackOptions" variable must be added to the "DriverIntegration" variable set as the "Text" control element under "Variable definitions".
For Dell, the following call for unpacking (in the PowerShell script) was integrated: /s /e=%targetpath%.
For other manufacturers, the call parameters may vary, but the target path where the driver package is unpacked must always be %targetpath%!
Files in EXE format can only be integrated by one manufacturer - i.e. either Dell, or Lenovo, or HP!
More information can be found in the WinPE Driver Integration - HowTo.
EmpirumAgentSetup
The EmpirumAgentSetup package is executed to install the Empirum Agent on the client.
The variableM42_AGENT_PUSH_PACKAGE_FOLDER.Windowsis used to specify the version and variant (Matrix42 Advanced Agent or Matrix42 UEM Agent) of the Empirum agent.
The value of this variable is a relative path to the desired agent directory starting with the folder located under "Configurator$\Packages\Matrix42\". For example:
- UEM Agent Windows\2312.1.2
- EmpirumAgent\19.0
From the package EmpirumAgentSetup 2.2 and higher, the latest Matrix42 UEM Agent version released for installation is determined and used if no value is set.
Older versions of EmpirumAgentSetup use the Matrix42 Advanced Agent EmpirumAgent\19.0 by default.
EndOfLife
This PreOS package can be used to delete all disks of a client in an EndOfLife scenario. After the client has been executed, the management status of the Empirum client is reset. The variables of this package can be used to configure the EndOfLife process.
The RSAT tool is required for the three variables "RemoveFromADUser", "RemoveFromADPassword" and "RemoveFromADDC". This tool can be used to delete a computer from the AD during the runtime of EndOfLife - independently of Empirum-LDAPSync. To do this, the value for the variable "RemoveFromAD" must also be set to "1".
Further information on how to integrate the tool can be obtained from Matrix42 Support.
The following rights are required to remove an AD object:
- DELETE access to the object itself
- ADS_RIGHT_DS_DELETE_CHILD access to this object type in the parent container.
Information on this is described by Microsoft here.
| Variable | Description | Control element | Default value |
|---|---|---|---|
| ActivateEndOfLife | Set the value to 1 if you want to activate EndOfLife (confirmation prompt). | Number | 0 |
| RemoveFromEmpirum | After EndOfLife, the client is removed from Empirum (1), or remains in place(0). | Number | 1 |
| RemoveFromAD | Set this value to 1 if you want to remove the client from AD after the EOL. If the value is 0, the client remains in AD. Also applies to deletion via RSAT. | Number | 0 |
| GBytesWrite | Specifies the size of the randomized data on each disk in GB - set the value to 0 to overwrite the entire disk. | Number | 10 |
| NVMEFallback | Set this value to 0 if you do not want to fall back to sector-based erasure in the event of NVME format errors. | Number | 1 |
| EraseMethod | Erasure method: Empirum , DoD5220.22M or BSI/VSITR | Extended Dropdown | Empirum |
| RemoveFromADUser | "RSAT Required: Defines the domain user (e.g. domain\username) who has the authorization to perform a "RemoveFromAD" operation. | Text | |
| RemoveFromADPassword | "RSAT required": Defines the password to be used for a "RemoveFromAD" operation. | Password | |
| RemoveFromADDC | "RSAT Required: Defines the name of the AD domain controller (Full Qualified Name) on which the "RemoveFromAD" operation is to be performed. | Text |
HardwareInfo
This PreOS package is a sample package that starts the hardware tool to collect information about all devices of a client in order to make it available in the client's log.
LanguageInstallation
This PreOS package can be used to install Windows language packages (Local Experience Pack or the CAB file format) and to set the display language configured in the WindowsInstallation package variable UILanguage.
Local Experience Packs (LXP/APPX language pack formats) are only supported from Windows 10 version 1809 upwards. Only installations with an English (EN-US) base system are supported. All other base languages are only supported on an experimentally basis. The UILanguage/desktop language can be set user-specifically via the Windows "Regions and Language" dialog.
Known Microsoft problems with LXP's: Language packs known issue | Microsoft Docs
As of the WinPE PreBoot Support 1.9.5 package, the "online installation" of the language packs is also supported.
An Internet-enabled client is required for the online installation of the language packs.
Server variants are not supported here.
Online language packs have priority over the assigned language packs.
Mixed online / LXP / CAB operation can lead to errors during installation if the same language packs are not selected for online and assigned.
Language activation (e.g. SystemUI) is still carried out via the unattend.xml in the Windows installation package.
| Variable | Description | Control element | Default value |
|---|---|---|---|
| LpkSetupTimeoutSec | Timeout in seconds for LPK setup calls. The recommended range is 300 to 1200 seconds. | Number | 600 |
| OnlineLanguage1 to OnlineLanguage5 |
Windows Online language packs 1 to 5. Select en-US | de-DE | de-CH | fr-FR or define your additional language (RFC3066 compliant). | Combo-Box | |
| OnlineLanguage6 to OnlineLanguage10 |
Windows Online language packs 6 to 10. Define your additional languages (RFC3066 compliant). If required, these additional 5 variables must be created by you via the Matrix42 Management Console > Management > Administration > Extras menu > Variable Configurations. |
Combo-Box |
An output is displayed in the log if the subsystem is outdated (Windows 7 / 8 or early Windows 10 versions), if the subsystem is a server variant, which type of installation was carried out and whether this was successful.
PxeOffAndReboot
This PreOS package disables PXE activation on a computer and sets the status of the currently running PreOS package to Reboot Needed Immediately.
WindowsInstallation
This PreOS package is required for the deployment of a Windows 10 / 11, Server 2016 / 2019 / 2022 based operating system (x64 only) on a UEFI based client.
The following packages are required:
- DiskPartitioning (for partitioning the hard disk of the client)
- DriverIntegration (for adding drivers for the operating system)
- and after the Windows installation -
- PxeOffAndReboot (to switch off PXE and restart the computer with a newly installed operating system)
- DomainJoin (for adding a computer to a domain or workgroup)
- EmpirumAgentSetup (to install the Empirum agent)
The execution order of these packages is important and must be ensured.
For an OS installation via Empirum, you can now specify whether the client should preferably start later via PXE (this is the Empirum default setting), or whether the client should always boot directly locally (this means that it can no longer be managed directly via PXE).

If Bitlocker is to be installed, the variable BootSequence=BootMgrFirst must be set. This deactivates PXE as the primary boot method and (re-)activates the local boot. If a PXE boot is performed, the Windows partition is flagged as “System” by the kernel, which prevents a Bitlocker installation.
Starting with WindowsInstallation Package 6.11, the variable "OfflineSourcesCopyBehaviour" can be used to specify the copy behavior for offline sources.
The setting can be made via the WindowsInstallation variable BootSequence. An empty value here is equivalent to the setting "BootMgrLast", i.e. preferably start via PXE.
Variables definitions
When deploying server operating systems, the server name must be included when specifying local users, e.g. "%ServerName%\LocalUser". Do NOT use ".\LocalUser"!
| Variable | Description | Control element | Default value |
|---|---|---|---|
| LocalUserName | Defines the name of the local account to be created. If the value is empty, no local account is created. | Text | |
| LocalUserPassword | Defines the password of the local account to be created. | Password | |
| LocalUserDisplayName | Defines the display name of the local account to be created. | Text | |
| SetupUILanguage | Defines the language to be used in Windows Setup and Windows Deployment Services (e.g. en-US). | Combo-Box | en-US |
| InputLocale | Specifies the input language and input method for input devices, such as keyboard layout (e.g. en-US). | Combo-Box | en-US |
| SystemLocale | Specifies the default language to be used for non-Unicode programs (e.g. en-US). | Combo-Box | en-US |
| UILanguage | Specifies the language to be installed, which is used as the default system language for displaying user interface (UI) elements (e.g. menus, dialog boxes and help files) (e.g. en-US). | Combo-Box | en-US |
| UserLocale | Specifies the settings per user that are used for formatting the date, time, currency and numbers in a Windows installation (e.g. en-US). | Combo-Box | en-US |
| ProductKey | Specifies the product key to be used for the Windows installation. | Text | |
| UnattendXmlFile | Specifies a path to an unattend.xml file to be used as a template (e.g. 'custom.xml'; in this case '\\%EmpirumServer%\Configurator$\Packages\Matrix42\OsPackages\WindowsInstallation\<version>\custom.xml' is used). If the specified file is not found, an error message is displayed in the log and the installation is aborted. If empty, the default template (unattend.xml), which is part of the PreOS package, is used. | Text | |
| ActivationNow | Windows activation is performed immediately after installation. | Number | |
| ActivationKey | A special Windows activation key that is used after the client installation. For example, MAK activation. | Password | |
| UACLevel | Defines the UAC level of the Windows client. | Extended Dropdown box | Notify, dim desktop |
| BuiltinAdministratorActive | Specifies whether the built-in account should be active for managing the computer. Matrix42 recommends using LAPS to manage local administrator passwords. | Extended Dropdown box | No |
| BuiltinAdministratorPassword | Defines the password of the integrated account for managing the computer. | Password | |
| ForceDotNetInstallation | Forces the installation of .Net 4.7 (e.g. necessary under Windows 10 2016 LTSB). | Extended Dropdown box | No |
| BootSequence | Define a specific client boot sequence. BootMgrLast - for PXE first BootMgrFirst - for local boot first. |
Combo-Box | |
| OfflineSourcesCopyBehaviour | Specifies the copy behavior for offline sources. CopyAll - All offline sources are copied to the local system drive (default). CopyNothing - No offline sources are copied to the local system drive. CopyMUIAndDriversOnly - Only drivers and language pack sources are copied to the local system drive. CopyMUIOnly - Only language pack sources are copied to the local system drive. |
Extended Dropdown box |
If Bitlocker is to be installed, the variable BootSequence=BootMgrFirst must be set. This deactivates PXE as the primary boot method and (re-)activates the local boot. If a PXE boot is performed, the Windows partition is flagged as “System” by the kernel, which prevents a Bitlocker installation.
Miscellaneous variables
The following variables must also be configured for a successful operating system installation.
| Variable | Description | Control element | Default value |
|---|---|---|---|
| MX42_AGENT_PUSH_PACKAGE_FOLDER | Allows you to specify alternative operating system-specific package directories for the Agent Push. The specified path must be below the Empirum package path "Packages\Matrix42" and must be relative to it. You can use this specification to specify a specific UEM Agent version for installation after the operating system installation. Example: UEM Agent Windows\2408.1.2 |
Text | |
| FQDN | Fully qualified domain name. It does not contain a computer name. Example: QALab.Matrix42.de |
Text | |
Importing operating system sources and language packs
Before the Windows operating system files (ISO) can be imported, the Windows Assessment and Deployment Kit (WADK) 10 (2004) | 11 (22H2 from September 2023) must be installed on the (master) server.
The procedure for importing operating system files is described here.
The procedure for importing language packages is described here.
Create boot configuration
Boot configurations can be used to create a WinPE based PXE boot image based on the Windows ADK installed on the Empirum Master Server.
To use WinPE, a current .NET and a current Power Shell version (at least 5.1) is recommended!
We recommend the use of WADK 11 when creating on a machine with Windows 11 or Server 2022 and the use of WADK 10 when creating on a machine with Windows 7/ 10 or Server 2016/ 2019!
- Switch to Configuration > Boot Configurations.
To be able to create or change a boot configuration, the logged in user requires the EMP_I_DISK_CONFIG role, which can be assigned via Matrix42 DBUtil in the user administration. If the logged in user does not have the role, the content of the boot configuration is grayed out.
- Create a new boot configuration using the New button.

Symbol definition:
 One or more critical details are missing or incorrect.
 Information or data has been changed but not yet saved.
 The job is in the queue.
 The boot configuration is currently being created in the background.
 The boot configuration has been created successfully.
 An error has occurred during the creation of the boot configuration.
 The configuration was changed in the background and can no longer be saved. An update is required to load the changes.
 The boot configuration was deleted in the background and can no longer be saved. A refresh is required to remove the configuration from the list.
- Enter a descriptive name and description according to your requirements.
Only alphanumeric characters (a-z, A-Z and 0-9) are allowed for the name.
Names must be unique. The use of reserved names is prevented.
This includes names that are already used in the boot diskette configuration (EPE).
The symbol indicates that the entry is not allowed.
- Select WinPE as the configuration type to create a WinPE-based PXE boot image-if not already selected.
If you select WinPE as the configuration type, the selection of the Empirum PE source and the dynamic server detection are hidden and are not available in the configuration. These properties are only available under the EPE4 configuration and are not necessary in the case of a WinPE Preinstallation Environment. WinPE is selected by default for new configurations.
- Select the desired agent template from the Agent Template drop-down field.
If at least one agent template is configured, this is entered directly. If several Empirum agent templates have been created, the first one - sorted alphabetically - is always displayed directly. - To select which platforms are to be supported, you must either check EFI x86 or EFI x64 or select one of the platforms from the BIOS drop-down field. Several platforms can be selected at the same time. For BIOS, however, only one of the platforms can be selected at a time - either 32 bit or 64 bit. To create a configuration, at least one of the platforms must be selected. EFI x64 (64 bit) is selected by default.
- From the drop-down menu, select the Microsoft certificate that is appropriate for this boot image to sign the PXE image.

Starting with Empirum version 25.4.0, including the hotfix installer dated November 1, 2025, at the latest, a new CA2023 certificate can also be used to sign the PXE image.
The CA2011 (standard) certificate is still available for older hardware.
The information in the selected agent template determines how and with which server an attempt is made to connect during OS deployment.
If no entry is displayed in the selection under Agent Template, first create an Empirum Agent Template via Configuration > Software Management > Empirum Agent.
In addition to the user name, password and server name, the settings for the DHCP options are also transferred to the PXE boot image, provided it has been configured in the agent template. The selection can then be updated using the Refresh  button. The overview on the left is updated in real time. However, changes are only permanently applied after confirmation with Save.
- You can make the settings for TFTP Block Size, Self Provisioning and Driver Directories via Advanced Properties. Click the button
 to show the fields.

With the help of the TFTP block size setting, the transfer of the WinPE boot image can be adjusted to make it either more stable or faster.

A higher TFTP block size value usually leads to a faster transfer of the boot image. However, a larger block size can also lead to transmission interruptions.
An optimal value depends on the existing network infrastructure and its utilization. For a newly created boot configuration, the default value for the TFTP block size is 4 KB.
Self Provisioning is described in detail here.
- To include additional drivers into the WinPE boot image, click on the button
 below the list of additional driver folders.
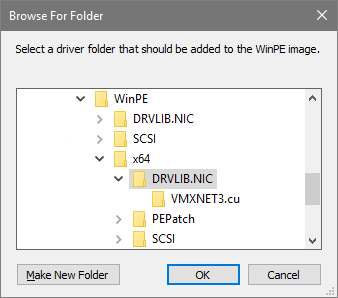
The Browse for Folder window opens, which can be used to select a directory. - Confirm the selection with OK.
The selected directory is added to the list of additional driver folders. - If several drivers need to be integrated, repeat the procedure from point 8.
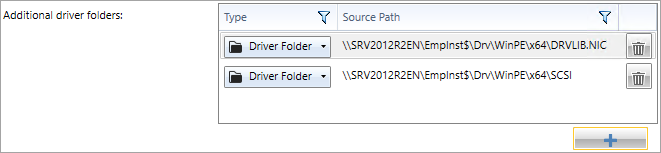
If you want to remove a driver directory, click on the button to the right of the driver directory entry. - Once all settings have been made, confirm with Save and answer the security question with Yes.
The configuration is saved in the database, the PXE boot image is created directly.

After saving the Empirum Preinstallation Environment configuration, the automatic creation of the PXE image is taken over by the Backend Task Queue extension.
If you have modified several configurations or downloaded a new WinPE support package, you can save all valid configurations with a single click using the "Save All" button.
Once the PXE boot image has been successfully created, it is displayed with the specified name in Management > Administration under PXE-BootImages in the right-hand tree and can be assigned as usual using drag & drop.
Back-end tasks
Back-end Task Queue
The current jobs in the Backend Task Queue can be checked using the following dialog in the Matrix42 Management Console (EMC):
- Matrix42 Management Console > Management > Administration > Info menu > Back-end Tasks
The queue entries with the name PE (= Preinstallation Environment) are the tasks that are of interest for creating the PXE image.
The list shows which tasks are currently being processed by the queue.

The BTQH service must run under a user who has administrative rights.
Back-end Task Log
In the Back-end Task log tab, the status of the jobs that have already been processed can be viewed.
The success of the task can be seen in the Result column. In case of failure, detailed information about the error is stored in the Message column.

Detailed information can also be obtained via the log file of the backend task queue - this is located at:
%ProgramData%\Matrix42\Logs\BackendTaskQueueHost64\BackendTaskQueueHost64.log
If an error message is displayed during the execution of the PowerShell script, please check the points mentioned here.
Create variables configuration
To simplify the initial configuration, you can download a set of variable configurations for the OS Installer from the Matrix42 Marketplace (Add-ons button) and customize them for your environment. For this example, we use the variable configuration from this package from the folder ".\24.0.0 - SDK\04 OS-Install - WinPE".
- Download the variable configuration package here and unpack it into a directory (e.g. Temp) on the Empirum Master Server.
- In the Matrix42 Management Console, go to Configuration > Variable Configurations and click the Import button at the bottom right.
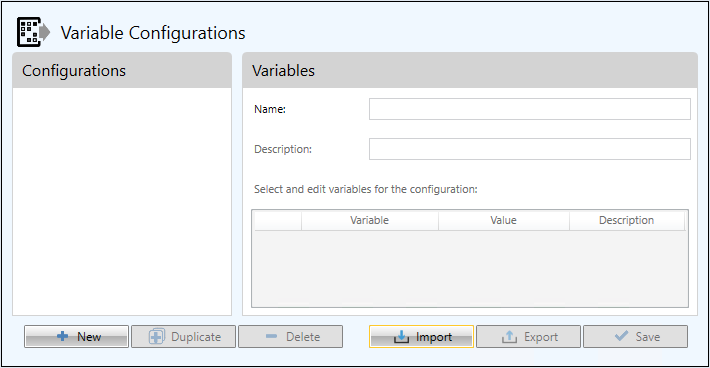
- Change to the directory (Temp) where you have unpacked the variable configuration package. Select the template from the folder ".\24.0.0 - SDK\04 OS-Install - WinPE" and click on Open.
- Confirm the successful import with OK.
- A description of which variables you need to adapt for your environment can be found here. In this case, this only affects the "OS-Install - WinPE" variable configuration. A description of the variables used can be found here: DiskPartitioning | DomainJoin | MX42_AGENT_PUSH_PACKAGE_FOLDER / FQDN | OS_RegionalSettings | WindowsInstallation
- Once you have checked all variables in the "OS-Install - WinPE" variable configuration and adapted them to your environment, click Save at the bottom right corner.

After saving, this variable configuration is displayed in Management > Administration under Variable Configurations and can now be assigned using drag & drop. On the configuration side, all preparatory measures have now been completed.
Create configuration group
In order for a computer to run the OS deployment via WinPE, the settings must now be made in the administration.
- In the Matrix42 Management Console, go to Management > Administration.
- Create a new configuration group.
- If you have created a view for the Matrix42 PreOS packages, drag it to the newly created configuration group.
Otherwise, under Software Packages > Matrix42 PreOS Packages, drag the Matrix42 PreOS packages
- DiskPartitioning,
- WindowsInstallation,
- PxeOffAndReboot,
- DomainJoin,
- EmpirumAgentSetup
to the configuration group.
When using language package imports, the LanguageInstallation package must also be assigned.
If additional drivers are to be integrated into the operating system, the DriverIntegration package must also be assigned.
The Matrix42 PreOS package HardwareInfo is only required if you also want to read out the hardware information for the assigned client (log). - In the tree on the right, under Software Packages > Matrix42, drag the current Matrix42 UEM Agent Windows software package onto the newly created configuration group.
- On the right-hand side of the tree, drag the variable configuration (OS Install) imported under Variable Configurations onto the newly created configuration group.
- On the right-hand side of the tree, drag the desired edition of the operating system under Operating System Imports > Microsoft > Windows 10 > x64 > "<your operating system import>" > e.g. Windows 10 Enterprise onto the newly created configuration group.
- On the right-hand side of the tree, drag the desired language pack(s) under Language Pack Imports onto the newly created configuration group, If language packs are required.
- On the right-hand side of the tree, drag the newly created WinPE boot image (WinPEx64) under PXE-BootImages onto the newly created configuration group.
- In the tree on the right under Agent Templates, drag the agent template required for this configuration onto the newly created configuration group.
- In the tree on the left under Unassigned Computers, drag a computer onto the newly created configuration group.
The configuration group you have created will then look something like this:

In general, it is possible to assign several Matrix42 PreOS packages, which are then executed one after the other when booting the WinPE-based PXE image.
As with other software packages, the execution order of these packages can be controlled globally via the order of the packages in the depot.
The options marked in green must be specified in the properties of the assigned client! Either the UUID and/or the MAC address must be specified.

Once all assignments have been made, the computer can be activated via the context menu.
- Right-click on the configuration group and select Activate. In the Activation Wizard that opens, activate the options PULL via DDS/DDC (Software packages only) and Enable PXE (Reinstall Computer). Click on Next. Click on Finish.
- Start the assigned client - the operating system is installed via the WinPE boot image.

If the assigned WinPE boot image is started on the computer, the Matrix42 Universal Agent Framework starts automatically and executes the assigned packages one after the other.
In the current version, manual intervention in the execution of the Matrix42 Universal Agent Framework is possible.
This should enable you to analyze the processes as easily as possible and correct them if necessary.
Manual intervention may lead to the installation being aborted!
As of WinPE support package 1.8.13, all PreOS packages are restarted in the WinPE phase if a package runs into an error. The behavior can be changed manually (see FAQ).
If you would like to customize the WinPE boot configuration and, for example, change the background image or texts, you will find instructions here .
When the WindowsInstallation package is executed, the Windows installation is also executed.
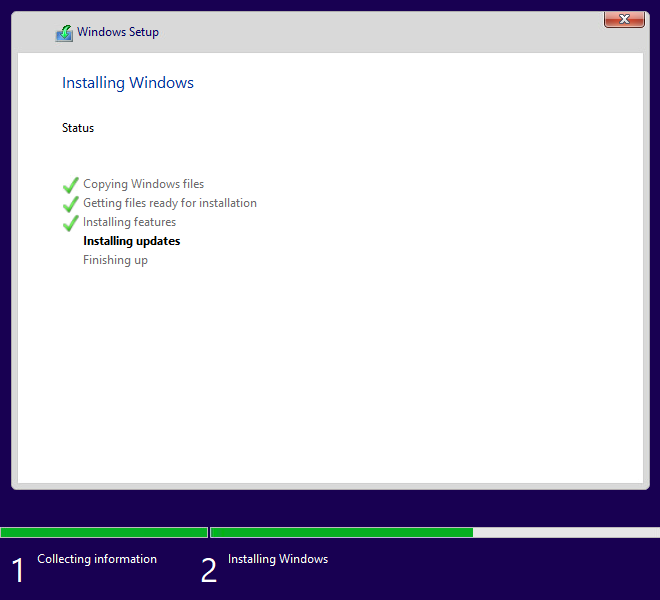
Once the various installation phases have been completed, the operating system is installed on the computer.
PXE-Log
uring the operating system installation via the Matrix42 PreOS packages, several reboots take place. The operating system is executed several times. During this process, the PE agent executes the assigned packages: LanguageInstallation, DomainJoin and EmpirumAgentSetup. The PE agent itself is installed with the first boot of Windows in the phase of the first log-on and removes itself after successful execution of all packages.
For a better understanding or to follow the installation, it is recommended to have a look at the PXE log (Matrix42 Management Console > Administration > right mouse click on the computer in the middle tree > Show Log > PXE Log tab) of the corresponding client.

Manual IP Configuration
Instead of using DHCP, a manual IP configuration can also be used for the operating system installation in the WinPE / Windows phase.
To do this, the IP configuration must be made in the IP Address and DNS tab in the client properties (EMC > Administration > Computer Properties > IP Address > Static).
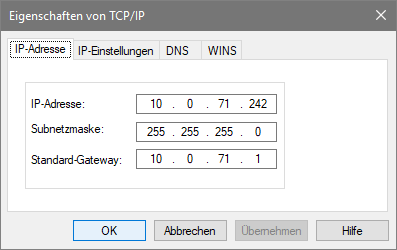
The values entered here are then entered in the <Computer name>.ini file in the [MS_TCPIP] section.

Additional information
As previously with the EPE in conjunction with the OS.ini, the additional information is now also supported via the WinPE and the <Computername.ini>.
If this "Additional information" has been defined for a computer, these values are also written to the "<Computername>.ini" of the respective computer from Empirum version 25.0.1.

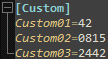
If the WinPE support package 1.9.10 (Windows installation 6.9) is used, these values are written to the client's registry during OS deployment.
