Getting Started - from EPE 4 to WinPE
This Getting Started describes the procedure to change from an EPE 4 based to a WinPE based operating system installation.
The complete WinPE - HowTo can be found here.
Requirements
We assume that you have EPE 4 in use, so the following requirements are met:
- At least one EPE 4 configuration is available / ready for use
- An operating system source is imported (Windows 10 Enterprise x64)
- The Empirum-PXE (TFTP) service was configured and installed via Empirum DBUtil
- Language packages are not considered here
- Drivers are not considered here, we assume a "virtual machine" (VM with NIC = E1000)
Switching to WinPE
First, a current WinPE preboot version must be integrated. There are two ways to do this:
The first option - via Matrix42 Management Console - automatically downloads the latest WinPE support package, unpacks it into the Empirum structure and integrates the packages into the Matrix42 Management Console.
The second option - via Marketplace - requires all steps to be carried out manually.
Via Matrix42 Management Console (preferred)
- Start the Matrix42 Management Console, go to Configuration > Boot Configurations and click on
 in the upper right corner to download the latest WinPE support package (the green dot means that there is a newer version than the one already integrated).

- Click on Yes.
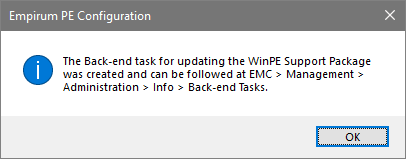
- Click on OK.
- If you switch to Management > Administration > Menu Info > Back-end Tasks in the Matrix42 Management Console, you will see a corresponding entry in the Back-end Task Queue tab.

And in the back-end task log the download and integration process.

- Now it's time to create a boot configuration.
Via Matrix42 Marketplace
- Download the latest WinPE PreBoot version from the Matrix42 Marketplace.
- Log on to the Matrix42 Empirum Master Server with an administrative account and copy the archive to a local folder (Temp) on the Empirum Master Server.
- Run the file WinPE_PreBoot_Support_*.exe (Run as administrator if UAC is enabled). The archive will extract itself to the Empirum folder in the same directory.
- Move (cut) the Empirum folder to the location where your Empirum installation is located, e.g. to D:\ if your Empirum installation is located in D:\Empirum. Confirm the merging of the folders with Yes and move and replace all requested files.
Import PreOS packages
- Start the Matrix42 Management Console and go to Configuration > Software Management > Depot.
- Expand tabs, right click on Matrix42 PreOS Packages and select Import/Export > Import Package.
- In the Import Wizard, click on Next.
- Click on the directory button and select the directory
%Server%\Configurator$\PackageStore\PreOsPackages
Click on Next. - Select (check mark set) the packages shown in the image and click Next.
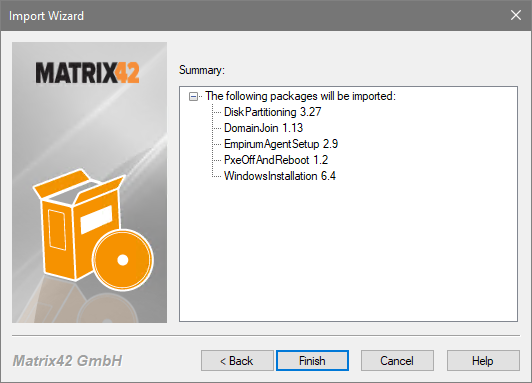
- Confirm the summary with Done.
- The selected packages have been integrated into the Matrix42 PreOS Packages tab. Check the order of the packages as shown in the next picture.

This is also the order in which the packages are executed later in the installation process.
If you create a view (1_OS-Install) from these packages in the View Designer, you can assign it to a configuration group in one go.
Create a boot configuration
To create the boot configuration a Power Shell version 5.1 or higher is required!
- Go to Configuration > Boot Configurations.
- Create a new boot configuration using the New button.
- Enter a descriptive name and a description.
- Select an Agent Template.
- Activate the EFI > x64 option (ticked) if it is not already activated.
For a safe operation we do not change the block size (Advanced Properties) at first.
Since a virtual machine with an E1000 network card is used as a prerequisite, we do not need any dedicated drivers now. - Once all settings have been made, click on Save.
The configuration you have created will then look something like this:

Create a Variable Configuration
To simplify the initial configuration, you can download a set of variable configurations for the OS Installer from the Matrix42 Marketplace (Add-ons button) and customize them for your environment. For this example, we use the variable configuration from this package from the folder ".\22.0.0 - SDK\04 OS-Install - WinPE".
- Download the Variable Configuration Package here and unzip it into a directory (e.g. Temp) on the Empirum Master Server.
- Go to Configuration > Variable Configurations and click on the Import button at the bottom right.
- Change to the directory (Temp) in which you have unpacked the variable configuration package. Select the template from the folder ".\22.0.0 - SDK\04 OS-Install - WinPE" and click Open.
- Confirm the successful import with OK.
- A description of which variables you need to adapt for your environment can be found here. In this case, this only affects the variables of the "OS-Install - WinPE" configuration variable.
- Once you have checked all variables of the "OS-Install - WinPE" variable configuration and adapted them to your environment, click Save at the bottom right.

All preparatory measures have now been completed on the configuration side.
Create a Configuration Group
- In the Matrix42 Management Console, go to Management > Administration.
- Create a new configuration group, e.g. "OS-Install - WinPE" as high up in the tree as possible to avoid inheritance from higher-level configuration groups.
- If you have created a view for the Matrix42 PreOS packages, drag it onto the newly created configuration group. Otherwise, under Software Packages > Matrix42 PreOS Packages drag the 5 Matrix42 PreOS packages mentioned above to the newly created configuration group.
- Since we are assuming a managed client here, also drag the current Matrix42 UEM Agent Windows software package to the newly created configuration group under Software Packages > Matrix42.
- On the right-hand side of the tree, drag the variable configuration (OS-Install) imported under Variable Configurations onto the newly created configuration group.
- On the right-hand side of the tree under Operating System Imports > Microsoft > Windows 10 > x64 > "<Your Operating System Import>" > Windows 10 Enterprise, drag it onto the newly created configuration group.
- On the right-hand side of the tree drag the newly created WinPE boot image (WinPEx64) under PXE-Bootimages to the newly created configuration group.
- On the right-hand side of the tree under Agent Templates, drag the Agent Template required for this configuration onto the newly created configuration group.
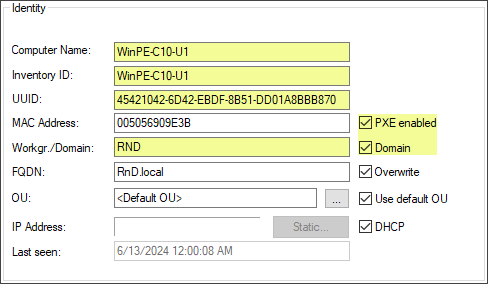
- In the tree on the left, under Unassigned Computers, drag a virtual cpmputer onto the newly created configuration group.
The configuration group you have created will then look something like this:

The options highlighted in yellow must be specified in the properties of the assigned virtual client! Either the UUID and/or the MAC address must be specified.
- Right-click on the configuration group and select Activate. In the Activation Wizard that opens, activate the options Activate PULL via DDS/DDC (software packages only) and Activate PXE (reinstall computer). Click on Next. Click on Done.
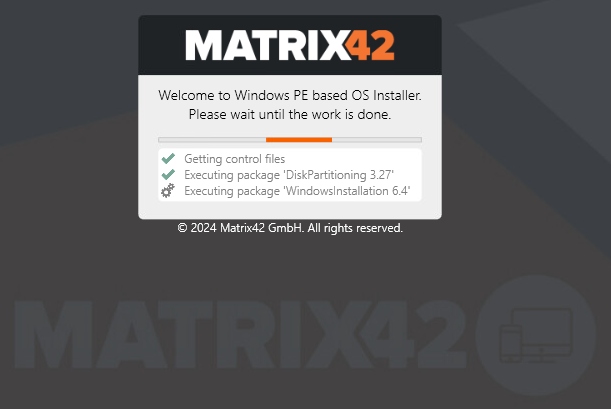
- Start the assigned virtual client - the operating system will be installed via the WinPE boot image.