Self Provisioning
Computer Self Provisioning allows computers to be set up completely automatically with the operating system and software - by employees without Empirum knowledge.
Compared to Empirum-PE-based Computer Self Provisioning (EPE 4), two conceptual changes have been made. Firstly, the concept of computer templates was introduced, which is explained in more detail below. In addition, the Empirum API is used to communicate with the Empirum server during Computer Self Provisioning execution. This means that the Empirum API service must also be installed and configured on the Empirum server.
WinPE-based self-provisioning can be used on all (EFI) computers, but the local boot (to skip self-provisioning) only works on computers that have already been set up with Empirum version 19.0.1 or higher / WinPE PreBoot Support Package version 1.6.1 or higher. Alternatively, self-provisioning can also be carried out via a USB stick, which can be created under Boot configurations in Empirum.
WinPE-based self-provisioning only works with EFI computers. BIOS computers are not supported. It is therefore important to ensure that the WinPE-based boot configuration intended for Self Provisioning does not contain a BIOS option.
Deployment via the Empirum sub-depots is currently only possible if the computer to be used can establish a connection directly to the Empirum API service of the Empirum Master Server.
If a USB stick is created on a Server 2012 R2 or Server 2016 or Windows Server prior to version 1703, offline sources cannot be added as these Windows Server versions cannot create a second NTFS partition. This function is only supported from Server 2019 onwards. Alternatively, a current Windows 10 version with installed ADK 10 (2004) and installed Matrix42 Management Console can be used.
If you define a WinPE PXE image as the default image, EPE-based OS installations are no longer possible via this PXE server. Mixed operation of WinPE PXE default/SP images and EPE PXE OS installations is not supported.
As of WinPE PreBoot Support Version 1.8.3, it is also possible to perform self-provisioning via http(s).
Computer templates
WinPE-based Computer Self Provisioning introduces the concept of computer templates. This replaces the concept of Self Provisioning groups. Computer templates are placeholders in Empirum and can be treated like normal computer objects. They can be assigned to configuration and assignment groups like normal computers. This allows the target state of the new computers to be defined.
During the execution of a computer self-provisioning, a computer template is selected which serves as a template for the new computer to be created. This is assigned to the configuration and assignment groups to which the computer template is also assigned. The new computer is activated and the deployment is then carried out.
Creating computer templates
Computer templates can be created in the Matrix42 Management Console under Administration using via the context menu in the left tree.
- Right-click on Computer or Computer Templates and select New Computer Template.

The dialog opens, which can be used to create a new computer template.
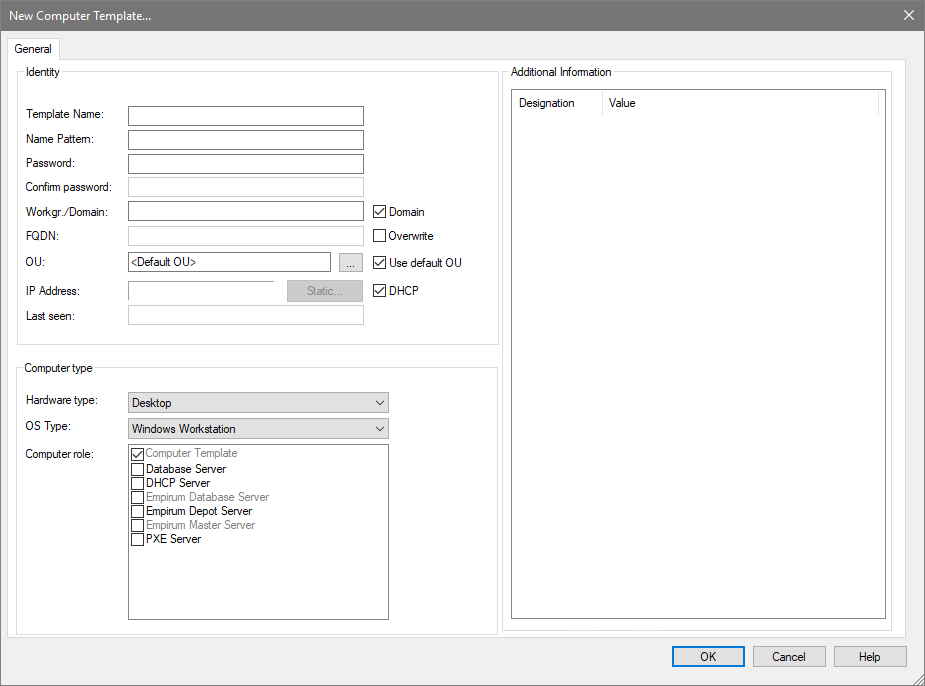
The New Computer Template dialog corresponds to the dialog for creating a new computer.
The special feature here is that the UUID and MAC address properties are not specified for computer templates. This information can only be specified by the respective computer during Computer Self Provisioning. These properties are therefore grayed out.
- Enter a unique name to the right of Template Name (mandatory field).
- Optionally, enter a Windows computer name for the computer(s) to be installed to the right of Name Pattern.
- Optionally, enter a password for using this computer template to the right of Password and Confirm Password.
- Enter a workgroup or domain name to the right of Workgr./Domain. The Domain option must be activated (ticked) for a domain name (mandatory field).
- The FQDN (Fully-Qualified Domain Name) and OU (Organisational Unit) settings are not used/processed within the client Self Provisioning.

- Template Name
Unique name for this computer template. A computer template can only be assigned once to a configuration group. - Name Pattern
f a name is specified for name pattern, this value is used in the self-provisioning process and the user is no longer prompted for the name. The value is automatically used as the computer name for the client to be created. The Empirum API will append a "001, 002, ..." if necessary, if there is already a corresponding client. Only a maximum of 12 of the characters A-Z, a-z, 0-9, -, _ are allowed.
If the value for Name pattern is empty, the user is always asked for the computer name (during the self-provisioning process). The user can enter a name with a maximum of 15 characters. The system checks whether the name has already been assigned in Empirum and informs the user accordingly. - Password, Confirm password
If a password is entered under Password and Confirm password, the password stored here must be entered directly after displaying/selecting the computer SP template in order to start the installation. If no password is entered, there is no prompt. - Workgr./Domain
A domain/workgroup is made up of several computers that have been assigned a common name. A domain consists of shared resources and their users. - Domain
Specify here whether the computer is part of a domain. If no check mark is set here, the new computer belongs to the workgroup specified under Workgroup/Domain. - FQDN (not supported)
The value FQDN and its overwriting are not yet supported by WinPE Self Provisioning. - OU (not supported)
The value OU and its overwriting are not yet supported by WinPE Self Provisioning.
- Template Name
- Once all the necessary information has been entered, the new computer template can be created by clicking OK.
This is then displayed in the list under the Computer Templates filter in the left-hand tree (the computer template is also displayed in the list of unassigned computers).

The Computer Templates filter lists all computers with the assigned Computer Template role.
Configuring and assigning computer templates
Once the computer template has been created, it can be assigned to an existing configuration group that has already been prepared for WinPE-based OS deployment. The configuration group must be prepared as described in the chapter Create Configuration Group. The following settings must therefore be made:
- Assignment of a WinPE based PXE image
- Assignment of the necessary PreOS packages (DiskPartitioning, WindowsInstallation, PxeOffAndReboot, DomainJoin, EmpirumAgentSetup, ...)
- Configuration of deployment-relevant computer variables (variable configurations)
- Assignment of the imported operating system edition
- Assignment of software packages to be installed after operating system installation
Computer templates can also be used to configure assignment groups and can also be assigned to several assignment groups. When performing Computer Self Provisioning, the newly created client is assigned to all groups to which the computer template is also assigned.
Configuring and installing the Empirum API service
As already described, communication in Computer Self Provisioning with the Empirum Server takes place via the Empirum API. For this purpose, the Empirum API service must be configured and installed on the Empirum Master Server via Matrix42 DBUtil.
More detailed information on installing the services via Matrix42 DBUtil can be found in the Matrix42 online help.
- To do this, start Matrix42 DBUtil.
- Log in with the corresponding user.
- Select the location.
- Open the services configuration via Menu > Actions > Install/configure services.
- Select the HTTP protocol and configure the port for the HTTP connection (default value is 9200).

Currently, WinPE-based Computer Self Provisioning requires that the Empirum API service is configured with the HTTP protocol. This can be configured either unencrypted (HTTP) or encrypted with a certificate (HTTPS).
- Apply the changes with Apply.
- Reinstall the Empirum API service via the context menu of the Empirum API entry in the list.
- Once the service has been successfully installed, Matrix42 DBUtil can be closed again.
The Empirum API service is now installed and available for WinPE-based Computer Self Provisioning. Next, you can continue with the creation of a boot configuration for Computer Self Provisioning.
Boot configurations - Computer Self Provisioning
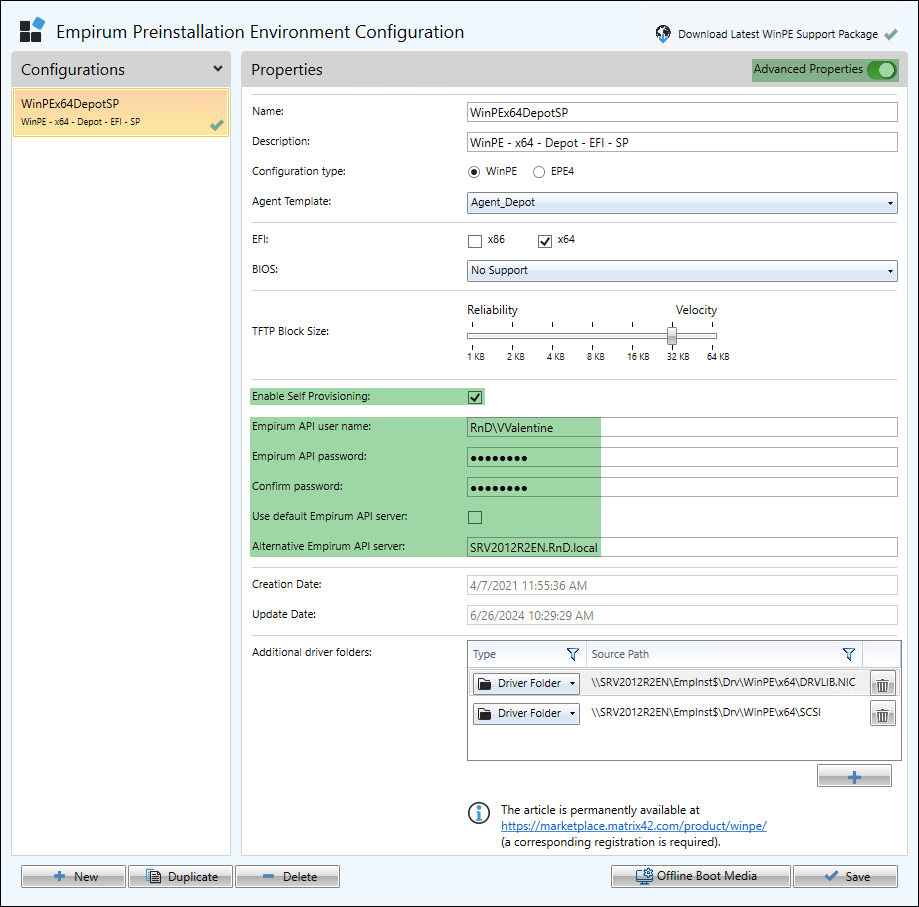
A boot configuration containing this functionality must be created so that computer self-provisioning can be carried out during the boot process. In a WinPE-based boot configuration, the Self Provisioning property must be activated for this.
- First activate the Advanced Properties button.
- Activate the Enable Self Provisioning option (ticked).
After activation, additional properties for the login information are displayed. - Enter an Empirum API user name, the corresponding Empirum API password and the confirmation of the password.
- If you do not want to use the default Empirum API server, uncheck the Use default Empirum API server option and enter the server to be used to the right of Alternative Empirum API server.
Use a user who has sufficient rights on the database. The user must have at least the roles EMP_M_COMPUTER and EMP_M_COMP_ROLE, which can be assigned to the user via Matrix42 DBUtil. SQL Server or Windows users are possible.
- The boot configuration must then be saved so that the changes to the PXE boot image are implemented.
Once the PXE boot image has been successfully created, you can continue with the activation of Computer Self Provisioning on the Empirum server.
Additional Empirum API connection data
In order to establish communication at WinPE runtime, additional connection data is taken from the database when the PXE boot image is built and stored in the PXE boot image. The following information is adopted:
- Empirum API service server name or the server name entered via the Alternative Empirum API server option
- Empirum API service details of the HTTP protocol:
- Port
- Encryption
If the Empirum API service has not yet been configured and installed via Matrix42 DBUtil, an error will occur when building the Self Provisioning activated PXE boot image, as the connection details to the Empirum-API service are required.
Currently, only the HTTP protocol is supported, which can be configured either unencrypted (HTTP) or encrypted with a certificate (HTTPS).
Activate Computer Self Provisioning on the Empirum Server
WinPE-based self-provisioning is currently only intended for installation streets and should not be used in production environments, as the workstations cannot be booted locally unless they have been set up with the WinPE support version (1.6.3) or EPE support version (4.7.11).
With the help of Offline Boot Medium Creation, a USB stick can be created under Boot Configuration in the Empirum console, with the help of which Computer Self Provisioning can be executed directly on the new computer by booting the USB stick.
- If computer self provisioning is to be enabled via a PXE boot, the Default PXE image on the PXE server entry of the Empirum Master Server must be set to the generated WinPE-based self-provisioning image in Matrix42 DBUtil.

- The change must then be saved with Apply and the PXE service must be reinstalled.
Registry adjustments for the Empirum PXE service
As with EmpirumPE 4 (EPE 4) based Computer Self Provisioning, the following registry value must be set on the Empirum Master Server (on which the PXE service is running) for WinPE based Computer Self Provisioning:
HKEY_LOCAL_MACHINE\SOFTWARE\Wow6432Node\matrix42\PXE\EPE4SP
This must be set to 1, or created (type = DWORD; value = 1).
Perform Computer Self Provisioning on the computer
Once the preparations have been made, Computer Self Provisioning can now be run on a new computer. Booting can be carried out either via the USB stick created or via PXE.
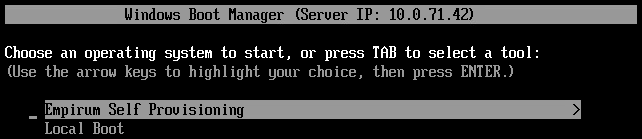
- When the computer boots, the Windows Boot Manager is displayed with the Local Boot entry selected by default.
If you want to run Self Provisioning, you must select the Empirum Self Provisioning menu entry.
After selecting Empirum Self Provisioning, the WinPE-based environment is started automatically and the user is guided through Computer Self Provisioning. The following information is required for this:
- Selection of the computer template
- Enter the stored password (if configured)
- Specification of the new computer name (if no name pattern has been specified)
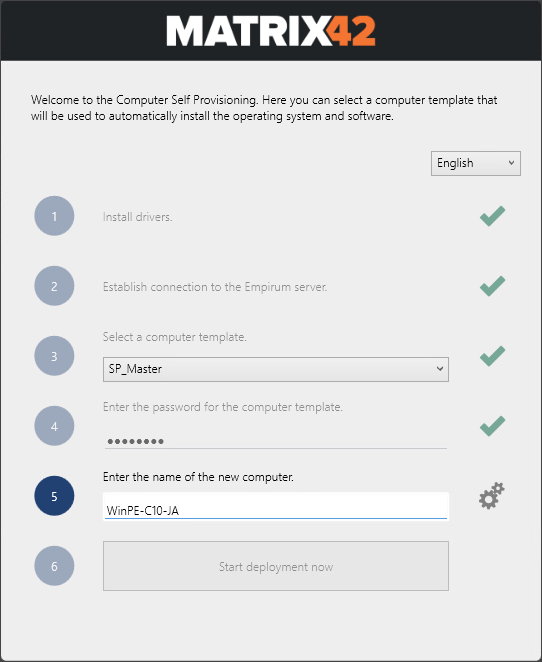
After starting the Self Provisioning user interface, the necessary drivers are installed (1).
A connection to the Empirum server is then established (2).
If the action was successful, this is confirmed with a green check mark in each case.
(3) Select computer template
- Select one of the available computer templates.

Only assigned computer templates are displayed for selection here.
After selecting the computer template, you are taken to the input screen for the computer template password (4). If no password has been assigned for the selected computer template, continue directly with (5) Enter new computer name.
(4) Enter the computer template password
- If a password has been entered in the computer template, it must be confirmed here to reinstall the computer using Self Provisioning.

- After entering the password, press the [ENTER] or [TAB] key.
The password of the computer template is checked. If the password has been entered correctly, continue with (5) if no name pattern has been defined.
If a name pattern has been defined, the process continues directly with (6).
If an incorrect password was entered for the selected computer template, you can enter it again or select another computer template (3).
(5) Enter new computer name
- If no name pattern was defined in the computer template, a computer name must now be entered.
- After entering the computer name, press the [ENTER] or [TAB] key to reach the point (6).
A maximum of 15 of the characters A-Z, a-z, 0-9, -, _ are allowed. If the computer name is entered incorrectly, the input area will turn red. If you move the mouse over the input area with the red border, a corresponding error message is displayed.
If a computer template with a predefined name pattern has been selected, this name pattern is already entered as the computer name.
(6) Start deployment now
You now have the opportunity to check all the information provided.
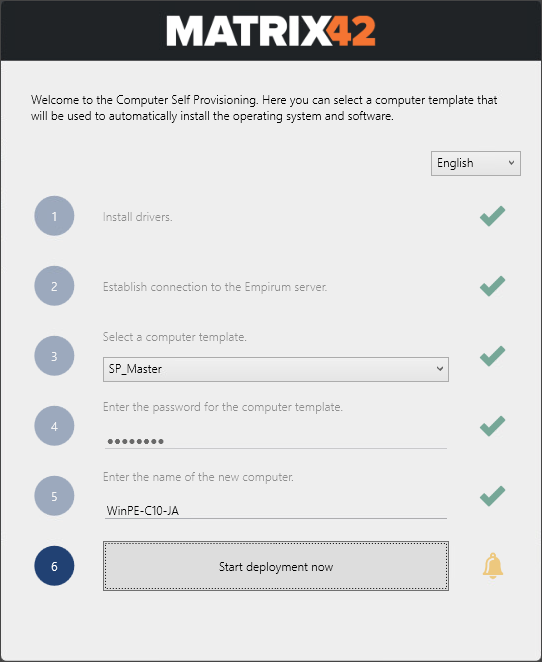
- Pressing any key [ENTER] to complete the process so that the computer can be deployed immediately afterwards.
A check is carried out to see whether this computer name already exists - if so, a "001", "002 etc." is appended and the computer is registered with this name in Empirum.
Currently this name extension scheme ("001", "002 etc.") is fixed and cannot be changed!
The actual computer name is now displayed in the lower area, as it was created in Empirum - in the group with the selected computer template - via API.
The new computer is now created in Empirum with the specified name and assigned to the configuration and assignment groups according to the selected computer template and activated.
If the computer is already known in Empirum, it is first completely removed from all groups and from Empirum before it is created again.
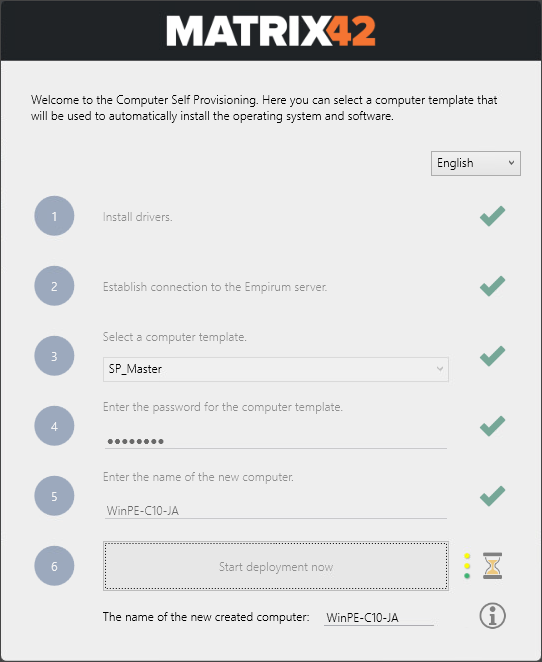
If you move the mouse over one of the three yellow / green dots, you can see which of the files (<Computername>.ddc, <Computername>.ini, DeviceMapping.xml) has already been created / downloaded (green).
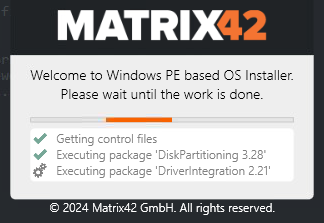
This Self Provisioning screen remains visible (hourglass) until the new deployment jobs have been written to the DDC file, then the startup screen is displayed and the usual OS deployment runs through.
Self Provisioning via Depot Server (Offline)
The following requirements must be met so that self-provisioning can also be performed via a depot server (offline):
- Customized Empirum Agent Template.
- Customized WinPE Bootimage - Standard and Self Provisioning.
- Own Empirum group with correspondingly selected Empirum server (depot).
- The variable FQDN must be filled with a correct value.
- The sync template ESubdepot_DeviceMapping must be assigned to the (offline) depot server (if Empirum Sync is used).
Empirum Agent Template
It is best to create a separate Empirum Agent Template for the Depot Server (Offline) (in this example "Agent_Depot").

It is important that the depot server (offline) is selected here as the "Fallback Server" here (in this example "Doku-Depot.RnD.local").
WinPE Boot images
For the standard WinPE boot image and for the self-provisioning boot image, the previously created agent template must be selected (in this example, "Agent_Depot").


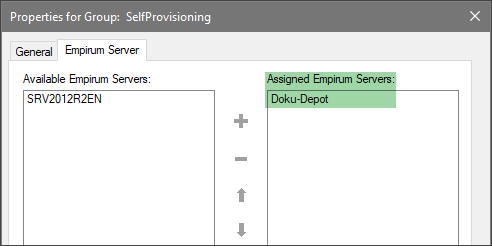
Empirum Group
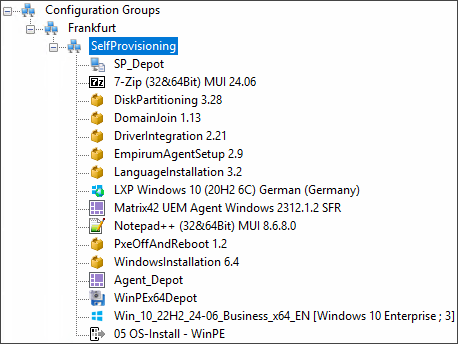
It makes sense to create a separate configuration group here (in this example "SelfProvisioning"). To ensure that the configuration files are transferred (synced) to the correct depot server, you must make the following setting.
Right-click on this group and select Properties. Switch to the Empirum Server tab. Under Available Empirum Servers, select your depot server (Offline) and add it using the plus button under Assignet Empirum Servers.
The PreOS packages you require, an operating system import, a PXE boot image (standard, no self-provisioning) and a computer template must be assigned to this configuration group for a functional run. Optionally, language packages, the UEM agent and other software packages can be assigned.
All variables used here must also be set via variable configuration (or directly in this configuration group), in particular the FQDN variable.
The default boot image is required as further reboots are necessary during the operating system installation.