Creating custom service forms
Overview
Very often when shopping for a Service in the Service Catalog, a lot of additional information needs to be obtained from the service Requestor. For that purpose, the Service designer is able to define a special Custom Form (literally Configuration Item) which will be requested anytime the Service is added to the Shopping Cart, or Order directly.
In advanced cases, some additional data for Service provisioning needs to be received not only from the Requestor but also from those who approve the Order. For that purpose, the same Custom Form could be used.
Designing Custom Form
To declare and design the Service Custom Form the following steps need to be completed:
Define the Custom Form Data Model (Schema)
As for any other case in Service Management, you need to set up a new Configuration Item, which keeps all the data submitted on placing an order.
In case a Configuration Item is created for the purpose of being used as a Custom Form, it has to include one of the predefined Data Definitions:
- Service Form Base (SvcServiceFormBase) or
- Main Data Definition (SPSCommonClassBase).
From the System performance perspective, it is highly recommended to use a Simple CI based on the “Service Form Base” (SvcServiceFormBase).
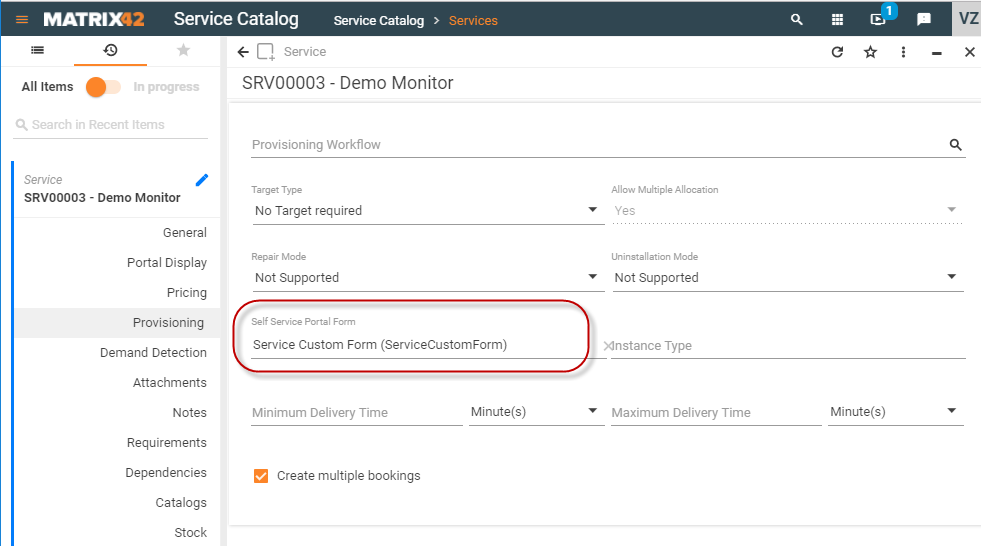
Setup Custom Form for Service
To associate the created Configuration Form with the Service (simple or combined), set it in the Provisioning section of the Service Dialog for the "Self Service Portal Form" property:
Design appearance of Custom Form
From the System perspective, the Custom Form is an absolutely ordinary Configuration Item, which could be fully or partially managed in UUX. To do that all the necessary UUX artifacts like Dialog, Preview, etc. need to be defined for the CI. But if the purpose is to have only a Form on ordering of the Service, it is enough to define the Dialog layout only. For that, proceed to Layouts/Dialogs management area and create a new Dialog for the just created Configuration Item.
Use the Layout Designer to author the form.
If the Dialog is going to be used as a Custom Form, you need to keep in mind that only the first Dialog View (Dialog tabulator) is displayed to the Service Requestor, and exactly the first view needs to have all the controls needed to be provided by Requestor. Other tabulators can be used either for further Data management or as additional forms requested to be filled by Decision Makers on the approval stage.
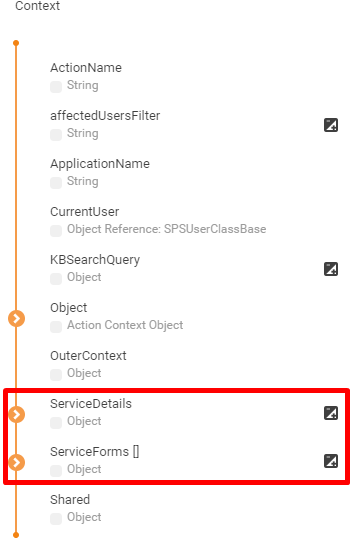
On designing the Custom Form, sometimes it is very important to get current Shopping context information, e.g. which Service is being added to Cart (especially for cases when the same Form is reused in multiple Services), who is the Order Requestor, or for whom the Service is shopped. All this information can be obtained in the Layout Designer Context section. Since not every Dialog is going to be used as a Custom Form, by default this data is hidden but can be easily activated.
Select the Context Data Source and Add new Property with name “ServiceDetails” of type Object and "ServiceForms" of type Object and checked IsArray flag.
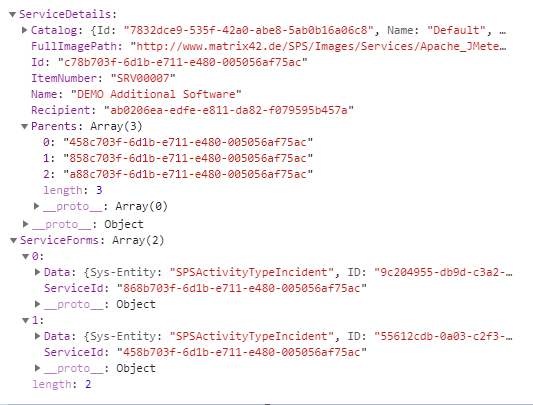
The System automatically attached the Javascript object of the following structure to the declared Property:
ServiceDetails: {
    Catalog:  { Id, Name },
    Recipient,
    Recipients,
    Id,
    Name,
    ItemNumber,
    FullImagePath,
    Parents

},
ServiceForms: [
    {
        ServiceId,
        Data: {}
    }
]
ServiceDetails - contains information about shopped Service
Catalog – Object ID and the Name of the Service Catalog from which the Service is ordered;
Recipient – Id of the Recipient of the shopped Service (obsolete since 12.1.1; The field is still filled by the Recipient ID, and in case of multiple recipients, only one recipient will be set);
Recipients – Ids of the multiple Recipients of the shopped Service (new since 12.1.1);
Id – Id of the Service object;
Name – Service name
ItemNumber – Service's internal number;
FullImagePath – Full Path to image used in service;
Parents – list of ids of all parent elements ordered from root Combined Service to it's children;
The "Recipient" field in ServiceDetails for ServiceForm must be used when Single-Recipient mode is active, or Service require Dedicated Service Form per Service. A new "Recipients" field must be used for Service that Require one form for multi-recipient recipient.
ServiceForms: - an array of already filled on previous steps Custom Forms
ServiceId – Id of the Service related to the form
Data - the entity object created as a result of Custom Form filling
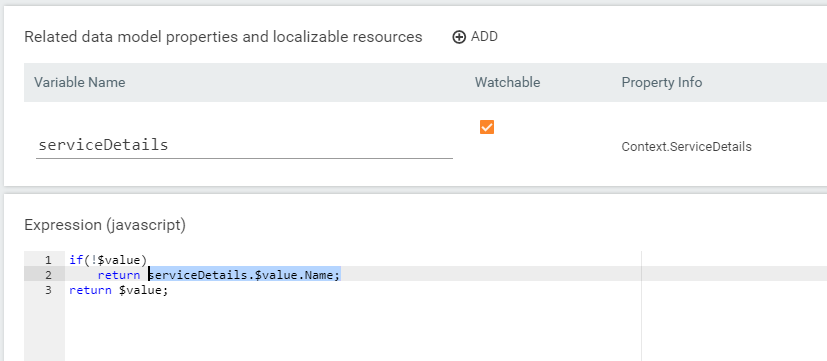
By using the "Add Property" function for the ServiceDetails and ServiceForms properties, you can fully re-create the Model of the Object, and then use the Object properties directly, or you can refer the ServiceDetails or ServiceForms properties in calculated fields, and use simple Javascript to get specific property value (like shown in Example below)
On the Image below, the example of the run-time data of the ServiceDetails and ServiceForms properties is presented:
Example
The following example demonstrates how the ServiceDetails object could be used in defining the logic of the Custom Form. It initiates the value of a Property by the name of the ordering service
When Combined Service is being ordered with Assign Service action (in Service Desk app) all Custom Forms are present on one page and to be filled at once, so Context.ServiceForms object will be empty.
ServiceDetails and ServiceForms attributes in DataModel's context node are available only on service form data creation.
If it is needed to display some info from an Order on the service form when it is opened from an already existing booking or from a shopping cart item, some customization may be handy.
For example, if you need to display order Recipient, follow the next steps.
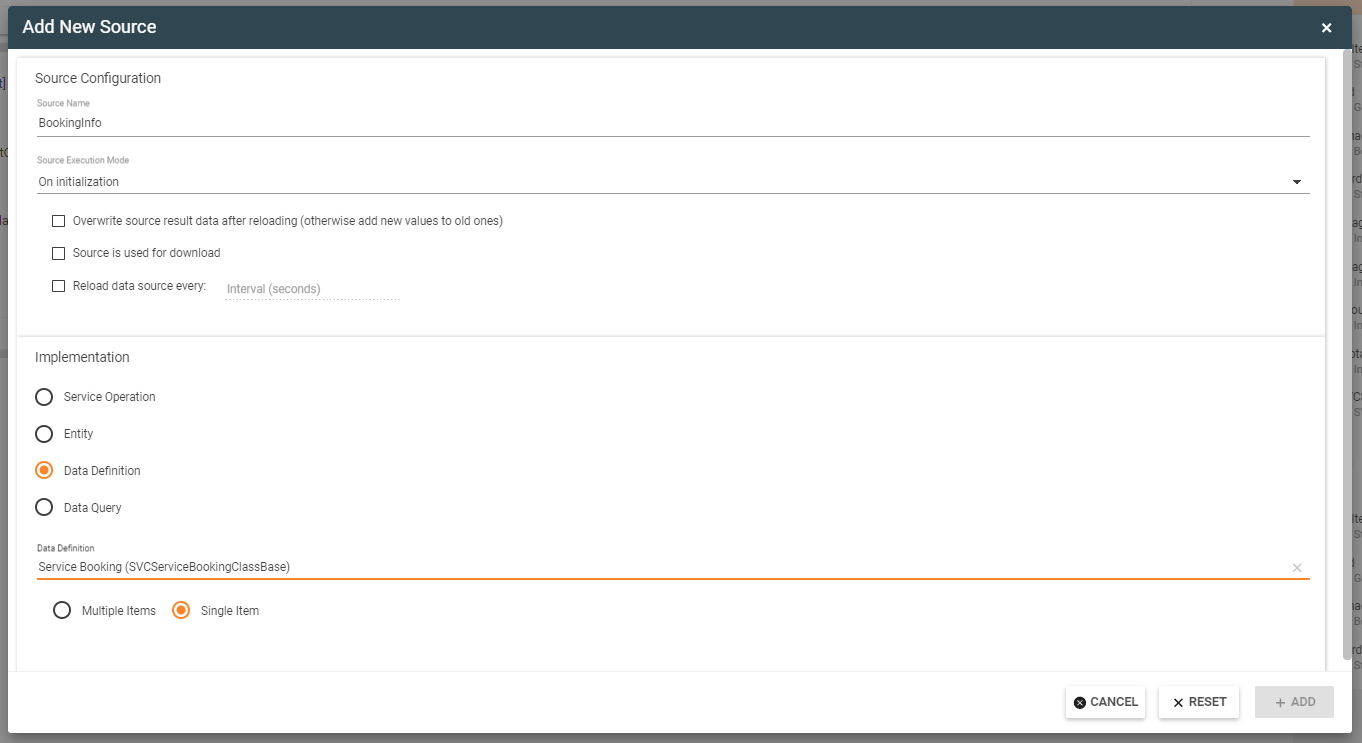
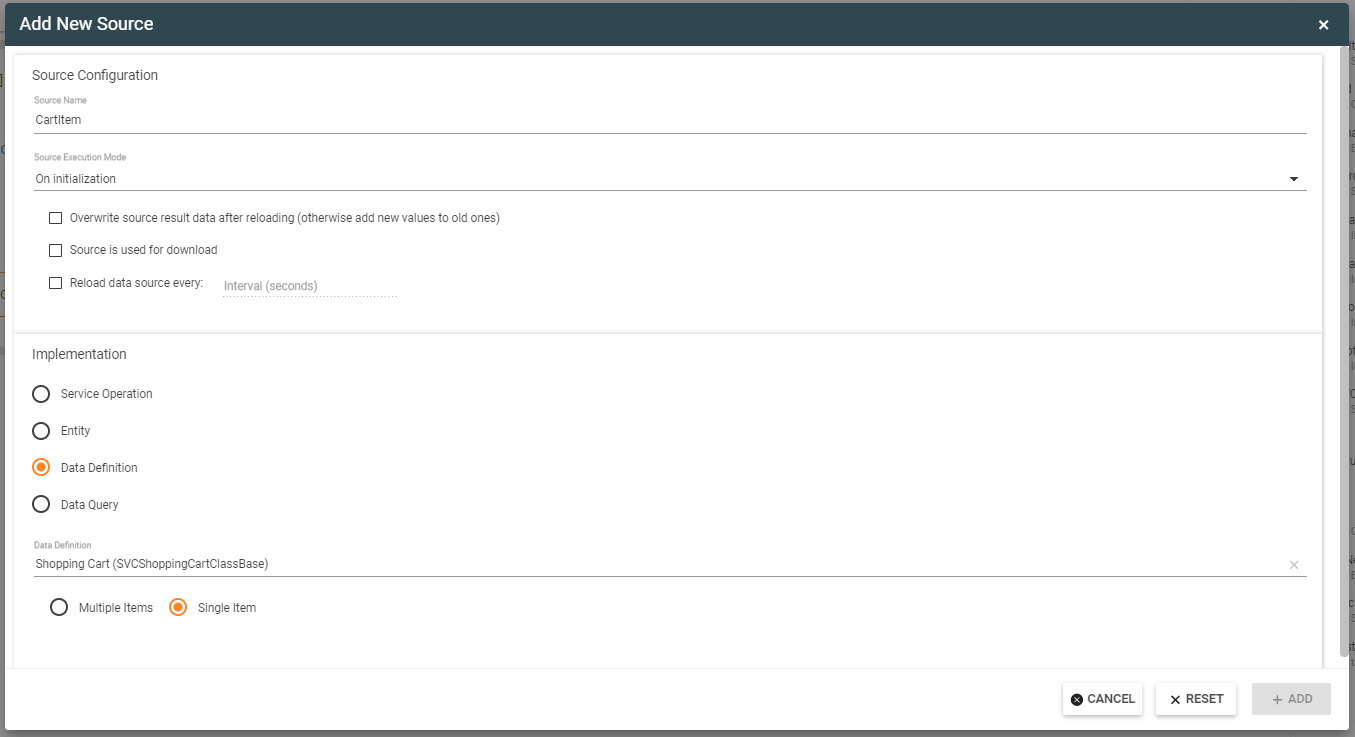
- Open a Custom Form layout in layout Designer and add a new Source as shown below
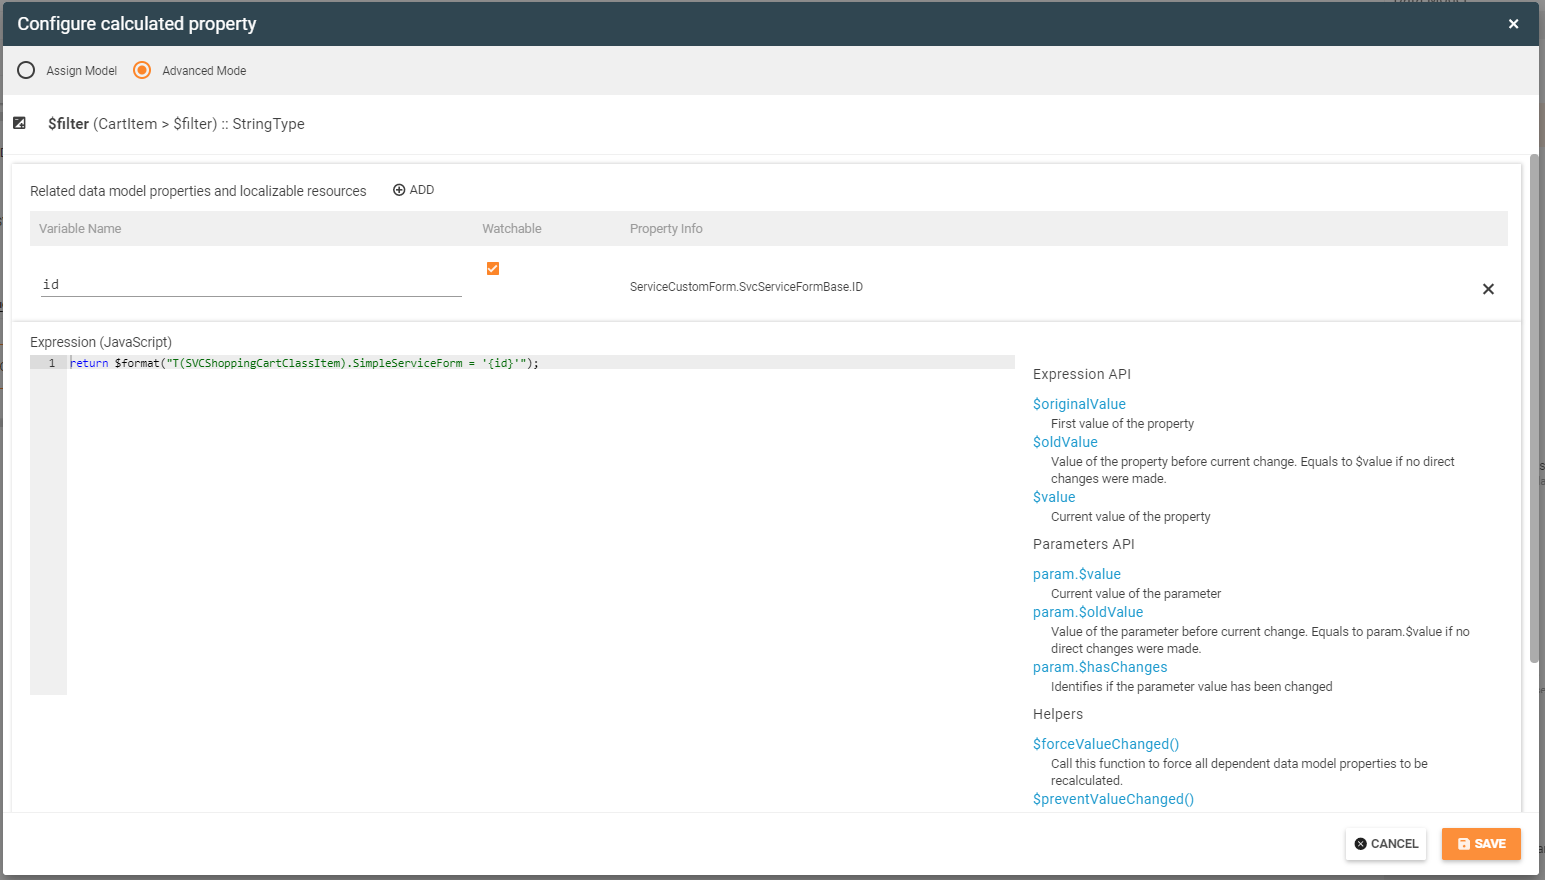
- In an added source edit $filter field and configure it as shown below

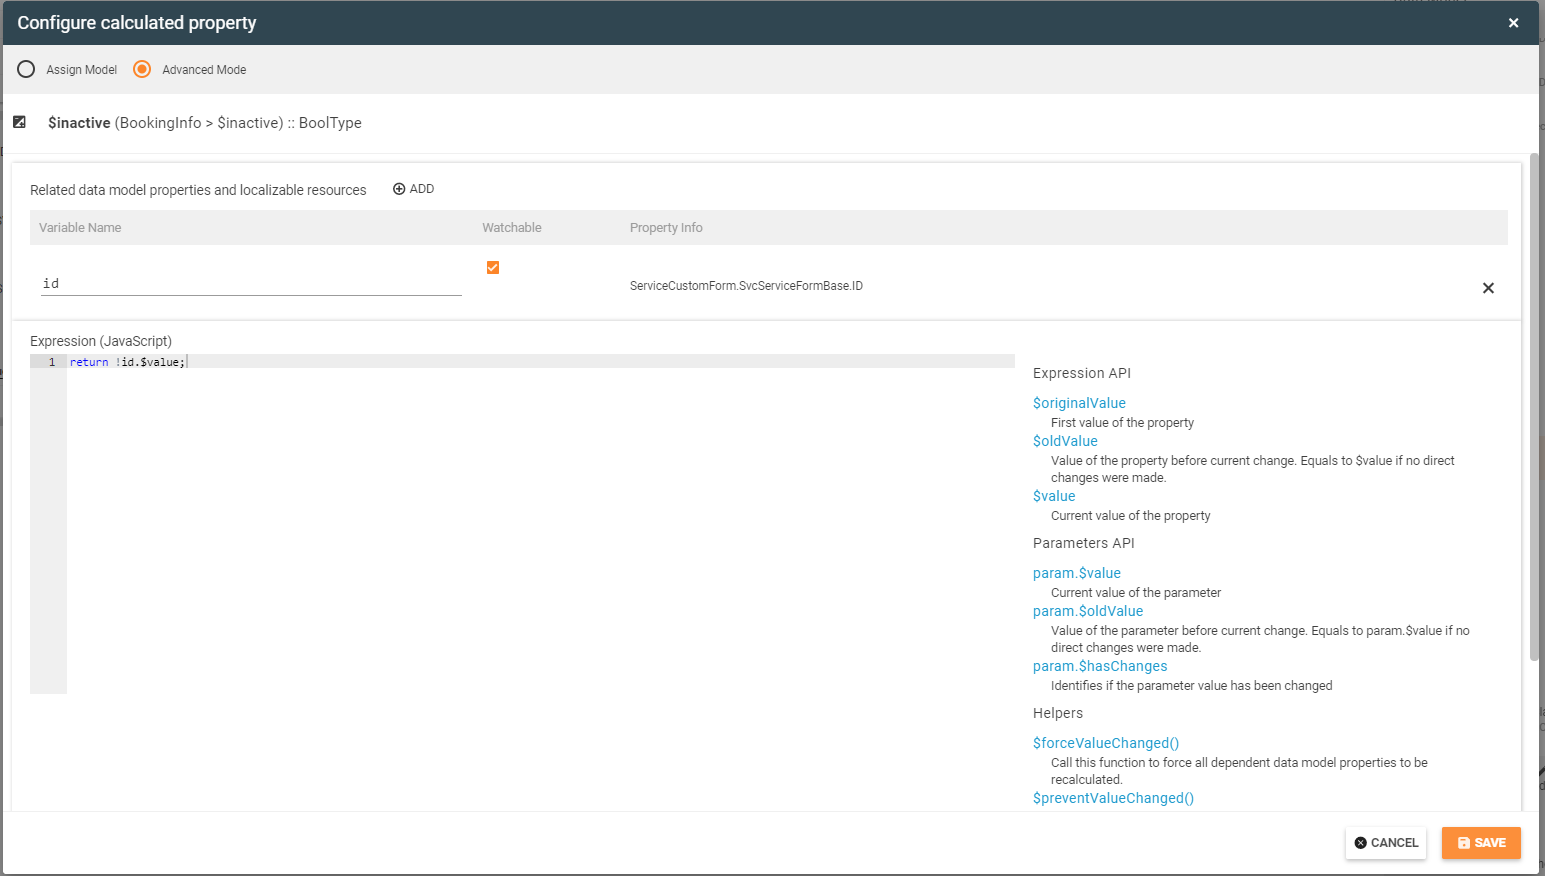
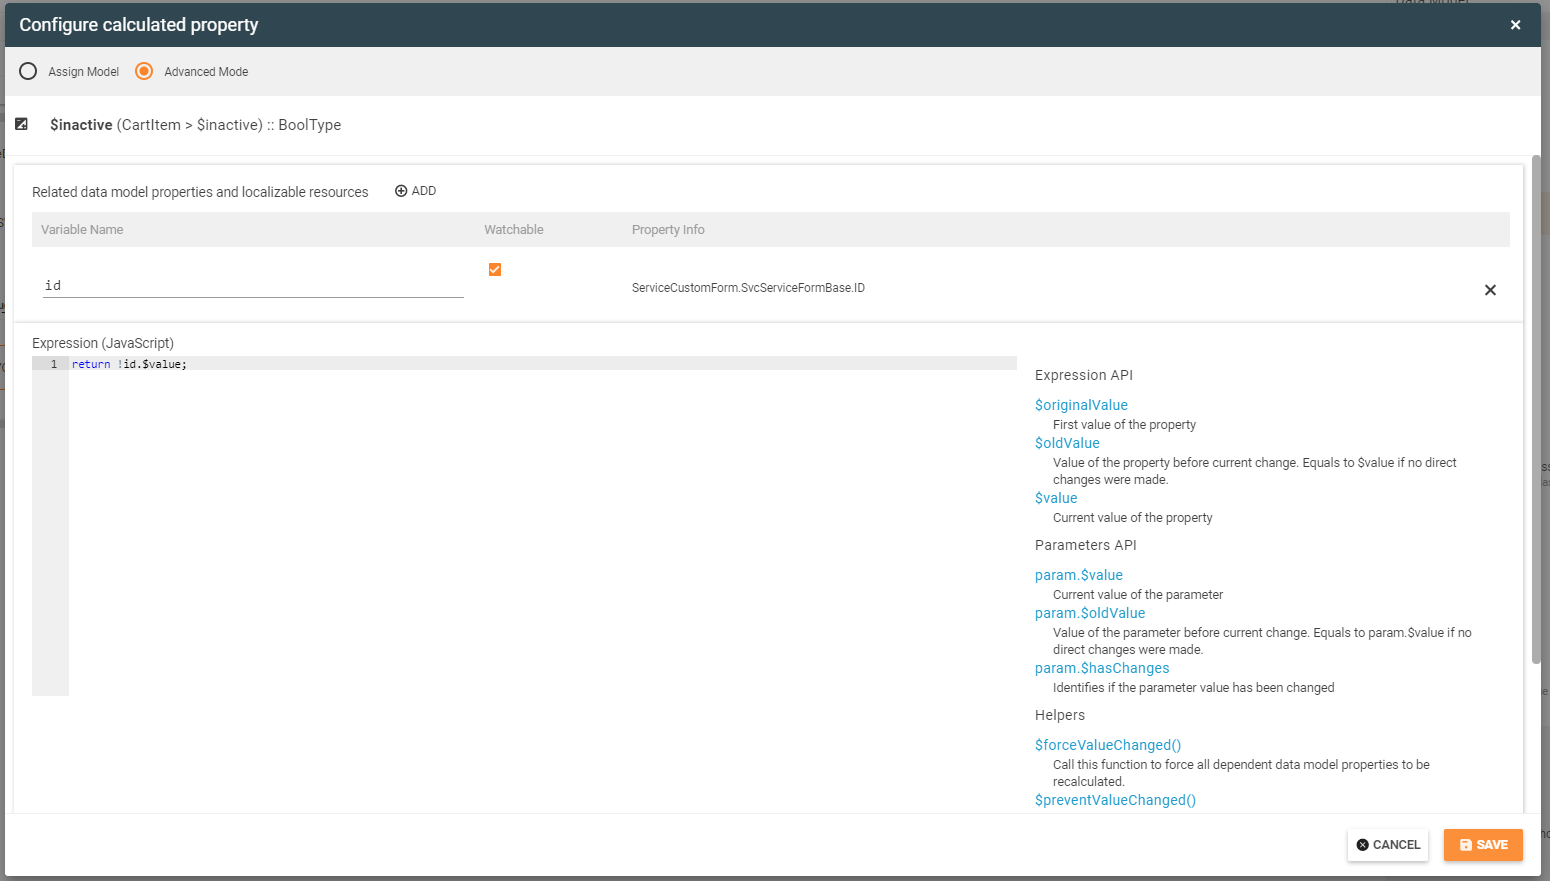
- In an added source edit $inactive field and configure it as shown below (not to trigger this source on creation)
- Add an Extra property to an attribute BookingInfo.SVCServiceBookingClassBase.Order and configure it as shown below

- Open a Custom Form layout in layout Designer and add a new Source as shown below
- In an added source edit $filter field and configure it as shown below
- In an added source edit $inactive field and configure it as shown below (not to trigger this source on creation)
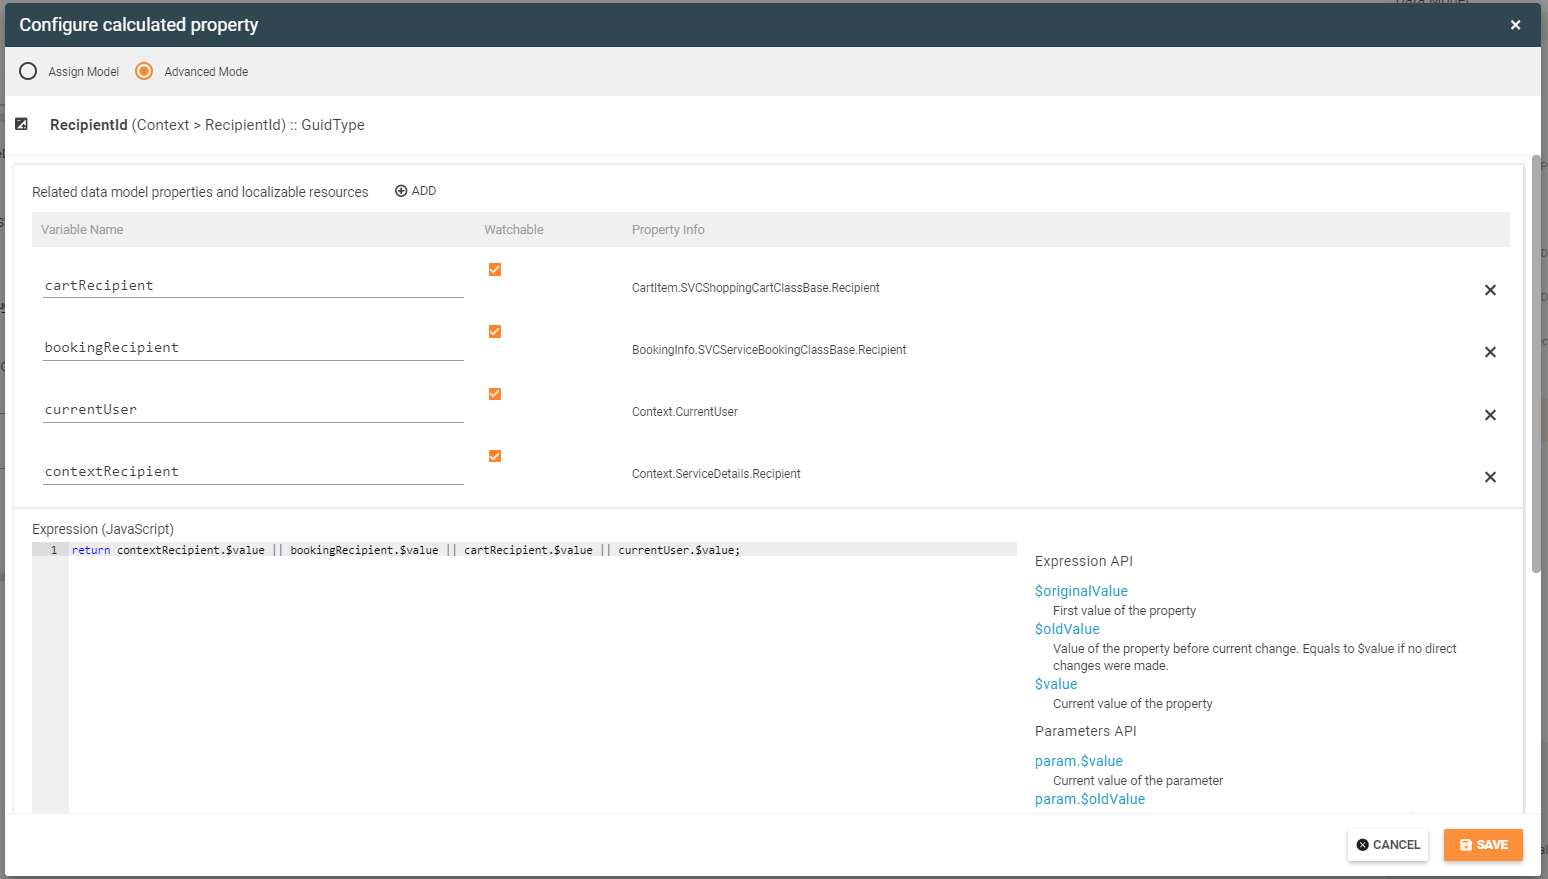
- Add Property to RecipientId to a Context and configure it as shown below
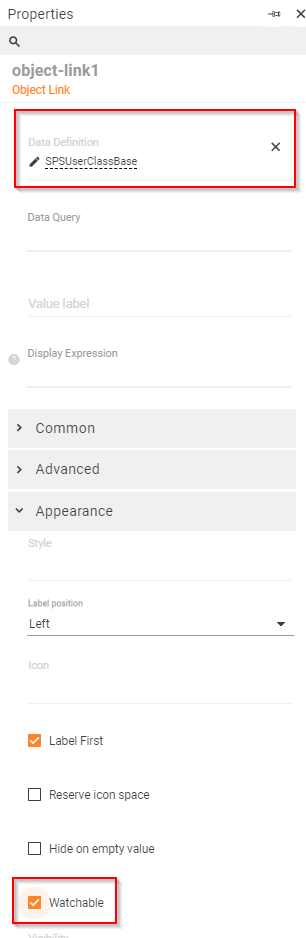
- Drag new Property RecipientId onto canvas and select "Object Link" control.
- Configure new object link as shown below
- Publish the layout.
Now Recipient is displayed on service forms everywhere.
Design Custom Form for Decision Makers
For very intricate cases, the additional data could be requested from Decision Makers on Order approval. For that purpose, define additional View in Custom Form dialog (any View except the first, which always play the role of Custom Form for Requestor). Make sure that no Database Mandatory attribute is used on that View, otherwise, the Requestor (which does not see this form) would not be able to submit the Custom Form. If you really need to ensure the Decision Maker provides the necessary data, use the appropriate Control validators or special control like Form Message for validating the form.
To activate the designer Custom Control View to be displayed on approving, adopt the appropriate Approval Workflow to reference the specific Dialog View from the particular Approval Step.