Installing and configuring the Matrix42 Empirum Inventory data provider
Overview
The Empirum Inventory data provider imports devices, applications and fingerprints from the Matrix42 Empirum service.
Please note that there are functional limitations.
Installation
You can install the Empirum Inventory data provider from the Extension Gallery.
- Open the Administration application and go to Extension Gallery.
- You need to log on with a Matrix42 user account to acces the Matrix42 Extension Gallery.
- Search for Empirum Inventory.
- Select the Empirum Inventory Data Provider extension.
- Follow the installation/update wizard. The prerequisite Generic Inventory Import Data Provider extension will be installed automatically if it is not already installed.
The Empirum Inventory extension requires the Matrix42 Generic Inventory Import extension as a prerequisite.
Configuration
- The Empirum Inventory data provider allows a manual configuration or an import of existing configurations of the legacy Empirum Connector.
- Customers which want to migrate from the legacy Empirum Connector should use the import wizard for an easy setup.
- The Empirum Inventory Data Provider configurations are also used by the Empirum Provisioning Extension.
When removing a configuration the associated services of this Empirum location will be set to blocked.
Creating a configuration manually
- Open the Administration application and go to Integration > Data Providers.
- Double-click the Empirum Inventory data provider to open it. The page contains the configurations list where configurations for this provider can be managed.
- Create a new configuration. A new dialog will open.
- On the General page the following configuration can be performed:
- Select the Enabled checkbox to enable the configuration after saving it.
- Enter the Name of Location which represents the connected Empirum location.
Make sure to use the exact same name as the Enterprise Service Bus (ESB) will use this name for the objects of the corresponding node.
Make sure to use the exact same name as in the legacy Empirum Connector if switching to the data provider without using the migration wizard.
- Select the Data Gateway if the data collection should be performed on another server.
- In the Organizational Unit field, select an organizational unit to which imported devices will be assigned.
- Enter a description to identify the connected Empirum server.
- On the Settings page, the following configuration can be performed:
- Configure the connection parameters for the connection to the Empirum server. Make sure the settings correspond to the settings in DBUtil on the Empirum server. The supported protocols are:
- net.tcp
- http
- https
Matrix42 recommends to use a secured connection via https.
- Provide the name without any prefix (i.e., myempirum.company.com).
- When selecting Use Empirum Encrypted Password, provide the password based on the Empirum SYNC or AES256 encryption. See the Empirum documentation for details.
- The action "Complete Inventory" on assets managed by Empirum uses a dedicated URL to the Empirum Web Console (EWC). The URL is configured in the section Option for Full Computer Inventory.
- Use the URL which is based on the settings above or modify it if required.
- If required provide a dedicated user which can log on to the EWC.
- Import Settings
- Select if new computers should be created and which status they will have.
- Select if the status should be set for computers which are removed from the Empirum server.
- Select if computers without inventory data should be considered. If not selected miscellaneous devices and self-provisioning templates will also be ignored.
- Review the provided matching keys. These keys define if a device is updated or a new device is created when no matching can be performed.
- The Scanned Computers page allows to define which computers should be imported based on an include or exclude definition.
- Save the data provider configuration.
- To import the data, run the Enable and Activate action for the data provider.
Default matching keys
The default matching keys should in most cases prevent that computers which are imported from different sources are created as duplicate entries. The keys can be adjusted to the specific needs in the settings for each location.
If the Intune Data Provider is used in combination with Empirum Data Provider the SPSComputerClassBase.Name needs to be added as last matching option as Intune removes spaces from serial numbers.
Default keys:
- SPSInventoryClassBase.EmpirumClientID, SPSInventoryClassBase.EmpirumLocation
- SPSComputerClassBase.Name, SPSComputerClassBase.SystemSerialNumber, SPSComputerClassBase.WindowsDomainName
- SPSComputerClassBase.Name, SPSComputerClassBase.SystemSerialNumber
- SPSComputerClassBase.Name, SPSComputerClassBase.PrimaryMACAddress
- SPSComputerClassBase.Name, SPSComputerClassBase.WindowsDomainName
- SPSComputerClassBase.SystemSerialNumber
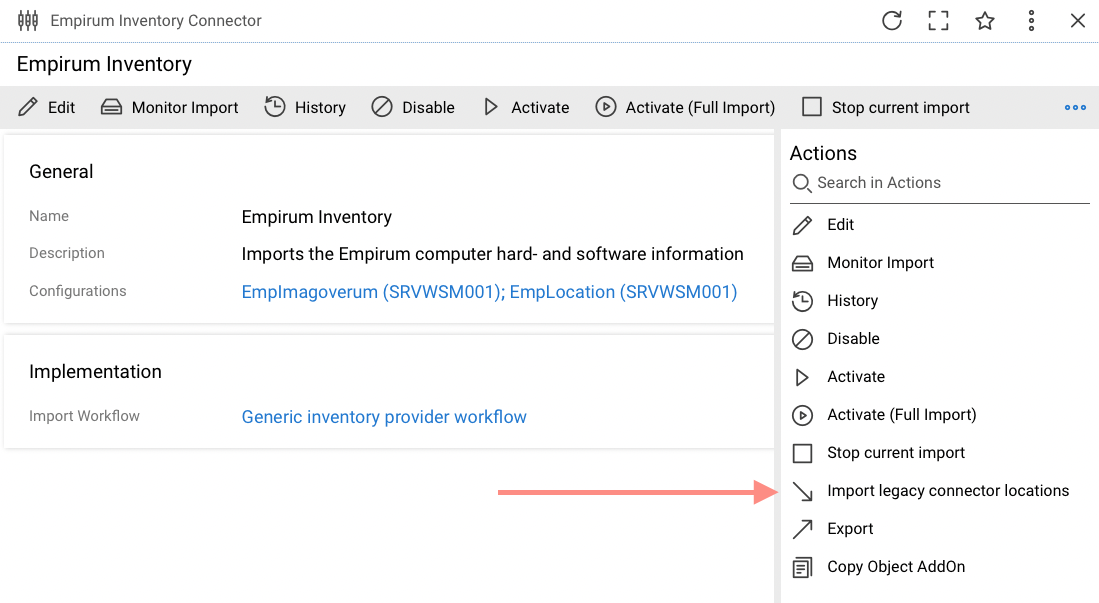
Importing Empirum Connector configurations
The Import Legacy Empirum Connector Configurations action allows the import of all Empirum locations which have the Import Inventory Data option activated.
The action is only available if a legacy Empirum Connector configuration exists and the import has not been performed yet.
Not all settings are transferred. Review the configuration after the import.
- Open the Administration application and go to Integration > Data Providers.
- Click the Empirum Inventory data provider to show the preview page.
- Run the Import Legacy Empirum Connector Configurations action.
- The wizard provides the following options:
- Disabling the legacy Empirum Connector computer import after importing the configurations - this will deactivate the Import Inventory Data option of the imported locations.
- Import of locations with Import Inventory Data enabled. This imports all possible settings and creates new configurations in the Empirum Inventory data provider for the listed legacy Empirum Connector locations.
- Closing the dialog.
Make sure to review the configuration. It is now possible to use https as a protocol and assign a worker with data gateway services for connecting to the Empirum server.
Large Enterprise Adjustments
The Empirum Inventory Data Provider is tested with up to 50.000 devices. As the import performance differs from the environment and the data Matrix42 provides defaults which are a good compromise between performance and robustness. If there are issues importing computers due to timeouts the following changes can be made to address them:
- Change chunk size of devices retrieved per API call. This needs to be performed via DB update:
- Default is 100, recommended if timouts occure is 30
- UPDATE SPSGenericConnectorConfigurationClassEmpirum SET ImportComputersChunkSize=30 WHERE [EmpirumLocationName]='YOUR LOCATION NAME'
- Change the timeout by increasing the workflow lifecycle period in file "Matrix42.Worker.Host.exe.config":
- <add key="TaskDomainFinishTaskTimeSeconds" value="28800" /> <!-- default - 14400 -->
- <add key="TaskDomainLifeTimeMinutes" value="480" /> <!-- default - 240 -->
- Restart the worker process
For customers using the Matrix42 cloud a ticket at our support is required.
Tracking the import progress
Use the HostCommon.log by filtering "LCM" to monitor or troubleshoot the import progress.