User Management
Overview
Your FireScope appliance has two Admin User accounts, one for the FireScope SPM interface and one for the Configuration Management Interface (CMI). The Admin User is a reserved and restricted FireScope Administrator that has accessibility of all privileges granted to User Groups but cannot be a member of any groups. This user should perform administration and configuration tasks but not as an actual user.
These two Admin User accounts are separate for security purposes. The default password to both of these accounts is password. FireScope recommends that you change the passwords for both Admin accounts to two different passwords at your earliest convenience.
User Access Level
FireScope SPM has several access levels to allow your users the necessary accessibility for their assigned tasks.
The access roles from least access to most access are as follows:
- Dashboard User
- Services Supervisor
- Services Manager
- Configuration Administrator
- FireScope Administrator
- Account Administrator
Dashboard User
Dashboard users are restricted to the Dashboard Pages only. Lens content accessibility is restricted to associated Logical or Service Groups, based on User Group membership. Although the Users cannot create reports, they can access reports shared based on User Group membership (or public reports). They can create their own Dashboard Pages and Spaces. For Trend Graph or Pie/Bar charts, Dashboard users can also create their own graphs from accessible CI Attributes.
Services Supervisor
Services Supervisor have all the access of Dashboard users plus access to Service Management and Analysis sections of the application. Some Dashboard content will also provide additional contextual links to allow further analysis your issues or services. In addition to services and analysis views, supervisor users can create and manage their own reports. CI access is based on user group membership.
Services Manager
Services Manager user have access to Dashboard, Analysis, Service Management, and Service based Configuration (Service Groups, Policy, etc) but not device level Configuration (CI).
Configuration Administrator
Configuration Administrator have the ability to edit the configuration of your CIs, Visual Controls and other Data Collection or Data presentation settings. CI access is based on user group membership.
FireScope Administrator
FireScope Administrator have the ability to edit settings that affects users, groups or properties that has impact on accessibility. Batch configuration functions such as Blueprint linkage and Migrate CIs requires this level of access. FireScope Administrators has access to all Service Groups, Logical Groups and CIs. They can also administer other users’ Dashboards and Reports.
Account Administrator
Global Settings that affects all configurations and evaluations within the account requires this level of access. Limit this user access level to those you wish to conduct global setting configurations only. Account Administrators have access to all Service Groups, Logical Groups and CIs. This level of access can also administer other users’ Dashboards and Reports.
Dashboard |
||||||
|
Only |
Supervisor |
Manager |
Administrator |
Administrator |
Administrator |
|
| View Dashboard |
|
|
|
|
|
|
| Pages |
|
|
|
|
|
|
| Spaces |
|
|
|
|
|
|
Service Management |
||||||
Business Services |
Only |
Supervisor |
Manager |
Administrator |
Administrator |
Administrator |
| Service Policy Status |
|
|
|
|
|
|
| Service Explorer |
|
|
|
|
|
|
| Service Dependency Maps |
|
|
|
|
|
|
| Service Level Agreement |
|
|
|
|
|
|
| SLA Projection |
|
|
|
|
|
|
Events |
Only |
Supervisor |
Manager |
Administrator |
Administrator |
Administrator |
| Recent Events |
|
|
|
|
|
|
| Recent Event Timeline |
|
|
|
|
|
|
| Policy Event Timeline |
|
|
|
|
|
|
| Notification |
|
|
|
|
|
|
| Incident Management |
|
|
|
|
|
|
Storage Management |
Only |
Supervisor |
Manager |
Administrator |
Administrator |
Administrator |
| Overview |
|
|
|
|
|
|
| Usage |
|
|
|
|
|
|
| Infrastructure |
|
|
|
|
|
|
Virtual/Cloud |
Only |
Supervisor |
Manager |
Administrator |
Administrator |
Administrator |
| Amazon AWS Infrastructure |
|
|
|
|
|
|
| VMWare Infrastracture |
|
|
|
|
|
|
| VMWare Explorer |
|
|
|
|
|
|
Network |
Only |
Supervisor |
Manager |
Administrator |
Administrator |
Administrator |
| Explorer |
|
|
|
|
|
|
| Port Visualizer |
|
|
|
|
|
|
| Port Details |
|
|
|
|
|
|
| Infoblox Grid Management |
|
|
|
|
|
|
| Infoblox IPAM Explorer |
|
|
|
|
|
|
User Experience Check |
Only |
Supervisor |
Manager |
Administrator |
Administrator |
Administrator |
| Web |
|
|
|
|
|
|
| User Experience Check |
|
|
|
|
|
|
| ServiceNow |
Only |
Supervisor |
Manager |
Administrator |
Administrator |
Administrator |
| ServiceNow Statistics |
|
|
|
|
|
|
Analysis |
||||||
CI Analysis |
Only |
Supervisor |
Manager |
Administrator |
Administrator |
Administrator |
| CI Quick View |
|
|
|
|
|
|
| Latest Data |
|
|
|
|
|
|
| CI Profile Overview |
|
|
|
|
|
|
Visualization Analysis |
Only |
Supervisor |
Manager |
Administrator |
Administrator |
Administrator |
| Data Center View |
|
|
|
|
|
|
| Virtual Controls |
|
|
|
|
|
|
| Historical Trend View |
|
|
|
|
|
|
| Graphic Data Analysis |
|
|
|
|
|
|
Maps |
Only |
Supervisor |
Manager |
Administrator |
Administrator |
Administrator |
| Custom Maps |
|
|
|
|
|
|
| Google Maps |
|
|
|
|
|
|
| Data Center Google Map |
|
|
|
|
|
|
Logs |
Only |
Supervisor |
Manager |
Administrator |
Administrator |
Administrator |
| SNMP Traps |
|
|
|
|
|
|
| Syslog |
|
|
|
|
|
|
| Window Log |
|
|
|
|
|
|
| Log Attribute |
|
|
|
|
|
|
Reports |
Only |
Supervisor |
Manager |
Administrator |
Administrator |
Administrator |
| Quick Start Report |
|
|
|
|
|
|
| Manage Reports |
|
|
|
|
|
|
| Schedule Report |
|
|
|
|
|
|
| Firescope Analytics |
|
|
|
|
|
|
Infrastructure |
Only |
Supervisor |
Manager |
Administrator |
Administrator |
Administrator |
| Cisco UCS Report |
|
|
|
|
|
|
| Flexpod for Vmware |
|
|
|
|
|
|
| Rack Infrastructure |
|
|
|
|
|
|
Cloud Migration |
|
Supervisor |
Manager |
Administrator |
Administrator |
Administrator |
| Risk Analysis |
|
|
|
|
|
|
Configuration |
||||||
CIs |
Only |
Supervisor |
Manager |
Administrator |
Administrator |
Administrator |
| CI |
|
|
|
|
|
|
| Attribute |
|
|
|
|
|
|
| Attribute Set |
|
|
|
|
|
|
| User Experience Check |
|
|
|
|
|
|
| ESB |
|
|
|
|
|
|
Group |
Only |
Supervisor |
Manager |
Administrator |
Administrator |
Administrator |
| Logical Group |
|
|
|
|
|
|
| Service Management |
|
|
|
|
|
|
| Tag Management |
|
|
|
|
|
|
Evaluation |
Only |
Supervisor |
Manager |
Administrator |
Administrator |
Administrator |
| Event Definition |
|
|
|
|
|
|
| AED |
|
|
|
|
|
|
| Policies |
|
|
|
|
|
|
| Notification |
|
|
|
|
|
|
| Dependencies |
|
|
|
|
|
|
| Maintenance Window |
|
|
|
|
|
|
| Service Level Agreement |
|
|
|
|
|
|
Service Dependency |
Only |
Supervisor |
Manager |
Administrator |
Administrator |
Administrator |
| Dependency Editor |
|
|
|
|
|
|
| Network Traffic |
|
|
|
|
|
|
| Network URLs |
|
|
|
|
|
|
| Network Destination |
|
|
|
|
|
|
Discovery |
Only |
Supervisor |
Manager |
Administrator |
Administrator |
Administrator |
| Network Discovery |
|
|
|
|
|
|
| Manage Clusters |
|
|
|
|
|
|
| Topology Discovery |
|
|
|
|
|
|
| Virtual Discovery |
|
|
|
|
|
|
| Storage Discovery |
|
|
|
|
|
|
| Amazon AWS Discovery |
|
|
|
|
|
|
| Cisco UCS Discovery |
|
|
|
|
|
|
| Infoblox Discovery |
|
|
|
|
|
|
| SMI-S Discovery |
|
|
|
|
|
|
| Credential Management |
|
|
|
|
|
|
Virtualization |
Only |
Supervisor |
Manager |
Administrator |
Administrator |
Administrator |
| Visual Control |
|
|
|
|
|
|
| CI MultiView |
|
|
|
|
|
|
| Performance Grid |
|
|
|
|
|
|
Map & Infrastructure |
Only |
Supervisor |
Manager |
Administrator |
Administrator |
Administrator |
| Custom Map |
|
|
|
|
|
|
| Google Maps |
|
|
|
|
|
|
| Icons and Images |
|
|
|
|
|
|
| Facilities |
|
|
|
|
|
|
| Racks |
|
|
|
|
|
|
| FlexPod for Vmware |
|
|
|
|
|
|
Blueprint |
Only |
Supervisor |
Manager |
Administrator |
Administrator |
Administrator |
| Ci |
|
|
|
|
|
|
| Attribute |
|
|
|
|
|
|
| Attribute Set |
|
|
|
|
|
|
| Event Definition |
|
|
|
|
|
|
| Visual Control |
|
|
|
|
|
|
| Blueprint Group |
|
|
|
|
|
|
Administration |
||||||
Permission |
Only |
Supervisor |
Manager |
Administrator |
Administrator |
Administrator |
| Users |
|
|
|
|
|
|
| User Group |
|
|
|
|
|
|
| AD User Configuration |
|
|
|
|
|
|
| External Authentication |
|
|
|
|
|
|
Application Settings |
Only |
Supervisor |
Manager |
Administrator |
Administrator |
Administrator |
| Ci Type |
|
|
|
|
|
|
| Data Retention |
|
|
|
|
|
|
| Google Map Key |
|
|
|
|
|
|
| Locale |
|
|
|
|
|
|
| Service Rules Settings |
|
|
|
|
|
|
| Severity Colors |
|
|
|
|
|
|
| Syslog Facilities |
|
|
|
|
|
|
| Syslog Priorities |
|
|
|
|
|
|
| Theme Management |
|
|
|
|
|
|
| Value Translation |
|
|
|
|
|
|
Utilities |
Only |
Supervisor |
Manager |
Administrator |
Administrator |
Administrator |
| Agent Management |
|
|
|
|
|
|
| Agent Upgrades |
|
|
|
|
|
|
| Edge Device |
|
|
|
|
|
|
| Blueprint Linkage |
|
|
|
|
|
|
| Service Modeler |
|
|
|
|
|
|
| Export |
|
|
|
|
|
|
| Import |
|
|
|
|
|
|
| Migrate CIs |
|
|
|
|
|
|
Integration |
Only |
Supervisor |
Manager |
Administrator |
Administrator |
Administrator |
| Integration Information |
|
|
|
|
|
|
| Service Now |
|
|
|
|
|
|
| Cherwell |
|
|
|
|
|
|
| Landesk |
|
|
|
|
|
|
System Reports |
Only |
Supervisor |
Manager |
Administrator |
Administrator |
Administrator |
| Audit Log |
|
|
|
|
|
|
| Administrative Notification |
|
|
|
|
|
|
| Edge Device Scorecard |
|
|
|
|
|
|
| System Messages |
|
|
|
|
|
|
| Config and Usage Statistics |
|
|
|
|
|
|
Create, Update and Delete SPM User
Create a SPM User:
- Log in to FireScope SPM as a FireScope Administrator.
- Click Administration > Permissions > Users. The Users page will be displayed with list of the current Users, their access level, user group(s) and online status.
- Click on the Create button(on the upper, right side of the page). The Create User page will be displayed.
- Complete the form.
- Click on the Save button.
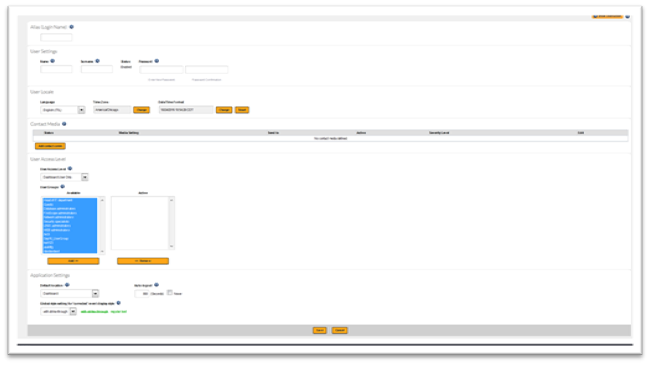
User Profile
| Alias (Login Name) | User name used to log into SPM. |
| Name | User’s first name. |
| Surname | User’s last name. |
| Password | User’s password to log in to SPM. |
User Locale
| Language | Preferred language used in the SPM user interface. |
| Time Zone & Date Format | The settings here are used to interpret the time displayed for data history, events, and all time related displays. |
Contact Media
| Contact Media | This is the contact SPM will use to contact the user in case of an event. You can configure multiple contact methods for a user, and for each contact method, you can detail hours of the day to use this method as well as filter the severity of events that trigger notifications. |
User Access Level
| User Access Level | Defines what this user can access in SPM. User Access LevelAvailable MenusAccount AdministratorHighest level user access; access to all global Administration optionsFireScope AdministratorHas access to common administrative tasks,except for access to global account controlsConfiguration AdministratorDashboard, Service Management, Analysis, ConfigurationServices SupervisorDashboard, Service Management, AnalysisDashboard User OnlyDashboard |
| User Groups | User Groups this user will be associated with. The primary purpose of User Groups is to define what assets this user can manage. Select the User Group names and use the Add and Remove buttons to configure User Groups for this user. |
Application Settings
| Default location | Default page displayed when this user logs in. |
| Auto-logout | How many seconds of inactivity will trigger this user’s session to be automatically logged out. To disable automatic logout, check the Never box. |
| Refresh | Default polling period to refresh data in SPM interface items.You can override this value for Dashboard Lenses by adjusting their individual settings. |
| Related Events and Display Types Options – Event type (Shown in Non-Dashboard) | You choose to only show failed, ok, or unknown events only. In some views, unknown events are counted as failed as well. You can override this value for Dashboard Lenses by adjusting their individual settings. |
| Global style setting for ‘corrected’ event display style | Options “with strike-through” OR “regular text”Sets how to display ‘corrected’ events. with strike-through Place a line through the event; this is useful for color blind users and emphasizes the failed events. |
Update a SPM User:
Refer to Create User for Screen Shots# Log in to FireScope SPM as a FireScope Administrator.
- Click Administration > Permissions > Users. The Users page will be displayed with list of the current Users, their access level, user group(s) and online status.
- Click on User’s Alias (Login Name). Edit User page will be displayed.
- Add, delete or update the User information.
- Click on the Save button.
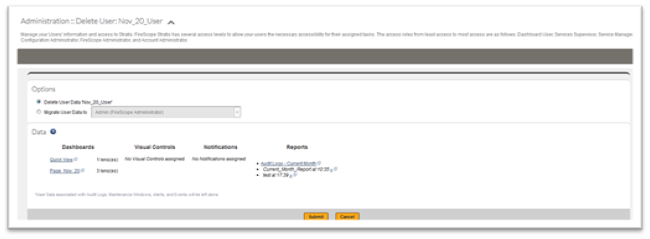
Delete a SPM User:
Note: Deleting a User consists a some considerations.# If this User is Active Directory created, deleting this user will simply cause the user to be recreated in the next synchronization.
- Determine the reassignment of any objects that may belong to this user. For example, you may choose to reassign ownership and persist and pass control to another user.
- Below is the reassignment screen you will see after clicking delete on an individual User’s Configuration form. (not from the grid)
User Groups
User Groups are used to manage access for a group of Users. They are commonly used to represent a team within an organization that shares common responsibilities or tasks related to managing the IT assets.While User Group membership determines which assets are accessible to Users, User Access Level(link) determines the level of access rights (read-only, read-write) the user has to those assets.
User Groups linked to a Service Group – will allow users access to all Logical Groups, CIs and related elements (Attributes, Event Definitions, Events, etc) under that Service Group & its Logical Groups.
User Groups linked to a Logical Group – will allow users access to all CIs and related elements (Attributes, Event Definitions, Events, etc) under that Logical Group.
User Groups linked to a Blueprint Group – will allow users access to view and edit Blueprint Groups and their associated Blueprint elements.
Creating and Managing a User Group
Note: Although users can belong to more than one User Group, it is easier to manage permissions by NOT overlapping User and Group memberships with complex Service and Logical Group assignments.# Log in to FireScope SPM as a FireScope or Account Administrator.
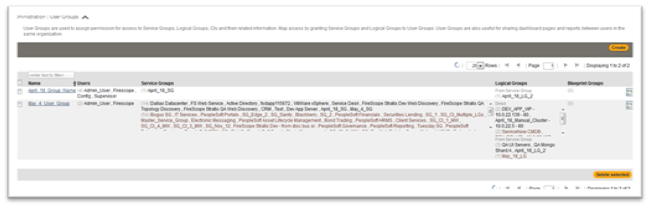
- Click Administration > Permissions > User Groups. The User Groups page will be displayed with list of the current User Groups.
- Click on the Create button. Create User Groups page will be displayed.
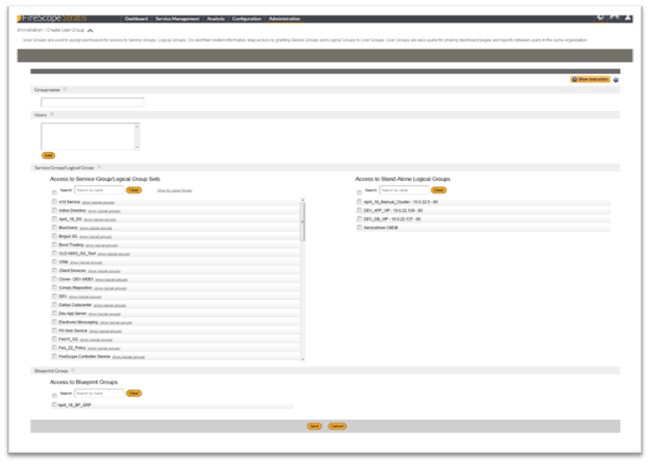
- Group Name: Create your user groups to organize asset access.
- Users: Select which groups this new user will be associated with for access to assets. User group assignment also determine visibility to group shared dashboard pages.
- Service Group/Logical Group
- User groups linked to a Service Group – will allow users access to all Logical Groups, CIs and related elements (attributes, event definitions, events, etc) under that Service Group & its Logical Groups.
- User groups linked to a Logical Group – will allow users access to all CIs and related elements (attributes, event definitions, events, etc) under that Logical Group.
- Blueprint Group:
- User groups linked to a Blueprint Group – will allow users access to view and edit Blueprint Groups and their associated Blueprint elements.
- Click on the Save button.
External Authentication(SAML)
If you have SAML Identity Provider or Windows Active Directory deployed in your organization for user access management, you can utilize SPM External Authentication to use the same Credentials as the organization’s login Credentials.
To Select a Method of Authentication: # Login in to Firescope SPM as an Account Administrator.
- Click on Administrator > Permissions > External Authentication. External Authentication page will be displayed.
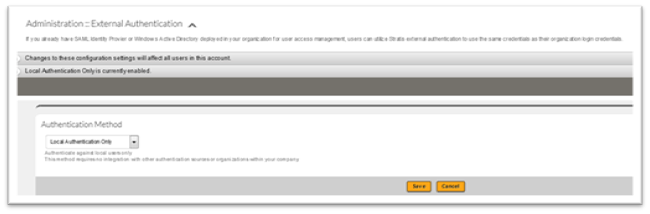
- Select the Authentication Method from the drop down list. For more information on each method refer to Authentication Methods section.
- Complete the form.
- Click on Enable and Save button.
Authentication Methods
- Local Authentication OnlyThis is the default Authentication method. It authenticates against local Users only. This method does not require any type of integration with other authentication sources or organizations within the company.
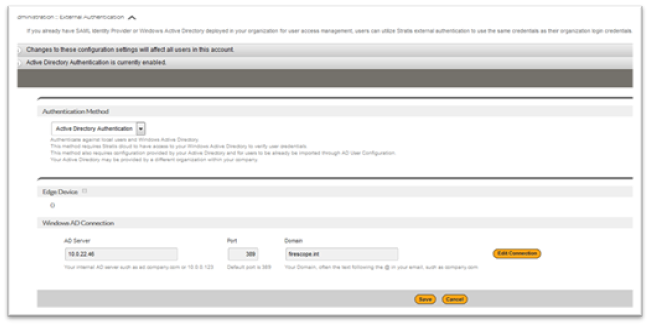
- Active Directory Authentication
This is a method that authenticates against local Users and Windows Active Directory. This method requires SPM cloud to have access to the Windows Active Directory to verify user credentials. It also requires configuration provided by Active Directory and Users should be already imported through AD User Configuration. The Active Directory may be provided by a different organization within your company.
- SAML AuthenticationThis is a method that authenticates against local Users and SAML. SAML authentication is a method that authenticate Users against a remote service, know as a SAML Identity Provider (IdP), instead of authenticating against SPM which is considered to be the SAML Service Provider (SP). SAML Identity Provider may be provided by a different organization within the company.
Successful SAML authentication requires following:- SPM cloud to have access to your SAML Identity Provider.
- Configuration and exchange of SAML metadata between SPM and your SAML Identity Provider.
- Changes to the customer’s authentication server (idP ie PingID) and to the customer’s account in SPM (SP).
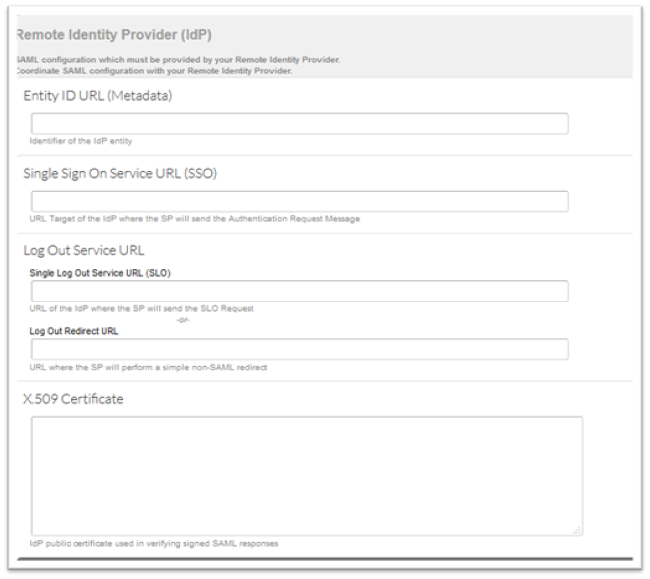
Select the SAML Authentication method from the drop down list on External Authentication page. SAML Authentication page will be displayed. This page has three sections which are explained below.# Remote Identity Provider(IdP) – This information must be provided by your Remote Identity Provider. Coordinate SAML configuration with your Remote Identity Provider. For more information on the fields refer to the Section Description Table 1 below. Section Description Table 1
| Entity ID URL (Metadata) | Identifier of the IdP entity |
| Single Sign On Service URL (SSO) | URL Target of the IdP where the SP will send the Authentication Request Message |
| Log Out Service URL Single Log Out Service URL (SLO)URL of the IdP where the SP will send the SLO RequestLog Out Redirect URLURL where the SP will perform a simple non-SAML redirect |
|
| X.509 Certificate | IdP public certificate used in verifying signed SAML responses |
- Local Service Provider(SP) – SAML configuration must be provided to your Remote Identity Provider and must match your Remote Identity Provider configuration. Coordinate SAML configuration with your Remote Identity Provider. This information is provided by SPM. For more information on the fields refer to the Section Description Table 2 below.
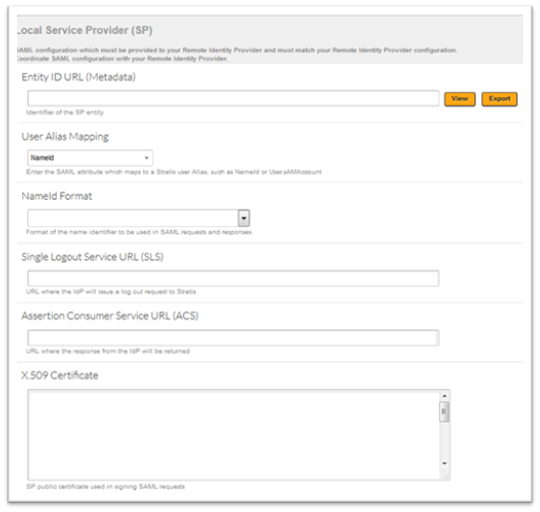
Section Description Table 2
| Entity ID URL (Metadata) | Identifier of the SP entity |
| User Alias Mapping | Enter the SAML attribute which maps to a SPM user Alias, such as NameId or User.sAMAccount |
| NameID Format | Format of the name identifier to be used in SAM requests and responses |
| Single Log Out Service URL (SLS) | URL where the IdP will issue a log out request to SPM |
| Assertion Consumer Services URL(ACS) | URL where the response from the IdP will be returned |
| X.509 Certificate | IdP public certificate used in verifying signed SAML responses |
- Options – This section has additional SAML configuration which must match your Remote Identity Provider configuration.Coordinate SAML configuration with your Remote Identity Provider. For more information on the fields refer to the Section Description Table 3 below.Section Description Table 3
| Sign Requests/Response Authn Requests SignedSP Specified user authentication mechanism to request the IdP to use for user authenticationLogout Request SignedThe logout Request messages sent by this SP will be signedLogout Response Signed The logout Response messages sent by this SP will be signedSign MetadataThe Metadata provided by this SP will be signedMessages SignedRequire the Response, LogoutRequest and LogoutResponse received by this SP to be signedAssertions SignedRequire the Assertion elements received by this SP to signed |
|
| Authentication Context | SP specified user authentication mechanism to request the IdP to use for user authentication |
| Signature Algorithm | Algorithm that will be used for signing |
Configuring SAML with ADFS
The following guide explains the key settings required to setup SAML authentication using ADFS
Prerequisites:* ADFS 2.0 / 3.0
- FireScope Edge must be able to connect via LDAP to a domain controller
- FireScope Cloud must be able to connect to your ADFS server (Authentication is performed between FireScope web servers and ADFS)
# First import the users that will be using FireScope using the AD Import feature at Administration menu à AD User Configuration.
- Create the Relying Trust Party in ADFS. We recommend having a browser window open, connected to FireScope and with the Administration à External Authentication page open, with SAML Authentication selected.
- Choose import data about the relying party published online. Use the url in the Entity ID URL (Metadata) field in the Local Service Provider section in the FireScope interface.
- Follow the wizard, be sure to select “Select Permit all users to access the relying party”
- Add a Rule in the Issuance Transform Rules tab. Add NameID as “Claim rule name”, choose “Active Directory” as Attribute store, choose “SAM-Account-Name” as LDAP Attribute and “Name ID” (Space between Name and ID) as “Outgoing claim type.”
- In the ADFS management console, click the Certificatesfolder and double-click on the Token Signing certificate, then Click the Details tab and the Button Copy To File. Export the certificate as Base-64 encoded X.509
- Open the exported file in a text editor and copy the content, paste into the X.509 Certificate field in the Remote Identity Provider section in the FireScope interface.
- Set the following fields to complete the FireScope side of the SAML integration:
| Field | Sample Value | Notes |
| Entity ID URL | http:// [your-adfs-server.domain.com].com/adfs/services/trust | If you’re not sure what your Entity ID URL is, go to https://[your-adfs-domain.com]/FederationMetadata/2007-06/FederationMetadata.xml one of the first elements in this document is your Entity ID URL |
| Single Sign On Service URL (SSO) | https://[your-adfs-server.domain.com] /adfs/ls/IdpInitiatedSignOn.aspx?LoginToRp=https://[yourFireScopeInstance].firescope.com | |
| Single Log Out Service URL (SLO) | Optional | |
| Log Out Redirect URL | Optional | |
| User Alias Mapping | NameID | |
| ADFS – Lower case URL-Encoding | Should be checked | |
| Authentication Context | None | |
| Signature Algorithm | SHA-256 |
Finally, visit the home page of your instance of FireScope, fill in your account name and leave username and password blank. Click on Enter and you should be re-directed to your ADFS server to complete authentication.
Common Errors
Invalid issuer in the Assertion/Response
Check that you have the correct Entity ID URL, and also verify that you are using the appropriate http or https at the beginning.
NameID was not in the Assertion Response
Check your claim rule and make sure you are sending SAM-Account-Name matched to Name ID.
User was not found
Check to make sure that you have imported users through the Administration menu à AD User Configuration page in FireScope. This should be in active status, and you can validate the correct users are created by checking the Users page. AD imported users are noted with a “synced from AD” message immediately beneath the user’s name.
AD User Configuration
SPM allows the user to configure access to Windows AD from a deployed Edge device which provides users a more secure method to access user information to setup accounts in SPM cloud. The connection is assigned to a single Edge device which is already deployed within the user’s network and utilizes an already open connection between the Edge device and the SPM cloud to deliver the user data.
Note: Make sure the AD account user you enter here has visibility to the users you wish to import.# Log in to FireScope SPM as a Account Administrator.
- Click Administration > Permissions > AD User Configuration. The Users Configuration page will be displayed.
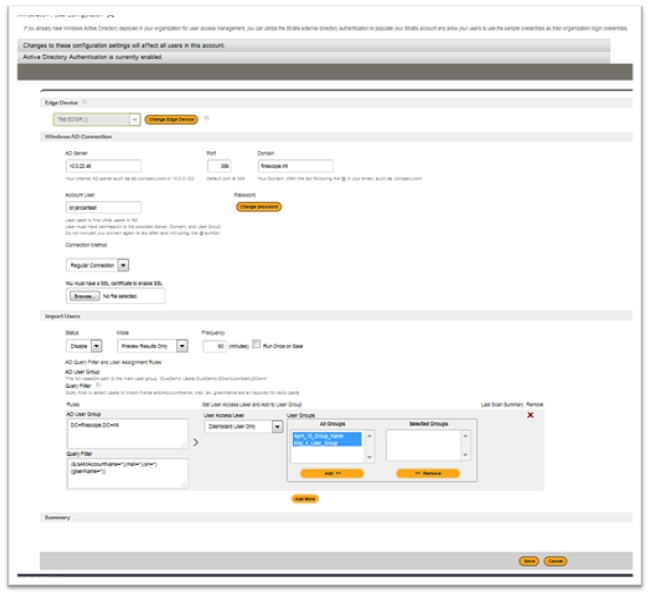
- Complete the form, for more information refer to the Section Description Table below.
- Click on Save button.
Note: If a user is matched on more than one filter, their user account will have the highest level of permissions.
Section Description Table
| Section | Description |
| Edge Device | Select an Edge Device to designate the data collection or operation target. |
| Change Edge Device |
Click on the Change Edge Devicebutton to select an Edge Device. Note:Changing the Edge device setting will require configuration update to move the access to your data from one Edge to another. |
| Windows AD Connection |
AD Server: Your internal AD server such as 'ad.company.com' or '10.0.0.123'. Port: Default port is 389 Domain: Your Domain, often the text following the @ in your email, such as company.com Account User: User used to find other users in AD. User must have permission to the provided Server, Domain, and User Group.Do not include your domain again i.e. text after (and including) the @ symbol Password: Enter New Password |
| Import Users |
Status: You can select the status(Enabled or Disable)from the drop down list. Mode: You can create active directory query filter and user assignment rules to process users as they are imported into SPM. The Preview Results Only mode lets you review the results without actually creating or updating Users.You can change the Mode to Import Users in Results once you have the expected results. Frequency or Run Once: You can schedule import configuration by entering frequency time in minutes or check the Run Once on Save check box to run it only once. Last check displays the date and time of last configuration. AD User Group: This is the actual location of the User; The full baseDN path to the main user group. ‘CN=Users,DC=companyname,DC=int’ Query Filter: This is utilized to narrow the user list down to the ones you wish to import with this rule.—- “(sAMAccountName=*)(mail=*)(sn=*)(givenName=*)” portion of the query is required to retrieve valid users. User Access Level: You can select the user access level for the imported or updated user from the drop down list. If the user is part of multiple rule results, the highest level will be granted. User Group: You can select the user group of which the imported or updated user will become a member. Last Scan Summary: Displays the record of updated and imported users. Click on the Results to see detailed view. Remove: You can delete the Rules by clicking on the X. |