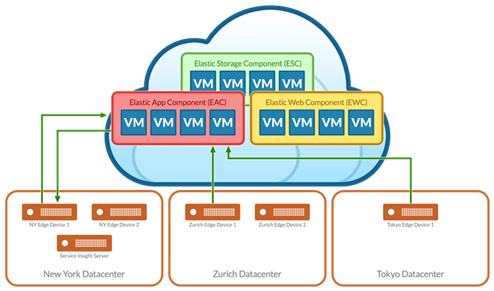
Edge Device
Overview
The Edge Device resides at each business location, performs Discovery and data collection, and pushes the resulting data up to the central FireScope SPM cloud. All Edge Device configuration is performed through the central FireScope SPM interface, enabling new business locations to be easily integrated into Dashboards by starting up a new Edge Device and pushing down configuration. Edge devices can be physical or virtual appliances, depending on the size of the environment they reside in and volume of data collected.
Communication with the central cloud can be over standard HTTP or HTTPS, is configurable per edge device, and leverages message queuing to ensure accurate delivery of data. Additionally, if an edge device loses connectivity to its cloud, data will be locally cached until connectivity is restored, at which time a secondary history queue is used to push cached attribute data without disrupting real-time data.
Deploy Edge Device
- Download the Edge OVA from Marketplace.
- Once the file is downloaded successfully, connect to ESX Server via vSphere client.
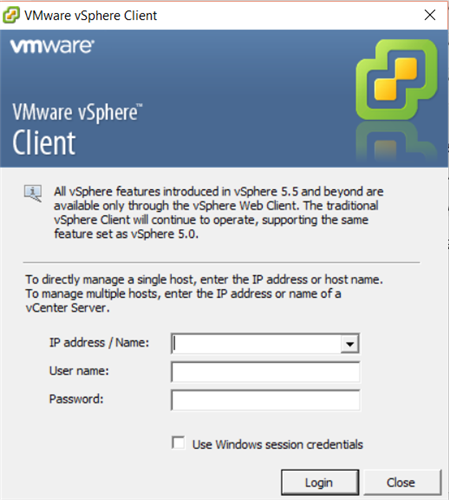
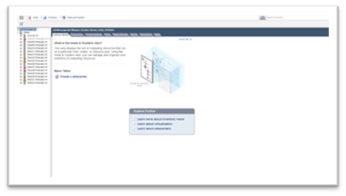
- Log into the Vmware. Deploy OVF template page will be displayed.
- Click on File > Deploy OVF Template. Deploy OVF Template wizard will be displayed.
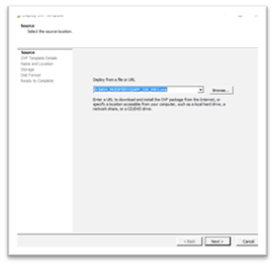
- Click on Browse and select the SEDGE.ova that was downloaded (Step 1) and click Next.

- Specify a Name of the VM (As per company standards)and click Next.
- Select DataStore and click Next.
- Select Thin provision and click Next.
- Check the box Power on Deployment and Click Finish.
- After successful deployment, node will be starting. Once the node is started follow below steps for Network and Hostname assignments.
- Enter 1 for Configure Network Settings.
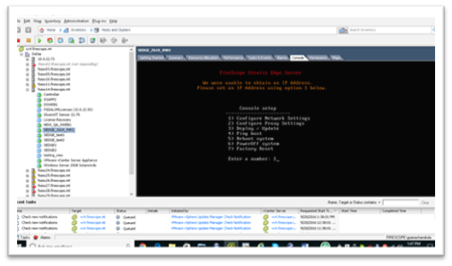
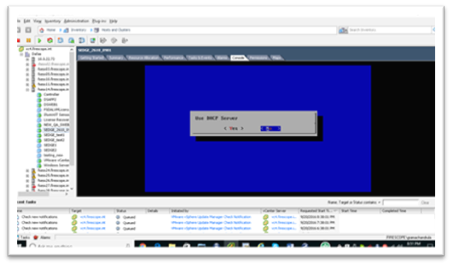
- Select No
- Enter Hostname

- Enter IP Address

- Enter Subnet Mask

- Enter Gateway

- Enter PRIMARY DNS Server

- Enter SECONDARY DNS Server

- Enter NTP Server

Note: Once you enter all above details, SEDGE Node will be installing required modules / updates and Creates Database and tables etc.
Create Edge-CMI Account
- Log into CMI Account.
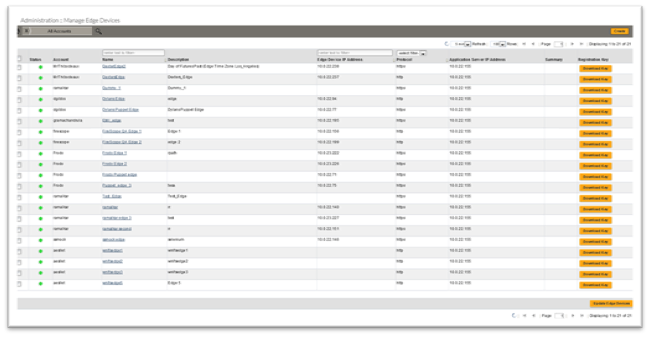
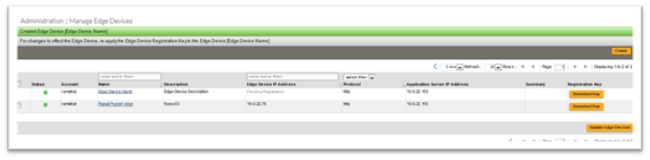
- Click on Administration > Device Management > Edge Device, Manage Edge devices page will be displayed.
- Click on Create. Create Edge Device form will be displayed.

- Complete the form.
- Click on the Save button.
- Click on Download Key button.
- Select Save file option.
Note: Registration key is necessary for Edge Registration.
Create Edge – Non CMI Account
SAAS customers do not have access to the CMI Account, so to create an Edge device the user has to log in with Account Admin User Access level.
To create an Edge device
- Log in to FireScope Cloud Advisor with Firescope or Account Administration privileges.
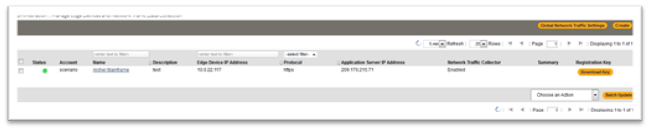
- Click on Configuration > Edge Device, Manage Edge devices page will be displayed.
- To create a new Edge Device click on the Create button or to set the network traffic collection rules for all edge devices click on Global Network Traffic Settings (upper right hand corner) button.
Create New Edge Device
- Create Edge Device form.

- Select the Edge Device Status from the drop down list.
- In Edge Device Details section,
- Enter a name for the new Edge Device
- Enter Description for the new Edge Device
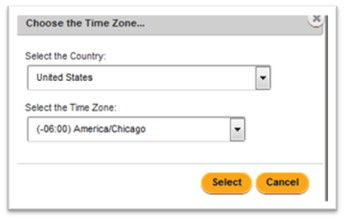
- TimeZone – You can click on the Change button to select a different Country and its Timezone from the drop down list.
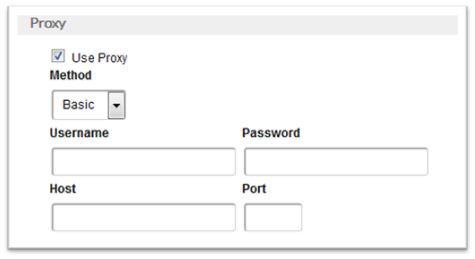
- Proxy: Click on the Use Proxy check box if you want to use a proxy for this Edge device. Proxy section will be expanded with the connection information fields. Enter the necessary information to connect to a proxy.
- Select the application server IP from the Application Server Connection Settings drop down list.
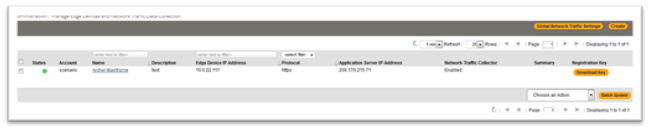
- Network Traffic Collector – This section sets the rules for Network Traffic Collection. These rules are applied to this particular Edge Device only.
Note: If Global Network Traffic Setting is created as well, then these two rules are combined for data collection.
- Collect Traffic: You can select enable or disable from the drop down list to turn on or turn off data flow.
- Options: To select the type of data flows select the check boxes in front of the following options,
- Collect NetFlow: NetFlow is a network protocol developed by Cisco for collecting IP traffic information and monitoring network traffic. By analyzing flow data, a picture of network traffic flow and volume can be built. Supported versions: V1/V5/V7/V8/V9/V10.
- Collect SFlow: sFlow is a general purpose network traffic measurement system technology. sFlow is designed to be embedded in any network device and to provide continuous statistics on any protocol (L2, L3, L4, and up to L7), so that all traffic throughout a network can be accurately characterized and monitored. Supported version: V2/V4/V5.
- Promiscuous Mode: In a network, promiscuous mode allows a network device to intercept and read each network packet that arrives in its entirety. This mode of operation is sometimes given to a network snoop server that captures and saves all packets for analysis (for example, for monitoring network usage).
- Promiscuous Mode Network Interface: Specify network interface for capturing promiscuous network traffic.
- Lowercase, alphanumeric characters only.
- Leave blank to default to OS selected network interface.
- Promiscuous Mode Network Interface: Specify network interface for capturing promiscuous network traffic.
- Exclusion:Enter a comma-separated list of IPs and/or Ports to be excluded from the Network Traffic Data Collection.
- IP Exclusion: The list you enter, uses normal IP range syntax, so it can include hostnames, CIDR netblocks, octet ranges, etc.
- Port Exclusion List: The list can be individual ports (8024,8025) or a range of port (8024-8034).
- Inclusion: Enter a comma-separated list of IPs and/or Ports to be included in the Network Traffic Data Collection.
- IP Inclusion List: The list you pass uses normal IP range syntax, so it can include hostnames, CIDR netblocks, octet ranges, etc.
- Port Inclusion List: The list can be individual ports (8024,8025) or a range of port (8024-8034).
Click on the Save button. The Edge Device page will be displayed.
Click on the Download Key button. Option to Save or Open the Edge device key is displayed.
Select the Save option.
Register Edge
- Open your browser and type http://<ip or dns of your newly deployed Edge Device>:8004. Login page will be displayed.
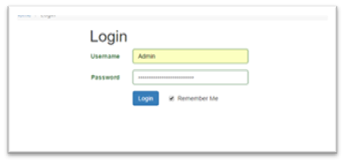
- Enter Username and Password. Click on Login.
- FireScope SPM EMI menu page will be displayed.
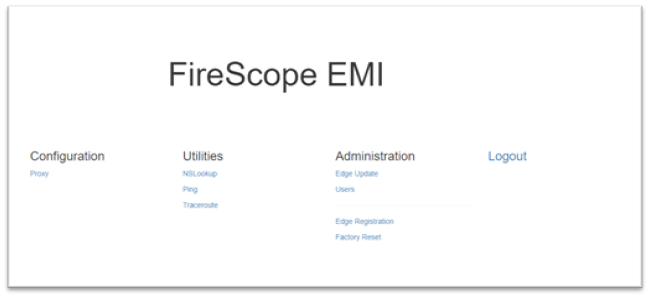
- Click on Administration > Edge Registration. Edge Registration Key page will be displayed.
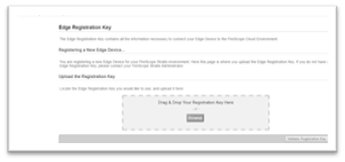
- Drag & Drop EDGE Registration Key or Browse and upload Key.
- Click on the Validate Registration Key. Validation page will be displayed.
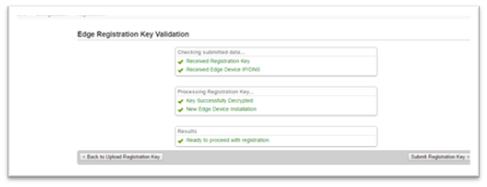
- Click on Submit the Registration Key. Edge Registration Complete page will be displayed.

- Click on Edge Registration Complete.
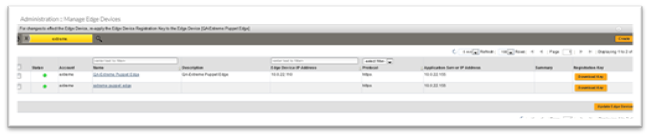
- Refresh the Manage Edge Device page in CMI account. You will see the registered Edge Device IP address.
Update Edge Device -CMI Account
- Login into CMI Account
- Click on Administrator > Device Management > Edge Devices. Manage Edge Devices page will be displayed.
- Select the Edge Device Account (Click in the check box).
- Click on Update Edge Devices.
Update Edge Device – Non-CMI Account
- Login into Firescope SPM with Administrator privileges.
- Click on Administrator > Utilities > Edge Devices. Manage Edge Devices page will be displayed.
- Select the Edge Device Account (Click in the check box).
- Click on Update Edge Devices.
Global Network Traffic Settings -Non-CMI Account
You can set the network traffic collection rules for all edge devices here. # Log in to FireScope SPM with Firescope or Account Administration privileges.
- Click on Configuration > Edge Device, Manage Edge devices page will be displayed.
- To create a new Edge Device click on the Create button or to set the network traffic collection rules for all edge devices click on Global Network Traffic Settings (upper right hand corner) button.
Set Global Network Traffic Settings
- Global Network Traffic Settings form.

- Traffic Sampling Frequency: Select the sampling frequency time from the drop down, this defines the amount of time in which network packets for the same (source_ip, target_ip, port) are aggregated into the same flow. Setting a larger sampling frequency is advantageous in that less flows are created in the system and increases processing time. Note: Flows will take a longer amount of time to be available for processing.
- Application Messaging IP/DNS: RabbitMQ messaging for intra-application communication requires access from your edge devices to your cloud FireScope web server (typically the 2nd configured webserver). If your webserver location is different than the default setup (a different DNS or virtual IP), you can enter it here.
- Global IP Exclusion List: Specifies a comma-separated list of IPs to be excluded. The list you pass in uses normal IP range syntax, so it can include hostnames, CIDR netblocks, octet ranges, etc.
- Global Port Exclusion: Specifies a comma-separated list of ports you want to exclude. The list can be individual ports (8024,8025) or a range of port (8024-8034)
- Global IP Inclusion List: Specifies a comma-separated list of IPs to be the ONLY ones included in network traffic data collection. The list you pass enter uses normal IP range syntax, so it can include hostnames, CIDR netblocks, octet ranges, etc.
- Global Port Inclusion List: Specifies a comma-separated list of ports to be the ONLY ones included in network traffic data collection. The list can be individual ports (8024,8025) or a range of port (8024-8034).
Service Rule Settings – Non CMI Account
Here you can schedule Data Analysis, assign discovered CIs to Edge Devices based upon IP ranges and if there are CIs which do not match the IP filters and ranges you can assign them to a default Edge device.
Note: Saving the Service Rules Settings page will restart the job.
To accomplish the above,# Log in to FireScope SPM with Firescope or Account Administration privileges.
- Click on Administration > Application Settings > Service Rules Settings, Edge Assignment Rules page will be displayed.
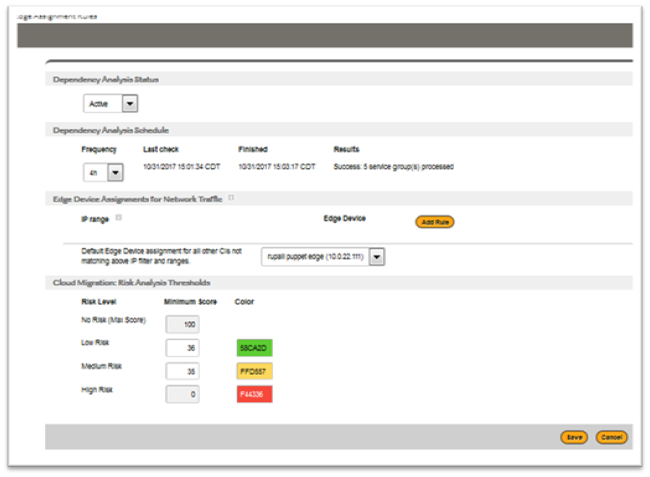
- Status: You can enable or disable the Edge assignment Rule by selecting Active or Disable from the drop down list.
- Dependency Analysis Schedule: Select the interval of frequency from the drop down list. to determine often you want the job to run.
- Last Check: Displays the date and time the job starts processing
- Finished: Displays the date and time the job was completed .
- Results: This displays the status (success/fail) and number of Service Groups processed
- Edge Device Assignments for Network Traffic: Network Traffic which is selected by Business Service Rules will be assigned to the selected Edge Devices based on matching IP ranges. You can also select the default Edge Device assignment for all other CIs not matching the specified IP ranges.
- Click on Add Rule button to add IP addresses or IP range. IP Range section will be displayed
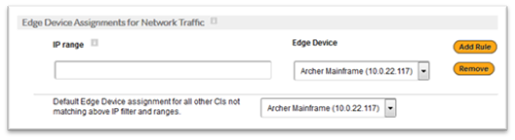
- IP range: Enter Network IP address(s) you want to assign to a particular Edge Device. You can enter a single IP, multiple IP’s or a Range of addresses.Examples:Multiple IP’s:192.168.0.1,192.168.0.2,192.168.0.3 IP Ranges:192.168.0.1-254 (means 192.168.0.1 to 192.168.0.254)192.168.0-14.1-254 (means 192.168.0.1 to 192.168.14.254)192.0-1.1-4.1-254 (means 192.0.1.1 to 192.1.4.254)191-192.0-1.1-.1-254 (means 191.0.1.1 to 192.1.4.254)Also supports CIDR notation (192.168.0.0/24) See http://www.subnet-calculator.com/cidr.php
- Edge Device: Select an Edge Device from the drop down list, to which the network traffic will be assigned to. Note: You can add multiple rules by clicking on the Add Rule button or remove a rule by clicking on the Remove button.
- Select an Edge device from the drop down list to which all the other CIs that do not match the IP filter and ranges will be assigned to.
- Click on the Save button.
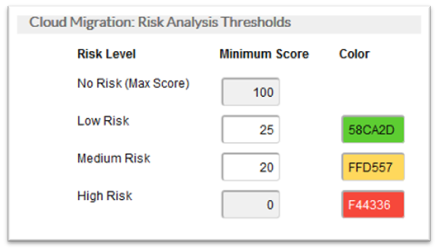
- To see the results of the Cloud Migration: Risk Analysis Thresholds settings click on Analysis > Cloud Migration > Risk Analysis. In the example below you can see that
- 0 to 20 is Red
- 21 to 25 is yellow
- 26 to 100 is Green