Agents
Overview
FireScope SPM includes optional Agents that can be installed on most commonly deployed server platforms. These Agents enable FireScope to better access OS-specific performance metrics and log files. FireScope officially supports Agents on manufacturer supported versions of enterprise level operating systems patched to the currently supported service pack/patch level. If an Operating System is unsupported by our C++ Agent, then our Java based Flex Agent could be used for compatibility.
Agent Operation
At the time of installation, the installer creates the necessary user, group and other folders needed for the Agent to run. The Agent comprises of two processes:# firescope_agentd – The firescope_agentd listens on the configured port which is usually 8042. The firescope_agentd has following functions,
- It periodically(every 30 seconds) sends the agent_info to Edge device. Agent info is an xml content as shown below.
 <?xml version="1.0" encoding="UTF-8"?>
<agent_info>
   <ip>10.0.23.221</ip>
   <port>8042</port>
   <mgmt_port>8044</mgmt_port>
   <os>windows</os>
   <arch>64</arch>
   <version>4.0.49</version>
   <build>41179</build>
   <ping_period>30000</ping_period>
   <last_upgrade_time />
   <last_upgrade_status />
</agent_info>
- When the Discovery job is run by SPM, the Edge device requests the agent_capabilities from the Agent. Agent capabilities is an xml content that includes the details about storage, cpus, interfaces, and system.
 <?xml version="1.0" encoding="UTF-8"?>
<discovery>
   <hosts>
      <host address="constant">
         <capabilities>
            <cpus>
               <cpu>
                  <name>Cpu 1</name>
                  <description>0</description>
                  <index>0</index>
                  <load-oid>cpu_utilization(0)</load-oid>
               </cpu>
               <cpu>
                  <name>Cpu 2</name>
                  <description>1</description>
                  <index>1</index>
                  <load-oid>cpu_utilization(1)</load-oid>
               </cpu>
               <cpu>
                  <name>Cpu 3</name>
                  <description>2</description>
                  <index>2</index>
                  <load-oid>cpu_utilization(2)</load-oid>
               </cpu>
               <cpu>
                  <name>Cpu 4</name>
                  <description>3</description>
                  <index>3</index>
                  <load-oid>cpu_utilization(3)</load-oid>
               </cpu>
            </cpus>
            <interfaces>
               <interface>
                  <name>Local Area Connection</name>
                  <description>Local Area Connection</description>
                  <admin-status>UP</admin-status>
                  <operational-status>UP</operational-status>
                  <interface-type>ethernet-csmacd</interface-type>
                  <inbound-errors-oid>network_interface_incoming(Local Area Connection,errors)</inbound-errors-oid>
                  <outbound-errors-oid>network_interface_outgoing(Local Area Connection,errors)</outbound-errors-oid>
                  <inbound-traffic-oid>network_interface_incoming(Local Area Connection,bytes)</inbound-traffic-oid>
                  <outbound-traffic-oid>network_interface_outgoing(Local Area Connection,bytes)</outbound-traffic-oid>
                  <admin-status-oid />
                  <operational-status-oid />
               </interface>
               <interface>
                  <name>Loopback Pseudo-Interface 1</name>
                  <description>Loopback Pseudo-Interface 1</description>
                  <admin-status>UP</admin-status>
                  <operational-status>UP</operational-status>
                  <interface-type>softwareLoopback</interface-type>
                  <inbound-errors-oid>network_interface_incoming(Loopback Pseudo-Interface 1,errors)</inbound-errors-oid>
                  <outbound-errors-oid>network_interface_outgoing(Loopback Pseudo-Interface 1,errors)</outbound-errors-oid>
                  <inbound-traffic-oid>network_interface_incoming(Loopback Pseudo-Interface 1,bytes)</inbound-traffic-oid>
                  <outbound-traffic-oid>network_interface_outgoing(Loopback Pseudo-Interface 1,bytes)</outbound-traffic-oid>
                  <admin-status-oid />
                  <operational-status-oid />
               </interface>
            </interfaces>
            <memories>
               <memory>
                  <name>Memory 1</name>
                  <description>Memory 1</description>
                  <storage-type>RAM</storage-type>
                  <total-space-oid>memory_size(total)</total-space-oid>
                  <free-space-oid>memory_size(free)</free-space-oid>
               </memory>
            </memories>
            <storages>
               <storage>
                  <name>C:\</name>
                  <description>C:\</description>
                  <mount>C:\</mount>
                  <storage-type>FIXED_DISK</storage-type>
                  <total-space-oid>filesystem_size(C:\,total)</total-space-oid>
                  <used-space-oid>filesystem_size(C:\,used)</used-space-oid>
                  <pused-space-oid>filesystem_size(C:\,pused)</pused-space-oid>
               </storage>
               <storage>
                  <name>E:</name>
                  <description>\vboxsrv\SpinningDrive</description>
                  <mount>E:</mount>
                  <storage-type>NETWORK_DISK</storage-type>
                  <total-space-oid>filesystem_size(\vboxsrv\SpinningDrive,total)</total-space-oid>
                  <used-space-oid>filesystem_size(\vboxsrv\SpinningDrive,used)</used-space-oid>
                  <pused-space-oid>filesystem_size(\vboxsrv\SpinningDrive,pused)</pused-space-oid>
               </storage>
               <storage>
                  <name>Z:</name>
                  <description>\fsfile\storage</description>
                  <mount>Z:</mount>
                  <storage-type>NETWORK_DISK</storage-type>
                  <total-space-oid>filesystem_size(\fsfile\storage,total)</total-space-oid>
                  <used-space-oid>filesystem_size(\fsfile\storage,used)</used-space-oid>
                  <pused-space-oid>filesystem_size(\fsfile\storage,pused)</pused-space-oid>
               </storage>
            </storages>
            <system-description>
               <description>Windows 8  (x64 version)</description>
               <up-time>1074</up-time>
               <contact />
               <name>Bryancan-PC</name>
               <location />
               <organization />
               <description-oid>host_information</description-oid>
               <up-time-oid>host_uptime</up-time-oid>
               <contact-oid />
               <name-oid>host_name</name-oid>
               <location-oid />
            </system-description>
         </capabilities>
      </host>
   </hosts>
</discovery>
- When the Edge device sends a query to collect the value of an attribute, the Agent processes the request and sends the response back to the Edge device.
Supported Operating Systems
| Operating System | Versions |
| Microsoft Windows | Windows 2003 Server and above, 32- and 64-bit |
| Red Hat Enterprise Linux | 4 and above, 32- and 64-bit |
| SUSE Linux Enterprise | 10 and above, 32- and 64-bit |
| Solaris | 9 and 10, Sparc and x86 |
| AIX | All versions officially supported by IBM |
Agent Installation
From time to time, FireScope will release new agents to be used with your SPM deployment. If you do not see the agent for your operating system listed on in your administration page, either create a helpdesk ticket or contact support@matrix42.com. FireScope officially supports agents on manufacturer supported versions of most enterprise level operating systems patched to the currently supported service pack/patch level.
As specified in the System Requirements, the ports 8042 and 8043 are utilized by the Agent and Edge device for communication. Also port 8044 is used by the Agent Manager. Make sure that any local port filtering does not block traffic on these ports.* Agent listens on port 8042 for messages from the Edge device.
- Edge device listens on port 8043 for messages from the Agent.
- Agent Manager listens on port 8044 for messages from the Edge device.
Notes: * To install any agent, you need root-level access to the system you will install on.
- For all Unix systems except Redhat 5 use the Dynamic Installer.
- What is a Dynamic Installer and why is it used? With Dynamic Installer the agent binary is dynamically linked. Since the dependent libraries are not bundled inside the agent binary, Agent uses the libraries from the operating system. This is because REdhat 6 and above were not compatible with how this Operating System wanted to be.
- For all other Unix platforms including RedHat 5, use the Static Installer.
- What is a Static Installer and why is it used?
With Static Installer the agent binary is statically linked. The dependent libraries are bundled(linked/packaged) inside the agent binary itself.
- What is a Static Installer and why is it used?
***The latest installation packages for Agents are available here:
>>>>Agent Downloads<<<<
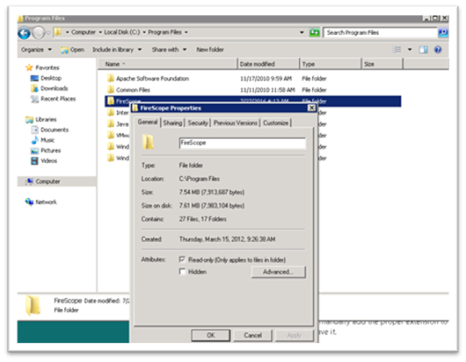
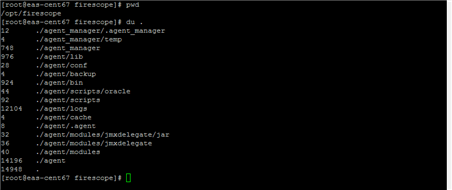
System Resources:
Depending on the load on an agent; the system resources used by an Agent varies.* On a typical Windows as well as Unix system, the agent uses under 10MB and the agent manager uses about 1MB of memory.
- The local storage used by the Agent is shown as below:
Unix (Linux, AIX, Solaris)
Selecting the Installer
All Linux and UNIX platforms must use the Dynamic Agent Installers except for RedHat-5 (32/64bit) and below which will use the Static Agent Installers.
Instructions to Install
The full list of installation options can be displayed by entering FireScope_Agent_Installer.sh -h
By default, the Linux and Unix Agents will be installed under /opt/firescope.
sh FireScopeAgent_Installer_Solaris-4.0.57_42376.sh -A <firescope-edge-device-ip>
If you want to install the Agent in a different directory add -b option, followed by the directory you want it to be install in. For Example:
sh FireScopeAgent_Installer_Solaris-4.0.57_42376.sh -A <firescope-edge-device-ip> -b /export/home/fsbuild/instalationstuff/
The installation shell script can be modified to suit your OS needs.
For the purposes of this document, you can replace opt with the target directory of your choice. However, everything under the firescope/ directory must remain as documented.
To install the Agent:# Extract the tar file. e.g. tar xvf FireScopeAgent_DynamicInstaller_Linux-4.0.61_42952.tar
- Invoke the installation script.Example:e.g. sh FireScopeAgent_DynamicInstaller_Linux-4.0.61_42952.sh -A <firescope-edge-device-ip>This will place the Agent and all necessary files in /opt/firescope and place the appropriate init scripts where necessary. The installation will also create the firescop user account. Once the installation has completed, you can tail the log file (tail -f /opt/firescope/agent/logs/firescope_agentd.log) to verify that it’s running.
- After the agent is installed, it takes a few minutes for the SPM to start the collection of data.
Starting and Stopping the Services
Use the following commands as needed:* Linux
- service firescope_agent_managerd start or service firescope_agent_managerd stopThis will automatically start/stop the firescope_agentd service as well. If there is a need to start/stop the firescope_agentd service separately, use following commands.service firescope_agentd startservice firescope_agentd stop
Uninstalling the FireScope Agent
- To uninstall the FireScope Agent, use following script.sh /opt/firescope/FireScope_Agent_Uninstall.shThis will shut down all FireScope processes, remove the associated files, and delete the firescop account.
FireScope Agent Important Files
Configuration file/opt/firescope/agent/conf/firescope_agentd_posix.xml
Log file/opt/firescope/agent/logs/firescope_agentd.log
PID file/opt/firescope/agent/logs/firescope_agentd.pid
Store and forward cache directory/opt/firescope/agent/cache
Windows
The following information provides instructions for installing the FireScope Agent on any 32- or 64-bit version of Windows 2000 Server or Windows 2003 Server.
Desktop operating systems are not supported.
Note:* Ports 8042 and 8043 are utilized by the FireScope Agent and Server for communication. Make sure that any local port filtering does not block traffic on ports 8042 and 8043 to ensure maximum effectiveness from your FireScope SPM solution.
- To install any agent, you need administrative access to the system you will install on.
To install the Agent for Windows: Follow the instructions for Installing an Agent for SPM.
- Double-click the FireScope Agent for Windows executable.
- Click Next. The FireScope End User License Agreement (EULA) is displayed. Read the EULA carefully.
- Click I Agree to continue the installation.
- Accept the default selection to install the FireScope Agent component.
- Click Next.
- Enter the name of the FireScope server that will manage this server. You can enter the IP address or the Fully Qualified Domain Name (FQDN). The Hostname should contain the host name of this server and does not need the FQDN.
- Click Enable Remote Commands if you want to allow FireScope to perform automated tasks on this server (e.g., restart services on failure or execute scripts based on specific events that you specify within FireScope).
- Click Next.
- Select the destination folder where you want to install the FireScope Agent. The default destination folder is C:\Program Files\FireScope Agent.
- Click Next. The FireScope Windows Agent creates a service called FireScope Agent, which automatically starts after installation and on system boot, using Local System for login credentials. You can modify these settings in the Services administrative tool.
- Click Close.
- Add this host on the FireScope appliance you specified during this installation.
Silent Installation
In 2008 r2, DEP and UAC are major limiting factors, so run a cmd window as administrator, then use the following command:* Least required for install:msiexec /i FireScope_Agent_Windows_Server-xxbit_x.x.x.xx-xxxx.msi /qn APPLIANCE_NAME=xxx.xxx.xxx.xxx
Note: APPLIANCE_NAME is the actual IP address of the Edge device
| Property | Description | Value |
| APPLIANCE_NAME | FireScope Edge Device | |
| LISTENIP | Agent Listen IP | |
| CINAME | Configuration Item Name | |
| JAVAHOME | Path to Java.exe | |
| PORT | FireScope Agent Port | 8042 |
| SPORT | Agent Server Port | 8043 |
| MPORT | Agent Manager Port | 8044 |
| RMTCMD | Remote Commands | TRUE |
| REALTIME | Store and Forward | TRUE |
| STORETIME | Cached Time | 300 |
| STORECOUNT | Cached Count | 100 |
| JPORT | JMX Port | 8046 |
| ENABLEJMX | JMXDelegate | TRUE |
| WPORT | WMI Port | 8047 |
| ENABLEWMI | WMIDelegate | TRUE |
Silent Uninstall
In 2008 r2, DEP and UAC are major limiting factors, so run a cmd window as administrator, then use the following command:* Least required for uninstall:msiexec /x FireScope_Agent_Windows_Server-xxbit_x.x.x.xx-xxxx.msi /qnFor more information on msiexec, refer to this link
Agent Configuration
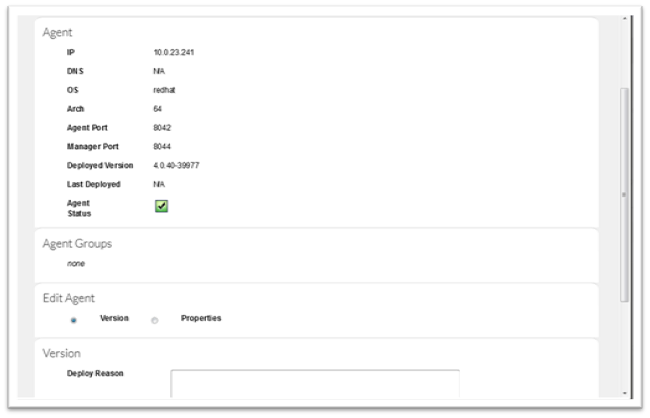
Note: To Configure any agent, you need root-level access to the system you will be performing the installation on.# Log in to FireScope SPM as an Administrator.
- Click Administration > Utilities > Agent Management. The Agent Management page will be displayed.
- In the Agent IP / DNS column, click the Agent you want to configure. There is a pause while FireScope SPM establishes a remote connection to the Agent and the Agent Attributes are updated. A summary of the Agent’s configuration will be displayed on the Agent Management window.
Configuring or Updating Multiple Agents
To simplify configuration of multiple Agents, or to ensure that multiple Agents have a consistent configuration, FireScope SPM includes a bulk editor for agents.
To configure multiple agents:# On the Agents Management page, check the box next to each Agent you want to configure.
- Click Edit properties for selected button. There is a pause while FireScope SPM SDDM establishes a remote connection to the Agent and the Agent Attributes are updated. Note: The Agents Management page is divided vertically and displays the properties for the selected Agents.
- Use the Properties to save section to specify a global value to apply to all selected Agents.
- The Agents to update side displays the current configuration for each selected Agent, displayed three at a time with paging controls at the top.Note: You can update the Agents individually in this section.
- Perform one or more of the following tasks:
- To remove a property from all Agents, in the Properties to Save column, clear the box next to the property you want to remove.
- To add a custom property to all Agents, click Add custom property button (at the bottom).
- To edit a property for all Agents, in the Properties to save section, edit the appropriate field in the Value column.
- To edit a property for one Agent, in the Agents to update section, edit the appropriate field in the column for that Agent.
- In Change Properties Reason, type the explanation for your changes.
- Click on the Save Properties button. The configuration updates are pushed to all of the selected Agents.
Agent Upgrade
To update an Agent with the latest upgrade: Download latest upgrade file by clicking on the appropriate Download Link from the table below.
- After you download the file you have to upload the Agent file into CMI account. This will make the file available to Accounts in Firescope SPM for upgrade.
To upload an Agent upgrade file into CMI Account:- Log in to FireScope SPM CMI account.
- Click on Administration > Device Management > Agent Upgrades. The Agent Upgrades page will be displayed.
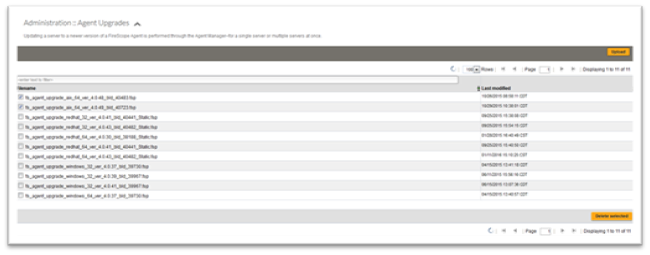
- Click on the Upload button( upper right corner). The Agent Upgrade page will be displayed.
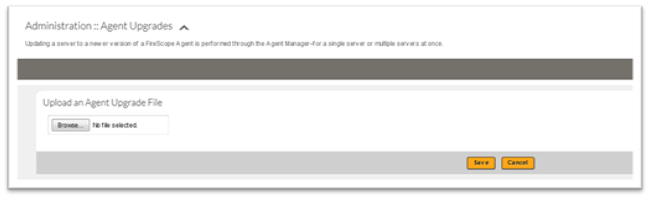
- Click on Browse in Upload an Agent Upgrade file.
- Select the upgrade file you want to upload.
- Click on the Save button.
- Log out of CMI account.
To Upload Agent Upgrade in Firescope SPM Account# Log in to the desired FireScope SPM Account with Administration privileges.
- Click Administration > Utilities > Agent Upgrades. The Agent Upgrades page will be displayed.
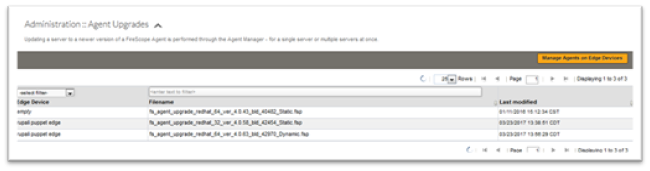
- Click on the Manage Agents on Edge Devices button(Upper right hand corner). Upload Agent Upgrade page will be displayed.
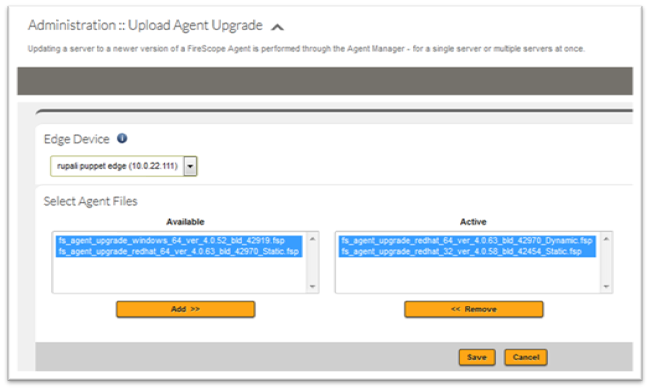
- Select the Edge Device from the drop down list.
- Select Agent files from the Available list, click on Add button. File is added to the Active list box.
- Click on the Save button.
To apply an updated Agent file to a single CI/server or multiple CIs/servers:- Click Administration > Utilities > Agent Management. The Agents Administration page will be displayed.
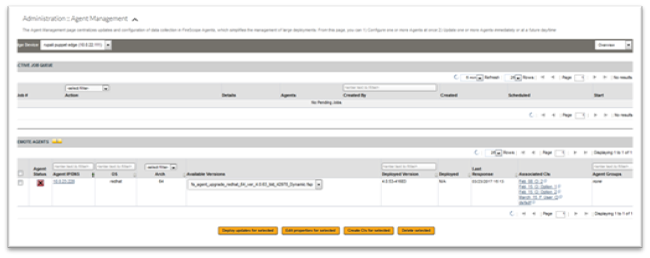
- In the Remote Agents section in Agent IP / DNS column, click on the check box next to the Agent you want to update. For multiple updates select as many Agent as you want to upgrade.
- Under Available Versions select the version from the drop down list.
- Click on the Deploy updates for selected button, Deploy Schedule page is displayed.
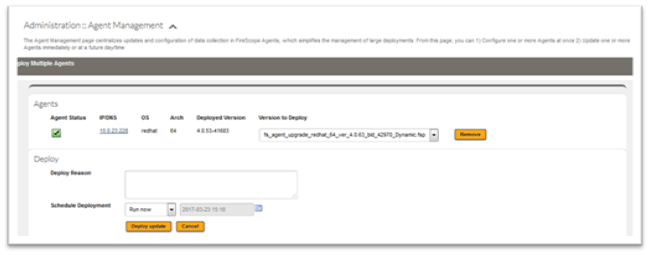
- Under Deploy section, complete the following fields
- Deploy Reason: Briefly explain the reason for the update.
- Schedule Deployment: Select to deploy now or choose a future date/time.
- Click Deploy update.
- The ACTIVE JOB QUEUE section on the Agents Management page shows the status of any pending updates.

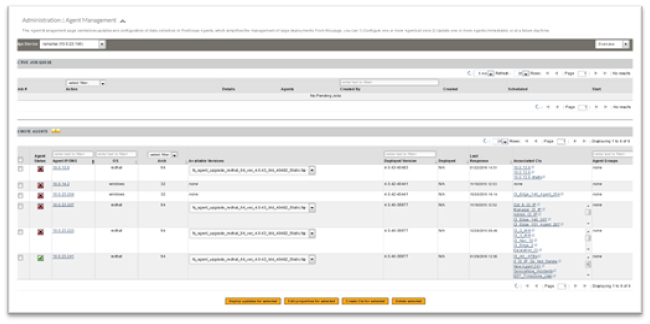
Agent Management
The Agent Management page centralizes updates and configuration of data collection in FireScope Agents, which simplifies the management of large deployments. From this page, you can:* Configure one or more Agents at once
- Update one or more Agents immediately or at a future day/time
See Agents for a list of supported Agents.
To access the Agent Management page:# Log in to Firescope SPM as an Administrator.
- Click Administration > Utilities > Agent Management. The Agent Management page will be displayed.

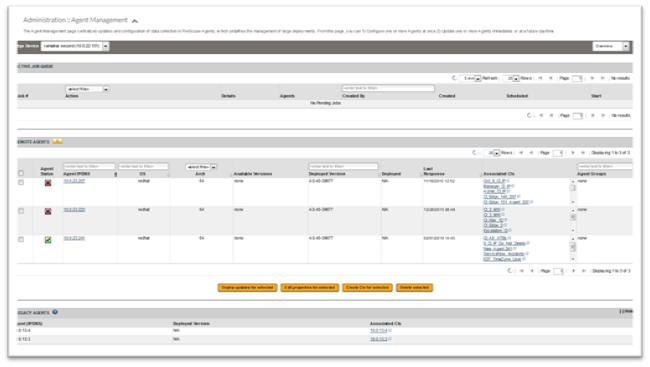
Section Descriptions The default Agent Management page is divided into three sections that provide an overview of the current status of active Agents.
| Section | Description |
| Active Job Queue | Pending actions to be performed on Agents or Agent Groups. |
| Remote Agents | Agents that are currently capable of remote administration. |
| Legacy Agents | Legacy agents are those that are known yet have limited information. Those agents, not found in the Remote Agents list, have deployed version and/or build attributes found in one of the Configuration Items. Links found under the Associated CIs column allow access to the corresponding CIs. |
Additional options that are available via the drop-down in the top right corner are:
| Option | Description |
| Overview | Default view of the Agent Management page, see the previous section descriptions. |
| Job Queue | Displays pending jobs and job that completed in the last twenty-four hours for Agents or Agent Groups. |
| Agents | Displays only the remote Agents and legacy Agents. |
| Agent Groups | Allows creating Agent Groups to facilitate Agent management functions. |
Create Agent Group
You can organize Agents logically into groups to simplify management. These groups can be used to ensure a consistent configuration and versions across Agents. A common example is to create a group for each platform, such as all Windows Agents.# Log in to FireScope SPM with Administration privileges.
- Click Administration > Utilities > Agent Management. The Agent Management page will be displayed.  
- Select Agent Groups from the drop-down in the top right corner. The Agent Management page displays existing Agent Groups.

- Click on the Create Agent Group button. The Agent Management page displays Agent Group fields.

- Complete the form.
- Click on the Save button.
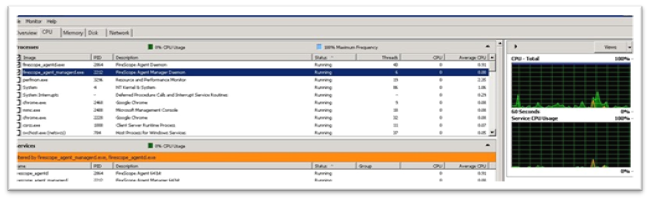
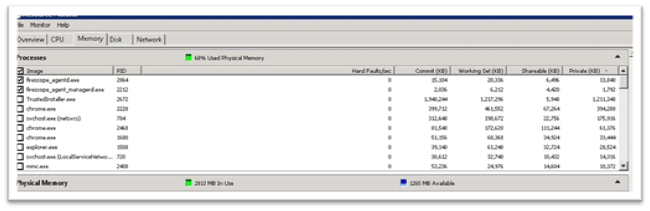
Agent Resource Usage
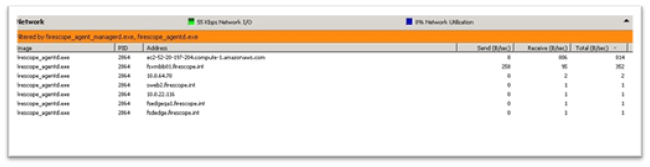
On one of the Windows systems following resource usage was noticed:
CPU Usage
Memory Usage
Network Usage