Approval process
Overview
In Matrix42 Service Catalog, approval workflows cover the approval process in which one or more deciders must approve or reject the services that are ordered. The workflows are initiated when users order services via the Matrix42 Self Service Portal.
You can select from a set of ready-made approval workflows or create your own approval workflows, either from scratch or based on the ready-made workflows provided out of the box, to fit your specific business needs.
Based on your specific business needs, you can choose to specify:
- a general approval workflow to be used with all orders in the Matrix42 Self Service Portal,
- on a per service basis, a specific approval workflow which is initiated following the successful completion of the general approval workflow,
- both general and specific workflows, or
- no workflows whatsoever, in which case your orders will be automatically approved.
Learn more about Order Lifecycle in Matrix42.

Bookings which are not part of General or Specific Approval Task are considered as Approved. Such behaviour could be changed by means of Specific Approval Workflow.
General Approval Workflow
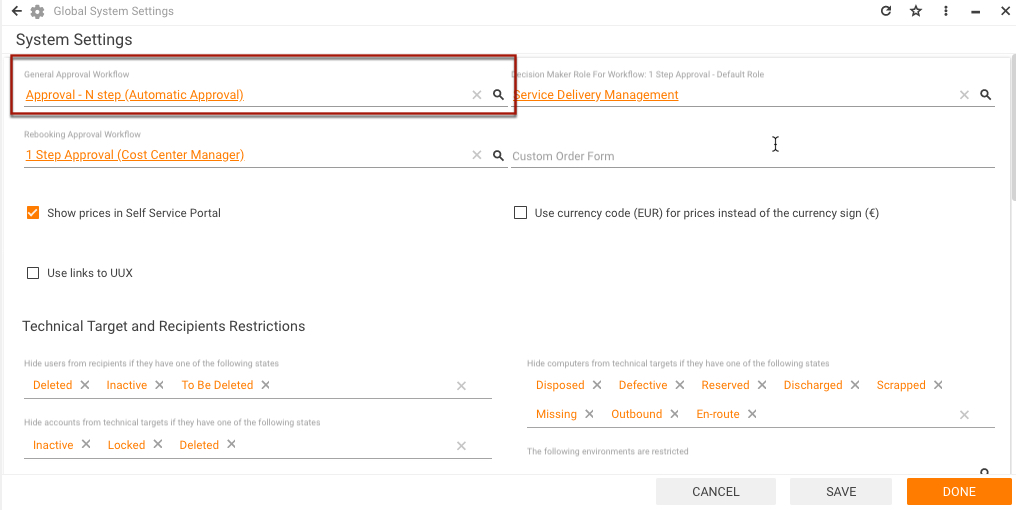
You can define the General Approval Workflow to be used with all orders in the Matrix42 Self Service Portal in the Service Catalog Settings. All you need to do is click the selection icon next to the General Approval Workflow field (outlined in red in the screenshot below) and select a workflow from the list of available ones by clicking it. Make sure to click Save or Done at the bottom of the System Settings dialog to save the change.
Specific Approval Workflow
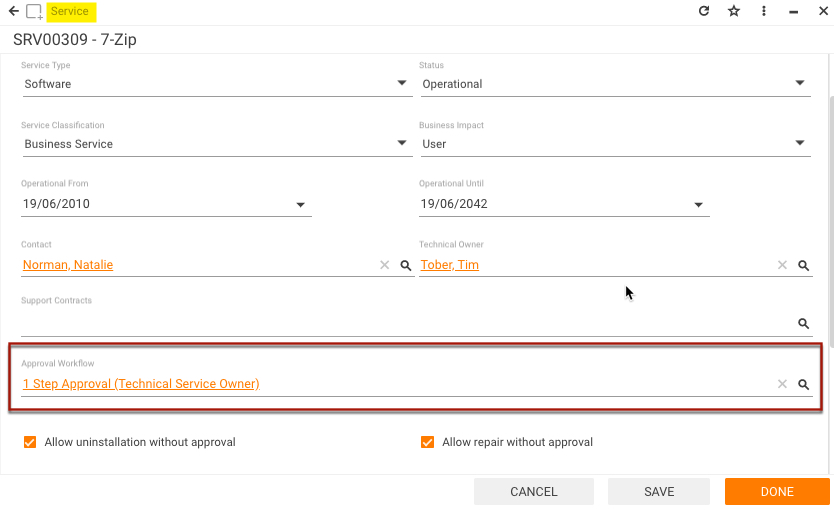
You can define the Specific Approval Workflow, which is initiated following the successful completion of the General Approval Workflow, on a per Service basis on the General dialog page of the Service dialog. All you need to do is click the selection icon next to the Approval Workflow field (outlined in red in the screenshot below) and select a workflow from the list of available ones by clicking it. Make sure to click Save or Done at the bottom of the Service dialog to save the change.
Examples of Ready-Made Approval Workflows
Below are just a few examples of the ready-made approval workflows you can select from or use as templates for creating your own approval workflows with the help of the Matrix42 Workflow Studio. Either one of the following workflows can be used either as a global or as a service specific approval workflow.
- 1 Step Approval (Cost Center Manager): 1 step approval workflow. The decider is the manager of the cost center that is specified in the order.
- 1 Step Approval (Default Role): 1 step approval workflow. The decider is any one of the members of a default role that can be configured in the Global System Settings.
- 1 Step Approval (Catalog Responsible): 1 step approval workflow. The deciders are responsible persons or roles of the catalogs that contain the ordered service.
- 1 Step Approval (Technical Service Owner): 1 step approval workflow. The Technical Owner of the requested service is the single decision maker.
- 2 Step Approval (Cost Center Manager, Catalog Responsible): Approval workflow with two approval instances. The deciders are (1) the cost center manager of the cost center specified in the order and (2) the responsible persons or roles of the catalogs that contain the ordered service.
- 3 Step Approval (Cost Center Manager, Catalog Responsible, Technical Service Owner): Approval workflow with three approval instances. The deciders are (1) the cost center manager of the cost center that is specified in the order, (2) the responsible persons or roles of the catalogs that contain the ordered service, and (3) the person responsible for the ordered service.
All the above listed standard approval workflows are marked as System and cannot be changed but can be used as templates for creating your own approval workflows with the help of the Matrix42 Workflow Studio.
How Approval Workflows Work
Standard Matrix42 approval workflows differ by the number of approval steps (1, 2, or 3) and by deciders (examples of which include Default Role, Cost Center Manager, and Portfolio Responsible).
To view the flow chart of a workflow with all the approval activities:
- Go to Administration > Services & Processes > Workflows > Manage Workflows.
- Locate the workflow you need.
- Click the workflow to open it in Preview.
- Click Edit in Studio in the toolbar of the Preview to open the selected workflow in the Workflow Studio shown in the screenshot below.

Should the selected workflow not open in the Workflow Studio Editor right away, locate and double-click the workflow under the File tab > Open bookmark in Workflow Studio.
The flow chart located in the Workflow Studio Editor (in the center of the screen) is a visual representation of the selected approval workflow. Workflow activities are represented by icons with names of those activities. The workflow follows the sequence represented by the flow chart.
If deciders are missing from any of the approval activities, for example, Responsible Users and/or Roles are not specified, the approval tasks are created and automatically closed by the system as Approved, following which the workflows proceed to the next step.
If a user that orders a service is a decision maker in an approval activity, the approval task is also automatically approved and closed.
Example 1: 1 Step Approval (Default Role)
As you can see in the below flow chart, the 1 Step Approval (Default Role) workflow has two activities:
- Activity 1: Get Default Role.
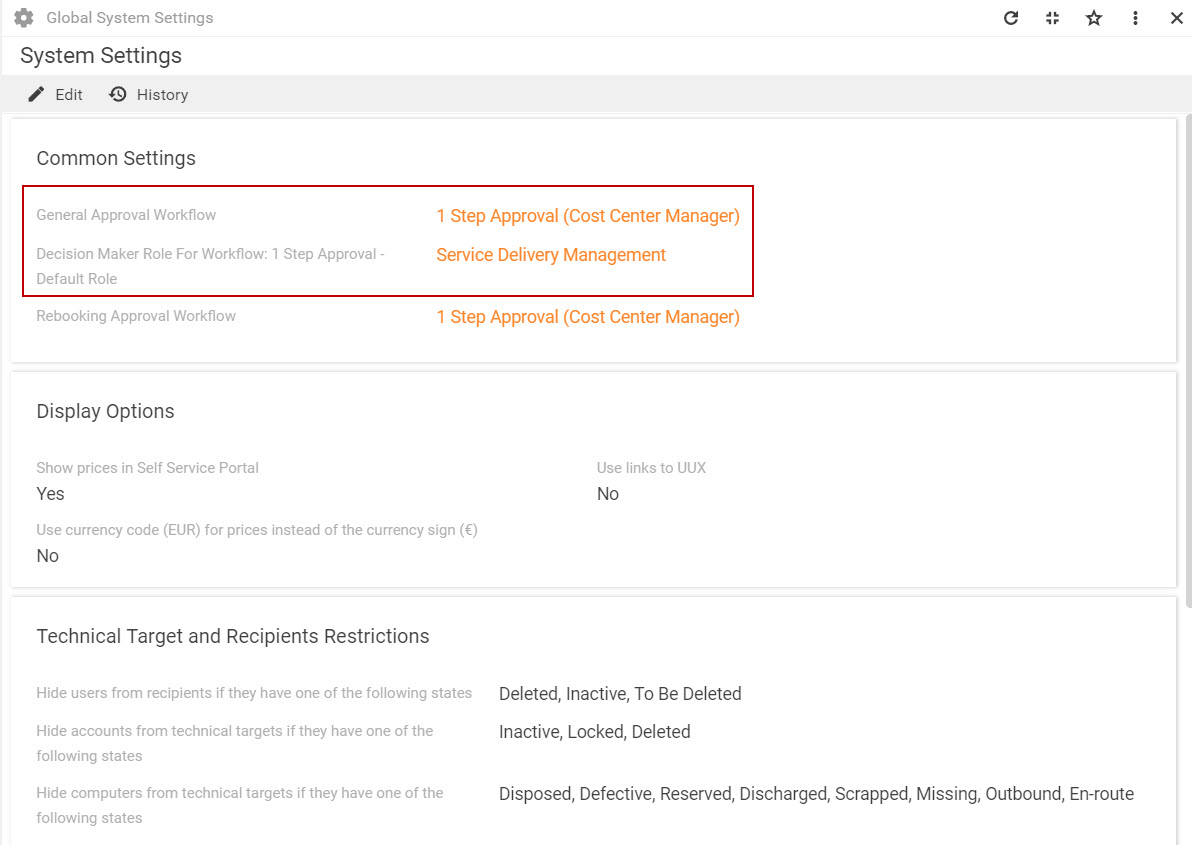
Get Global Configuration. Reads the attribute specified in the global configuration and provides the attribute value in a variable which can be used in further activities. Tip: Users with appropriate rights can specify the Default Role for the workflow in Service Catalog Settings, in the Decision Maker Role For Workflow: 1 Step Approval - Default Role field (outlined in red in the screenshot below).
- Activity 2: Default Role Approval.
Service Approval. Creates an approval task for decision makers of Service Catalog workflows and waits until the approval task has been processed by the user. The created approval task is assigned to the Responsible Role fetched by activity 1 of the workflow. The approval task can only be closed by users from the Responsible Role. As soon as the approval task is closed, the workflow resumes and finishes. An approval task is closed when Approve or Decline is clicked.
Example 2: 1 Step Approval (Cost Center Manager)
The 1 Step Approval (Cost Center Manager) workflow has only one activity: Cost Center Service Approval Activity.
Once a user orders a service, a booking is created with the selected cost center. If the cost center has a Decision Maker specified, the Service Approval Activity creates an approval task for the specified Decision Maker (see outlined in red in the screenshot below).
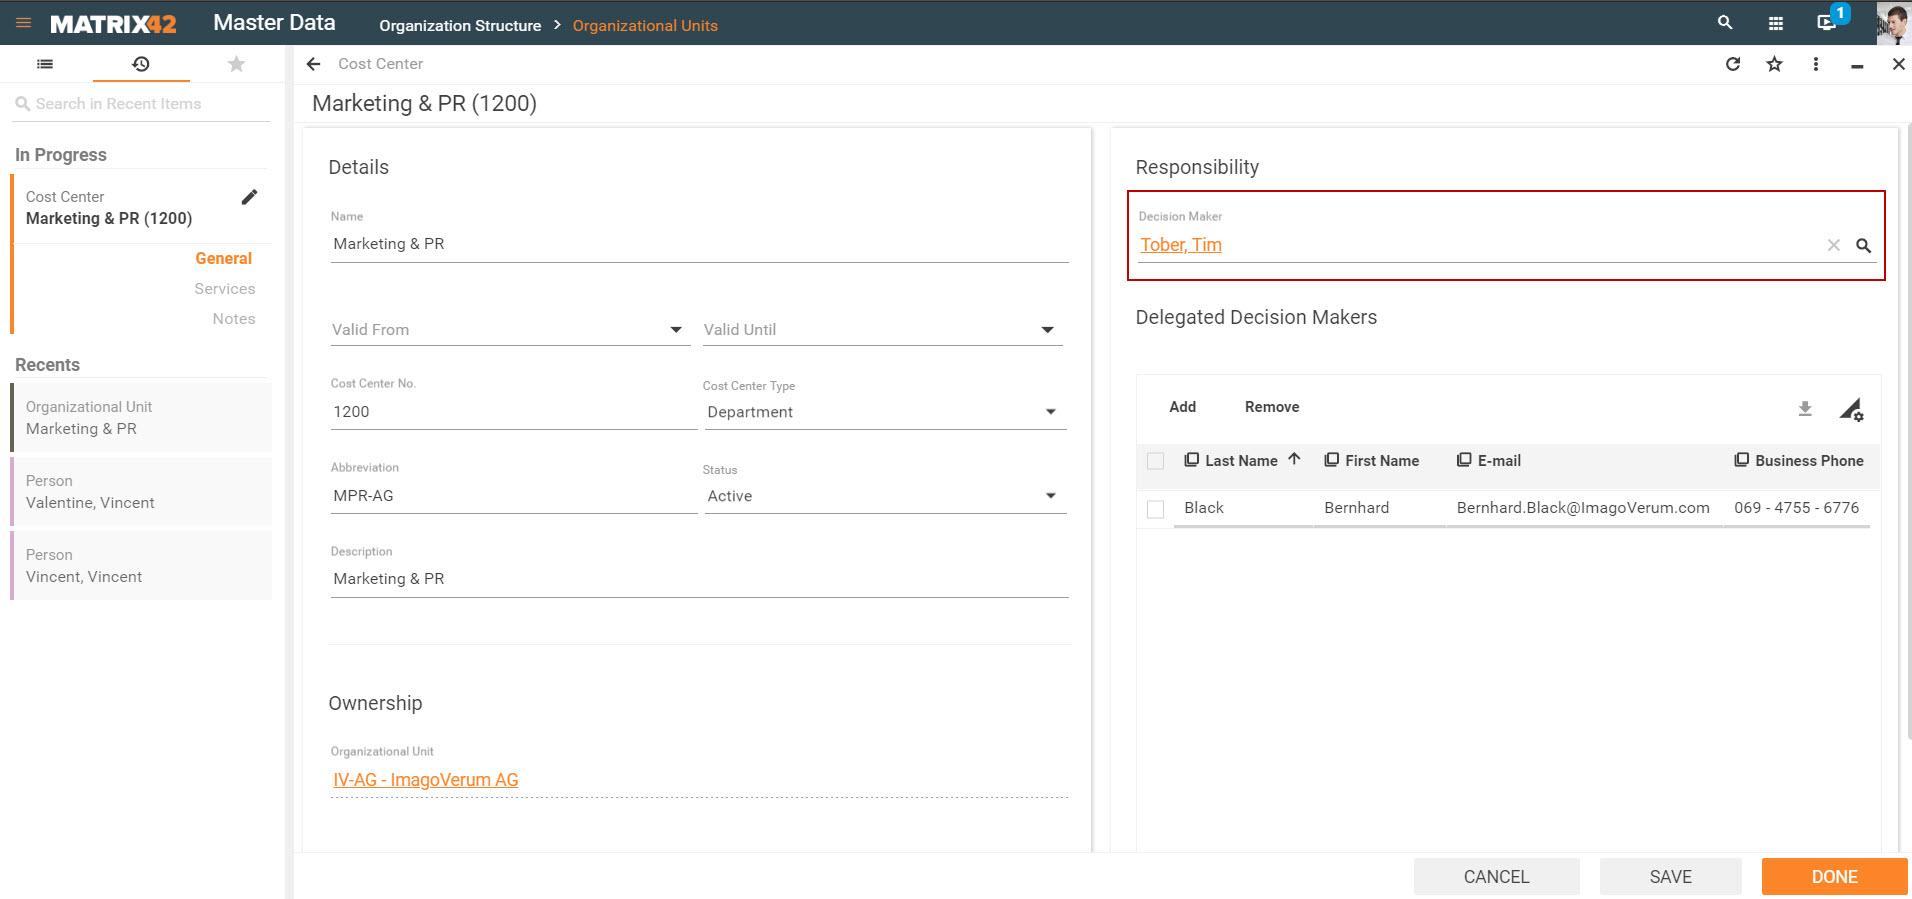
If the specified Decision Maker has a Delegate, the approval task can be closed by the Delegate. The workflow waits until the approval task has been processed by the user. As soon as the approval task is closed, the workflow resumes and finishes. An approval task is closed when Approve or Decline is clicked.
Example 3: 2 Step Approval (Cost Center Manager, Portfolio Responsible)
The 2 Step Approval (Cost Center Manager, Portfolio Responsible) workflow has two approval activities:
- Activity 1: Service Approval by Cost Center Manager.
Once a user orders a service, a booking is created with the selected cost center. If the cost center has a Decision Maker specified, the Service Approval Activity creates an approval task for the specified Decision Maker (see outlined in red in the screenshot below).
If the specified Decision Maker has a Delegate, the approval task can be closed by the Delegate. The workflow waits until the approval task has been processed by the user. An approval task is closed when Approve or Decline is clicked. As soon as the approval task is closed, the workflow resumes.
- Activity 2: Portfolio Approval.
The Portfolio Approval activity creates an approval task for the Catalog Responsible, Role or User, whichever is specified, based on the data obtained from the booking created when a user orders a service. The workflow then waits until the approval task has been processed by the user. An approval task is closed when Approve or Decline is clicked. As soon as the approval task is closed, the workflow resumes and finishes.
Sample Order & Booking Approval Process Explained
Let's say your order consists of 3 services, where the following settings are selected:
- the 1 Step Approval (Default Role) General Workflow is specified in Service Catalog Settings;
- service 1 has no Specific Workflow specified;
- service 2 has 1 Step Approval (Catalog Responsible) Specific Workflow specified;
- service 3 has 1 Step Approval (Cost Center Manager) Specific Workflow specified.
User places an order which consists of 3 services with the above settings.
- First, the General Approval workflow is initiated. An approval task is created for the specified Default Role. Since the user has ordered 3 services, 3 bookings have been created. Therefore, the approval task is created for the 3 service bookings. The Decider must close the approval task, i.e. approve or decline the order. The Decider opens the order in the Service Portal, approves only 2 bookings (out of 3), one booking without a specific approval workflow defined, and one booking with a specific approval workflow specified. The approval task is closed as Approved, although one of the bookings from the order has been declined by the Decider. The order now has 2 approved bookings, one with a specific approval workflow, and the other without. The declined booking is no longer part of the Approval Process.
- Second, the Specific Approval workflow for the one remaining booking approved at step 1 is initiated. The Decider (Cost Center Manager in our example) gets to close the approval task for the booking. Once the Decider approves or declines the booking, the approval process is finished.
Order & Booking Approval Process: Example 2
Let's take a look at another example of an approval workflow. Let's say a user has placed an order for 2 services which have the same Specific Approval workflow specified. Also, a General Approval workflow is specified in Service Catalog Settings.
- First, the General Approval workflow is initiated. The created approval task for the 2 bookings is closed by the Decider with both bookings approved.
- Second, the Specific Approval workflow is initiated for both bookings approved at step 1. A new approval task is created for both bookings. Only one approval task is created because they both have the same specific workflow specified.
Let's say several approval tasks exist at the same approval step. As soon as one of these approval tasks is approved/declined by the Decider, the rest of the approval tasks from this approval step are automatically closed, and the order is approved.
Creating Approval Workflows
With the help of the Matrix42 Workflow Studio, users can create new approval workflows, either from existing workflows or from scratch.
Creating Approval Workflow from Existing Workflow
To create a new workflow from an existing one:
- In Matrix42 Workflow Studio, go to the File tab > New bookmark.
- Click Workflow from..., select an existing workflow which you would like to use as a template by clicking it, and then click Create.
- Define the properties of the new workflow:
- provide a Name,
- select an Icon,
- select a Category under which the workflow is to be stored in Workflow Studio,
- make sure that the Service Approval Integration Context is selected. When such workflow is initiated, it receives parameters from the booking that has started the workflow.
- select the System checkbox to mark the workflow as System. Workflows marked as such cannot be subsequently modified.
- You may also add comments to describe, for example, the purpose and business context of the workflow. This information will help other users when working with this workflow.
- Click Save. The Matrix42 Workflow Studio Editor opens with the flow chart of the selected template workflow.
- You can now modify the copied workflow to fit your specific business needs by, for example, editing the copied activities, e.g. changing the decider, rearranging the order of activities in the flow chart, deleting activities, or creating new ones.
- When done modifying the new workflow, click Save, Check in, Release, and Publish on the toolbar.
The new workflow is now available for selection in both general and specific workflow lists.
Creating Approval Workflow from Scratch
To create a new approval workflow from scratch:
- In Matrix42 Workflow Studio, under the File tab > New bookmark, click Blank Workflow, and then click Create.
- Define the properties of the new workflow:
- provide a Name,
- select an Icon,
- select a Category under which the workflow is to be stored in Workflow Studio,
- make sure that the Service Approval Integration Context is selected. When such workflow is initiated, it receives parameters from the booking that has started the workflow.
- select the System checkbox to mark the workflow as System. Workflows marked as such cannot be subsequently modified.
- You may also add comments to describe, for example, the purpose and business context of the workflow. This information will help other users when working with this workflow.
- Click Save. The Matrix42 Workflow Studio Editor opens with the new blank workflow.
- Add approval activity(ies) to the canvas and connect them with arrow(s) to create the approval workflow flow chart:
- Select the Service Catalog bookmark at the bottom of the left-hand panel.
- In Repository located on the left-hand side of the screen, at the top, click the Service Approval activity, then drag and drop it onto the canvas located in the center of the screen.
- Connect the approval activity with the Start icon with the help of an arrow.
- Select the approval activity on the canvas, then in the Properties pane on the right of the screen:
- add Service Booking IDs,
- click Decision Maker Roles to add the Roles statically or by retrieving them from the database.
- When done creating the new workflow, click Save, Check in, Release, and Publish on the toolbar.
The new workflow is now available for selection in both general and specific workflow lists.