How to configure and activate the Enterprise Manager inventory data provider
Ports
For information on required ports, see Ports used by connectors and data providers.
Configuring the data provider
- Go to Integration > Data Providers in the Administration application.
- Double-click the Enterprise Manager Inventory data provider to open it. The properties dialog contains a grid with an empty configuration for this provider.
Only one configuration can be added for the Enterprise Manager Inventory data provider.
Open the configuration and fill in the General and Settings tabs.
General
Specify the Data Gateway instance that will execute the configuration and select the Enable import checkbox to activate this configuration.
Settings
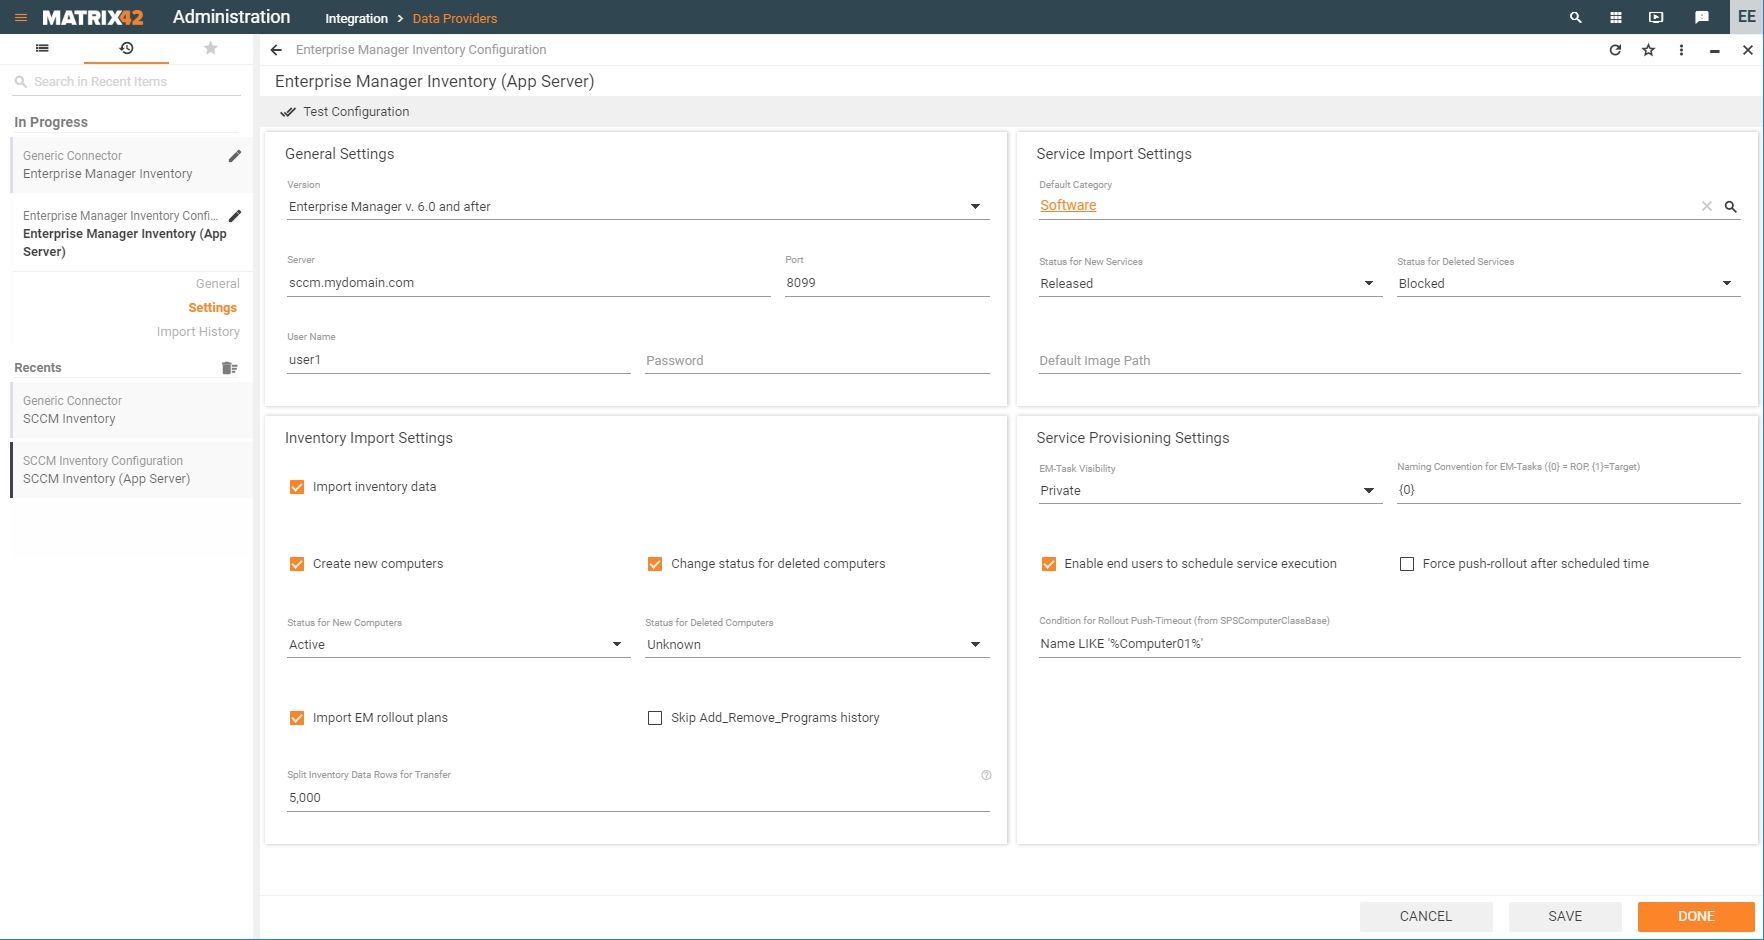
- Fill in the general settings.
- Select which version of Enterprise Manager you are connecting to.
- Enter the server name or IP address of Matrix42 Enterprise Manager in the Server field and port number of the API service of Matrix42 Enterprise Manager in the Port field.
- Specify credentials that are used to access the Enterprise Manager server in the User Name and Password fields.
- Provide the inventory import settings.
- Select the Import inventory data checkbox to import inventory of computers from Enterprise Manager.
- Select the Create new computers checkbox to enable import of new computers. Otherwise, the data provider will only update existing Matrix42 Software Asset & Service Management computers.
- Select the Change status for deleted computers checkbox if you want the status of computers to be changed in Matrix42 Software Asset & Service Management after they have been deleted in Enterprise Manager.
- Use the Status for New Computers drop-down field to select the status for computers that have been newly created by importing from Enterprise Manager.
- In the Status for Deleted Computers drop-down field, you can select the status which will be assigned to Matrix42 Software Asset & Service Management computers after they have been deleted from SCCM.
- Select the Import EM rollout plans checkbox if the data provider should import rollout plans from Matrix42 Enterprise Manager and create a search page under Service Catalog > EM Rollout Plans. Based on EM rollout plans, the system will create services.
- Select the Skip Add_Remove_Programs history checkbox if the data provider should disregard the application installation history that is also collected by Matrix42 Enterprise Manager and use only list of currently installed applications for the inventory.
- Enter the maximum volume of data that will be retrieved at once by the Enterprise Manager Connector Data Collector workflow in the Split Inventory Data Rows for Transfer field. The default value is 5000 rows.
- Specify the service import settings.
- Select the default category of services that will be created based on imported Matrix42 Enterprise Manager rollout plans.
- In the Status for New Services drop-down field, you can choose the status for newly imported services. If you select Operational, the new software is displayed immediately in Matrix42 Self Service Portal. The default value is Released.
- Use the Status for Deleted Services drop-down field to change the status for services that have been deleted from SCCM. The default value is Blocked, which means that this software is no longer displayed in Matrix42 Self Service Portal.
- You can specify Default Image Path a software program. The image will be displayed in Matrix42 Self Service Portal.
- Select the service provisioning settings.
- Select either Private or Public in the EM-Task Visibility drop-down field depending on whether the provisioning tasks that are created for EM rollout plans should be displayed in the Matrix42 Enterprise Manager interface.
- Use Naming Convention for EM-Tasks ({0} = ROP, {1}=Target) to set a template for naming of EM tasks, where {0} is a rollout plan and {1} is a target computer.
- Select the Enable end-users to schedule service execution checkbox to provide the possibility for users to select the date and time when the software will be installed on their computer.
- Select the Force push-rollout after scheduled time checkbox if the software provisioning task should be executed by Matrix42 Enterprise Manager immediately after a specific timeout instead of being put in a queue. It can be selected only if the Enable end-users to schedule service execution checkbox is cleared.
- If the Force push-rollout after scheduled time checkbox is selected, you can provide an ASQL construction that will be used as a condition for push-rollout in Condition for Push-Rollout Timeout (from SPSComputerClassBase).
Testing the connection
Use the Test Configuration action, which is available in the configuration dialog to verify your settings. As a result, the additional dialog will display validation results for this configuration.

Activating and monitoring the import
Run the Enable action for the data provider and then click Activate to start the import immediately.
You can check the import results on the General tab of the configuration in the Last Result, Last Run, and Description fields. For more details, go to Import History tab. It displays all instances of importing data, executed workflows, and import logs.