Release Notes Silverback 20.0 Update 1
About this release
Matrix42 Silverback 20.0 Update 1 provides new and improved features that have been implemented. During the development of this version, we have been focusing on valued feedback from our customers and partners in order to provide an ideal feature selection.
Please find the installation files of this version on Matrix42 Marketplace.
System requirements, integration guides and instructions for installation and update are available in the Matrix42 Help Center.
Important Announcements
Clear Cache
After updating to this Silverback version you might see incomplete views. Please clear your cache to get back to normal views. Open Developer Options of Chrome by pressing F12 and then clear the cache by pressing Ctrl+Shift+R.
Updated Framework Version
With the new release of our 20.0 Update 1 version, Silverback, including Silversync and the Cloud Connector requires a minimum .NET Version of 4.7.2 installed on the hosting Windows Server. The .NET Framework is one of the programming models which supports construction and operations of various applications running on Windows Servers. It is created by Microsoft and operates on Microsoft Windows and receives updates which will enrich the capabilities for developing applications like Silverback. The required 4.7.2 version has been released from Microsoft in April 2018 and is received through the following Updates.
- Microsoft .NET Framework 4.7.2 for Windows Server 2012 for x64 (KB4054542)
- Microsoft .NET Framework 4.7.2 for Windows 10 Version 1607 and Server 2016 for x64 (KB4054590)
Before installing or updating to Silverback, please review if your Windows Server fulfills the requirement of .NET minimum version 4.7.2. You can run the following command line to query the information from the registry:
reg query "HKEY_LOCAL_MACHINE\SOFTWARE\Microsoft\NET Framework Setup\NDP\v4\full" /v version
Decreasing support for Android device administrator
As announced in previous announcements Release Notes, Google is encouraging movement off of device administrator management by decreasing its management support in new Android releases. With the upcoming Android 11 release in the fourth quarter this year, another step towards this direction will affect all devices that are running on the deprecated device administrator management type (legacy management). These changes will include a deprecation of forcing passwords on devices and the retrieval of device information for non Android Enterprise devices.
Please review the following changes:
Affected Devices
- Platform: Android (non SamsungSafe)
- Operating Systems: Android 10 and later
- Device Management: Legacy Management (non Android Enterprise)
Affected Settings
- Password Quality
- Minimum Length
- Maximum Passcode Age
- Passcode History
- Maximum Failed Attempts
Additional impacts
For all legacy managed devices on Android and SamsungSafe platform with Android 10 and later, Google has restricted the ability to retrieve device identifier information. This restrictions will impact Silverback's features after a device is updated to Android 10 or later:
- IMEI and serial number will no longer be visible to IT administrators in the device overview
- This will affect the Hardware Authentication feature in Silverback
User experience
- For current devices under management the impacted configurations will be still working
- For newly enrolled devices, the above mentioned changes will take effect
What you should do
- Whenever a new device will be used in your company or the owner will change, enroll these devices with Android Enterprise
Overview
- General
- Android Enterprise
- iOS / iPadOS
- macOS
- tvOS
- Windows 10
New Features
General
Please find all new General Features in Silverback 20.0 Update 1 below.
Service Bus Integration
We invested a lot in the past several weeks to make the communication with the UEM Console faster, more efficient and convenient. For this we are happy to introduce with Silverback 20.0 Update 1 a new technology called Service Bus. A Service Bus is a fully managed enterprise integration message broker and acts as a reliable and secure platform for asynchronous transfer of data and state. This technology is used to send and update information from Silverback to the UEM Console and is dedicated to replace the Silverback Data Provider inside the Software Asset and Service Management soon. As of today we are supporting Microsoft Azure Service Bus as a cloud solution as well as RabbitMQ as an open-source software for on-premises scenarios.
Service Bus Settings
To add Microsoft Service Bus or RabbitMQ as your preferred Service Bus, you will find the corresponding settings in the Web Settings section of Silverback. Login as a Settings Administrators, navigate to Service Bus and configure the following settings. Please refer to our Service Bus Integration Guide.
| Setting | Options | Description |
|---|---|---|
| Service Bus Type |
|
Choose here either Azure or RabbitMQ as Service Bus provider |
| Connection string | e.g. Endpoint=sb://imagoverum.servicebus.windows.n...erum.uem.topic | Enter here the connection string which includes the authentication settings to send messages over the Service Bus |
| Topic/Exchange | e.g. matrux42.uem.topic |
Enter here your Topic for Azure Service Bus or the Exchange for RabbitMQ. Messages are sent to a topic and delivered to one or more associated subscriptions |
| Subscription/Queue | e.g. matrix42.uux.subscription | Add here your create Subscription for Azure Service Bus or the Queue for RabbitMQ. |
- Press Save
Use Sync All Data after the initial setup to perform a full synchronization of your current devices, tags and associated devices.
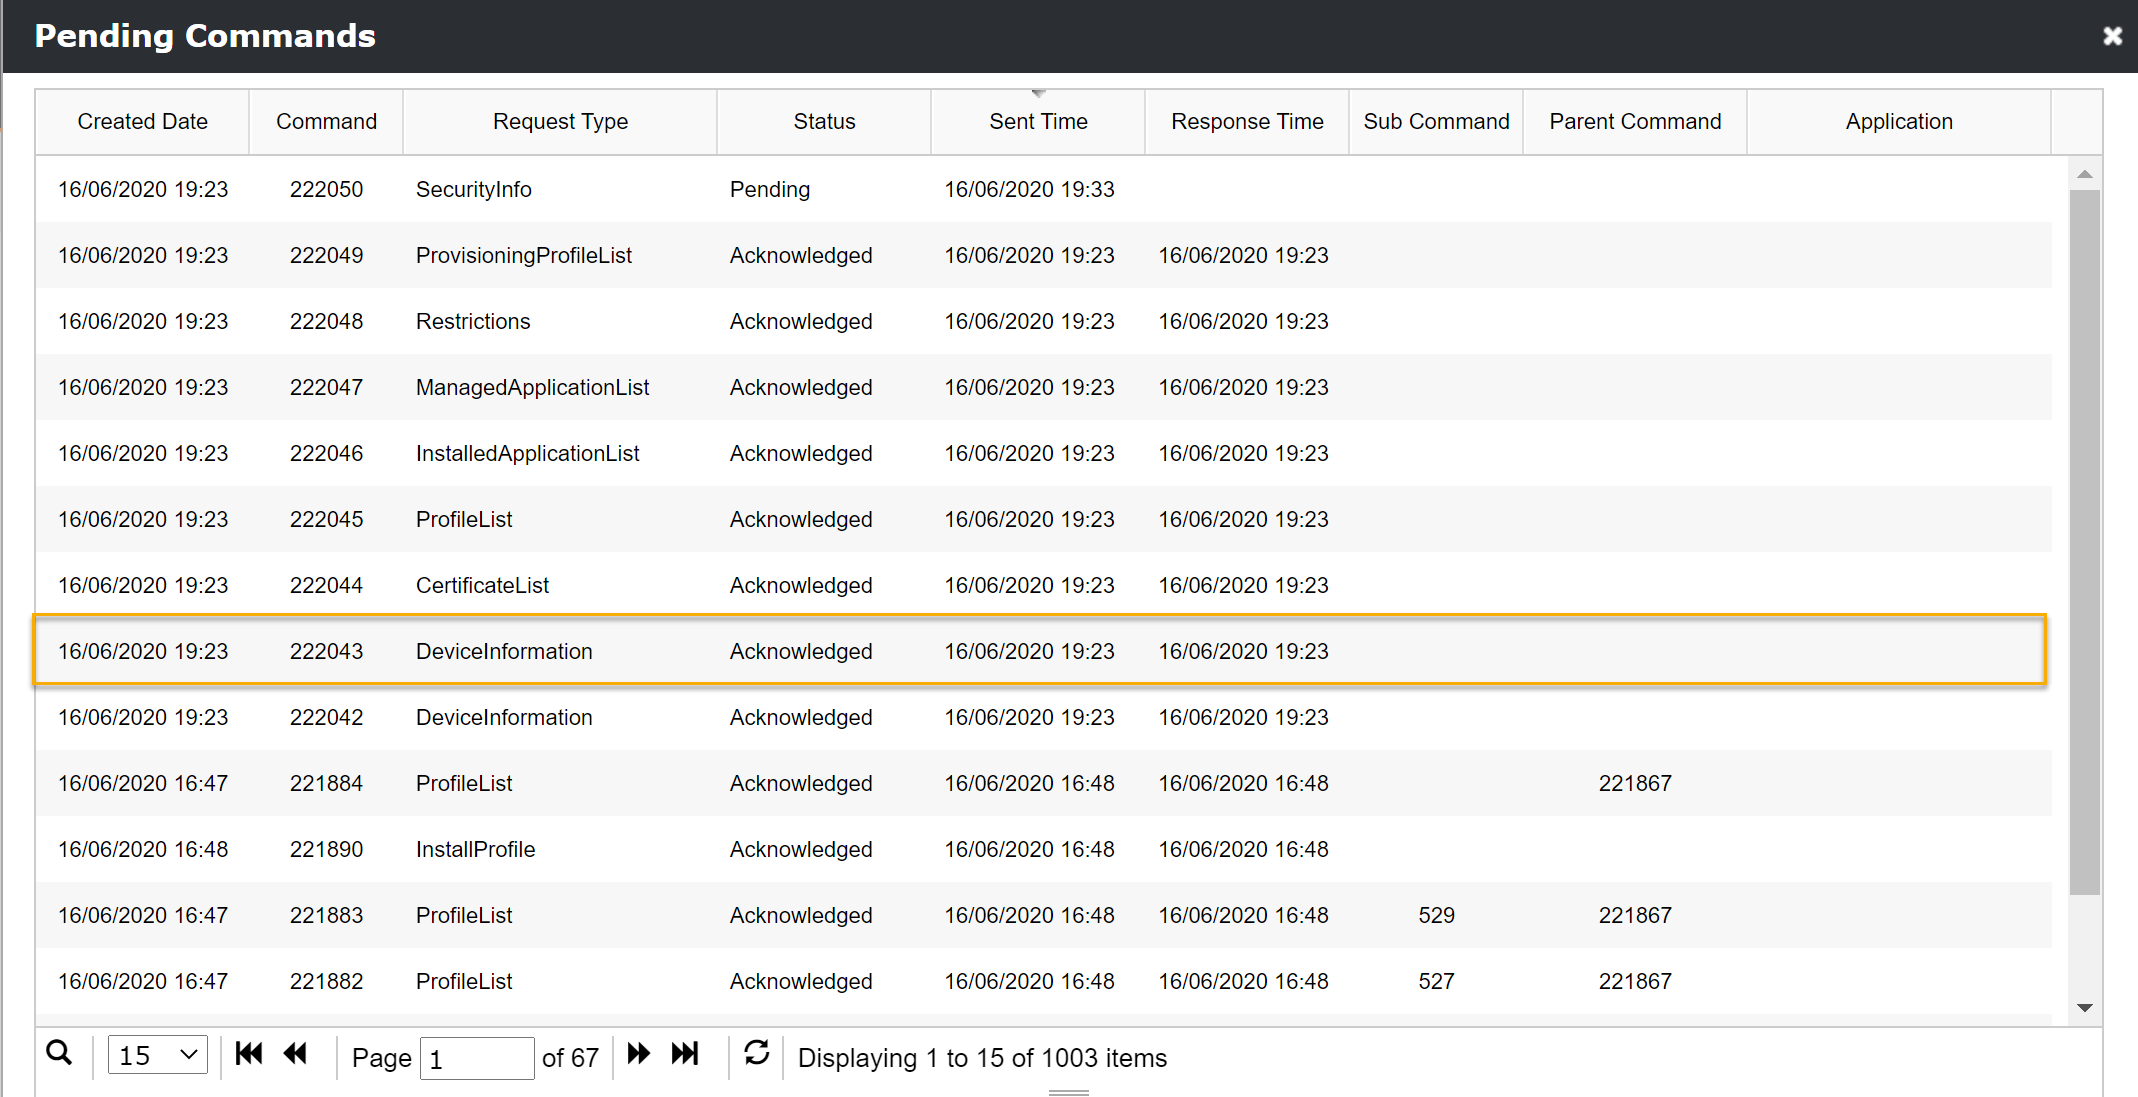
Real Time Device Information
When your Service Bus is set up and connected to your UEM Console, every new enrolled and already existing device will update the corresponding device information in the UEM Console when the Command DeviceInformation is being Acknowledged. The following device information will be sent via the Service Bus:
- User Information: Username
- Device Information: Type, Name, Manufacturer, Serial Number, Supervising Status
- Operating System Information: Name, Version, Patch Level, Pending OS Update
- Device Identifiers: UDID, Silverback API Device ID, IMEI
- Management Information: Managed By, Management Type , Last Seen Date, Enrollment Status
- Network Information: Primary Mac Address, IP Address
- Security Information: Please review New Windows 10 Security Information
- Domain Information: Domain Name
Depending on different platforms the information is only eligible by the operating system
Rollout-based Software Management
When your Service Bus is setup and connected to your UEM Console, Silverback will, whenever an existing tag will be updated or a new one created, send the following information via the Service Bus:
- Name: e.g. iPadOS Wi-Fi
- Description: e.g. Corporate Wi-Fi configuration
- Enabled Features: e.g. Profile, Policy, Apps, Content
- Enabled Device Types: e.g. iPhone, iPad, Android, SamsungSafe, Windows 10, macOS, AppleTV
- Enabled Auto Population Information : e.g. yes or no
- System Tag Information: e.g. yes or no
- Associated Devices list: e.g 4 devices with device information
App Protection Policies
With Silverback 20.0 Update 1 we are happy to release the Application Protections Policies for Microsoft 365 Applications like Microsoft Outlook, Microsoft Word, Microsoft Excel, Microsoft PowerPoint and other protected applications. App protection policies are rules which will help to increase the security for your organization's data, even when the devices are not managed with Silverback. The app protection policies are part of the Microsoft Framework integrated within the Graph API and can be now configured through Silverback to extend your current and existing device configuration policies with app level security policies and apply the policies on unmanaged devices. These policies or app rules ensure that the organizations' data remains safe or contained in managed applications. As an example this policies will help to add additional protections on a per-app level like enforcing an additional password, preventing from copy & paste to unmanaged applications or prevent access to corporate on devices depending on the operating system version.
What is the benefit
- You can add app level protection policies to prevent intentional and unintentional data loss
- Protect corporate data that is accessed from unmanaged devices
- Add data loss prevention controls, like cut, copy, paste, and save-as restrictions. These settings determine how users interact with data in the apps.
- Define access policies like PIN and credential requirements that users must meet to access apps in a work context.
- Set sign-in security requirements like minimum App conditions and device conditions
How it works
- By adding an application to Azure Active Directory with API permissions Silverback will gain access to the Graph API
- The application information will be added into Silverback and the App Protection Policy feature will be activated
- You configure App Protection Policies and assign them to your Azure Active Directory Groups
- App Protection Policies will be applied through Silverback to Microsoft Intune and will be synchronized regularly
- Whenever a user logs into any protected application (unmanaged or managed devices) with a work or school account, the configuration will be applied
- The configuration will only affect the work or school account. If a personal account is signed into the app, the data is untouched.
Android and Samsung devices requires the Company Portal app installed on the device without any further actions. Please ensure that the users are capable to install the app.
What you need
- Successful accomplished Azure AD Integration Guide I and II
- Access to Azure Active Directory
- A license model from Microsoft that include Microsoft Intune
How to configure it
- Login to your Azure Portal
- Navigate to Azure Active Directory > Mobility (MDM and MAM)
- Select your Silverback application and click On-premises MDM application settings
- Navigate to API Permissions
- Click +Add a permission
- Select Microsoft Graph
- Select Application permissions
- Expand DeviceManagementApps and enable DeviceManagementApps.ReadWrite.All
- Expand Groups and enable Group.ReadWrite.All
- Click Add permissions
- Click Grant admin consent for your organization
- Select Application permissions
- Open your Silverback Management Console
- Navigate to Admin
- Select Azure Active Directory
- Choose App Protection
- Enable App Protection by enabling the checkbox
- Define a period for how often Silverback performs a sync with the Graph API
- Press Save
- Confirm with OK
- Confirm again the the settings saved successfully
- Navigate to App Portal
- Select MAM
- Click New App Protection Policy
- Enter a Display Name, e.g. Microsoft Outlook on iOS/iPadOS
- Select a Platform e.g. Android
- Enter a description (optional)
- Click Save and Process
- Under Apps, select Assign Apps
- Select e.g. Microsoft Outlook
- Click Attach Select Apps
- Confirm with OK
- Click Save and Proceed
- Under Data
- Change Restrict cut, copy, and paste between other apps to Blocked
- Click Save and Proceed
- Under Access
- Enable PIN for access
- Click Save and Proceed
- Under Conditions
- Enter as Min OS version (warning) e.g. 13.0
- Click Save and Proceed
- Under Assignments
- Click Assign Group
- Select your desired Group
- Click Attach Selected Groups
- Confirm with OK
- Click Save and Close
Review your configuration
- Open your Microsoft Endpoint Manager admin center
- Select Apps
- Select App protection policies
- Your previously created polices should be listed here
- Select your policy and check the properties
User Experience
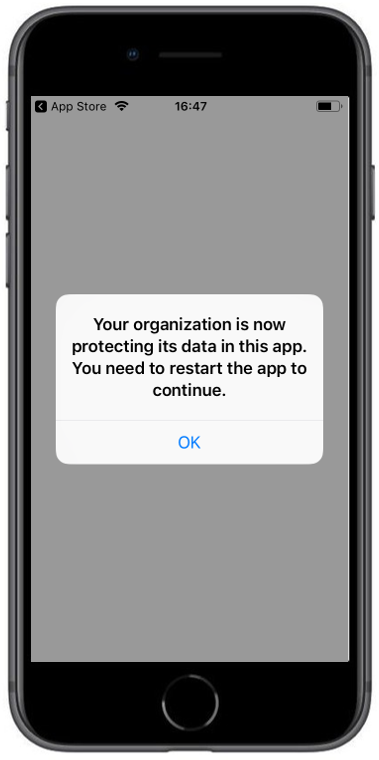
The following screenshots demonstrate the behavior of the previously created App Protection Policy.
 |
 |
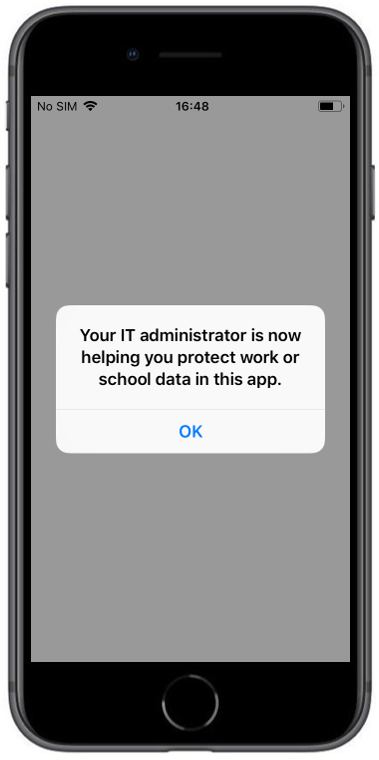 |
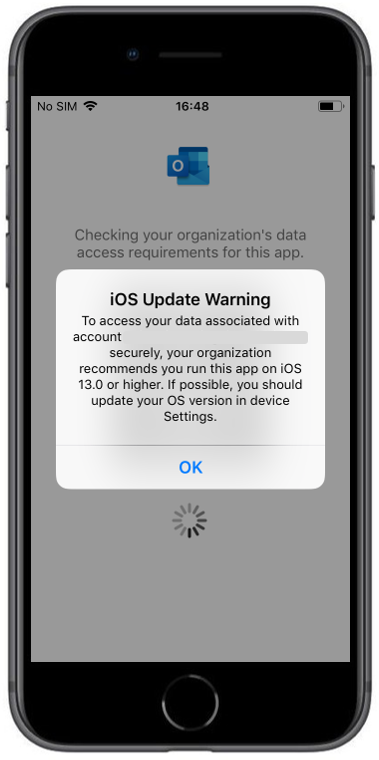
| After login with the corresponding Office365 Account the protection information is shown. You need to restart the application afterwards | When the operating system is lower as the configured one in the App Protection Policy you will see the following warning | After pressing OK you will see the notification that this app is protected |
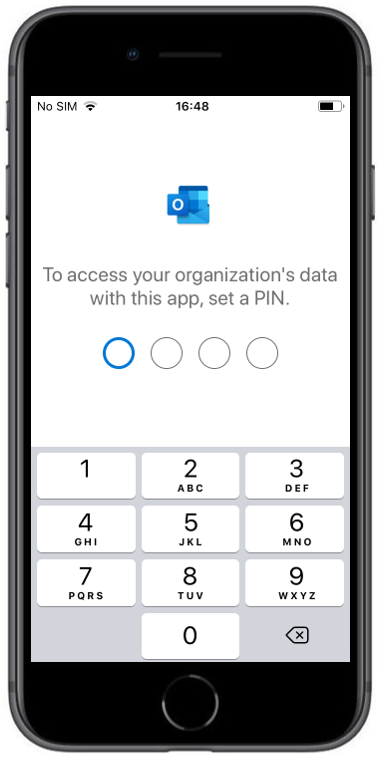 |
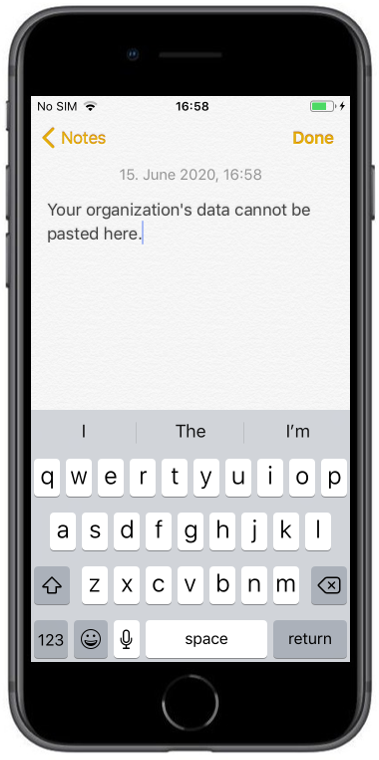 |
|
| Due to the enabled PIN access within the configuration, you will get forced to set a PIN for accessing the corporate data | When you try to copy and paste content from an email you will see the following information. |
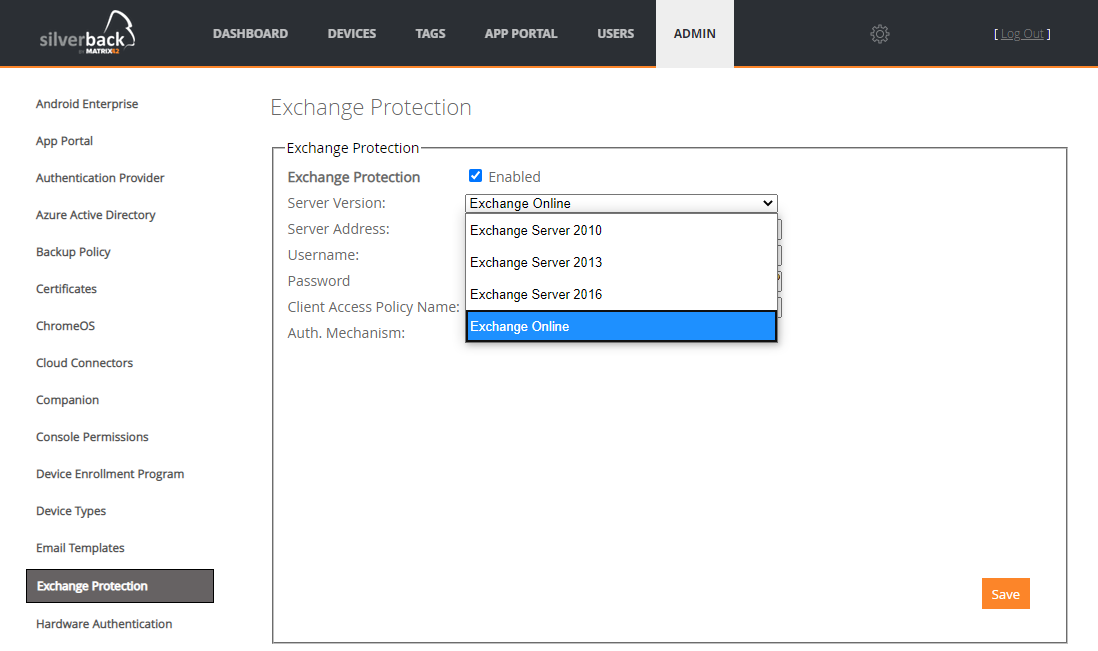
Exchange Protection
The Exchange Protection allows you to control who can access Exchange ActiveSync from mobile devices. Silverback acts as the management platform providing control over Exchange ActiveSync access based on its policies. Silverback will either allow managed devices, or deny unmanaged devices, ensuring a basic level of compliance. With Silverback 20.0 Update 1 we are happy to extend the current Exchange Protection for Microsoft Exchange Server 2010 with the Version 2013, 2016 and Exchange Online.
Please refer to our Exchange Protection Integration Guide for additional information and configuration.
Android Enterprise
Please find all news about Android Enterprise in Silverback 20.0 Update 1 below.
New passed certifications
- Silverback successfully passed the EMM Feature Checkbox for Zero-Touch Enrollment at the Enterprise Solutions Directory
- Also we achieved new "Advanced" Badges at the Enterprise Solution Directory for:
- Pre-configure devices with advanced zero-touch enrollment
- Set advanced passcode restrictions
- Check device integrity
- Enforce Verify Apps by default
- Block external data transfers
- Managed Google Play in EMM console
- Remotely configure WiFi settings
- Remotely configured certificate authenticated WiFi
- Standard Certificate Management
- Advanced certificate Management
- Silverback successfully passed the Knox Mobile Enrollment certification and is now listed as a vendor in the Device Owner Profiles
OEM Configuration
We are happy to introduce a new feature or a new paradigm of how the management of Android devices will evolve in the future. When we look back to the history of the Android Management it offered just a bunch of useful and enterprise ready controls and all manufacturers needed to find their own enterprise strategies and thus, their own management APIs. This kept all Enterprise Mobility Management solutions under action, to support different APIs for different manufacturers and different devices.
Within the new greatly working Android Enterprise Management platform, Google and device manufacturers are underlying new capabilities to create an easy adoptable device management. In a nutshell, device manufacturers will provide API management with separate applications, and you as an Administrator can configure these applications in Silverback through Managed Play and Android Enterprise.
What is the benefit
- You will participate from a zero day support for new features and functionalities, even without updating your management system
- Manufacturers will update their applications and extend the management capabilities within the application
- OEMConfig applications can run with privileged access, so you will have an extremely granular control management capabilities.
- Depending on your device fleet you will be able to enrol devices knowing every API that has been made for the device from day one.
How it works
- The manufacturers develop their devices, the software and the relevant APIs over and above Android Enterprise
- In tandem, the manufacturers creates their custom OEMConfig application to reference and interface the created APIs
- The manufacturers uploads the OEMConfig application to Google Play with supporting managed app configs for all available APIs
- You as an Administrators approves and imports the application into Silverback
- Utilising managed app configurations, you immediately receives the latest version of OEMConfig and the APIs the manufacturer has added
- You configure the managed app configs and distribute the applications to your device fleet
- The OEMConfig application will retrieve the managed app configurations and will implement them on the device
OEM Config Apps
Based on our valued customer feedback, we start with Silverback 20.0 Update 1 with the OEM Configuration for Samsung devices and the Knox Service Plugin:
Knox Service Plugin
 |
Knox Service Plugin is the specific OEM Configuration applications for Samsung Devices. You as an Administrator can use the Knox Service Plugin app to enable the so called Knox Platform for Enterprise policies on your managed devices. The application works on Android 8.0, and above for fully managed device deployments (device owner) ,and with Android 9.0 and above for all deployment modes. |
How to configure it
Basically you need to import the OEM Application into Silverback, add the application into a tag, configure the managed configuration and deploy it.
- Open your Silverback Management Console
- Navigate to App Portal
- Select your platform
- Select SamsungSafe for Knox Service Plugin
- Click New Application
- Click the magnifier Icon next to Name
- Enter the name of the desired your application
- For SamsungSafe "Knox Service Plugin"
- Press Enter
- Select your application
- Press Select
- Change the Name to e.g. Knox Service Plugin (optional)
- Press Save
- Confirm the requested permissions
- Select your platform
- Navigate to Tags
- Click New Tag or use an existing one
- Under Definition
- Enter a Name, e.g. Knox Service Plugin
- Enable Apps in Features
- Enable Android or SamsungSafe as device type
- Press Save
- Under Definition
- Navigate to Apps
- Press Assign More Apps
- Select your OEM Config application
- Click Add Selected Apps
- Press the Edit button for Manage Config
- Click the Edit button at Edit managed configuration
- Press Assign More Apps
- Edit your Managed Configuration
- Enter a Profile name
- Enter your KPE Premium License Key (optional for Premium marked features)
- Enable Debug Mode (for testing purpose)
- Configure additional policies and profiles
- Press Save
- Hand over to your device
- Install your OEM Config Application
- As Knox Service Plugin as an example the application will be installed and gets device administrator on the device
- Additionally and due to Debug Mode the application will start in the foreground
- Press Apply latest Security Policies
- Click New Tag or use an existing one
User Experience
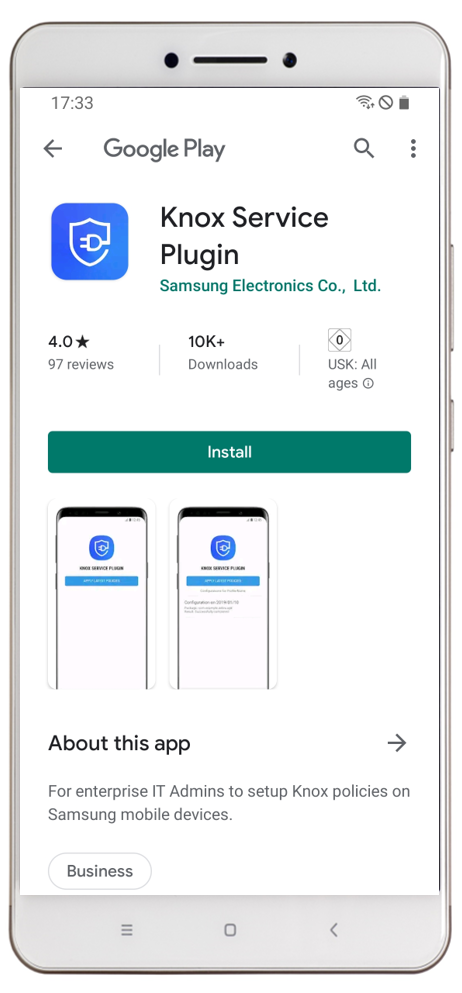
The following screenshots demonstrate a manual installation of the Samsung Knox Service Plugin on the device with enabled debug options within the managed configuration.
For productive use we recommended to enable Automatically push to managed devices and disable debug mode.
 |
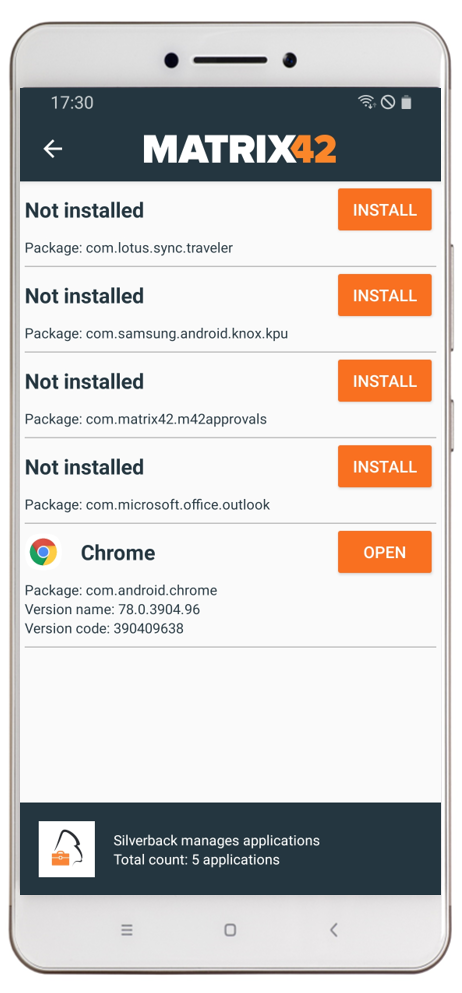 |
 |
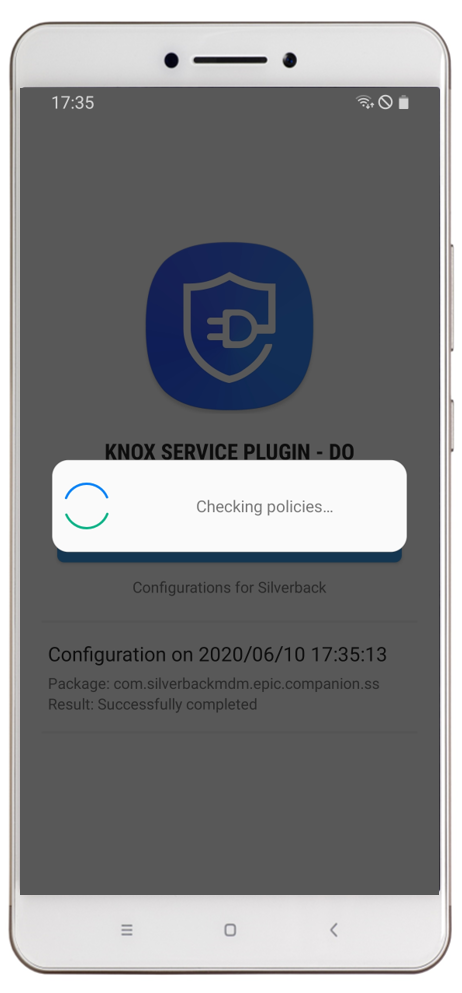 |
| After configuring the Managed Configuration and assigning them to a device, you will a information in the App Configuration Profile | After right click on the three dots of the App Configuration Profile you will find the information that the Samsung Knox Service Plugin (com.samsung.knox.kpu) has a managed configuration | After clicking install you will be redirected to the Google Management Play. Press Install to download and install the application. | After successful installation the application will start automatically due to the Enabled Debug mode. After the first start the application will start to check the policies. |
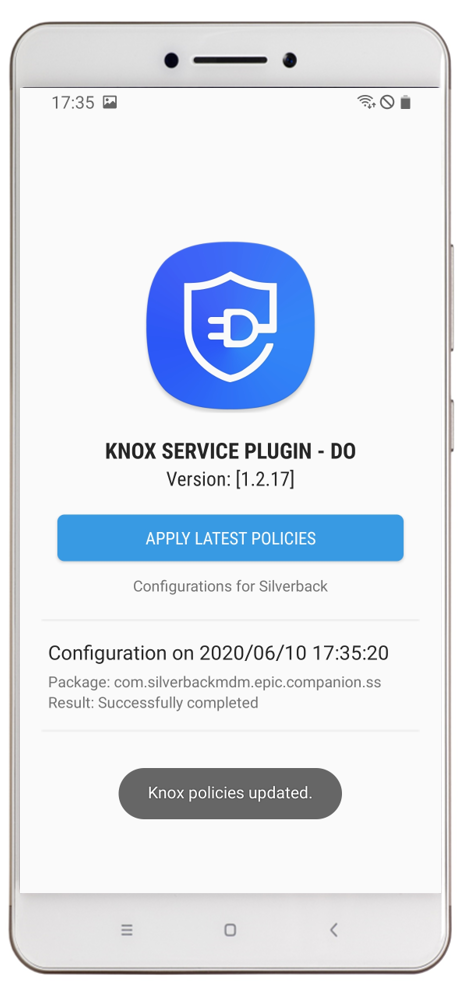 |
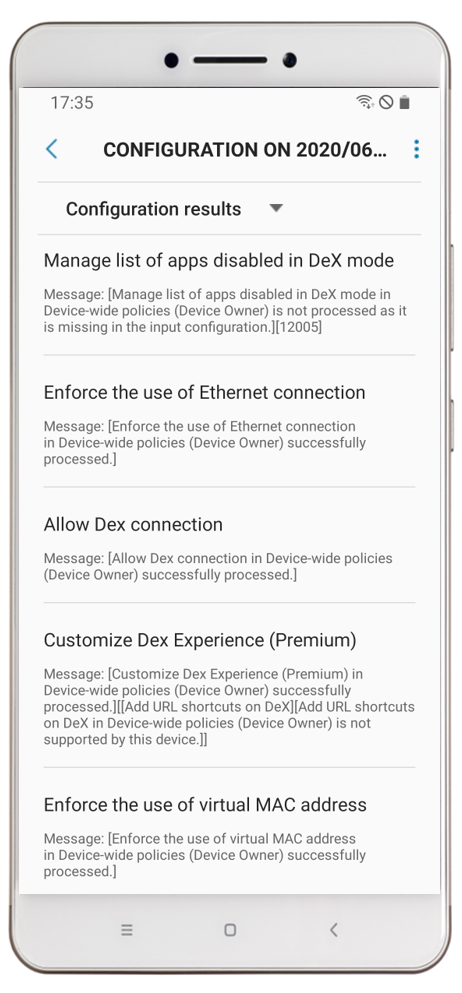 |
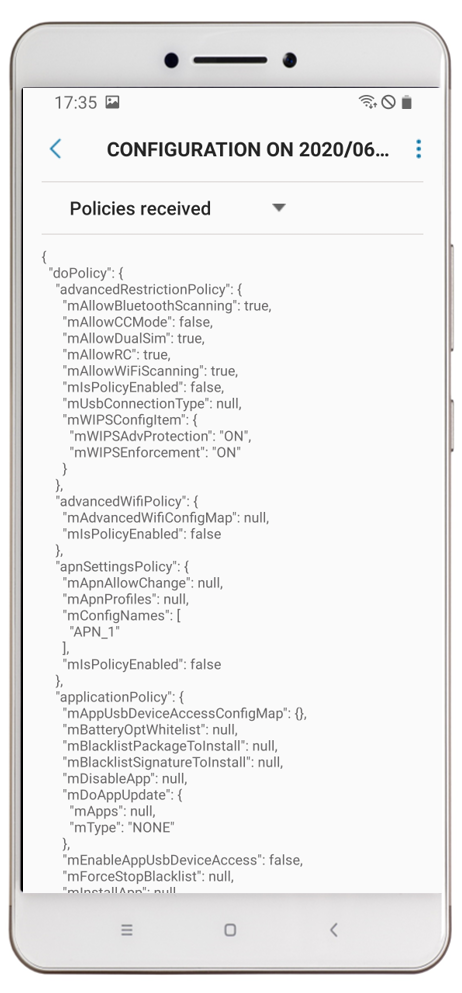 |
 |
| After a successful sync you will see the latest installed configuration. Click Apply Latest Policies to refresh policies (optional) | By pressing the Configuration Profile you will gain more information about the provided overall device configuration. | By changing from Configuration results to Policies received you will find a higher level of configurations. | When you navigate into the Device admin apps sections on your device you will see that the Knox Service Plugin has been granted Administrative access on the device |
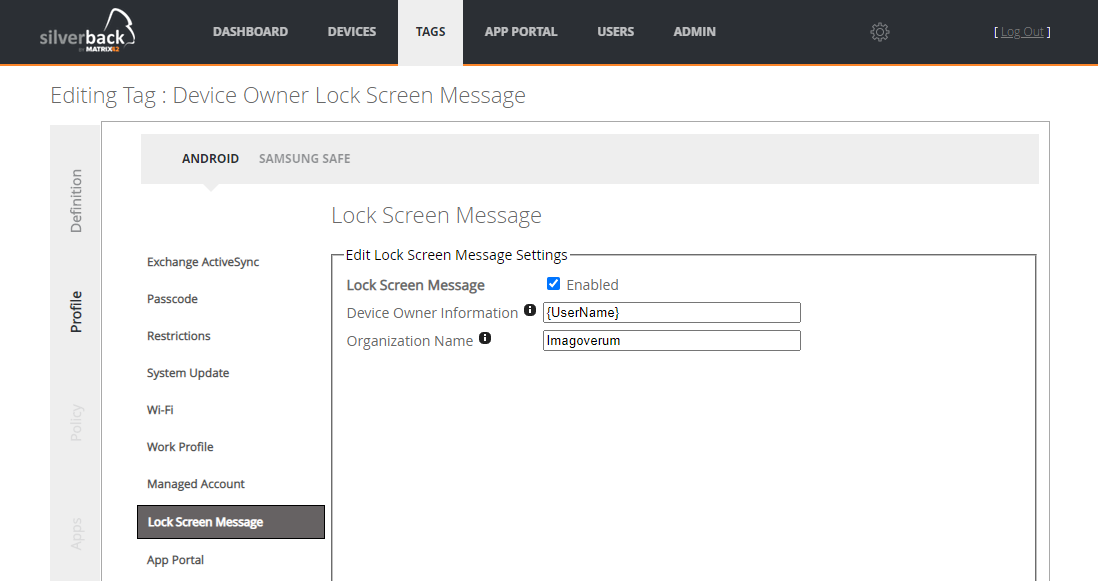
Lock screen information
On Android Enterprise administrators have now the ability to configure Custom Lock Screen Messages. This feature allows to place additional information on the devices lock screen. As an example you can place useful information like the serial number, the device user or the managed by information.
Configuration
Navigate Profiles and Lock Screen Message to configure the Device Owner Information and the Organization Name.
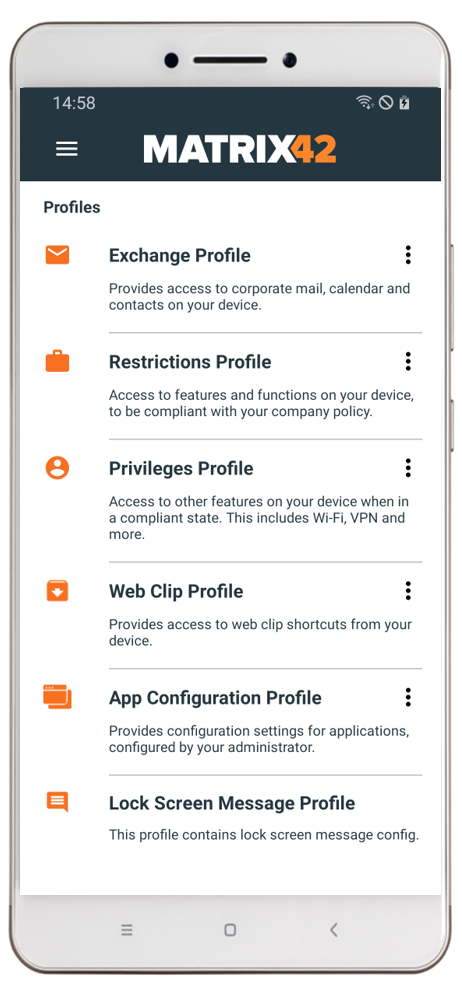
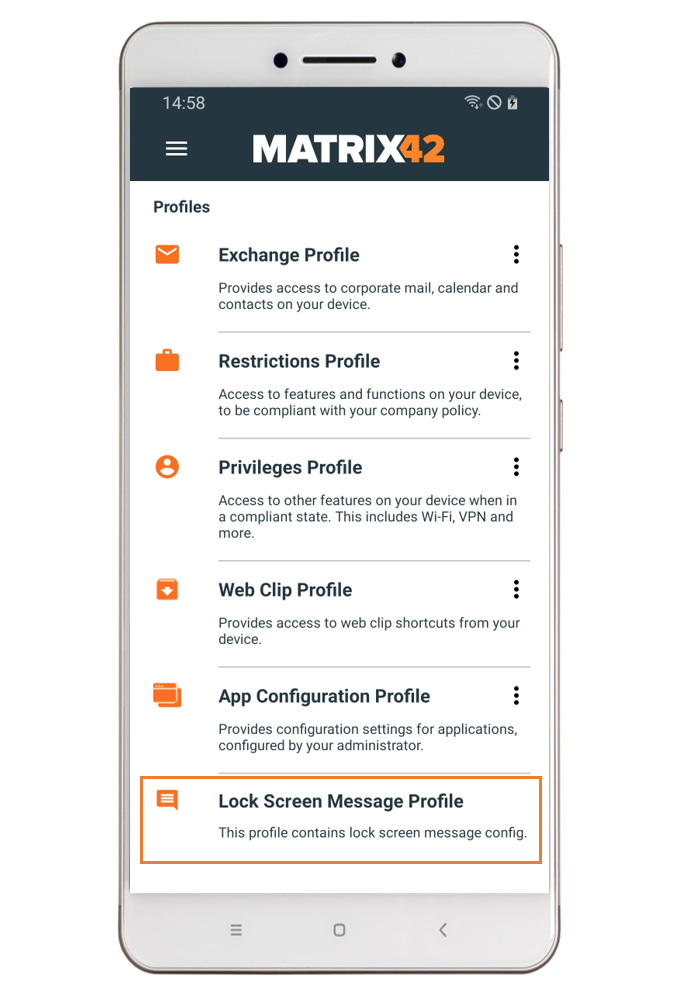
User Experience
After assigning the Tag to a specific device, Companion will show a Lock Screen Message Profile. When the settings are applied it will look like in the second screenshot.
Use System Variables, e.g. {SerialNumber} to display Serial Number on the lock screen.
 |
 |
iOS & iPadOS
Please find all new iOS & iPadOS Features in Silverback 20.0 Update 1 below.
Multiple DEP Profiles
For all customers using the Device Enrollment Program our new version offers the ability to define multiple profiles. As today one global profile can be configured which will take place for all devices within the company. With this update you are able now to assign specific profiles to specific devices. This will help as an example to configure the out-of-the-box experience for all iPhones in a different way as for iPads.
Create a new profile
- Open your Silverback Management Console
- Navigate to Admin
- Select Device Enrollment Program
- Choose Additional Profiles
- Press Create New Profile
- Enter a Profile Name and configure settings and setup items
- Press Save
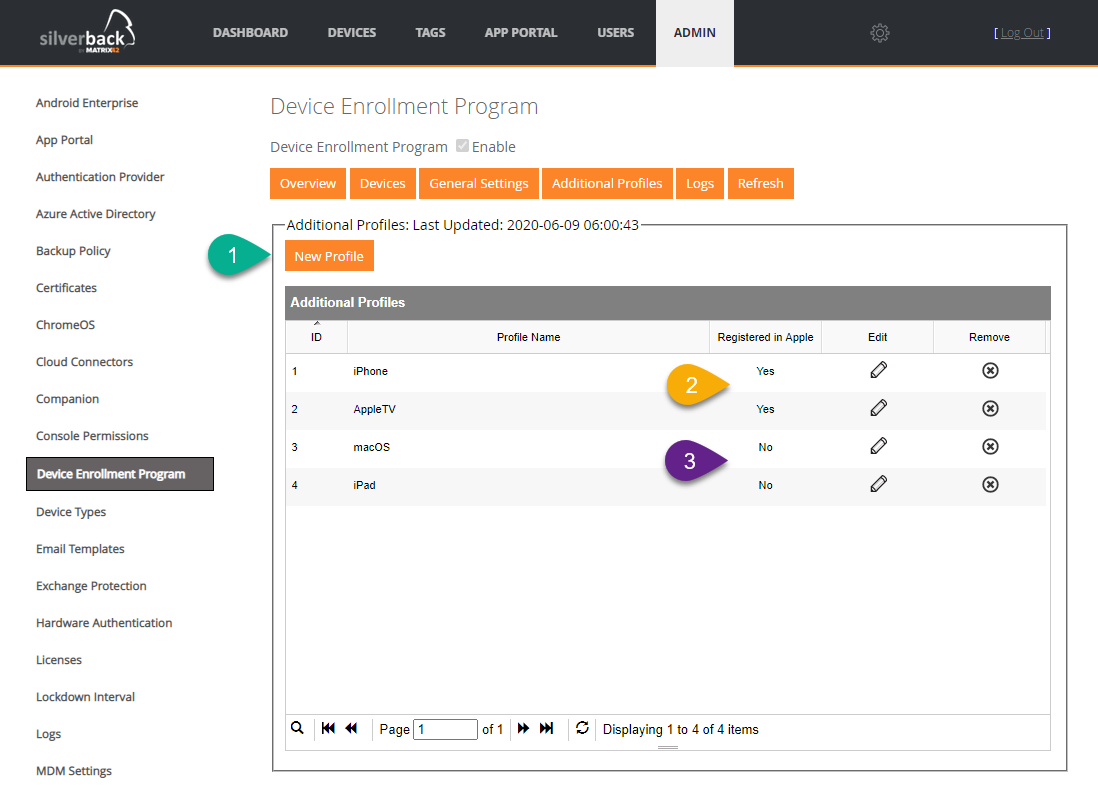
- Silverback will request a new profile to be registered at Apple through the Silverback Queuing Service
- After a couple of time the profile will be registered and the profile will be ready to use
- Applied profiles will be shown with Yes
- Use the refresh button within the table to update the view
Assign Profile
- When the Profile is assigned on Apple side switch to Devices
- Select your device where you want to apply the new profile
- Click Assign Profile
- Select the profile from the dropdown list
- Confirm with assign to devices
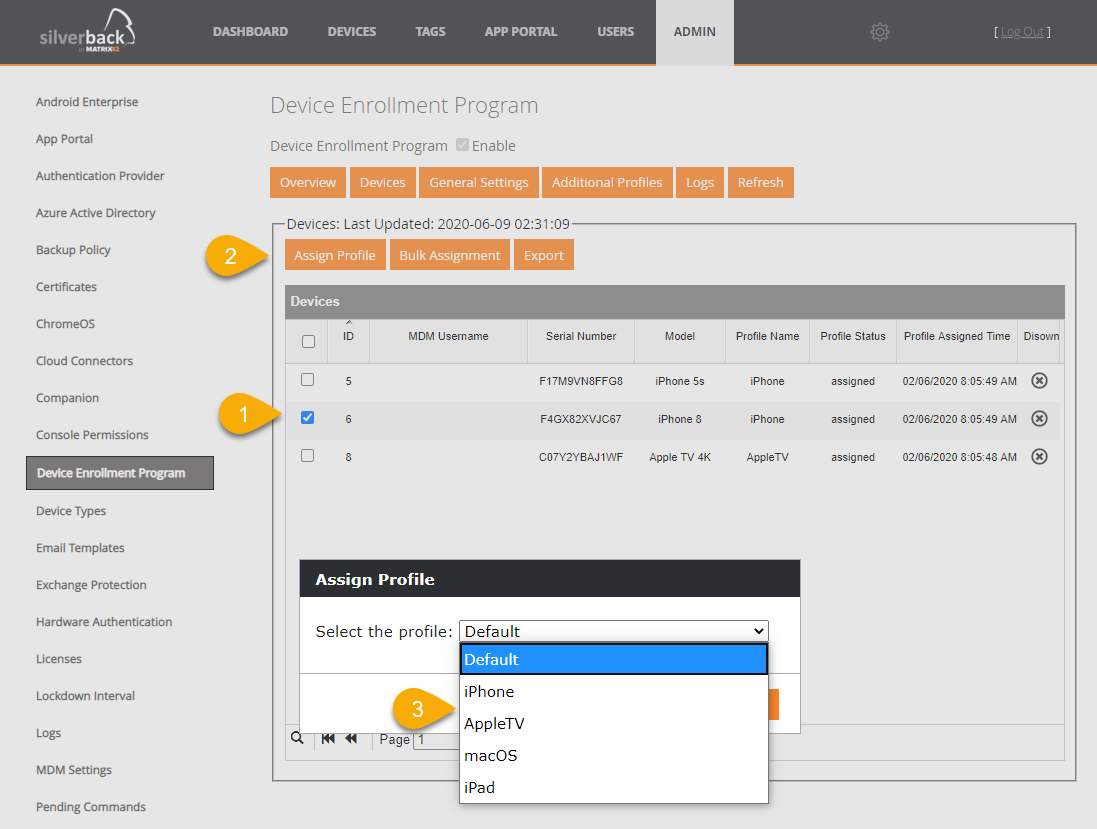
- Silverback will request a profile assignment to Apple through the Silverback Queuing Service
- After a couple of time the profile will be applied to the device
- Review the Profile Name, Profile Status and Profile Assigned Time information
Bulk Assignment
After a first testing for new profiles you might want to assign profiles across your device fleet. For this we added the possibility to use *.csv files to assign profiles in bulk to devices. All you need to do is to download your current device list through the Apple Business Manager and add the Profiles through a Text Editor or Microsoft Excel and upload it to Silverback.
Create Profile List
- Login to your Apple Business Manager
- Navigate to Settings
- Select your Silverback Server
- Under Devices, click Download
- Open the download file with Microsoft Excel
- Select the first column
- Navigate to Data
- Select Text to Columns
- Press Next
- Enable comma
- Press Next
- Click Finish
- Add in the first row under column C the Name PROFILES
- Add in the following rows the names of the profiles you want to assign to the device
- At the end it should look like this
- Click File
- Select Save As
- Select as File Type CSV (Comma delimited) (*:csv)
- Press Save
- When you open the file with a Text Editor it should now look like this


Import Profile List
- Navigate to Silverback
- Select Device Enrollment Program
- Select Devices
- Click Bulk Assignment
- Select Choose File
- Navigate to your previously created *.csv file and select it
- Press OK
- Click OK after the assignments are done
Depending on the amount of assignable devices, this process might take a while.
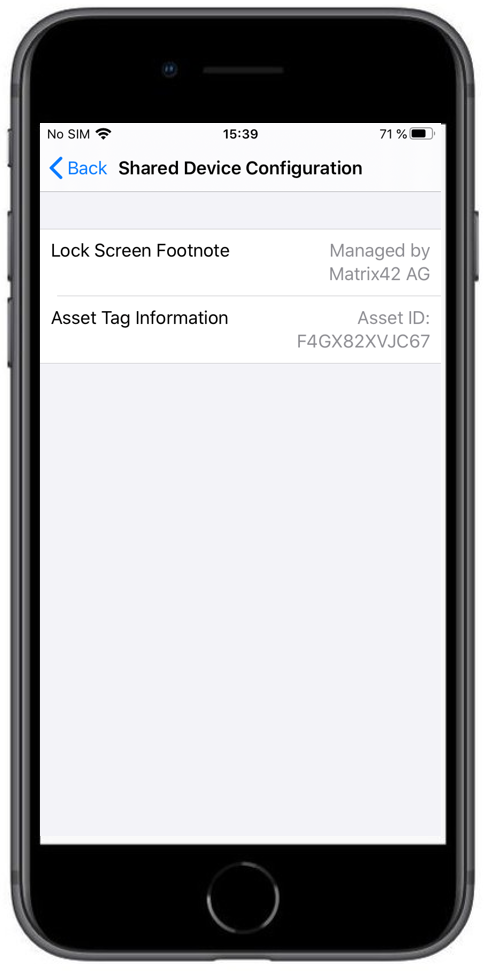
Lock screen information
For supervised devices this payload allows administrators to configure Custom Lock Screen Messages. This feature allows placing additional information on the devices lock screen. As an example, you as an administrator could place useful information like the serial number, the device user or the managed by information.
Configuration
Navigate Profiles and Lock Screen Message to configure the Lock Screen Footnote and Asset Tag Information.
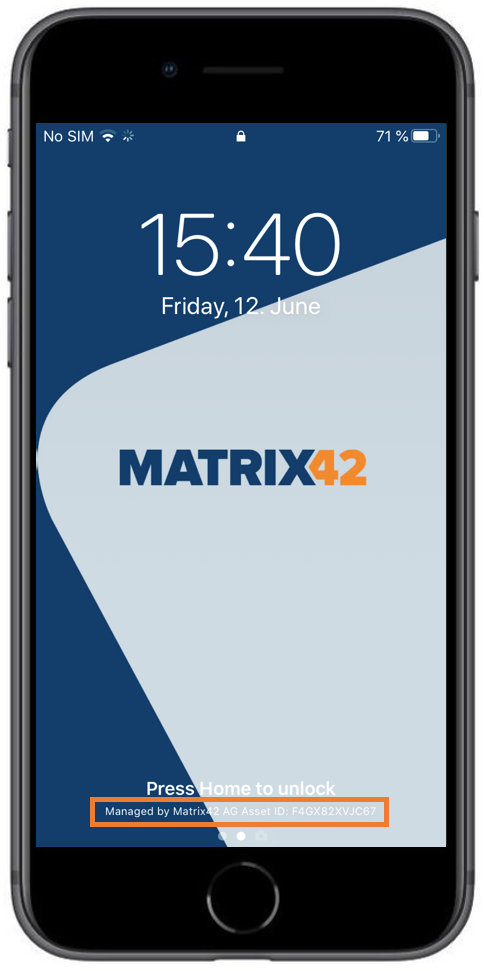
Use System Variables, e.g. {SerialNumber} to display Serial Number on the lock screen.
| Settings | Options | Description |
|---|---|---|
| Lock Screen Message | Enabled or Disabled | Enables the Shared Device configuration profile to display Lock Screen messages |
| Lock Screen Footnote |
|
Add here the footnote displayed in the login window and lock screen. On current iOS13 devices the Lock Screen Footnote is placed on the bottom left. Supported on iOS 9.3+ |
| Asset Tag Information |
|
Add here the asset tag information for the device, displayed in the login window and lock screen. On current iOS13 devices the Asset Tag is placed on the bottom right. Supported on iOS 9.3+ |
User Experience
After assigning the Tag to a specific device, you will find under General > Device Management > Silverback MDM Profile > More Details a new Shared Device Configuration Profile. When the settings are applied, the Lock screen will look like in the second screenshot.
 |
 |
Tag Auto Population to supervised devices
In Silverback 20.0 Update 1 we improved the Tag Auto Population to control and differentiate the tag assignment to supervised devices. By activating the Auto Population you will find the new Device Variable Key "supervised". With the Device Variable Yes, the tag will be applied to all supervised devices. With No, the Tag will be applied to all non supervised iOS and iPadOS devices.
macOS
Please find all new macOS Features in Silverback 20.0 Update 1 below.
Firewall
macOS Firewall can be set up to prevent unauthorized applications, programs and services from accepting incoming connections. The configuration is supported from macOS Siera and newer (10.12+).
| Settings | Description | |
|---|---|---|
| Firewall Settings | Firewall Settings | Enables the firewall profile configuration. If no other values will be defined, it will prevent the user to do manual changes in the firewall settings on the device. |
| Enable Firewall | Enabled or disabled | Specify, whether the firewall should be enabled or not. If true, the firewall will be enabled. Signed software and system services will receive incoming connections by default unless explicitly blocked through Application Access |
| Block All Incoming Connections | Enabled or disabled | If enabled, the firewall will be configured to block all incoming connections by default. |
| Enable Stealth Mode | Enabled or disabled | If you’re concerned about security, you can use “stealth mode” to make it more difficult for hackers and malware to find your Mac. When stealth mode is turned on, your Mac does not respond to “ping” requests and does not answer connection attempts from a closed TCP or UDP network. |
| Applications Access | ||
| Bundle Identifier | e.g. com.shazam.mac.Shazam |
With application access you can determine the list of apps with connections controlled by the firewall. Add a list of applications with the unique Bundle ID. |
| Incoming Connection | Enabled or disabled | If enabled, incoming connections for the specified application will be received. If disabled incoming connections will be denied. |
Privacy Preferences
Privacy Preference settings allows Administrator to predefine approvals or denials for device feature requests from applications. On macOS devices, apps and processes often prompt users to allow or deny access to camera, microphone, files, calendars and address books. With Silverback 20.0 Update 1 you gain the ability to manage data access consent on behalf of your users and to overrule previous decisions made from the users. Privacy Preferences are supported in macOS Mojave (10.14+) and later.
Under Profiles, navigate to Privacy Settings and click New Privacy Preference Profile to control data access on an app level basis.
| Setting | Options | Description |
|---|---|---|
| Name | e.g. Skype | Application Name |
| Identifier Type |
|
Select her either BundleID or Path depending on if it is an app bundle or the binary |
| Identifier |
e.g. com.skype.skype |
The bundle ID or installation path of the binary. |
| Code Requirement | e.g. identifier "com.skype.skype" and anchor apple generic and certificate 1[field.1.2.840.113635.100.6.2.6] /* exists */ and certificate leaf[field.1.2.840.113635.100.6.1.13] /* exists */ and certificate leaf[subject.OU] = AL798K98FX | Provide here the Code Requirement of the application. This is obtained via the command codesign. Open Terminals on your Mac and run codesign -dr - /Applications/Skype.app for getting the Code Requirement for Skype |
| Static Code Validation | Enabled or Disabled | Optional and if enabled , statically validates the code requirement of the app or service on-disk. Used only if the process invalidates its dynamic code signature. |
| Access Permissions | ||
| Accessibility |
|
Controls the access permissions for the app via the Accessibility subsystem. |
| Address Book |
|
Controls the access permissions for contact information managed by the Contacts.app |
| Calendar |
|
Specifies the policies for calendar information managed by the Calendar.app. |
| Camera |
|
Controls the access permissions to the system camera. Access to the camera can only be denied. |
| File Provider Presence |
|
Controls the access permissions to File Provider Presence. This allows a File Provider application to know when the user is using files managed by the File Provider. |
| Listen Event |
|
Controls the permissions to allow the application to use Core Graphics and HID APIs to listen /receive to CGEvents and HID events from all processes. Access to these events can only be denied. |
| Media Library |
|
Controls the permissions to allow the application to access Apple Music, music and video activity, and the media library. |
| Microphone |
|
Controls the access permissions to the system microphone. Access to the microphone can only be denied. |
| Photos |
|
Controls the access permissions to the pictures managed by the Photos app in ~/Pictures/.photoslibrary. |
| Post Event |
|
Specifies the access permissions for the application to use Core Graphics APIs to send CGEvents to the system event stream. |
| Reminders |
|
Specifies the policies for reminders information managed by the Reminders app. |
| Screen Capture |
|
Controls the access permissions to the application to capture the contents of the system display. Access to the contents can only be denied. |
| Speech Recognition |
|
Controls the access permission to the application to use the system Speech Recognition facility and to send speech data to Apple. |
| System Policy All Files |
|
Controls the application access to all protected files, including system administration files. |
| System Policy Desktop Folder |
|
Controls the application to access files in the user's Desktop folder. |
| System Policy Documents Folder |
|
Controls the application to access files in the user's Documents folder. |
| System Policy Download Folder |
|
Controls the application to access files in the user's Downloads folder. |
| System Policy Network Volumes |
|
Controls the application to access files on network volumes. |
| System Policy Removable Volumes |
|
Controls the application to access files on removable volumes. |
| System Policy Sys Admin Files |
|
Controls the application access to some files used in system administration. |
| Apple Events | ||
| Identifier Type |
|
Depending on the application, workflows may need to be approved by the application to communicate with built-in applications and services using the Apple Event service. Select her either BundleID or Path for the control of the desired Apple Event |
| Identifier | e.g. com.apple.systemevents | Provide here the bundle ID or installation path of the Apple Event. The example shows the Identifier for System Events |
| Code Requirement | e.g. identifier "com.apple.systemevents" and anchor apple | Provide here the Code Requirement of the application. This is obtained via the command codesign. The example shows the Identifier for System Events |
| Process Access | Enabled or Disabled | Define if the access is granted or prohibited to the Apple Event from the Privacy Preference controlled application |
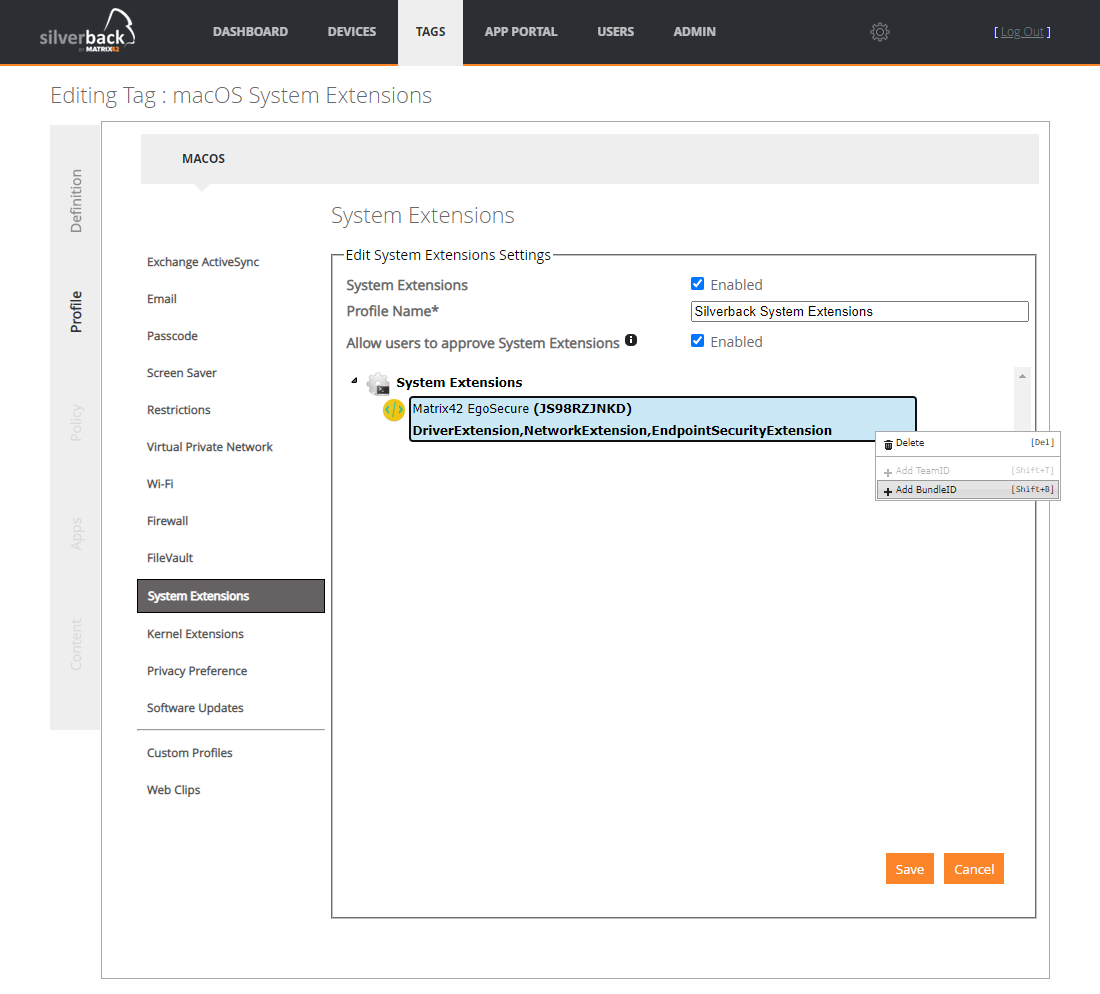
System Extension
Please find the overview, configuration and useful information about System Extensions below.
Overview
Apple did with macOS Catalina a step in modernizing and improving the security and reliability of macOS to provide a better architecture for kernel extensions and drivers. The outcome is now a separation between System Extensions (macOS 10.15+) and Kernel Extensions . System extensions on macOS Catalina allow software like network extensions and endpoint security solutions to extend the functionality of macOS without requiring kernel-level access. System extensions are divided into Driver, Network, and Endpoint Security Extensions. They run in user space, where they can’t compromise the security or stability of macOS. Once installed, an extension is available to all users on the system and can perform tasks previously reserved for kernel extensions. With Silverback 20.0 Update 1 you can now control the application access to extensions and whitelist them.
How to configure
To configure System Extensions navigate to Profile and select System Extensions:
- Enable System Extensions
- Enter a Profile name, e.g. Silverback System Extensions
- Enable Allow users to approve System Extensions (optional)
- Right Click System Extensions
- Select + Add Team ID
- Enter the display name for the Team ID
- Enter the Team ID
- Select allowed System Extensions type
- Click OK
Please note that for specified Team ID not containing the Bundle ID nodes, all the validly signed kernel extensions will be allowed to load on the device.
- Right click the newly added Team ID
- Select +Add BundleID
- Enter the display name for the System Extension
- Enter the Bundle ID of the System Extension
- Press OK
How to obtain
- To start, you can obtain a list of system extensions that are present on the machine via Terminal
- On you macOS device, open Terminal
- Run the following command
systemextensionsctl list
- The outcome provides the following information
enabled active teamID bundleID (version) name [state]
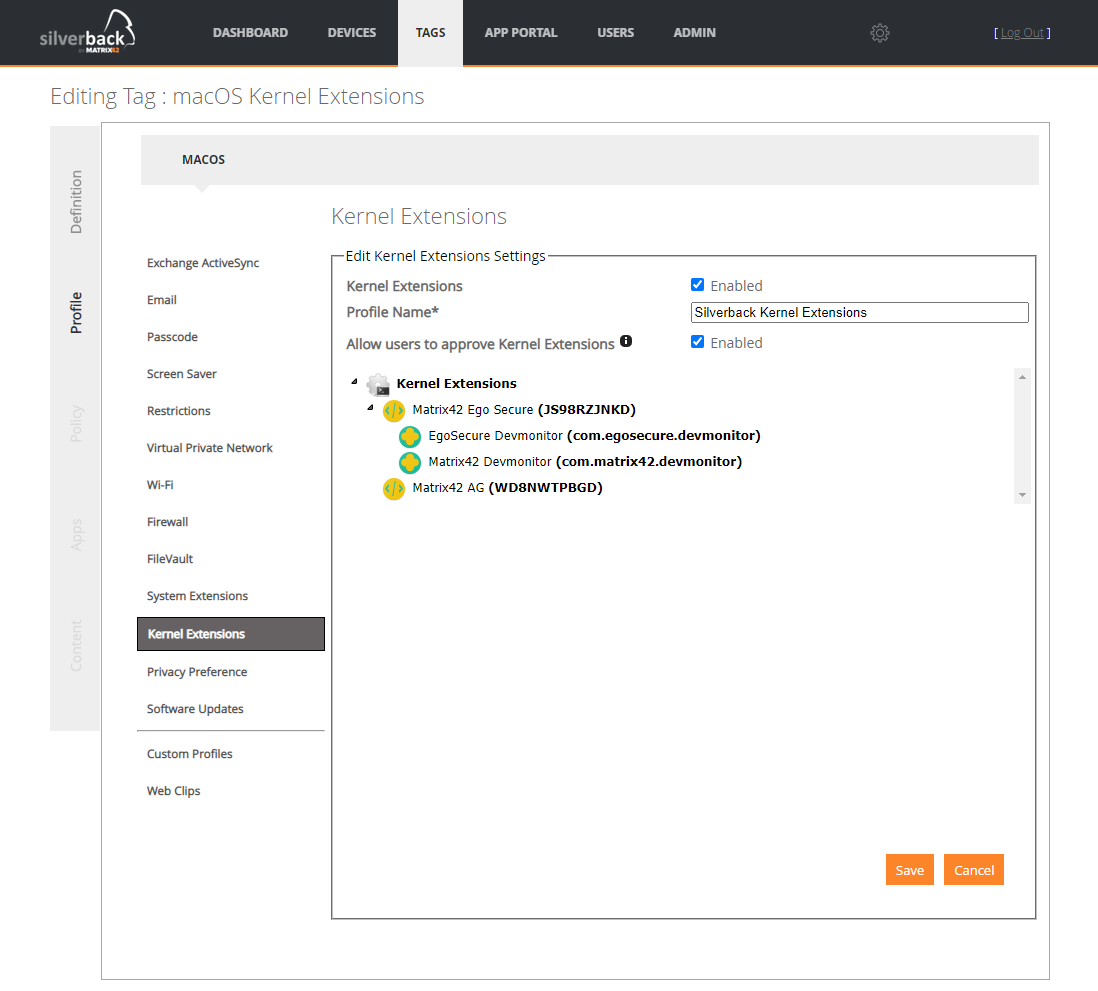
Kernel Extensions
Another part of our new macOS Feature Updates for Security and Privacy is the configuration of Kernel Extensions.
Overview
In general, applications like antivirus software, firewalls, VPN clients, USB driver etc, install kernel or system extensions to extend native capabilities of the macOS operating system. The applications gain features access that are of the OS that applications without extensions can't access. At the last WWDC conference, Apple announced the plans to deprecate macOS Kernel Extensions and replace them with the macOS System extensions to modernize the platform, improve security and reliability, and enable more user-friendly distribution methods. The first step from Apple towards that was the introduction of system extensions for macOS Catalina. Due to the current shift from Kernel Extensions to System Extensions, we decided for your convenience and backwards compatibility, to implement both extensions in Silverback 20.0 Update 1. Please note that future OS releases will no longer load kernel extensions that use deprecated KPIs by default.
How to configure
To configure Kernel Extensions navigate to Profile and Kernel Extensions:
- Enable Kernel Extensions
- Enter a Profile name, e.g. Silverback Kernel Extensions
- Enable Allow users to approve Kernel Extensions (optional)
- Right Click Kernel Extensions
- Select + Add Team ID
- Enter the display name for the Team ID
- Enter the Team ID
- Press OK
Please note that for specified Team ID not containing the Bundle ID nodes, all the validly signed kernel extensions will be allowed to load on the device.
- Right click the newly added Team ID
- Select +Add BundleID
- Enter the display name for the Bundle ID
- Enter the Bundle ID
- Press OK
How to obtain
- On you macOS device, open Terminal
- To obtain the Team ID, proceed with the following
sqlite3 /var/db/SystemPolicyConfiguration/KextPolicy
- Once done, type:
SELECT * FROM kext_policy;
You will see the Team ID, the bundle ID for each individual extension and the display name of the developer. Note down the Team ID (the first item) - you will need all the IDs for the extensions you wish to whitelist.
- To list all Kernel Extensions, enter the following
kextstat
- To list all installed third party extensions
kextstat | grep -v com.apple
- To find the Kernel Extensions Folder
cd /System/Library/Extensions/
Software Update
With Silverback 20.0 Update 1 we are happy to provide Administrators the capabilities to control Software Updates settings on macOS devices. To configure Software Updates navigate to Profiles in a Tag and select Software Updates and configure the following options:
To check if the settings have been applied, navigate either System Preferences > Software Update > Software Update> Advanced or to System Preferences > Profiles > Device Profiles and review your applied profile.
| Setting | Options | Description |
|---|---|---|
| Software Update | Enabled or Disabled | Enables the configuration of the Software Update Policy and installs a profile to associated devices |
| Profile Name | e.g. Silverback Software Update | Display Name of the Software Update Device Profile. |
| Catalog URL | e.g. http://swscan.apple.com/content/cata...ndex.sucatalog |
The URL of the software update catalog. An internal software update server allows to reduce the amount of bandwidth used when distributing software updates from Apple. Instead of each computer downloading updates from Apple’s Software Update server, updates are only downloaded from Apple once per server. An internal software update server also allows you also to control and approve updates before you make them available. This setting is reflected in the System Preferences > Profiles section on the Mac. |
| Check for updates | Enabled or Disabled | If disabled, deselects the Check for updates option and disables the automatic check for updates. |
| Download new updates when available | Enabled or Disabled | If disabled, deselects the Download new updates when available option and prevents the user from changing the option. If enabled the Mac will download updates without asking the user |
| Install macOS updates | Enabled or Disabled | If disabled, restricts the Install macOS Updates option and prevents the user from changing the option. If enabled the Mac will install macOS Updates automatically. This setting is reflected in the System Preferences > Profiles section on the Mac and will enable the Automatically keep my Mac up to date Software Update option. |
| Install app updates from the App Store | Enabled or Disabled | If disabled, deselects the Install app updates from the App Store option and prevents the user from changing the option If enabled, the Mac will install app updates from the App Store automatically. This setting is reflected in the System Preferences > Profiles section on the Mac and under Advanced |
| Install system data files and security updates | Enabled or Disabled | If disabled, disables the automatic installation of critical updates and prevents the user from changing the Install system data files and security updates. If enabled the Mac will install system files and security updates automatically |
| Allow prerelease software installation | Enabled or Disabled | If enabled, prerelease software can be installed on this computer. |
| Automatic installation of configuration data | Enabled or Disabled | If disabled, its restrict the automatic installation of security-configuration updates, such as XProtectPlistConfigData which prevents known malware from running |
| Restrict app installations to admin users | Enabled or Disabled | If enabled, restrict app installations to admin users. This setting is reflected in the System Preferences > Profiles section on the Mac |
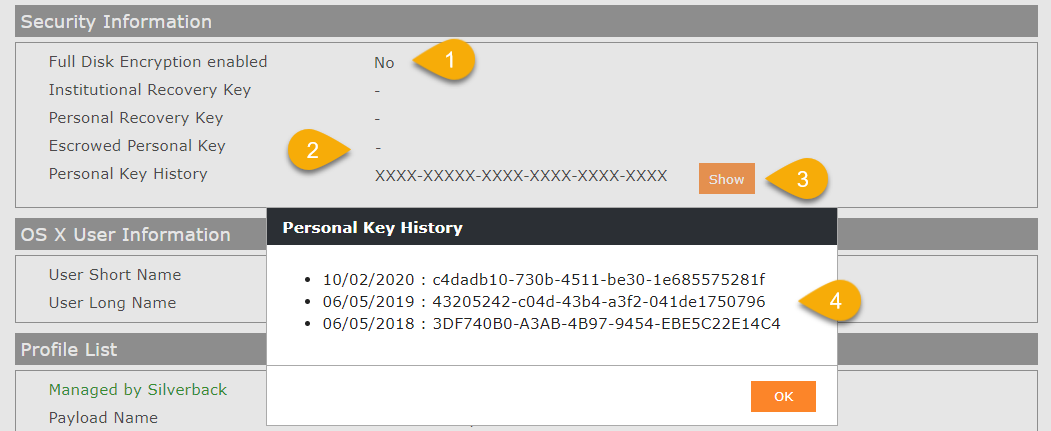
FileVault
FileVault full-disk encryption uses XTS-AES-128 encryption with a 256-bit key to help prevent unauthorized access to the information on your startup disk. When FileVault is turned on, macOS devices always require log in with an account password. The encryption occurs in the background and only while the device is awake and plugged in to AC power. Users or Administrators can check the progress in the FileVault section of Security & Privacy preferences. Any new files that are created are automatically encrypted as they are saved to the startup disk.
With Silverback 20.0 Update 1 Administrators can now force the encryption on managed macOS devices. In case users will lose or forget their account password, the devices can be recovered by an reset using the Reset Password assistant with the Recovery Key from the users. Administrators will see the corresponding Recovery Key in the device information under the Security Information sections. Due to the possibility of changed personal recovery keys in the device cycle for the users, a Recovery History will be saved and can be revealed by Administrators. Each reveal action will create an entry in the Audit Logs.
To configure FileVault navigate to Profile and FileVault and provide your configuration
| Setting | Options | Description |
|---|---|---|
| Enable FileVault | Enabled or Disabled | Forces the users to encrypt assigned devices |
| Profile Name | e.g. Silverback FileVault | Display Name for the Profile on the assigned device. |
| Location | e.g. The Key will be represented to your Administrator in case you will forget your macOS Password. | The description of the location where the recovery key will be escrowed. This text will be inserted into the message the user sees when enabling FileVault manually. You can use this |
| Bypassed allowed |
|
The maximum number of times users can bypass enabling FileVault before being required to enable it to log in. |
| Request encryption during logout | Enabled or Disabled | If disabled, prevents additional requests for enabling FileVault at user logout time. |
| Show recovery key to user | Enabled or Disabled | If disabled, prevents display of the personal recovery key to the user after FileVault is enabled. |
When the device encryption starts, the macOS device will send the Personal Recovery Key to Silverback

The Personal Key History will be helpful, if the FileVault Profile will be removed from the devices, but the device stays encrypted.
If the profile is applied and the user wants to manually enable FileVault, the process will run into a failure. (The operation couldn't be completed. com.apple.OpenDirectory error 5103)
Screen Saver
As the last part in the macOS Feature Updates for Security and Privacy for Silverback 20.0 Update 1 Administrators can configure the Screen Saver Settings for macOS. This feature sets controls if a password is required when the Screen Saver is unlocked or stopped, the delay of passwords can be defined and the idle time, before the screen saver starts.
Screen Saver Module Path might work only on older devices, even if the setting is not officially deprecated by Apple.
| Setting | Options | Description |
|---|---|---|
| Require Password | Enabled or disabled |
Defines if the user is prompted for a password when the screen saver is unlocked or stopped. When you use this prompt, you must also provide Password Delay (in sec). Available in macOS 10.13 and later. |
| Password Delay (in secs) | 1-2147483647 |
Defines the number of seconds to delay before the password will be required to unlock or stop the screen saver (the grace period). To use this option Require Passwords must be enabled. A value of 2147483647 can be used to disable this requirement. Available in macOS 10.13 and later. |
| Login Window Screen Saver Idle Time (in secs) | e.g. 0 |
The number of seconds of inactivity before the screen saver activates. If nothing is presented the default of 300 seconds (5 Minutes) will take effect. (0 = Never activate). |
| Screen Saver Module Path | e.g /System/Library/Screen Savers/Flurry.saver | The full path to the screen-saver module to use. Note that not all screen savers will work before login. These may include any feed\, random\, shuffle or non-Apple codesigned screensavers. |
tvOS
Please find all new tvOS Features in Silverback 20.0 Update 1 below.
New DEP Settings
With Silverback 20.01 Update 1 you will find two new settings in Device Enrollment Program General Settings and additional Profiles.
| Setting | Options | Description |
|---|---|---|
| Language | e.g. de | A language designator is a code that represents a language. |
| Region | e.g. DE |
A region designator is a code that represents a country. Use the ISO 3166-1 standard, a two letter, capitalized code. |
Windows 10
Please find all new Windows 10 Features in Silverback 20.0 Update 1 below.
New Windows 10 Device Information
For every Windows 10 device you will find now the following new device information in the device overview:
| Information | Example | Description | Minimum Version |
|---|---|---|---|
| Domain Name | e.g. imagoverum.com |
Returns the fully qualified domain name of the device (if any). If the device is not domain-joined, it returns an empty string. |
1709 |
| Version | e.g. 2004 | Reflects the Windows 10 Version presented under Settings > About > Windows specifications | - |
| OS Mode | e.g. The device is in standard configuration |
Displays if the device is is in standard configuration or S mode configurations. |
1803 |
| OS Edition | e.g. Enterprise |
String that specifies the OS edition, e.g. Enterprise . |
1607 |
| Battery Level | e.g. 32746 -seconds |
Displays the Battery Level. Displays Unknown if AC power online |
1607 |
| Battery Status | e.g. AC power online | Displays the status of the battery | 1607 |
| Battery Estimated Runtime | e.g. Unknown or device is connected to AC power |
Displays the estimated battery charge remaining. The value is the number of seconds of battery life remaining when the device is not connected to an AC power source. When the device is connected to a power source or when the estimation is unknown, the value will be as in the example |
1607 |
New Windows 10 Security Information
For every Windows 10 device you will find now the following new device security information in the device overview:
All of the values are send over the Service Bus and are part of the Insights Windows 10 Security Dashboard in the UEM Console
| Information | Example | Description | Minimum Version |
|---|---|---|---|
| Secure Boot Status |
|
Indicates the secure boot status. |
- |
| Encryption Compliance |
|
Displays the encryption status of the device |
- |
| TPM Specification Version | e.g. 2.0, 0, 1.16 | Displays the specification version of the Trusted Platform Module, e.g. Family 2.0, Level 0, Revision 1.16, | 1607 |
| Antivirus Status |
|
Integer that specifies the status of the antivirus. |
1607 |
| Antivirus Signature Status |
|
Specifies the status of the Antivirus signature. If more than one Antivirus provider is active, this information returns:
When no antivirus provider is active, the returned information will be 0. |
1607 |
| Antispyware Status |
|
Specifies the status of the Antispyware. |
1607 |
| Antispyware Signature Status |
|
Specifies the status of the Antispyware signature. If more than one antispyware provider is active, this information returns:
This node also returns 0 when no antispyware provider is active. |
1607 |
| Firewall Status |
|
Specifies the status of the firewall. |
1607 |
| UAC Status | e.g. 2 | Integer that specifies the level of the UAC. | |
| Virtualization-based Security Hardware Requirement Status |
|
Displays the Virtualization-based security hardware requirement status. |
1607 |
| Virtualization-based Security Status |
|
Displays the Virtualization-based security status. |
1709 |
| Local System Authority Credential Guard Status |
|
Local System Authority (LSA) credential guard status. |
1709 |
Tag Auto Population to Azure AD devices
In Silverback 20.0 Update 1 we improved the Tag Auto Population to control and differentiate the tag assignment between Azure AD joined devices and non Azure AD joined devices. By activating the Auto Population you will find the new Device Variable Key "Azure AD Joined". With the Device Variable Yes, the tag will be applied to all Azure AD joined devices. With No, the Tag will be applied to all non Azure AD joined devices.
Mobile Applications
Please find all application updates below.
Matrix42 Companion
| Icon | Release Notes | Release Version | Platform |
|---|---|---|---|
 |
|
20.0.1 |
|
Matrix42 Approvals
| Logo | Release Notes | Release Version | Platform |
|---|---|---|---|
 |
|
1.1.0 |
|
Matrix42 Secure Container
| Logo | Release Notes | Release Version | Platform |
|---|---|---|---|
 |
|
1.0.4.81 |
|
|
|
13.0.0. (48) |
|
M42Mobile
| Logo | Release Notes | Release Version | Platform |
|---|---|---|---|
 |
|
3.5.8 |
|
Improvements
- Added 350 new devices models
- Improved User Interface for Hardware Compliance
- Bulk Device Type import listens now to semicolon instead of comma
- Android Restrictions are grouped now in categories
- Added Enabled checkbox for Windows Store for Business to turn off periodical apps import
- Added X-Frame options for STS and SSP
- Removed deprecated Knox Signed checkbox for Samsung Safe applications
- Improved User Interface for Wi-Fi Trust sections
- Queued Commands are now preventing duplicates if commands has not been process yet
- Added new LDAP setting to control sleep interval between filter tasks
- Added cache functionality to STS
- Added German and French search option for Device Owner in Devices Tab
- Improvements for Azure SQL elastic pools
- Added reading of task minute offset settings in registry
- Added task offset configurable from registry
- Added German translations for Auto Population values
- Improvements on Android for Delete Business Data on Work Profiles
- Added Payload signing and encryption for macOS
- Remove buttons for Business Apps for Windows has been disabled
- Visible in App Portal options has been disabled for Windows 10 applications
- Previous Unlock Tokens for Clear Passcode action on iOS and iPadOS will now be kept if device provides an empty token
Minor Changes
- Samsung Knox value has been removed from device information due to container deprecation
- Queuing Service is now part of Settings Admin
- CSR Creation for Companion Push Certificate has been removed
- Changed Tag Auto Population Device Variable Value from "True" and "False" to "Yes" and "No" and added translations
- Web Settings has been restructured
- General
- Excel Connection is now hidden
- Companion
- Queue Device Inventory on Companion Check-in is now the first item
- All free text items are now below each other
- Windows has been renamed to Windows 10
- Deprecated WP Marketplace Settings has been removed
- Deprecated Company Hub Settings has been removed
- Deprecated Assigned Access is now hidden
- WP8 MDM Settings Enrollment URL has been moved to General and renamed to Windows Enrollment Server
- All WNS Settings received a new frame called Windows Push Notification Services
- All WPMDM_OmaDmRetryPlease receives a new frame called Device Management Client
- LDAP
- LDAP Server, Port, Type, SSL, Lookup Username and Password has now a separate frame "LDAP Connection"
- LDAP Filter and LDAP Administrator Filter has now a separate frame "LDAP Filter"
- General
Fixes
- Fix for Invalid Profile after Reset OTP with Username and OTP authentication for Device Enrollment Program
- Fix for Log GetLatestWarningForSystemUserId(Int32 systemUserId)
- Fix for adding applications in legacy management mode for Android and SamsungSafe when no Android Enterprise account is present
- Fix for hidden Automatically push to devices settings for Android and SamsungSafe devices
- Fix for removing sub menus in managed configuration in tag area
- Fix for assigning Android Enterprise apps if one application in list is broken