OneDrive, OneNote, Teams, Office
OneDrive, OneNote, Teams, Office Configuration
Distribute and configure Microsoft apps for iOS, Android or macOS so your users can access several services from their smartphone, desktop or tablet on the go. The following guide shows an example configuration for Microsoft Teams for iOS and Android, which can be adopted for other applications like OneNote, OneDrive, Word, Excel, Powerpoint etc. Please note that the login or first start experience for users may vary between the platform and the applications. For Microsoft Outlook as an example you can pre-configure the account information and username (Android & iOS) for your user. For Teams in combination with the option Allow only configured organization accounts in apps, the account might be displayed to the user. But for OneDrive, the user might enter the username manually and additionally note that some Microsoft 365 applications are exchanging information as well, so accounts might be already present when the users is e.g., logged in into OneDrive and is opening afterwards OneNote for the first time.
This described information and behavior may be deviant in the future.
On macOS, Microsoft OneDrive, OneNote, Word, Excel. PowerPoint can be deployed through the Volume Purchase Program and you may be able to configure the applications via Managed Preference. Please refer to the official Microsoft documentation.
Consider to deploy Office365 as a bundle via the Unified Endpoint Management Agent. Please refer to Deploy Office365 for macOS for additional information.
On iOS & iPadOS
- Import Microsoft Teams or any of the other above mentioned applications to the App Portal
- Assign your selected application to a Tag
- Click the Edit button for Managed Config
- Review the configuration keys given by Microsoft
- Review Silverback system variables
- Paste your configuration into to the App Configuration XML area
- Configure the following to Allow only configured organization accounts in apps
<key>IntuneMAMAllowedAccountsOnly</key>
<string>Enabled</string>
<key>IntuneMAMUPN</key>
<string>{UserName}</string>
- Save the configuration
- Assign the tag to a test device or Push the tag to your already assigned devices
- Install the application
- Try to login with your corporate account
- Try to login or add an additional account, that is not reflecting the {UserName} variable
On Android Enterprise
- Import Microsoft Teams or any of the other above mentioned applications to the App Portal as Managed Play application
- Assign your selected application to a Tag
- Click the Edit button for Managed Config
- Press Edit managed configuration
- Review the configuration keys given by Microsoft
- Review Silverback system variables
- The following configuration represents an individual working setup
- Add as Allowed Account e.g. {UserName}
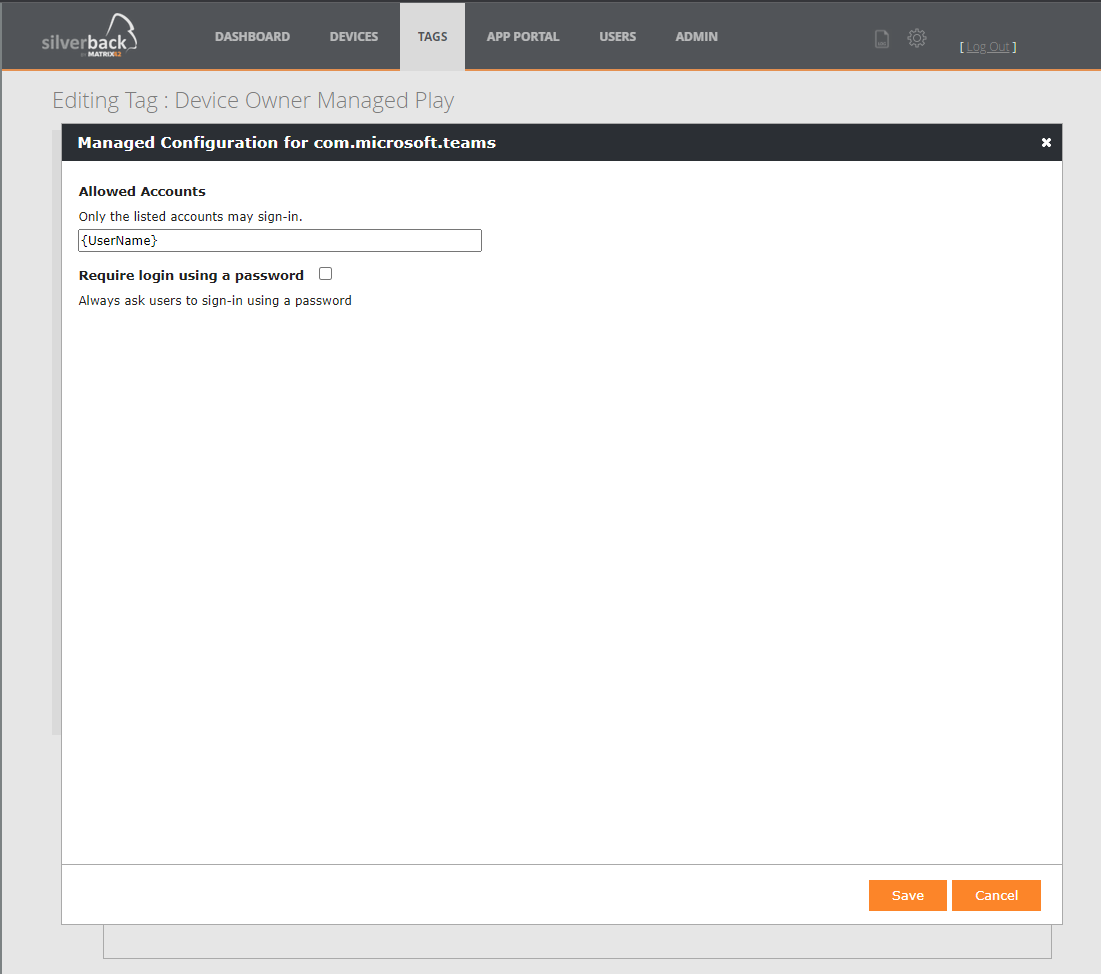
- Press Save
- Assign the tag to a test device or Push the tag to your already assigned devices
- Open Companion, navigate to Profiles and check if a Managed Configuration for Microsoft OneDrive is present
- Install the application from Managed Google Play
- Try to login with your corporate account
- Try to login or add an additional account, that is not reflecting the {UserName} variable
App Protection Policies for iOS and Android
Several Microsoft 365 and partner applications are supporting additional app protections policies to ensure your organization's data remains safe or contained in managed apps. Please refer to Azure AD Integration VI: App Protection Policies for the integration on Android and iOS/iPadOS applications.
On macOS
For macOS devices, the application for Microsoft Teams is handled and installed as an Enterprise application. For this you need first to download the sources from the official download area from Microsoft. Then you will need to generate a property list (*.plist) for Microsoft Edge with the provided MDMPackager tool on a macOS device. After uploading the application, you can distribute Microsoft Teams to managed macOS devices.
Microsoft Teams does not currently provide an XML configuration schema and this may change in the future. Please refer to the official Microsoft documentation.
On macOS, Microsoft OneDrive, OneNote, Word, Excel. PowerPoint can be deployed through the Volume Purchase Program and you may be able to configure the applications via Managed Preference. Please refer to the official Microsoft documentation.
Additionally, consider to deploy Office365 for macOS as a bundle via the Unified Endpont Management Agent. Please refer to Deploy Office365 for macOS for additional information.
Download Sources
- Please refer to Get clients for Microsoft Teams on Microsoft
- Locate the Download link, e.g. https://teams.microsoft.com/downloads
Use a macOS device to download the macOS client for teams.
- Download the *.pkg file
Create Property List
- Download the MDMPackager.zip on a macOS device
- Open your Finder and navigate to Downloads
- Perform a double-lick on your downloaded MDMPackager archive
- Perform a right click on the exported MDMPackager application
- Click Open
In case you receive a warning, press open to open the MDMPackager
- For classic teams:
- Enter as name Microsoft Teams
- Enter as bundle identifier com.microsoft.teams
- Enter as version your downloaded version, e.g. 1.4.00.22368
- For new teams:
- Enter as name Microsoft Teams
- Enter as bundle identifier com.microsoft.teams2
- Enter as version your downloaded version, e.g. 24137.2012.2930.9819
- Now click first in the Path to package (.pkg) field
- Now drag and drop your downloaded *.pkg file into the field
Before releasing the file, ensure you see a green + symbol. Additionally, you can enter the path manually, e.g. /Users/Admin/Downloads/MicrosoftTeams.pkg
- Press create plist
- Confirm with OK
The property list will be created in the *.pkg location (e.g. under Downloads) and named as manifest.plist
Upload to App Portal
- Navigate to your Silverback App Portal
- Select macOS and click New Application
- Enter as Name e.g. Microsoft Teams and enter a description
- Upload your *.pkg file
- Upload your recently created manifest.plist
- Press Save and wait until the upload is finished and press OK
Distribute Microsoft Teams
- Navigate to Tags
- Create a new Tag, provide a Name and enable Apps and macOS and press save
- Navigate to Apps and Assign Microsoft Teams
- Assign the tag to a test device or Push the tag to your already assigned devices
Review Installation
- Navigate to Devices
- Locate an assigned device for this tag, open the device information and press refresh
- Click Actions and select Pending Commands
- Locate the Request Type InstallEnterpriseApplication as it is indicating if the device acknowledges the installation request
- If the command is displayed as acknowledged, the application should be installed automatically on the device in the background
- Head over to your managed device
- Open Microsoft Teams