Silversync Guide III: Configuration
Silversync Configuration
- You should have now successfully accomplished Silversync Guide II: Installation
- Navigate back to Silverback Management Console
- Click OK
- Refresh your Browser page and/or click refresh button in the table
- You should see your server, with a last connection time and IP Address
- Click Edit
- Check your Deployment Options
- Make a selection based on the file access methods described below and proceed with the corresponding configuration.
File access methods overview
Server Authenticates: Server Authenticates is the method where the Silversync system itself is used to access files. This means that the server has an account that needs permissions on all files that users will synchronizing, and access to the files is controlled by Silverback and the Tags assigned to the user. While using this method, the server will access the content on behalf of the user. This requires that the Server has READ permissions to the file location. To use this method, proceed with Option A: Server Authenticates
The server authenticated access method is completely read-only. This method allows administrators to upload files and folders to file locations and users to upload files via the Personal File Management console. File consumption on user devices themselves is always read-only.
User Authenticates:
User Authenticates is the method where the individual user's file permissions are used to access files. This means that a user must be given minimum read permissions to files and folders before they can synchronize them. Administrators can assign content to users and users can upload files to accessible folders and shares. Any content where the user does not have proper NTFS permissions will not be listed or blocked from uploading. To use this method, proceed with Option B: User Authenticates
Files can be accessed with Read/Write permissions and administrators can provide content in folders or users can upload and open files via the Personal File Management console and/or with the Matrix42 Documents application
If you don't see the User Authenticates option, this probably means that your Silversync server is not connected to your domain controller or you have not run the installation as a domain administrator. Both are prerequisites for the User Authenticates access method.
Option A - Server Authenticates
- Select Server Authenticates
- Click Save
Do not close this Window
Create Folders
- Open the Windows Explorer on your Silversync server
- Create the following folder structure:
- C:\Files
- C:\Files\Files Folder 1
- C:\Files\Files Folder 2
- C:\Files\Files Folder 3
- C:\Userdrives
- Open the Windows Explorer on a Remote Fileshare Server
- Create the following folder structure
- C:\Remote Fileshare
- C:\Remote Fileshare\File Share 1
- C:\Remote Fileshare\File Share 2
- C:\Remote Fileshare\File Share 3
Set Permissions
- On your Silversync server all permissions should be set by default
- On your Remote Fileshare Server perform the following
- Right Click the C:\Remote Fileserver Folder
- Click Properties
- Click Security
- Click Advanced
- Click Add
- Click Select a principal
- Click Object Types
- Enable Computers
- Click OK
- Search for your Silversync Server Computer Object
- Ensure that the following rights are given
- Read and execute
- List folder contents
- Read
- Click OK
- Click Apply and OK
- Click OK to close Properties
Share Folders
- Right-click the C:\Remote Fileserver folder
- Click Share with
- Specific People
- Your Silversync Computer Object should be listed with Read rights
- Click Share
- Note down your address e.g. \\FILESERVER\Remote Fileshare
- Click Done
Add Content
- Navigate back to your Silverback Management Console
- Navigate to the Content Locations
- Click Add
- Enter C:\Files
- Click Add
- Enter \\FILESERVER\Remote Fileshare
- Click Save
- Wait for the progress indicator to finish
- Click Save and Close
- Now restart your Silversync Service and ensure to restart the service after every change in the Edit Silversync server section
Enable Push Notifications
To enable Push Notifications, you need to bind your server to the M42 Notification Server Service.
- If you are still in the Edit Silversync Server windows, confirm your changes with Save and Close
- Now click Bind to M42 Notification Server
- In the next window click Bind again
- Login with your Matrix42 account
- Click Allow Access
- Accept the Licenses Agreement
- Click Connect
Next Steps
- Learn how to Distribute Content to devices: Silversync Guide IV: Content Distribution
- Review other sections (optional)
- Navigate to Service Mappings
- Navigate to Logs
Option B - User Authenticates
- Select User Authenticates
- Click Save
- Review the screen below carefully and decide with which method you want to proceed
- Proceed with Option 1 and provide the Domain Administrator Credentials to automatically configure the Delegation and SPNs (recommended)
- Proceed with Option 2 and configure for security reasons the Delegation and SPNs manually (optional)
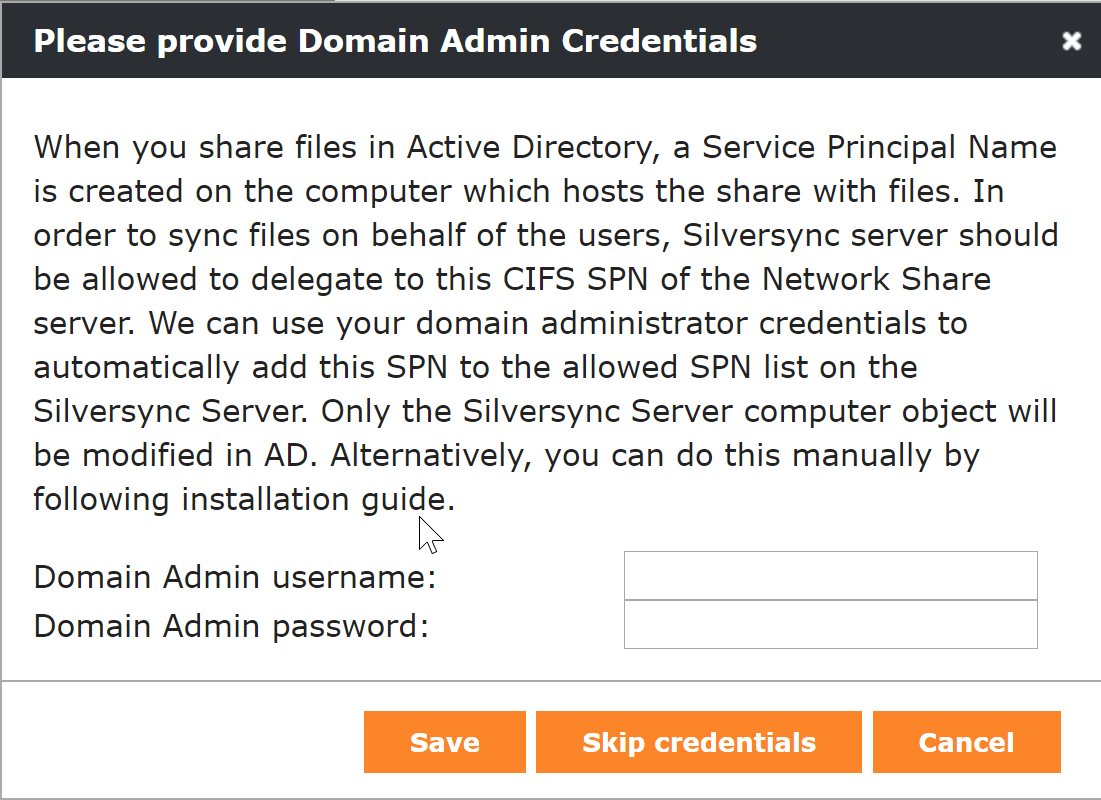
Option 1: Enter Domain Administrator Credentials (recommended)
- Enter your Credentials
- e.g. IV\superadmin or superadmin@imagoverum.com
- e.g. Pa$$w0rd
- Click Save
- Proceed with Connect to LDAP
Option 2: Skip Credentials (optional)
In some environments, it may not be possible to provide domain administrator credentials to a third application. The system needs these credentials because it needs to establish trust in the Active Directory domain so that the server can access files as a user. This allows Silverback to determine if the user actually has permissions to the file. If you do not want to provide domain administrator credentials, you will need to provide delegations and SPNs manually. Please follow the steps below:
- Press Skip credentials
- Perform the step written in the following guide: Silversync Guide VIII: Configuring User Based Authentication Manually
- Come back when you have finished everything and Proceed with Connect to LDAP
Connect to LDAP
- Navigate to Authentication
- Enter your LDAP Server Address: eg. dc01.imagoverum.com
- Enter LDAP Server Port: e.g. 389
- Enter a LDAP Lookup Username
- Enter a LDAP Lookup Username Password
Review additional settings under additional configuration options
- Press Save
Create Folders
- Open Windows Explorer on your Silversync server
- Create the following folder structure:
- C:\Files
- C:\Files\Files Folder 1
- C:\Files\Files Folder 2
- C:\Files\Files Folder 3
- C:\Userdrives
- Open Windows Explorer on a Remote Fileshare Server
- Create the following folder structure
- C:\Remote Fileshare
- C:\Remote Fileshare\File Share 1
- C:\Remote Fileshare\File Share 2
- C:\Remote Fileshare\File Share 3
Share Folders
- Right Click the C:\Remote Fileserver Folder
- Click Share with or Give access to Specific people...
- Select Find People
- Add Authenticated Users or a specific user group
- Change to Read/Write if desired
- Click Ok
- Click Share
- Note down your address e.g. \\FILESERVER\Remote Fileshare
- Click Done
Add Content
- Navigate back to your Silverback Management Console
- Navigate to the Content Locations
- Click Add
- Enter C:\Files
- Click Add
- Enter \\FILESERVER\Remote Fileshare\
- Click Save
- Enter your Domain User Credentials to Assign Folders
- Click Save
- Wait for the progress indicator to finish
- Click Save and Close
- Now restart your Silversync Service and ensure to restart the service after every change in the Edit Silversync server section
Check other configuration (optional)
- Navigate to System Settings
- Navigate to Service Mappings
- Navigate to Logs
Enable Push Notifications
To enable Push Notifications, you need to bind your server to the M42 Notification Server Service.
- If you are still in the Edit Silversync Server windows, confirm your changes with Save and Close
- Now click Bind to M42 Notification Server
- In the next window click Bind again
- Login with your Matrix42 account
- Click Allow Access
- Accept Licenses Agreement
- Click Connect
- Proceed with Silversync Guide IV: Content Distribution
Review additional configuration options
Silversync covers a variety of other configurations that can be carried out.
Authentication
The authentication section lets you define the access settings for LDAP users and also the used service account.
| Authentication Settings | ||
|---|---|---|
| Local Users Only | Enabled or Disabled | Will only allow Local Silverback Users to synchronize |
| LDAP Server Address | e.g. dc01.imagoverum.com | Network IP address or FQDN of the LDAP Server |
| LDAP Server Port | e.g. 389 | TCP Port for LDAP Communications |
| Base DN | e.g. OU=USERS,OU=IMAGOVERUM,DC=imagoverum,DC=com | The base container where Silverback will look for users |
| Require SSL | Enabled or Disabled | Defines if LDAP/S is being used |
| LDAP attribute |
|
Identifying LDAP Attribute to use for authentication |
| LDAP Type |
|
Type of LDAP Source being connected to. |
| LDAP Username | e.g. ldap_lookup@imagoverum | LDAP Lookup account used when searching for users |
| LDAP Password | e.g. Pa$$w0rd | The Type of LDAP Source being connected to. |
| Service Account | ||
| Service Account |
This is the account that Silversync components run as on the remote Silversync server. When no credentials are specified, the Network Service principal is used. When specifying the username, please use the NT Syntax (e.g. DOMAIN\User). For local users, you can specify .\user. |
|
| Username | e.g IV\silversync_service | Let’s you determine which account Silversync will run as. If empty, Network Service is used. |
| Password | e.g. Pa$$w0rd | Let’s you determine which account Silversync will run as. If empty, Network Service is used. |
System Settings
System Settings lets you determine some environmental defaults for this Silversync server
| Log Level |
|
This is the amount of detail included in the logging, this should mainly be changed for troubleshooting purposes. Debug will place at folder C:\Silversync\logs for any connection one log file in *.txt format. |
|---|---|---|
| Cache Expiry | e.g. 18 | How long until the cached will be cleared. Caching the content helps speed up synchronization, but it should not last for a long time as it takes system resources to maintain. |
| Notification Interval | e.g. 1 | How long in minutes the system should wait before sending another push to a user. This prevents the user from being notified multiple times when copying several files. This prevents the user from getting, for example five notifications instantly if you copy five files to the content location. |
| Notification Message | e.g. Silversync content changed |
This is the message that is sent to the user when content changes are detected |
| Content Refresh Interval | e.g. 12 | How long until the system will refresh the entire content location for the users. In general, this can be left, as individual file changes are automatically detected. |
| Allowed Extensions | e.g. .ai,.bmp,.csv,.doc,.docm,.docx,.dot,.dotm,.dotx,.gif,.htm,.html,.ico,.jfif,.jpe,.jpeg,.jpg,.log,.m3u,.mobileconfig,.mov,.mp4,.numbers,.pages,.pdf,.png,.pot,.potm,.potx,.pps,.ppsm,.ppsx,.ppt,.pptm,.pptx,.psd,.rtf,.svg,.svgz,.tif,.tiff,.txt,.wav,.xla,.xls,.xlsm,.xlsx,.xlt,.xltm,.xltx,.xml,.plist,.itmsp,.ibooks,.json,.key,.m4v,.webclip | This lets you determine what file types should be recognised by Silversync. Files not on this list will be excluded which is helpful for filtering out system files, or file types that users might not be able to open. |
| Days to retain logging | e.g. 30 | How many days should the Silversync logging be kept before being removed. |
Service Mappings
Service Mappings determine the location of web services for access by users and applications. It's recommended that you leave this as the default, but also check that it matches the DNS record for your Silversync server. It should be automatically populated with your server URL.
| Silversync admin console URL | e.g. https://silversync.imagoverum.com/syncadmin |
|---|---|
| DataProvider URL | e.g. https://silversync.imagoverum.com/syncdata |
| MetaDataProvider URL | e.g. https://silversync.imagoverum.com/syncmetadata |
| Personal File Management URL | e.g. https://silversync.imagoverum.com/pfm |
Personal File Management
Personal File Management is a user's own personal storage space and allows users to upload their own content via Silversync. The settings on this page allow you to configure the the content locations, the maximum server space per user and the logo. Please note that the configuration for the Personal File Management features is explained later in this guide. (Silversync Guide VII: Personal File Management).
| Personal File Management Content Location | e.g. C:\Userdrives | This is the location relative to the Silversync server to store Personal File Management uploads by users. Leave this blank if you do not wish to use PFM. |
|---|---|---|
| Maximum Server Storage Per User | e.g. 200 | The maximum size in megabytes that a user is allowed to consume on the server. This is per user, so keep this in mind when planning available storage, that this number should multiply with every new user in the system. |
| Logo | Choose File | Lets you upload a logo file that will be shown to users in the PFM console. This helps with branding to give users a common feel with your other company pages. |
Logs
Logs doesn’t require you to configure anything, but it's useful to know how to access this page. This is where you will find the logs for your Silversync server. If you need to troubleshoot a problem or confirm that new content is being uploaded, you can check this page.
Next Steps
- Proceed with Silversync Guide IV: Content Distribution