Getting started with SDDM Data Provider - CI, Service, Dependency Federation
Overview
The new SDDM Import data provider will first import SDDM CIs into a staging database and then create ESM objects from the staging database records. This approach allows higher level of import customization. To configure all import settings correctly, take the following steps:
- Set up the SDDM import configuration.
- Adjust import definitions to work for the specific Matrix42 ESM installation.
- Optionally, you can also handle the import of custom attributes from FireScope.
Prerequisites
Port 38061/tcp is used for HTTPS connection to the FireScope API. Make sure that firewall rule allows outgoing traffic to port 38061 on the FireScope API Server.
Setting up the configuration
To configure the data provider:
- In the Administration application go to Integration > Data Providers and open the SDDM Import data provider for editing.
- In the Configurations grid, add a new configuration.
Multiple configurations can be set up for different FireScope environments.
If you set up several configurations where CIs or Service Groups settings overlap, it is advised that you create an engine activation with a sequence of configurations. The sequence will specify the order of executing SDDM data provider configurations. This way you can make sure that the data provider imports all necessary data from SDDM. For more information, please refer to Engines and Running Engines in a Sequence.
Configuring the General page
On the General page:
- Make sure the Enable import checkbox is selected.
- In the Scope section, select checkboxes for those objects that you want to be imported from FireScope:
- CI for the the import of devices;
- Service Groups for the import of service groups;
- Dependencies for the import of dependencies.
Selecting these checkboxes will enable additional pages in the configuration that you will need to set up.
Please note that selecting the checkboxes only results in the import of objects into the SDDM Staging Area navigation item in the Assets application. To create ESM objects, you will need to select the Enable import checkbox on the CI Settings, Service Groups Settings and Dependencies Settings pages.
- In the FireScope URL field, enter the fully qualified domain name of the FireScope API Service (for example, firescope401apps.m42cloud.com). You will find these URL in the Settings of SDDM: Settings --> Application Settings --> Global Network Traffic Settings --> Application Messaging Host IP/DNS
- Provide a name of the FireScope account in Account.
- Specify FireScope user and password in corresponding fields.
All settings are case sensitive!
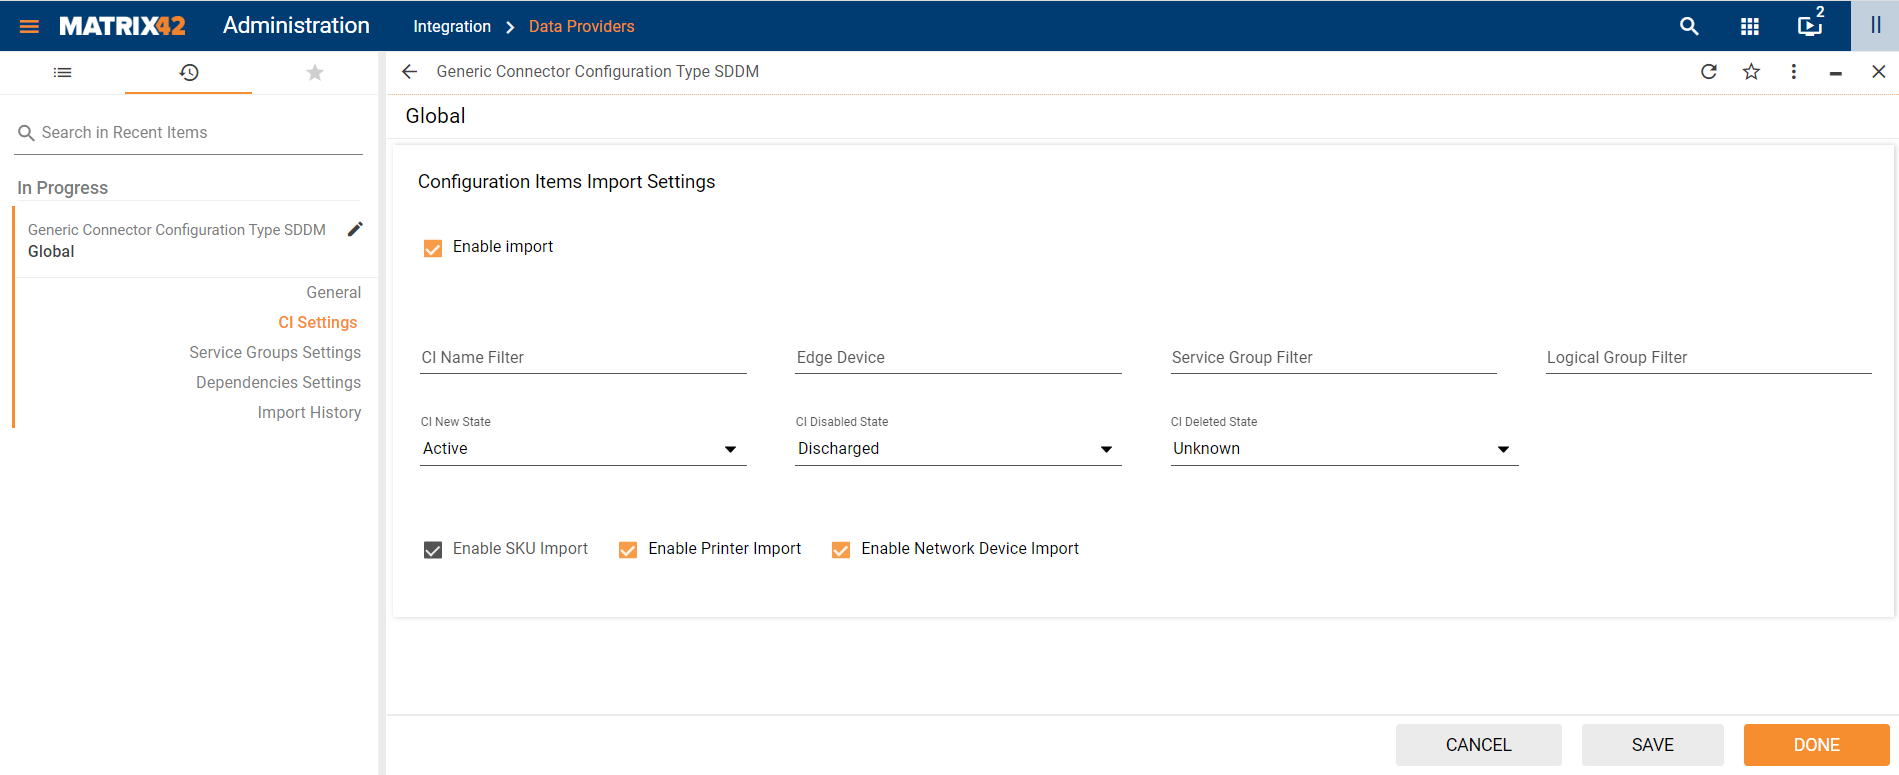
Configuring the CI Settings page
On the CI Settings page:
- Select the Enable import checkbox to create ESM devices from FireScope configuration items.
- Use the CI Name Field, Edge Device, Service Group Filter and Logical Group Filter fields to filter the import by these values. All filters are combined with the AND operator and allow entering only one value.
- In the CI New State drop-down field, you can choose the status that will be assigned to all newly imported computers that have the Enable Monitoring checkbox selected in FireScope.
- In the CI Disabled State drop-down field, you can choose the status that will be assigned to all newly imported computers that have the Enable Monitoring checkbox disabled in FireScope.
- In the CI Deleted State drop-down field, you can choose the status that will be assigned to computers that are no longer delivered by the import.
- The Enable SKU Import checkbox is always selected. The Model, Manufacturer, and Type attributes are filled in for new SKUs. SKUs are set only for imported computers.
- Select Enable Printer Import to import printers
- If you select the Enable Network Import checkbox, the import will create network devices with the following asset types: ‘Firewall', 'Load Balancer', 'Router', 'Router, Firewall', 'Wireless', 'Switch' and 'Network'.
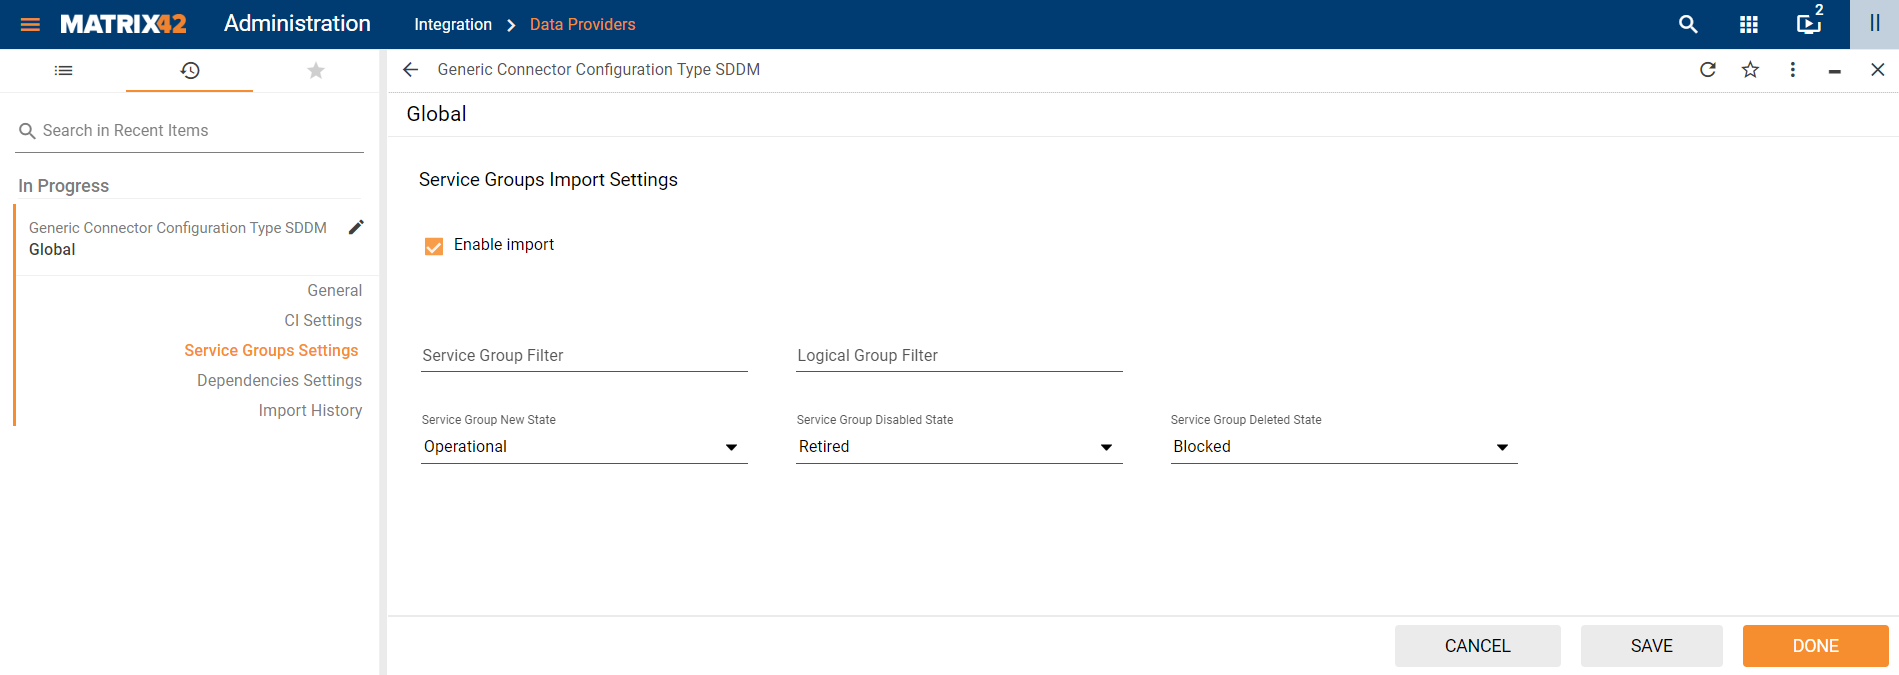
Configuring the Service Groups Settings page
On the Service Groups Settings page:
- Select the Enable import checkbox to create services from FireScope service groups.
- Use the Service Group Filter and Logical Group Filter fields to filter the import by these values. The filters are combined with the AND operator and allow entering only one value.
- In the Service Group New State drop-down field, you can choose the status that will be assigned to all newly imported service groups that have the Enable Business Service Rules checkbox selected in FireScope.
- In the Service Group Disabled State drop-down field, you can choose the status that will be assigned to all newly imported service groups that have the Enable Business Service Rules checkbox disabled in FireScope.
- In the Service Group Deleted State drop-down field, you can choose the status that will be assigned to service groups that are no longer delivered by the import.
Configuring the Dependencies Settings page
On the Dependencies Settings page:
- Select the Enable import checkbox to create dependencies in ESM based on data from FireScope.
- Use the Service Group Filter field to filter the import by these values. It allows entering only one value.
To be able to see imported dependencies in ESM, you will need to configure the dependency mapping.
After filling in all settings, save the configuration.
Adjusting import definitions
The import definitions for creating objects in Enterprise Service Management use the M42Production database as the source. If the database server is not located on the ESM application server, the connection information has to be updated for each import definition.
Please check this article on guidelines for updating the connection information for MS SQL data sources.
Handling custom information
The data provider imports all custom values from FireScope into the staging database. Enterprise Service Management stores those custom values as a multifragment. A stored procedure has been added to the extension in order to process this data.
If you want to import custom attributes, take the following steps:
- Create an import definition.
- Chose the configuration item you want to upgrade.
- Set the source as the M42 Production database.
- Specify the central table as SQL Expression.
- Enter “EXEC [dbo].[CUSTPSO_SddmGetCustValues]” as the expression.
- Set your mapping rules according to your liking and use the SDDM_CI_ID as the matching attribute for the target Enterprise Service Management configuration item.
On detailed information about creating an import definition, refer to the Create an Import Definition article.
Checking the import results
After you configure all settings, run the Enable and Activate actions for the SDDM Import data provider to trigger the import.
To check the results, click the configuration of the SDDM Import data provider to open its preview. The preview displays all jobs and import logs for the selected configuration.
You can also review jobs, workflow instances, and import logs on the Import History tab of the configuration dialog.
You can review imported staging CIs in the Assets application under SDDM Staging Area. The SDDM Staging Area navigation items contain objects from FireScope.
After the successful execution of the data provider, you can also find XML files with imported data in the Matrix42 root folder under Messages/Data/PSO.SDDM/LastResult.