AdHoc Sessions
Overview
The AdHoc Sessions feature or the FastViewer Webconsole lets you quickly create temporary remote access sessions without installing additional software or clients. Participants can join sessions through links, and control the access level allowed to the session owner.
Start an AdHoc Session
- Click the Create AdHoc Session button in the upper right corner of the screen to start a new session.

- Optionally, enter a session name.
- Select the type of access you need for the session; you can enable multiple options:
- Desktop: lets you access the desktop as the end user.
- Filetransfer: lets you transfer files to the client's computer.
- Terminal: lets you access the command terminal on the client's computer; the client cannot see your actions.
- Click OK.
- Copy the session link and share it with the participant.
- Click Disconnect in the upper right corner of the screen to close the session.
Join an AdHoc Session
- After receiving a link from the session organizer, paste it into your browser.
- Click Join.
- Select one of the options for joining:
- Join on the app: lets the organizer to access and control your computer fully. This option downloads the AdHoc Launcher locally; you must connect to the session through the launcher.
- Continue on this browser (view only): lets the organizer to view the contents of your screen. You can choose to share browser tabs, windows, or screens.
- Join a new session: lets you manually insert an ID for a new remote session.
- Click Stop at the bottom of your screen or press F11 to close the session.
AdHoc Session Features
During a session, as an organizer, you can access several actions and features in the web console.

Buttons available during AdHoc session
Toggle Fullscreen
This feature lets you toggle the full-screen view for the current connection. Press and hold Esc to exit the view.
View Mode
This feature lets you choose a mode to view the screen. You can pick one of the following views:
- Auto Scroll: the view follows your cursor automatically.
- Manual Scroll: lets you use scroll bars to move the view.
- Zoom to Fit: adapts the size of the shared screen to the size of your interface.
Screen Lock Mode
This feature lets you limit the input and screen for the participant.
To ensure the proper functionality of this feature, make sure to first request elevated rights.
- LOCK INPUT: Locks keyboard and mouse input while keeping the screen visible.
- LOCK INPUT and SCREEN: Locks both input and screen visibility.
- NO LOCK: Allows full access without restrictions.
Screen Lock requires Windows 10 version 2004 or newer. On older versions, only LOCK INPUT is supported.
Disclaimer: MSTSC/RDP sessions may not be supported in all scenarios.
Hide Wallpaper
This feature lets you hide or show the wallpaper on the remotely controlled computer.
Clipboard
This feature lets you enable or disable the wallpaper, so you can copy and paste information between computers.
Keyboard Commands
This feature lets you use a predefined list of keyboard shortcuts on the controlled computer.
Switch Session
This feature lets you switch between available connection types, depending on the types of access you requested at the beginning of the session (Desktop, Filetransfer, Terminal).
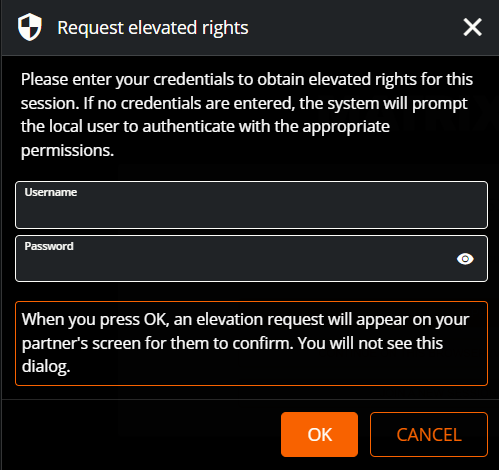
Request Elevated Rights
This feature lets you request elevated rights for the session and access the computer as an administrator.
To request elevated rights, you must take the following steps:
- Click Request elevated rights.
- In the Request elevated rights dialog box, you can:
- Provide administrator credentials.
- Alternatively, press OK to send an elevation request to the participant's screen.
Performance Monitor
This feature opens the Performance Monitor dialog box, which lets you track the quality of your connection, as well as export information.