Single-Sign-On (SSO) Setup with Microsoft Entra ID
This section describes the configuration of single sign-on (SSO) with Microsoft Entra ID.
What is the Microsoft Entra ID? https://learn.microsoft.com/en-us/entra/fundamentals/whatis
You can integrate Microsoft Entra ID with Remote Assistance Connect and create policies based on user identity and group membership. Users authenticate to Remote Assistance Connect with their Azure AD credentials.
Set up Microsoft Entra ID as an identity provider
Obtain Azure AD settings
The following Azure AD values are required to set up the integration:
- Application (client) ID
- Directory (tenant) ID
- Client secret
- Domain name
To retrieve those values:
- Log in on to Azure portal. (https://portal.azure.com)
- Go to Azure services >Microsoft Entra ID.
- Select Manage > Enterprise applications.
- Select New application.
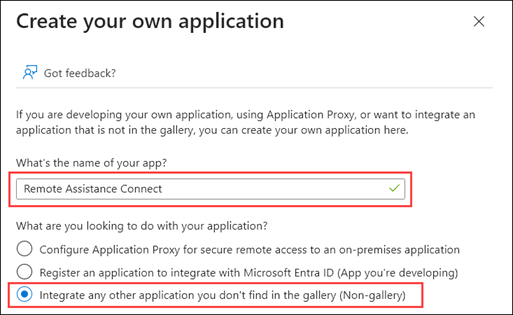
- Select Create your own application.
- Enter the name of your application, e.g. Remote Assistance Connect.
- Select the option Integrate any other application you don't find in the gallery (Non-gallery).
- Click on the button Create.
- In the overview of the created application click Set up single sign on.
- Select on the left side Properties.
- Set the properties of the created application as in the following picture. A logo file is optional.

- Click on the button Save.
- Next Step, go to Home and select App registrations, Click All applications and select the new created application.
- Under Redirect URI, select the Web platform and enter the following URL: https://connect.matrix42.com/auth/login/sso/entra-id
- UncheckID tokens, and click Save.

- Disable implicit grant.
- Next go to Manage > Certificates & secrets and select New client secret.
- Enter the name of the client secret and choose an expiration period.
- Click on the button Add.
After the client secret is created, copy its Value field. Store the client secret in a safe place, as it can only be viewed immediately after creation.
- Next step go to Overview and copy Application (client) ID and Directory (tenant) ID and the Client Secret to the Entra ID settings configuration page of Remote Assistance Connect.

- Enter the Domain Name and click on Save.
Configure API permissions
- From the App registrations page for your application, go to API permissions.
- Select Add a permission.
- Select Microsoft Graph.
- Select Delegated permissions and enable the following permissions:
- User.Read
- Group.Read.All (RA Connect can read the group IDs)
- offline_access

- Once all seven permissions are enabled, select Add permissions.
- Select Grant admin consent.
Add authorized Groups in Azure
- Go to Home > Microsoft Entra ID > Groups > New group.
- Select Security as Group type.
- Enter a Group name, e.g. Remote Assistance Admins.
- Add Members to this group.

- Repeat the process and create a group with the name Remote Assistance Users.
- Add Members to this group.

Add authorized Groups to Enterprise Applications
- Go to Home >Microsoft Entra ID.
- Select Manage > Enterprise applications.
- Search for the application you created before, e.g. Remote Assistance Connect and click on it.
- Select Assign user and groups and then select Add user/group.
- Select None Selected, search for the Remote and select Groups.
- Activate both Remote Assistance Connect groups.
- Confirm the dialog with Select.

Add Groups in Remote Assistance Connect
- Log in on to Remote Assistance Connect (https://connect.matrix42.com) with your admin credentials.
- In the upper right corner click the Settings icon >User management.
- Select Add group.
- Enter the name Remote Assistance Admins.
- Under Member of select the Administrators group.
- Under Entra ID copy (only necessary at first group) the Azure Remote Assistance Admins group ID.
- Click on Next.

- Repeat the process and create a group with the name Remote Assistance Users.

- Now you are able to define the corresponding permissions for these two new groups.
To do this, select Permissions and assign the corresponding options according to your choice. - Log off from the Remote Assistance Connect.
Test the log in with single sign-on (SSO) with Microsoft Entra ID
When testing, please make sure to not use an incognito window of your browser.
- Open Remote Assistance Connect (https://connect.matrix42.com) and select the button Single Sign-On.
- Enter your Email address an click on Sign in. Follow the instructions.
Did you log in correctly? Congratulations! You've successfully set up Remote Assistance Connect with Microsoft Entra ID.