Step-by-step Instructions
The following section provides “step-by-step” instructions on using the Matrix42 PreOS Package Editor.
With the help of the Matrix42 PreOS Package Editor, you can create and edit the necessary package folder structure and required files. Package information is stored in an XML file and the logic of the package must be implemented in a PowerShell script.
Sample and productive PreOS packages are available that can be imported in the Software Depot of the EMC. These can and should serve as an example as well as provide guidance for new PreOS packages or variants.
The platform of the WinPE-based deployment offers absolute freedom when it comes to implementing a PreOS package – the basic scripting language here is PowerShell. This is supported by Matrix42 CMDLets, which encapsulate and provide domain-specific context, such as the computer variables. These variables can be accessed with the Get-EmpirumVariable CMDLet.
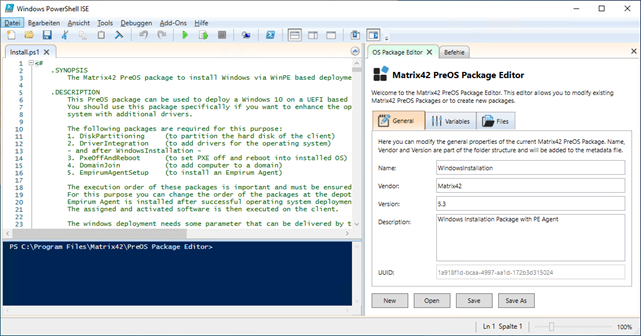
The SimpleOsDeployment package is an example of such a Matrix42 PreOS package and contains the key features required to perform a simple Windows 10 installation. The SimpleOsDeployment package comes with additional variable definitions that control the installation behavior. Variables can be added in the Matrix42 PreOS Package Editor.
All metadata and the variable definitions are stored in the EmpirumPackageData.xml file.
The Matrix42 PreOS packages can be imported via the Software Depot of the EMC and are then available as special software packages in Empirum. The packages are always stored on the “Matrix42 PreOS Packages” tab. This allows you to assign the Matrix42 PreOS packages as usual via the Administration to a computer that will execute them during a WinPE boot process.
The following sections describe the steps required to create a new Matrix42 PreOS package or open an existing one for editing:
- Installing the Matrix42 PreOS Package Editor
- Starting the Matrix42 PreOS Package Editor
- Creating a new PreOS package
- Opening an existing PreOS package
- Changing the package information
- Editing the package script
- Saving changes to the package information
- Saving changes to the package script
Installing the Matrix42 PreOS Package Editor
The Matrix42 PreOS Package Editor package 1.0 is part of the Matrix42 Empirum v18.0 release. After the Empirum installation or update, the package can be assigned as usual to a computer via the Matrix42 Management Console in the Administration and the installation can be activated.
To ensure that the Matrix42 PreOS Package Editor can load correctly in the PowerShell ISE, the PowerShell Execution Policy must be set to the RemoteSigned, Unrestricted, or Bypass value.
The current Matrix42 PreOS Package Editor package version is part of the WinPE PreBoot Support package and is available via the Matrix42 Marketplace.
After installing the WinPE PreBoot Support package, the Matrix42 PreOS Package Editor package is in the Configurator$\PackageStore directory of the Empirum server and can be imported as usual using the Matrix42 Management Console in the Depot configuration.
Starting the Matrix42 PreOS Package Editor
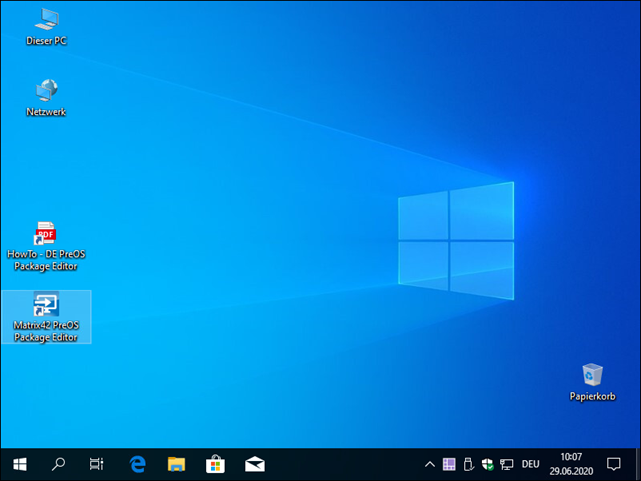
When the Matrix42 PreOS Package Editor package is installed, a shortcut is created on the desktop that can be used to open the editor.
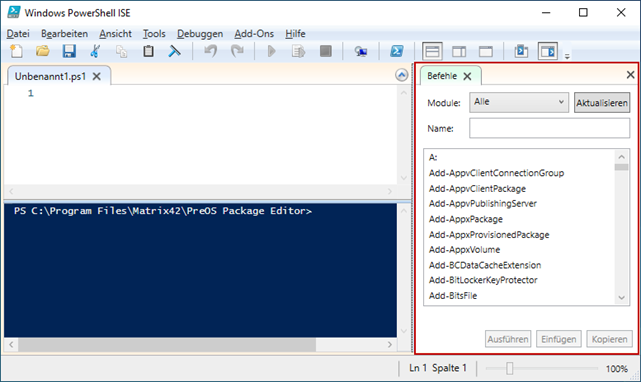
The Matrix42 PreOS Package Editor is a PowerShell ISE Add-On tool. Starting the editor also opens the PowerShell ISE application that then opens the Matrix42 PreOS Package Editor.
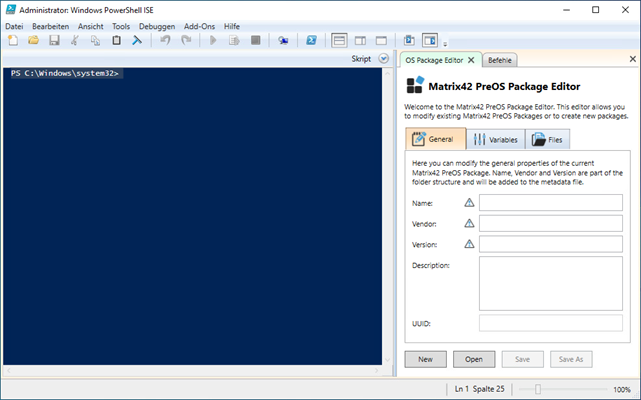
The Matrix42 PreOS Package Editor is located on the right side of the vertical panel in the PowerShell ISE. If it is not visible, you have to make it visible on the Add-On file menu.
The Add-On tool is loaded automatically when you start the PowerShell ISE.
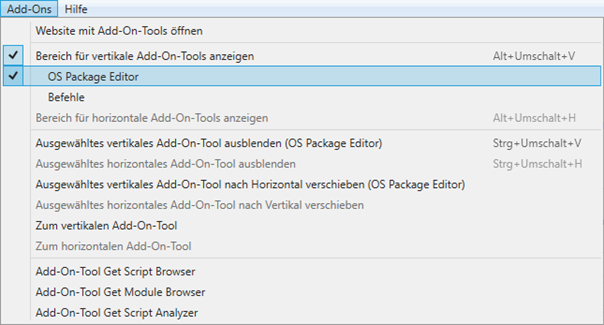
You can see the entry for the OS Package Editor under Add-Ons on the file menu.
Creating a new PreOS package
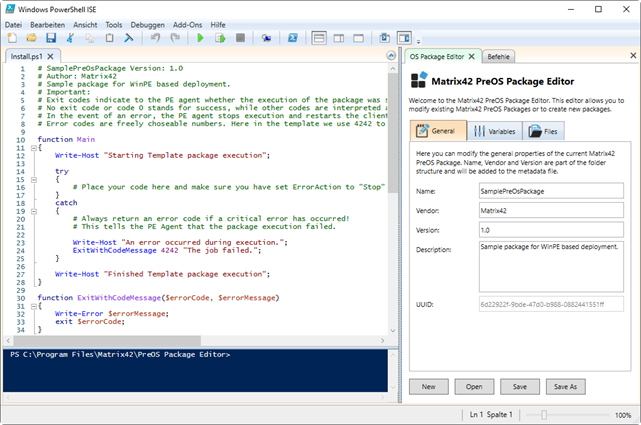
It does not require much to create a new PreOS package. The process can be completed quickly using the “New” button. You create a structure for the new PreOS package and must specify the Name, Vendor, Version, and Description values and save the package using “Save.”
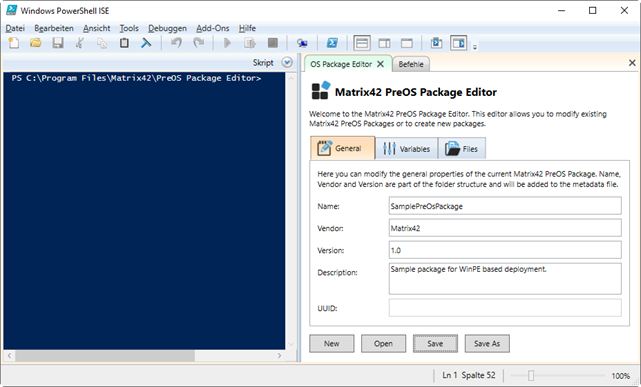
- Use the “New” button to create a new, empty package structure.
- Specify values for Name, Vendor, Version, and Description.
- Use the “Save” button to save the package and therefore also the package information.
When saving for the first time, the folder selection dialog box opens so that you can select the working directory in which to save the new package.
The required folder structure of the new package is created in the selected folder. In general, a PreOS package consists of a multi-layered folder structure that includes two fundamental files. The EmpirumPackageData.xml file contains all the information relating to a package, as well as the associated Empirum variables, and is located at the highest level directly in the package folder.
Underneath, in the Data folder, you will find a folder with the name of the vendor. In our example, the name of the vendor is “Matrix42.” The actual PreOS package folder with the name of the package is now located below the vendor. This folder and the top-level folder usually have the same name. In this example, it is “WindowsInstallation.” The inner package folder contains all the files needed to run the package, that is, the mass data plus an “Install” folder.
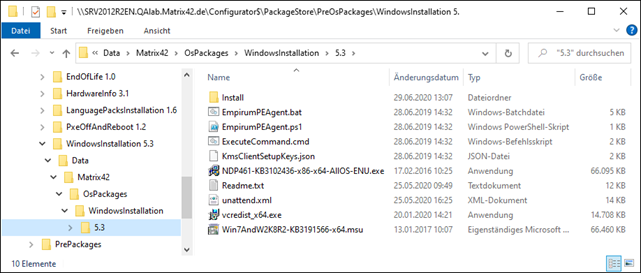
In this example, there is a Readme.txt for the package user, an unattend.xml for the automatic/unattended operating system installation, and an EmpirumAgent.bat for installing the Matrix42 Empirum Agent directly after the Windows installation. Finally, the Install folder contains the link for all this mass data and the package logic itself, that is, the Install.ps1 PowerShell script.
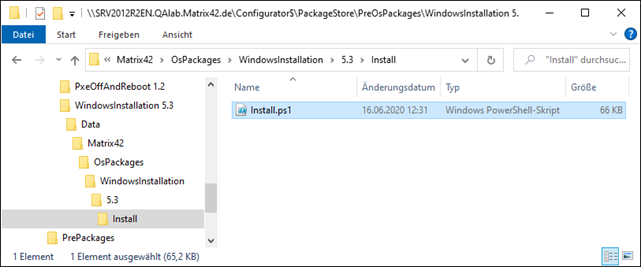
According to the naming convention, the “Install” folder must contain an Install.ps1 script that is executed at the WinPE runtime. In this case, it is a script that accesses Empirum variables for the client computer, prepares the unattend.xml for the Windows installation, and performs the installation.
So, all this – except the mass data – is created by saving the new package with the Save button. This structure is now created in the selected working directory.
Upon completion, the newly created package must be placed in the “Configurator$\PackageStore\PreOsPackages” folder on the Empirum server. Only then can it be imported via the EMC and assigned to a computer.
As you can see, a new UUID is generated and displayed for the new package. All visible package information can still be adjusted and changed after saving. The folder structure of the package is adapted, depending on the change.
After you have entered all the information, selected the working directory, and saved the package, the newly created Install.ps1 file is also opened as a new tab in the PowerShell ISE Editor and can now be edited. You can see that the first lines of the package are comments.
This is followed by the rough structure of a PreOS package script. In general, it should consist of PowerShell functions and include a direct call. As stated in the comments of the new script, it is also important that an exit code is returned in the event of an error. The PE Agent is guided by this when executing the PreOS packages and identifies a failed package when an exit code is greater than zero.
If no exit code or the code 0 is returned with the “Exit” command, the execution of the package is marked as successful, even if there are errors within the package that were neither handled nor caught. These errors can still be viewed in the log file that is written during execution. However, the package is not flagged as failed in Empirum and the PE Agent does not stop the execution, but continues with the next assigned packages.
In the script of the newly created package, this is implemented as a template: You can see a “Main” function that implements something – the logic of the package. It uses a try-catch block, and, in case of exception errors, the likewise existing “ExitWithCodeMessage” function is called in the catch block with an error code and a message.
In the function itself, you can see that the error message is output there with Write-Error (as in the case of the Write-Host calls, this also ends up in the log file during execution by the PE Agent) and that the specified error code is returned with “Exit.” Execution of the script also comes to an end here.
The so-called entry point follows at the very bottom. This is where the “Main” function is called and the package script starts to work. Regardless of how the script is implemented, it is important to detect and handle errors and, in the event of an error, return an error code with “Exit” so that the PE Agent can stop the execution.
If a PreOS package fails, the PE Agent will restart the computer and start to execute the failed package again from the beginning. This continues to take place so long as the package fails.
There are no limits to creativity and use here. Everything that can be executed and experienced on a client at WinPE runtime can be implemented in the Install.ps1 script.
The Install.ps1 script can and should now be edited and saved using the on-board tools of the PowerShell ISE. However, the script will also be saved if you click the Save button of the OS Package Editor Add-On tool.
In our example, we selected the desktop folder as the working directory and created a PreOS package called SamplePreOsPackage.
You can use the “Save To” button to create a copy of the current PreOS package now also or save it to another location.
When you click “Save To,” the browser selection dialog box appears, and you need to select the new (target) working directory. The original remains in its current position as a copy.
Opening an existing PreOS package
PreOS packages can be opened for editing or just for viewing. In the OS Package Editor, you can do this using the “Open” button.
In the Matrix42 PreOS Editor, only PreOS packages that are in import/export format can be opened
(Standard storage location: Configurator$\PackageStore\PreOsPackages). This folder contains the PreOS packages in the correct format.
After importing a PreOS package, the structure of the package has changed, which means it can no longer be opened from the “Configurator$\Packages\” subdirectory (error message).

You must select the corresponding EmpirumPackageData.xml of a PreOS package and confirm with OK.

The package information, that is, the metadata, is then displayed in the mask and the Install.ps1 script is opened for editing in the ISE Editor.
Changing the package information
The package Name, the Vendor, the Version, and package Description can be changed. The changes can be made in the corresponding input fields.
Saving changes to the package information
You save changes to the package information using the “Save” button. As the Name, Vendor, and Version package information is mirrored in the folder structure, folders are renamed or moved when the information is changed. Any mass data is also moved. In contrast, information such as Description or UUID is stored in the EmpirumPackageData.xml.
Saving a copy
Using the “Save As” button, you can save the current package (along with the changes made) either to another location by selecting a different destination folder, or under a different name if you have changed the name of the package.
In the latter case, you can store the copy with a different name alongside the original package in the same folder as well as store the copy in a different directory.
If neither the name nor the version of a package is changed but the package is saved using “Save As” in the same directory as the original, the original will be overwritten.
With "Save As" a new UUID is created and thus the copy becomes a new software package in Empirum's sense, which can be imported.
Editing the package script
When you open or create a new PreOS package, the “Install.ps1” control script is opened on a new tab in the ISE. This script is empty for the new package and contains only the package information in the header as PowerShell comments.
A package builder can now implement the script as required, using the native tools of the PowerShell ISE.
Show Command Add-on
If the Command Add-on is not visible when opening the PowerShell ISE, you must first display it. You can do this by selecting “Show Command Add-on” in the file menu under View.

If you have activated the Command Add-on under View, it may still not be visible. In this case, you still must activate the Vertical Add-on Tools Pane.

The Show Vertical Add-on Tools Pane entry must be selected in the file menu under Add-Ons. This opens the vertical bar for Add-Ons and the Command Add-on is visible.
Empirum OS Management CMDLets
The “Command” Add-on, which is supplied with the PowerShell ISE, is extended to include the list of Empirum CMDLets when the OS Package Editor is installed. The Matrix42.Empirum.PowerShell.OsManagement module is then registered and selectable.
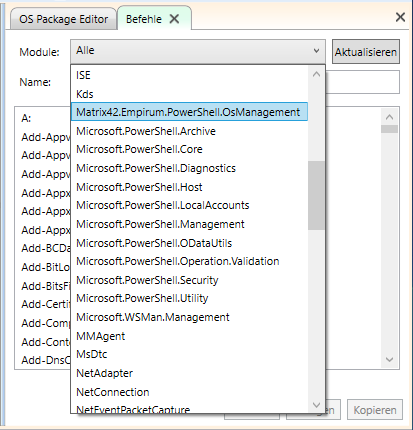
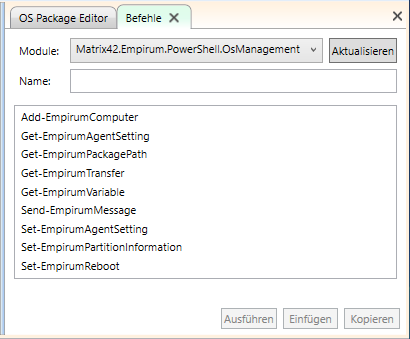
To display the Empirum CMDLets, select the Matrix42.Empirum.PowerShell.OsManagement module (1). The help for the selected CMDLet (2) can be displayed by clicking the question mark symbol (3).
To display more details (4) about the CMDLets, you first have to click the “Show Details” button.
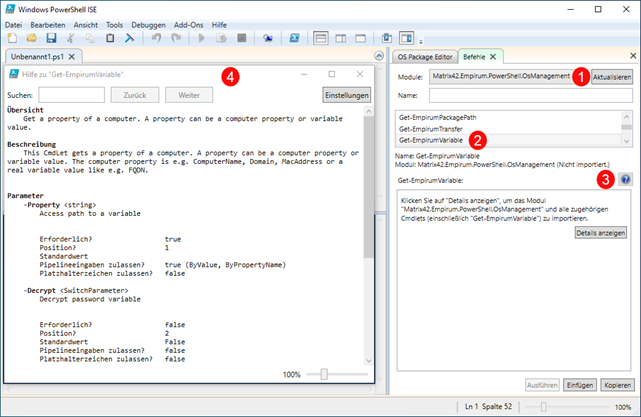
This allows the parameters and switches for the CMDLets to be displayed and set.
Once you have set the values for the required parameters or switches, “Insert” can be used to transfer the complete command to the console.
This command cannot be executed successfully at first, because the CMDLets require a specific environment. This means that debugging in the environment is currently not possible.
Executing irreversible commands: With Set-EmpirumReboot, you can, for example, cause a reboot of the executing system without intending to do so. For example, if you run the DiskPartitioning package, you could inadvertently repartition the hard disk of the executing system. Take particular care.
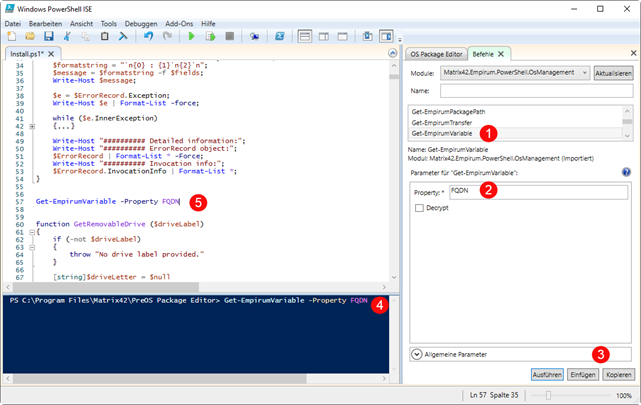
Here in the example we call the Get-EmpirumVariable CMDLet (1) with the property “FQDN” (2).
You can use the Insert button (3) to insert the command, including the property, into the console (4).
Once you have assembled a command, which you want to use in your script, and have been able to execute it successfully, you copy it from the console to the editor by Selecting, Copying, and Inserting (5).
Alternatively, you can click the Copy button directly (3) to copy the command to the clipboard, and then copy it to a desired location in the script that is open in the editor (5).
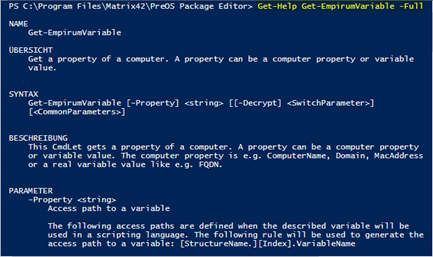
In the PowerShell console, you can use “Get-Help <CMDLet-Name> -Full” to display the required syntax and possibly also some examples.
Get-EmpirumPackagePath
Get-EmpirumPackagePath CMDLet specifies the full path to a given package. The package can be an “OS Software Package”, or an “OS Package Source”. The default package type is “OS Package Source”.
The path to the GettingStarted OS software package is generated in the example:
Get-EmpirumPackagePath -RelativePath 'Matrix42\OsPackages\GettingStarted\Install' -Type OsSoftwarePackage
The Get-EmpirumPackagePath CMDLet provides an additional -IncludeOfflineSources switch. If this switch is used, the CMDLet will first check whether the specified relative path exists in the local offline source directory and return it if necessary.
A local offline source directory can currently be integrated into offline boot media using the Offline Boot Medium Wizard.
Get-EmpirumAgentSetting
The Get-EmpirumAgentSetting CMDLet returns the Name of the associated Empirum server, the Username, the Password, or the Protocol that are necessary to establish a connection (with the “DepotServer” parameter set).
Get-EmpirumAgentSetting -DepotServer Name
Get-EmpirumAgentSetting -DepotServer LogonUser
Get-EmpirumAgentSetting -DepotServer LogonPassword
Get-EmpirumAgentSetting -DepotServer Protocol
With the “PeAgentConfig” parameter set, you can output the path to the folder on the server share that is used for logs – the MAC8 or UUID directory (RemoteLogFolder). You can also query the timeout for PreOS package scripts (PowerShellTimeoutInSeconds) and the state of the PXE-off behavior (EnableFinalPxeOff).
Get-EmpirumAgentSetting -PeAgentConfig RemoteLogFolder
Get-EmpirumAgentSetting -PeAgentConfig PowerShellTimeoutInSeconds
Get-EmpirumAgentSetting -PeAgentConfig EnableFinalPxeOff
Get-EmpirumVariable
Returns a property of a computer, or the value of an assigned Empirum variable. Examples of computer properties include Computer Name, Domain, or MAC Address. An example of a variable is FQDN.
Get-EmpirumVariable -Property ComputerName
Send-EmpirumMessage
Sends PXE log messages to the Empirum server from the executed PreOS package (with or without PxeLog parameters), sends a special message to reset the status of the previously installed software packages after formatting or partitioning (HardDiskFormattingOrPartitioningSuccessful), or a PXE-Off message to disable PXE activation for the current client on the server (TurnOffPxeActivation).
Send-EmpirumMessage "Starting PreOS package execution..."
Send-EmpirumMessage -PxeLog "Starting PreOS package execution..."
Send-EmpirumMessage -HardDiskFormattingOrPartitioningSuccessful
Send-EmpirumMessage -TurnOffPxeActivation
Set-EmpirumAgentSetting
Can be used to change configuration properties of the PE Agent.
An example is the reboot behavior of the PE Agent (enabled by default):
Set-EmpirumAgentSetting -RebootOption DisableReboot
Set-EmpirumAgentSetting -RebootOption EnableReboot
Another example is the PXE-Off behavior of the PE Agent (enabled by default):
Set-EmpirumAgentSetting -FinalPxeOff DisablePxeOff
Set-EmpirumAgentSetting -FinalPxeOff EnablePxeOff
Set-EmpirumReboot
Sets the reboot status of a package. This allows the restart of a client to be controlled or registered. Possible statuses are “NoRebootNeeded”, “RebootNeeded”, “RebootNeededImmediately”, “RebootInitializedByOsPackage” or "RestartAfterReboot".
For example, “RebootNeededImmediately” instructs the PE Agent to reboot after execution of the running package.
Set-EmpirumReboot RebootNeededImmediately
“RestartAfterReboot” instructs the PE Agent to reboot after execution of the running package and restart the same package after the reboot again.
Set-EmpirumReboot RestartAfterReboot
Add-EmpirumComputer
Adds the local client to a domain or workgroup. Accepts a SYNC encrypted password. An organizational unit can also be specified.
Add the client to join a domain:
Add-EmpirumComputer -User imagoverum\vvalentine -Password D4964E973C866C6CD0E12DE0621A435404E5D485D175B97CEB7ADECDA2D785595DA3515941D8E49C -Domain imagoverum.de
Add the client to a domain with an OU:
Add-EmpirumComputer -User imagoverum\vvalentine -Password D4964E973C866C6CD0E12DE0621A435404E5D485D175B97CEB7ADECDA2D785595DA3515941D8E49C -Domain imagoverum.de -OU "OU=OU1,DC=imagoverum,DC=de"
Add the client to a workgroup (local user with password in plain text):
Add-EmpirumComputer -User "LocalUser" -Password "Password in Clear Text" -Domain "Workgroup" -JoinWorkgroup
Set-EmpirumPartitionInformation
Sets the specified UUID for the partition that can be accessed via the specified drive letter (DriveLetter).
Here in the example, the identifier (UUID) is set to “XXXXXXXX-XXXX-XXXX-XXXX-XXXXXXXXXXXX” for the partition that can be reached under the drive letter X.
Set-EmpirumPartitionInformation -DriveLetter "X" -Uuid "XXXXXXXX-XXXX-XXXX-XXXX-XXXXXXXXXXXX"
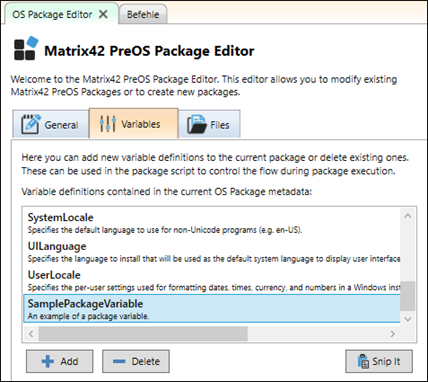
Adding package variables
Empirum variables can be added to each PreOS package. Variables of already existing packages can be displayed and removed. For this purpose, you must switch to the “Variables” tab.
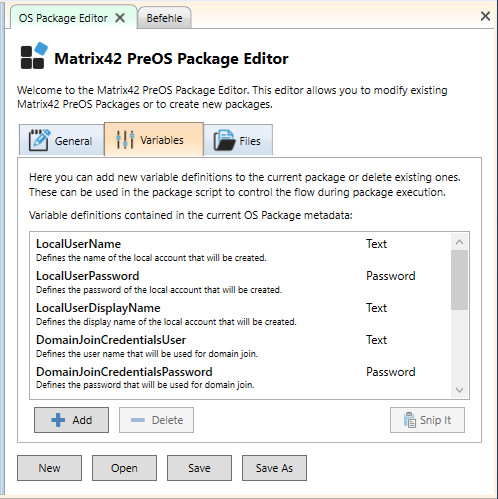
To delete, select a Variable definition and click “Delete.” Now only the types Text, Number, and Password are supported in the editor.
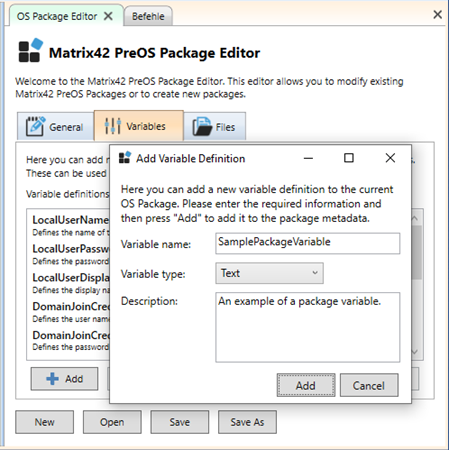
If you click “Add”, a window opens in which you can enter the new variable definition and add it to the package using Add.
The variables created in this way are imported when the PreOS package is imported and can be set in the Matrix42 Management Console to groups in general, or to computers to which the PreOS package is assigned.
Using package variables in the script
If you open an OS package, the associated package variables are listed under the “Variables” tab. Using the GettingStarted package as an example, this section demonstrates how to add these variables to the Install.ps1 script. Within the OS packages, the assigned Empirum variables are queried using the “Get-EmpirumVariable” CMDLet. The same applies to package variables imported via an OS package.
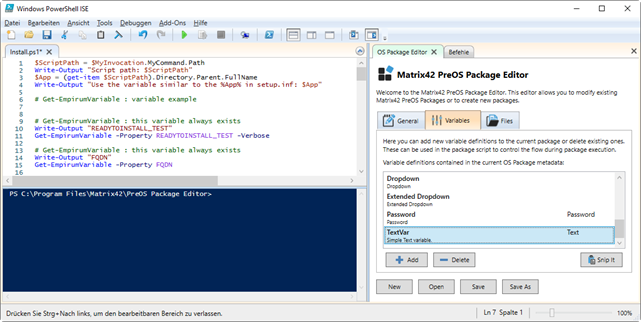
To place the variable query at the right position in the script (left), you must first position the cursor on the required line. In the example here, this is line 7. Now you can either double click the required variable on the right or select it first with a single click and then use the “Snip It” button. The result is the same.
The required code snippet, which makes it possible to query the variable at runtime, is inserted into the selected line in the script. The same snippet of code is also inserted into the console below so that the execution can be tried out directly. In addition, the code snippet is also copied to the clipboard and can be pasted from the clipboard as often as you like and at any position in the script using CTRL+V.
Here in the example the variable named TextVar of type Text is inserted into the seventh line of the script by double-clicking. The name of the variable itself is initially used as the variable name within the script. Here it is “$TextVar”. You can also see the same code snippet below in the console.
$TextVar = Get-EmpirumVariable -Property GettingStarted.TextVar

In addition, we also insert a variable of type Password in this example – here the package variable is named Password and is initialized in the script as a $Password variable.
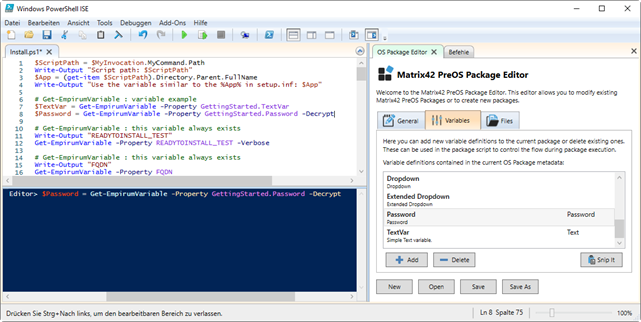
$Password = Get-EmpirumVariable -Property GettingStarted.Password -Decrypt
For a password variable, the “-Decrypt” switch is additionally used to output the password in plain text. This is the decrypted SYNC variant of the password. If you want the encrypted representation of a password variable, you must append the “_SYNC” postfix to the name of the variable without the “-Decrypt” switch.
$Password = Get-EmpirumVariable -Property GettingStarted.Password_SYNC
Saving changes to the package script
The Install.ps1 script is opened within the PowerShell ISE and changes can be saved correctly via Menu > File. In addition, the changes to the script are also saved using the Save button of the Add-On tool.
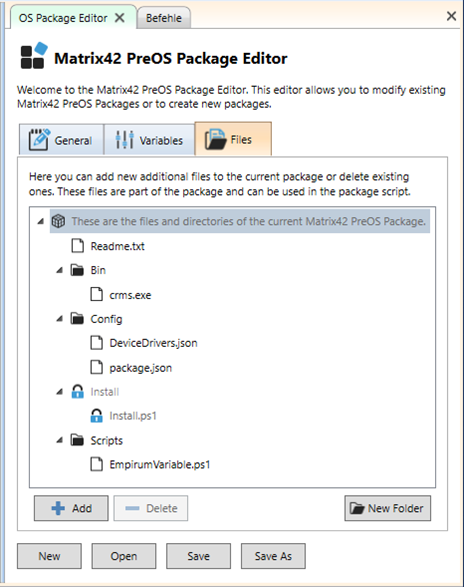
Adding additional files
When you create a new package, there is initially only one Install.ps1 script in an Install folder. However, you can add more files to the package that can then be accessed even while the package is being executed. To include more files in the package, you can use the “Files” tab.
It is not possible to add additional files until you have saved your newly created Matrix42 PreOS package – the tree structure of the additional files remains empty. As soon as you save the package, the file structure is created for the mass data of the package and you can then add additional files.
Symbol definition:
 Main node that represents the package directory in the mass data directory (for example, Data\Matrix42\OsPackages\WindowsInstallation\3.4) The additional child files are also copied to the appropriate Configurator$ share when the PreOS package is imported and are available during package execution.
 Additional folder
 Additional file
 Non-deletable additional files or folders. They are an essential part of the PreOS package and should not be deleted.
Here, the files that already exist are listed in a tree structure. You can use the “Add” button to add more files (not folders) to the package. In most supplied packages, you will see the Readme.txt file and the Install folder with the Install.ps1 script below. These are highlighted with a blue lock symbol. This means that they cannot be deleted, and no further files may be added to the Install folder. Furthermore, you cannot create any further folders underneath the Install folder.
To delete a file or directory, first select the file or directory in the tree structure and then click the Delete button.
If you want to create new subfolders, you can do so by clicking the “New Folder” button on the right. A new subfolder is first created in the selected directory with the name “New Folder.” You can rename this afterwards.
To create a subfolder on the top level, you must select the main node and then use the “New Folder” button.
Files are added directly and, when deleting, they are deleted immediately after confirmation – there is no need to save the package separately afterwards.
HTTP(S) support for self-developed PreOS packages
Self-developed PreOS packages may not be immediately suitable for http(s) transport. The reason for this is usually that the PowerShell scripts access files or directories on the Empirum share (SMB) that are not part of the PreOS package itself.
To make it easier to carry out the necessary adjustments, particular characteristics of the http(s) transfer are discussed here.
- In general, http(s) works with a local cache. Files and directories are transferred from the Empirum share to local directories via http(s). Not all shares are transferred automatically; only directories and files that are requested are transferred.
- In http(s) transfer, before the PreOS package is executed, the content of the package (for example, in the case of the WindowsInstallation PreOS package, the directory Configurator$\Packages\Matrix42\OsPackages\WindowsInstallation\5.0) is first transferred locally to a cache directory and then the install.ps1 script is run locally. Relative accesses to files that are in the package are therefore covered.
- If you need to access files in a PreOS package that are not in the package directory, you must do this using the Get-EmpirumPackagePath CMDLet. This method has been used in the past to obtain the path to the Empirum share (or the offline medium). In the http(s) case, this method must first transfer the specified file or directory locally to a cache directory and then return the local path. The PreOS package can therefore continue to work with the local path and access the file or directory.
- The
Get-EmpirumAgentSetting -PeAgentConfig RemoteLogFolderCMDLet cannot be used in http(s) to modify log files on the Empirum share. The newGet-EmpirumTransferCMDLet is provided for these purposes. TheGet-EmpirumTransfer LogFolder -Type RemoteLogFoldercall allows (similarly to the Get-EmpirumPackagePath call) the EmpInst$\Wizard\OS\WinPeStatus subdirectory to be transferred locally. The method returns an object that can be used to access the path to the local cache via the Path property. The PreOS script can initiate a synchronization of the local files with the server using the Sync method after the files in the cache have been adjusted. This will transfer the local changes to the server.
Here is an example from the HardwareInfo PreOS package:
$RemoteFolderObject = Get-EmpirumTransfer LogFolder -Type RemoteLogFolder -Verbose;
…
CreateAndCopyDriverJson $RemoteFolderObject.Path;
$RemoteFolderObject.Sync();