Provisioning process
Overview
Matrix42 provisioning workflows control the actual delivery of services and are intended for manual or automatic ordering of services, either by a support employee (manual) or by using the integration framework of Matrix42 Service and Software Asset Management (automatic).
The provisioning workflow is defined on a per-service basis and is initiated after the successful completion of the approval workflows, both general and specific if these are defined. Learn more about Order Lifecycle in Matrix42.
With Matrix42, you can select from a set of ready-made provisioning workflows or create your own provisioning processes, either
- from scratch or
- based on
- already existing Matrix42 standard ready-made provisioning workflows,
- templates (some of which may require some minor additional setup, such as adding some parameters, from your side and some of which may not) provided out of the box,
- your own previously created provisioning workflows or templates
to fit your specific business needs.
This article explains the various standard provisioning workflows and templates that are included in the product and explains how to create your own provisioning processes.
Specifying Provisioning Workflow for a Service
You can define the provisioning workflow, which is initiated following the successful completion of both general and specific approval workflows, if these are specified, on a per-service basis on the Provisioning dialog page of the Service dialog. All you need to do is click the selection icon next to the Provisioning Workflow field (outlined in red in the screenshot below) and select a workflow from the list of available ones by clicking it. Make sure to click Save or Done at the bottom of the Service dialog to save the change.
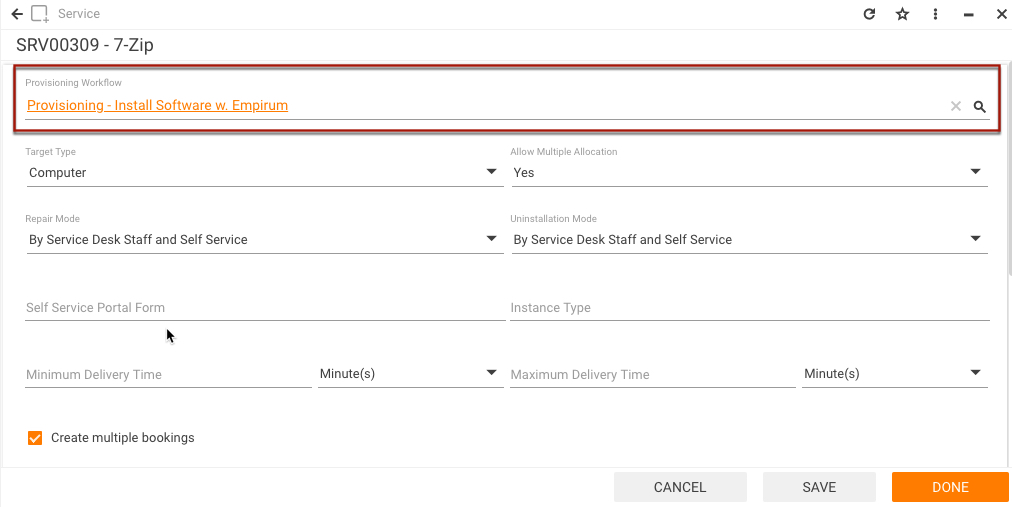
Please note that a task is created in the Service Catalog application in case that the executing configuration management system (e.g. Empirum) fails to install the package. IMPORTANT: Do not miss to close this task after resolving the problem in the configuration management system. This is required that the workflow re-checks the result of the provisioning request and close the corresponding booking accordingly
Examples of Ready-Made Provisioning Workflows & Templates
Standard Provisioning Workflows (New Style - developed with Workflow Studio):
New style provisioning workflows can be used as a basis for new provisioning workflows. These workflows were developed with the help of Matrix42 Workflow Studio, and, therefore, their flow charts can be viewed in the Workflow Studio.
- Provisioning - Create WF Change: Provisioning workflow for service requests that creates a corresponding change depending on installation, uninstallation, or repair request. For each case, a change template (default template for service provisioning that is provided with the product), which includes the desired workflow with required activities, should be configured for the service. Inside of the provisioning workflow, this configured sub-workflow will be started directly after creation of the change. The workflow updates the visual progress and waits until the change is closed before finishing the provisioning. The following workflows can be assigned as a sub-workflow:
- Change Management WF - Assign AD Group: Provisioning workflow assigns/removes a computer or an account to/from an AD group. Define which AD group of the workflow is processing for this service and whether the group membership is maintained for computer accounts or user accounts. The AD group should be defined in the configuration of the services. The AD Group is selected from the workflow configuration form and the target (Account/Computer) is specified during the order.
For correct data processing make sure that the AD Connector Configuration has necessary synchronization options enabled (see Administration application → Integration → Data Providers → Active Directory → edit Configurations → select necessary object → Connection Configuration action)
- Change Management WF - Assign Asset from Stock: The provisioning workflow assigns an asset that is available in stock to a person, or withdraws it from the person, and creates tasks for the Field Service role for either delivery or procurement. The respective stock-keeping unit should be defined in the configuration of the service.
- Change Management WF - Assign AD Group: Provisioning workflow assigns/removes a computer or an account to/from an AD group. Define which AD group of the workflow is processing for this service and whether the group membership is maintained for computer accounts or user accounts. The AD group should be defined in the configuration of the services. The AD Group is selected from the workflow configuration form and the target (Account/Computer) is specified during the order.
- Provisioning – MDM Enrollment, Provisioning – AirWatch Enrollment, or Provisioning – Silverback Enrollment: The provisioning workflow sends an SMS or an email to the mobile device. The message contains all necessary information for registration of the mobile devices in the Matrix42 Mobile Device Management system. The Device Configuration Group should be defined in the workflow configuration form. The type of enrollment invitation (SMS or email) can be specified during the order.
- Provisioning - AirWatch Install Application: Installs/removes an application on a mobile device enrolled to the Matrix42 Mobile Device Management system by using the MDM AirWatch Data Provider and creates a change to document this action. The application should be specified in the workflow configuration form. The target (mobile device) can be specified during the order.
- Provisioning Workflow - Assign Azure Active Directory Group: it can be installed from the Extension Gallery as an add-on. If your system is integrated with Azure Active Directory, you can use this workflow to include AAD accounts into the selected AAD group.
Standard Provisioning Workflows (Legacy Style):
Legacy style provisioning workflows cannot be used as a basis for new provisioning workflows, although the existing provisioning workflows used in the Services Provisioning or run as a result of Change Request that involves Service Provisioning, remain operational.
Legacy Style workflows had been created before the Matrix42 Workflow Studio became available, and, therefore, their flow charts cannot be viewed in Workflow Studio. The Workflow Instance processing stages monitoring or Visual Tracking are neither available. Legacy workflows are grayed out in Workflow Studio. Most of the so-called Legacy Style workflows have equivalents that have the same workflow processing logic and all missing features like flow chart, workflow instance monitoring and visual tracking available.
Several workflow equivalents should be assigned as the sub-workflows of the Provisioning - Create WF Change.
- Provisioning - Create Change: provisioning workflow creates a change during installation or uninstallation of a service. The attributes of the change will be set from the workflow configuration form and information that was specified during the order. Can be substituted with the Provisioning - Create WF Change workflow.
- Provisioning - Assign AD group: assigns/removes a computer or an account to/from an AD group and creates a change. Can be substituted with the Change Management WF - Assign AD Group assigned as a sub-workflow of the Provisioning - Create WF Change.
- Provisioning - Assign Asset from Stock: the workflow processing logic can be substituted with the Change Management WF - Assign Asset from Stock assigned as a sub-workflow of the Provisioning - Create WF Change.
- Provisioning - Create Task: The provisioning workflow creates a task during installation or uninstallation of a service. The task's attributes are set from the service definitions and information that is entered within the order. Can be substituted with the Create Task - Provisioning WF Template.
- Provisioning - Execute Script: The provisioning workflow runs a script definition for automatic provisioning or return of the service. The transfer of configuration and parameters of these script definitions should be defined in the configuration of the service. Can be substituted with the Execute Script - Provisioning WF Template.
- Provisioning - Install Software w. Empirum: The provisioning workflow automatically installs or uninstalls the software on/from a Computer or an Account using the Empirum Connector and creates a Change in order to document this action. The service is automatically configured by the connector when the software package is imported. The software has to be specified in the workflow configuration form. The target (Account/Computer) can be specified during the order.
- Provisioning - Install Software w. SCCM: The provisioning workflow automatically installs/uninstalls software on a computer using the SCCM Inventory Data Provider. The service is automatically configured by the connector when the software package is imported. The target computer should be specified in the target definition during the ordering. Can be substituted with the Provisioning - Install Software with SCCM assigned as a sub-workflow of the Provisioning - Create WF Change.
- Provisioning - Install Software w. EM: The provisioning workflow automatically installs/uninstalls software on/from a computer by using the Enterprise Manager Inventory Data Provider. The service is automatically configured by the connector when the Matrix42 Enterprise Manager rollout plan is imported. The target computer should be specified in the target definition during the ordering. Can be substituted with the Provisioning - Install Software with EM assigned as a sub-workflow of the Provisioning - Create WF Change.
- Provisioning - Send E-Mail: The provisioning workflow sends an email during installation or uninstallation of a service. The email's attributes are set from the workflow configuration form and information that was entered within the order. Can be substituted with the Send Mail - Provisioning WF Template.
Standard Provisioning Workflow Templates
You can create provisioning workflows of your own from standard provisioning templates provided out of the box. Some of the templates may require some minor additional setup, such as adding some parameters, from your side and some of these templates may be fully functional without any additional setup.
- Create Task - Provisioning WF Template: Provisioning workflow template for service requests, which creates a simple task for the installation, uninstallation, or repair of the corresponding service. After creation of the task, the workflow updates the visual progress and waits until the task has closed before finishing the provisioning.This standard ready-made template consists of the following steps:
- Get Order Data - the workflow gets certain data from the order.
- Get Booking Data - the workflow gets certain data from the booking.
- Create Install Task - a task to install software is created for a certain user.
- Wait for Activity - the task awaits closing.
- Once the task is closed, the workflow finishes. If, however, the task is closed with the Fail reason (e.g. it is impossible to install the software because Windows is faulty), the workflow fails, and the booking gets the Provisioning Failed status.
- Send Mail - Provisioning WF Template: Provisioning workflow template for service requests, which creates a simple mail for the installation, uninstallation, or repair of the corresponding service. After creation of the mail, the workflow updates the visual progress and directly finishes the provisioning.
- Execute Script - Provisioning WF Template: Provisioning workflow template for service requests that executes a Power Shell Script for the installation, uninstallation, or repair of the corresponding service. It also provides a defined error handling if execution of the script failed for any reason. After the script is performed, the visual progress will be updated. Depending on the result of script execution, the provisioning workflow will either finish successfully or fail.
How Provisioning Workflows Work
To view the flow chart of a provisioning workflow (new style) with all the activities:
- Go to Administration > Services & Processes > Workflows > Manage Workflows.
- Locate the workflow you need.
- Click the workflow to open it in Preview.
- Click Edit in Studio in the toolbar of the Preview to open the selected workflow in the Workflow Studio.
Should the selected workflow not open in the Workflow Studio Editor right away, locate and double-click the workflow under the File tab > Open bookmark in Workflow Studio.
The flow chart located in the Workflow Studio Editor (in the center of the screen) is a visual representation of the selected provisioning workflow. Workflow activities are represented by icons with names of those activities. The workflow follows the sequence represented by the flow chart.
Creating Provisioning Workflows
With the help of the Matrix42 Workflow Studio, users can create new provisioning workflows, either
- from scratch or
- based on
- already existing Matrix42 standard ready-made provisioning workflows,
- templates (some of which may require some minor additional setup, such as adding some parameters, from your side and some of which may be fully functional without any additional setup) provided out of the box,
- your own previously created provisioning workflows or templates
to fit their specific business needs.
Creating Provisioning Workflow from Existing Workflow or Template
To create a new provisioning workflow from an existing workflow or template:
- In Matrix42 Workflow Studio, go to the File tab > New bookmark.
- Click Workflow from... under New at the top of the window.
- Select an existing workflow or template in the corresponding panel ("Workflow" or "Template") located under the New panel, and then click Create on the right.
- On the Workflow Properties dialog page that appears,
- define the properties of the new workflow:
- provide a Name,
- select an Icon,
- select a Category under which the workflow is to be stored in Workflow Studio: "Service Catalog",
- make sure that the Service Provisioning Integration Context is selected.
- select the System checkbox to mark the workflow as System. Workflows marked as such cannot be subsequently modified.
- You may also add comments to describe, for example, the purpose and business context of the workflow. This information will help other users when working with this workflow.
- define the properties of the new workflow:
- Click Save. The Matrix42 Workflow Studio Editor opens with the flow chart of the selected template or workflow.
- You can now modify the copied workflow to fit your specific business needs by, for example, editing the copied activities, rearranging the order of activities in the flow chart, deleting activities, or creating new ones.
- When done modifying the new workflow, click Save on the right, and then click Check in, Release, and Publish on the toolbar located at the top of the dialog.
The new workflow is ready and available for selection in the provisioning workflow list.
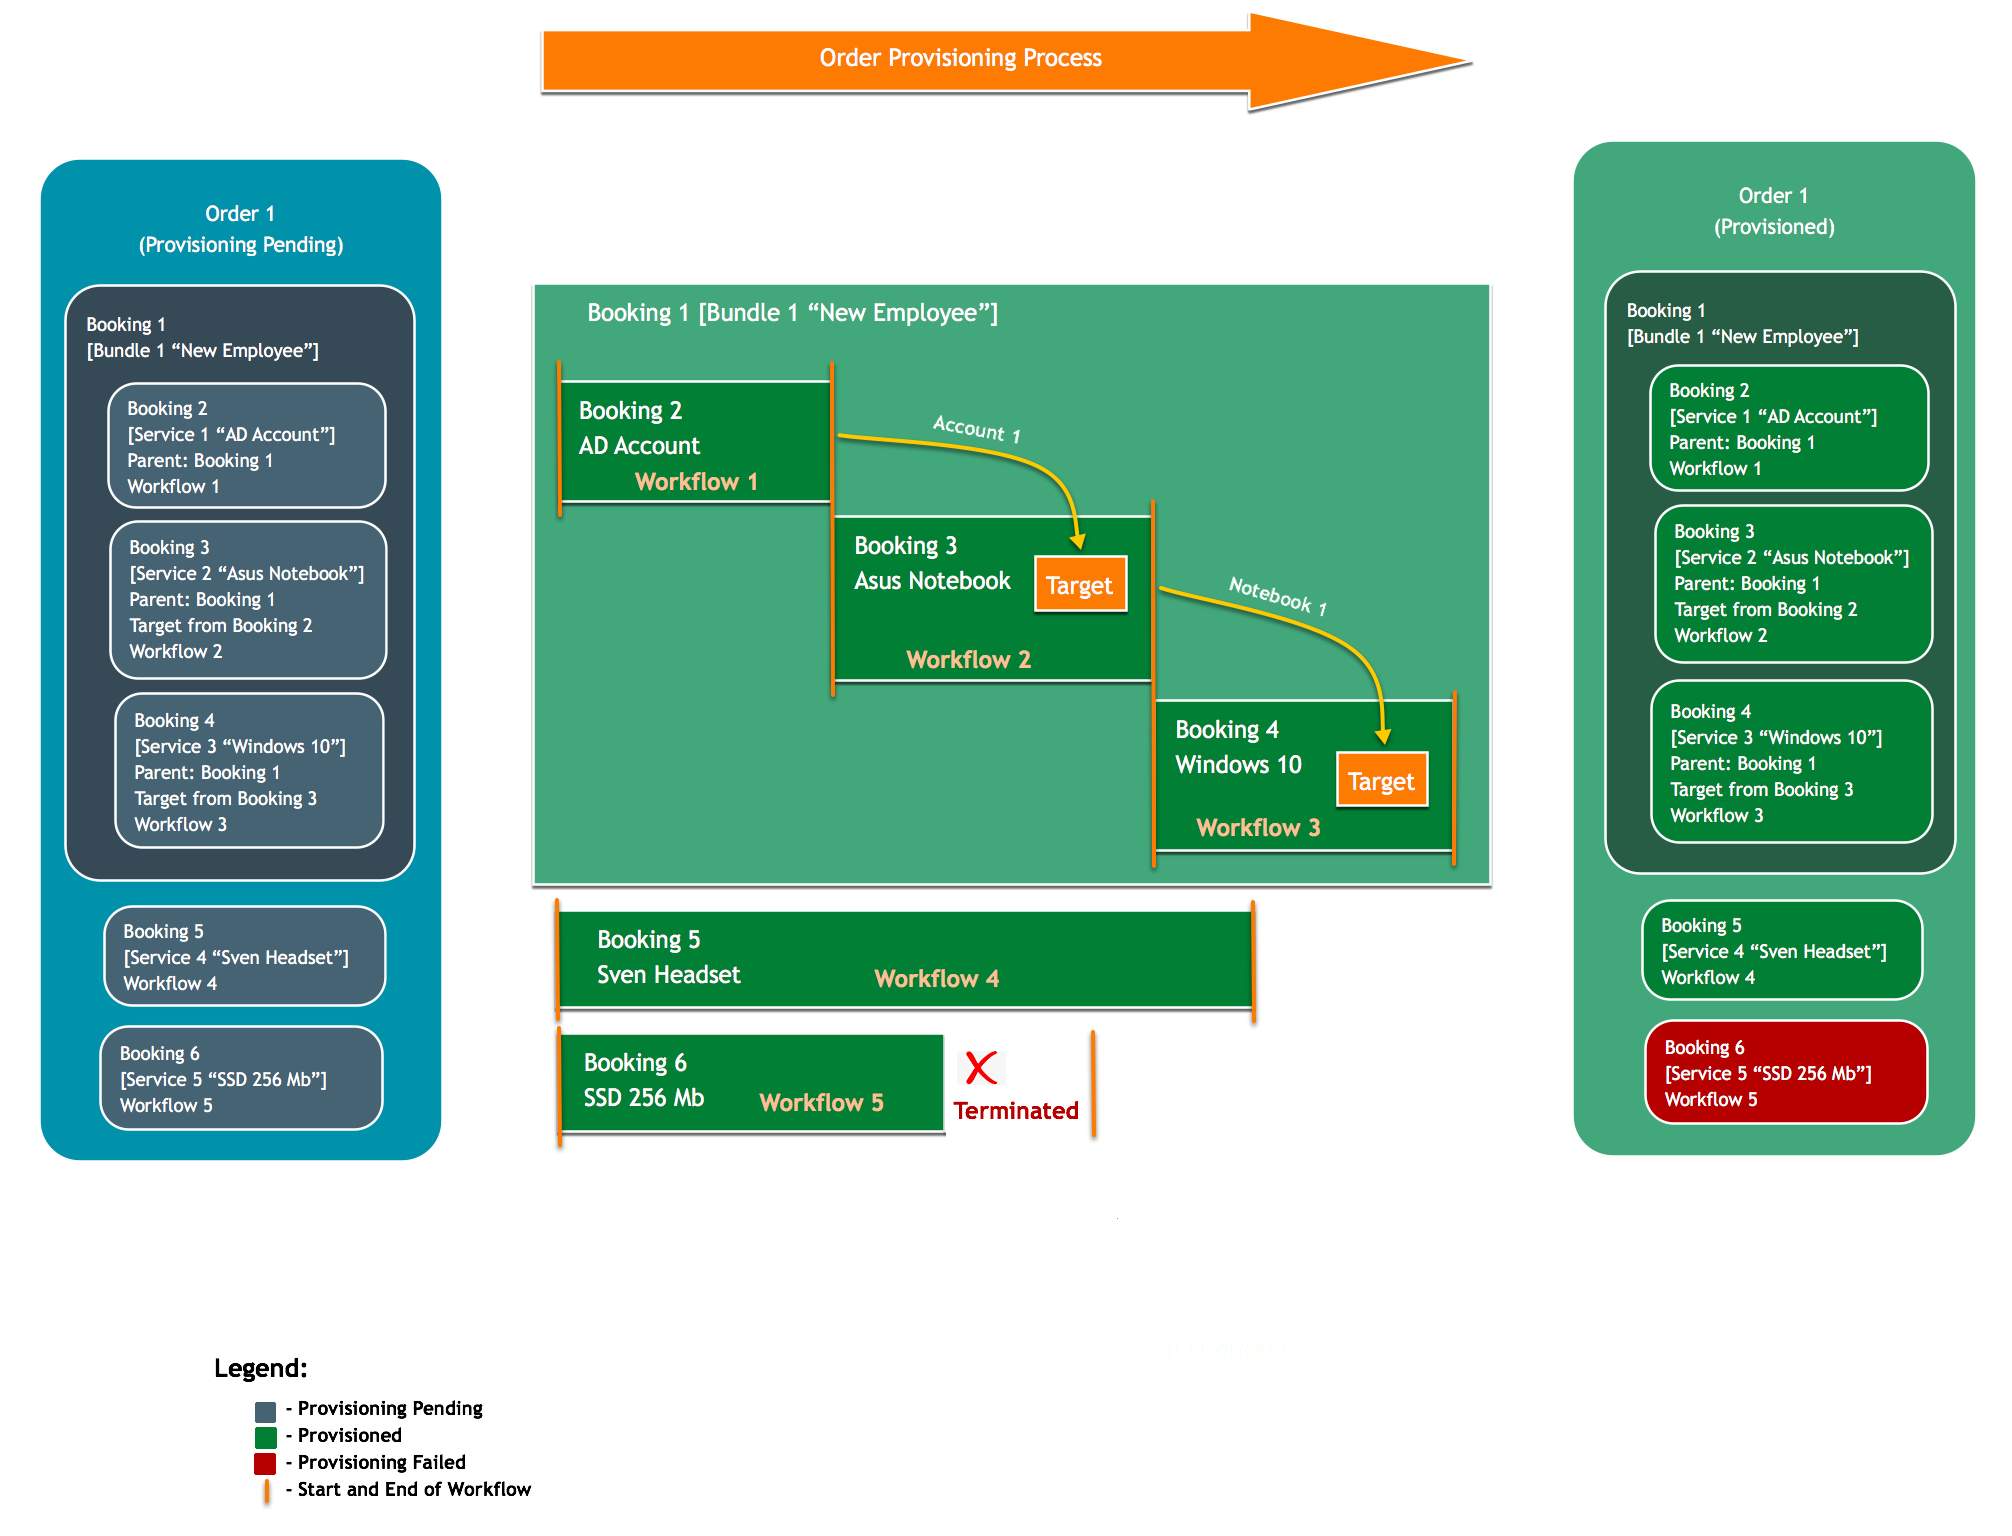
How to Set up Provisioning Process with Dependencies for Service Bundles: Example
Let’s take a look at the “New Employee” Service Bundle which is ordered any time a new employee joins the company. This Service Bundle contains two services:
- Service 1 “Hardware” (e.g. Computer) and
- Service 2 “Software” (e.g. Operating System to be installed on this specific Computer after it has been provisioned) to the new employee.
Ordinarily, when a user orders a software installation service, he/she must select a target (e.g. a computer or cell phone) on which this software must be installed.
Matrix42 also allows you to set up the provisioning process, which starts after the successful completion of the approval process, using dependencies so that when the Service Bundle is ordered, the user is not required to specify the target (i.e. the exact computer on which the software must be installed because it is unclear at this point which computer will be provisioned to the new employee).
Question: How to set up a Service Bundle so that a user is not required to select a specific target (computer) on which the software must be installed when ordering the Service Bundle, but rather have the system finish provisioning of Service 1 “Hardware” (Computer) from the New Employee Service Bundle and only then start provisioning of Service 2 “Software” for the provisioned computer?
Setting up Service 1 “Hardware”
- On the Provisioning dialog tab of the Service dialog (Service Catalog > Services), select the Provisioning - Assign Asset from Stock provisioning workflow.
- Make sure that the Stock Keeping Unit radio button is selected on the Stock dialog tab of the Service dialog.
- On the Stock dialog tab of the Service dialog, click the selection icon next to the Stock Keeping Unit field and select the Stock Keeping Unit from which you would like to select an Asset (a Computer in our example) for the provisioning workflow (selected at step 1). Available assets from the selected Stock Keeping Unit are added to the grid right below the Stock Keeping Unit field.
- When done selected the asset, click Done at the bottom of the Service dialog to save the changes and close the dialog.
Setting up Service 2 “Software”
- On the Provisioning dialog page of the Service dialog:
- in the Target Type drop-down, select “Computer”;
- in the Instance Type field, select “Computer (SPSComputerType)”;
- Click OK to save the changes and close the dialog.
Setting up “New Employee” Service Bundle
- On the Service Elements dialog page of the Service Bundle dialog (“New Employee”), click Service 2 “Software” in the grid.
- Under Provisioning Dependencies, specify service elements that must be provisioned before this service is provisioned: Service 1 “Hardware” in our case;
- Under Technical Target, in the Target Source Type drop-down list, select the Provided by Another Service in Set option.
As a result, when a user orders the New Employee Service Bundle, he/she will not be required to specify the target for the software. Provisioning of Service 2 “Software” will start only after the successful completion of provisioning of Service 1 ”Hardware”. Service 1 “Software” will be installed on the provisioned hardware (Service 1).