CRUD Security Management in UX
- Last updated
-
-
Save as PDF
Overview
Matrix42 security settings define access to applications and data by specifying who can preview, edit, create and delete data within the specified user role and its specific permissions.
Matrix42 security is managed from the Administration application → Security → User roles page.
Matrix42 platform provides a set of default user roles with pre-configured access to the standard content, actions and search areas of all out of the box Matrix42 applications.
All default roles are listed on the User roles page:

Default user roles:
- are provided out of the box;
- cannot be deleted;
- have pre-defined permissions;
- can be edited.
Managing roles and permissions
All settings in the Administration workspace should be configured with great care and by experts only. Otherwise, functional restrictions of Matrix42 Workspace Management may occur.
Before setting up new user role or managing the default settings it's best to fully understand how User Roles and Set Permissions work and which core concepts are standing behind.
Basic approach
Different roles imply different level of access to the data so that a user can have full access to one area of the application data and be just a viewer of another.
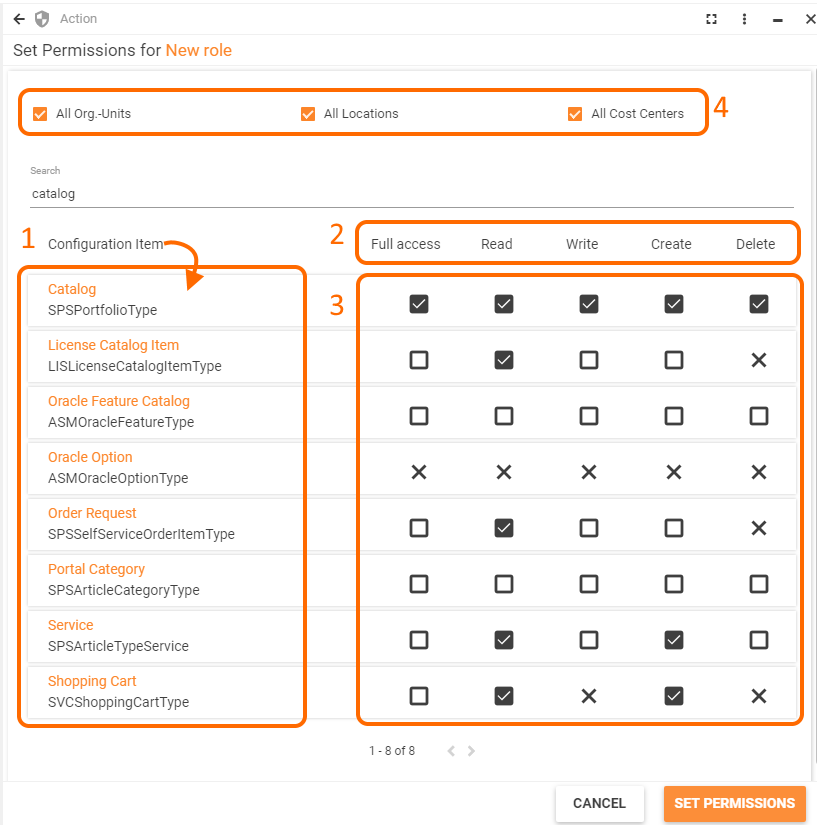
Set Permissions for a User Role allows:
- selecting Configuration Item which represents the accessed by the user data;
- previewing types of permissions available for each Configuration Item;
- applying specific settings for each type of permissions;
- additionally restricting data access for selected divisions of the organizational structure (Organizational Units, Locations, and Cost Centers):

Each stage of the User Role Permissions settings is described in detail below.
Configuration Items
User Role permissions define which operations can be performed with the Configuration Item's data.
Permission types
Each role has individual access to the application's data. This access is managed by restricting permissions which are split by type of basic functions performed upon the data, also referred to as CRUD operations:
- read: defines whether the data of a specified application area is visible to users in general. This option means that it is possible to create a role that is allowed to edit or delete entries, but since the read permission is not enabled users cannot preview the Configuration Item data and, effectively, are not able to do anything with it. Configuration Item data objects with disabled read permission are hidden in the corresponding application.
- write: defines whether the user role can edit and modify the Configuration Item data. A user who cannot change the Configuration Item data might still be able to preview it in a read-only mode if appropriate permission is set;
- create: allows users creating new data objects within a specified Configuration Item;
- delete: allows to remove existing data objects;
- full access: allows managing complete access to the data of a specific Configuration Item data by setting permissions to all CRUD operations at once.
Permission settings
Every permission which is not explicitly allowed is denied.
For instance, entries editing is enabled, but reading is not allowed. In this case, the user won't be able to open the entries. Such an approach might seem inconsistent, but it actually prevents unsolicited access to the data which is not intended for the considered user role.
Permission settings are managed by the Set Permissions action and have the following options for specified Configuration Item:
 not set: a default option implies that the access is implicitly denied;
  allowed: click the default checkbox once to explicitly grant access;
 denied: click one more time to revoke the permission and change the allowed setting to a cross icon, stating that the access is explicitly denied.
Not set and denied options may seem confusing as they both are intended to deny access, although they are necessary for managing overlapping permission settings, as the user can belong to more than one user role. In this case, the permissions of the individual roles, either standard or manually created, are accumulated and calculated according to the priorities as mentioned here.
Organizational structure
By default, all standard and new user roles are applied for all divisions of the organizational structure represented in the application.
User role settings allow fine-tuning and restricting assigned permissions to specific divisions and sub-divisions of the organizational structure, among them:
To avoid performance issues tend to apply restrictions to only one type of organizational structure division in one user role: either Organizational Units, Locations or Cost Centers.
To apply permissions for specific divisions of the organizational structure on the Set Permissions configuration page:
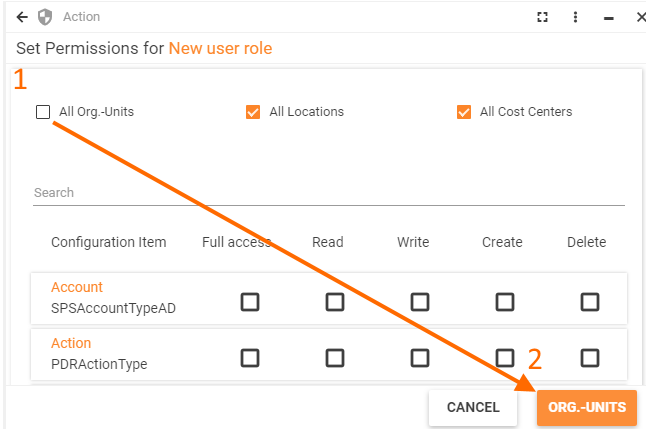
- Clear the checkmark of the necessary organizational structure type, for example, of an Organizational Unit:

- Proceed to specific Organizational Units;
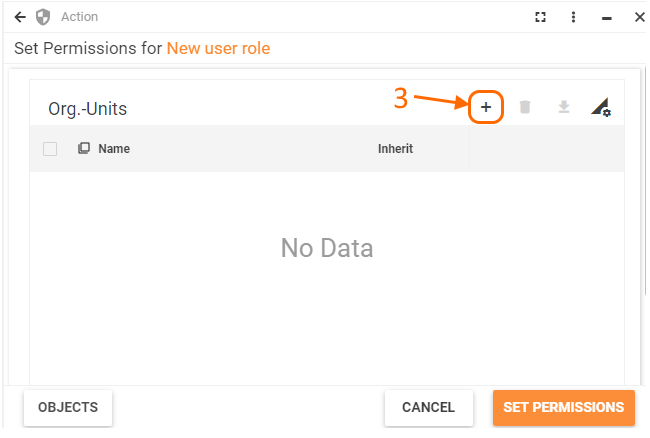
- Add necessary Organizational Units:

- Use the search icon to browse the list of Organizational Units available in the system:

- Configure Inherit checkbox option:
- select the checkbox to apply permission setting for the selected Organizational Unit and all its sub-divisions (Organizational Units may have a tree structure so that specified permissions will be applied to the current Organizational Unit and all its child items);
- clear the checkbox (default) to apply permissions only to specified Organizational Unit.
Add as many Organizational Units as necessary for the edited user role and proceed according to suggested options.
The same flow is applied for Locations and Cost Centers.
Default permissions
Every new user added to the application is automatically assigned a default user role "Everyone".
"Everyone" user role is assigned implicitly so that the featured permissions cannot be revoked. In other words, this user role has pre-configured default permissions providing its users minimal access to the application's data management.
Everyone user role access is rather limited. User role settings allow assigning more than one user role to the same user in order to expand access to the application data.
Assigning user roles
Every user can be a member of more than one user role.
To assign a user role:
- User role settings: in Administration application → Security → User roles list click edit user role and add necessary users via Members tab;
- Persons: user roles are also assigned to the users represented in the Master data application as Persons.
When the new User Role is assigned, the user needs to re-login to the system to see the applied changes.
Overlapping permissions
Every user can be a member of more than one role, therefore the permissions of the individual roles are accumulated and only one permission settings option is applied for each permission type. Let us examine it in more detail.
User roles assigned a specific user may have contradictory overlapping permission settings for the same Configuration Item data, for instance:
|
User role
|
Configuration Item
|
Read
data operation
|
| User Role A |
Announcement
SVMAnnouncementType
|
 denied denied
(explicitly denied)
|
| User Role B |
Announcement
SVMAnnouncementType
|
 allowed allowed
(explicitly granted)
|
| User Role C |
Announcement
SVMAnnouncementType
|
 not set not set
(implicitly denied)
|
Overlapping permission settings are accumulated and calculated according to the following priority:
-
 explicitly denied: has the highest priority among all 3 permission settings options and revokes the user access to the data operation for the specified Configuration Item;
 explicitly allowed: access to the Configuration Item's data management is explicitly allowed. This option is applied if the explicitly denied setting for the current data operation of the specific Configuration Item is not represented in any of the assigned to the user roles;
 not set: access to the Configuration Item's data management is implicitly denied if no other option with higher priority is set in other assigned to the user roles.
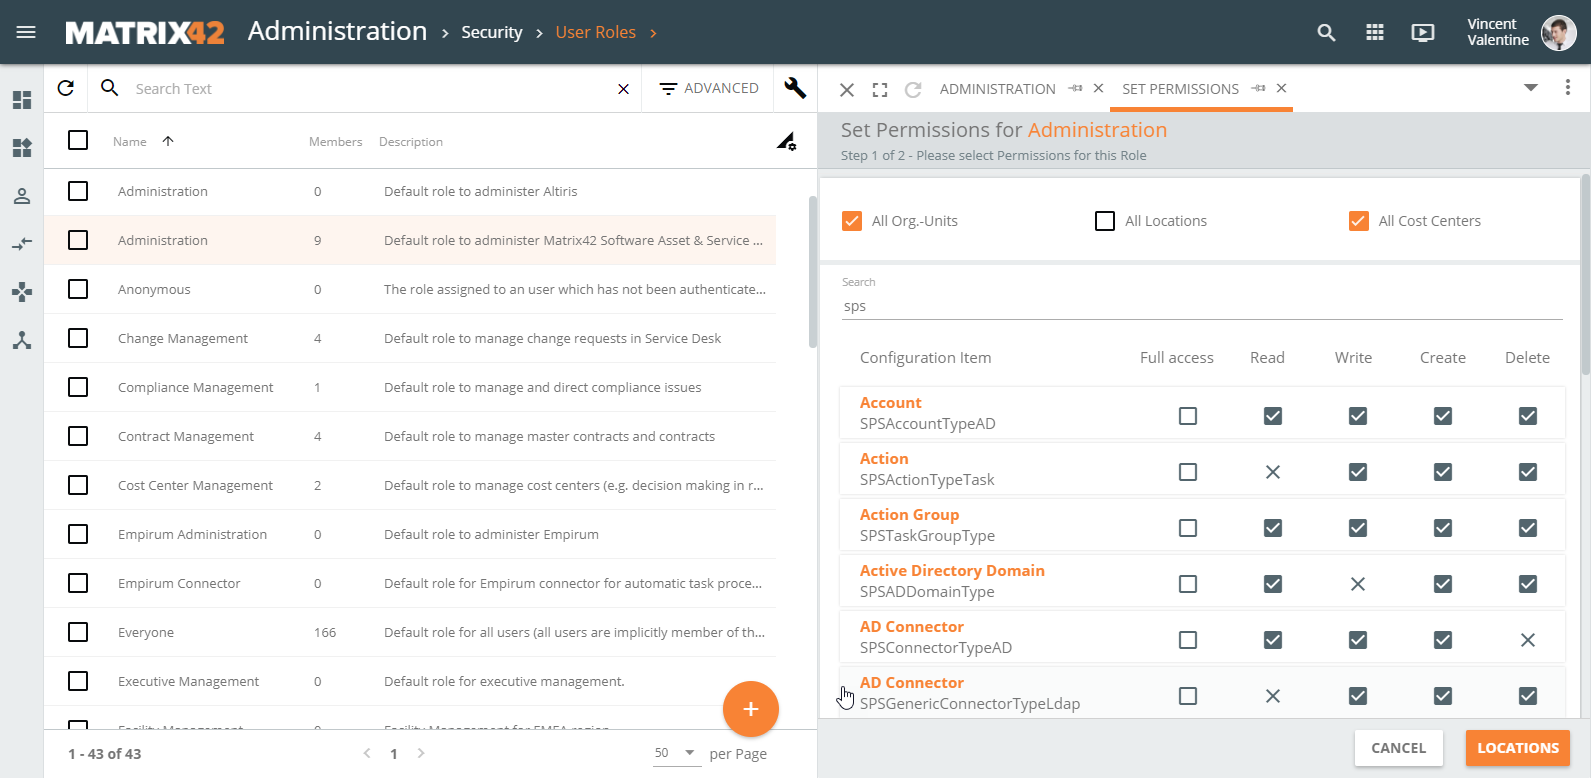
If you would like to limit the rights granted to the User Role at the initial step of the wizard by Organizational Unit(s), Location(s), or Cost Center(s), deselect corresponding checkboxes at the top of the Wizard. With every deselected checkbox, an additional step is added to the Wizard which allows you to further limit the rights.

- Step 2 (optional): Limit Rights by Organizational Units.
If you deselect the "All Org.-Units" checkbox at the top of the initial step of the Wizard, you will be able to limit the rights granted to the User Role by Organizational Unit(s). At this step, locate and add to the grid Organizational Unit(s) whose members will have the rights granted at Step 1.
Click the SET PERMISSIONS button (available at the final step of the Wizard) to save the changes and complete the Wizard.
Alternatively, click the LOCATIONS>> or COST CENTERS>> button at the bottom of the Wizard to go to the next step. The buttons are available only if you have deselected corresponding ("All Locations" and "All Cost Centers") checkboxes at the top of the initial step of the Wizard.
- Step 3 (optional): Limit Rights by Locations.
If you deselect the "All Locations" checkbox at the top of the initial step of the Wizard, you will be able to limit the rights granted to the User Role by Location(s). At this step, locate and add to the grid Location(s) whose members will have the rights granted at Step 1.
Click the SET PERMISSIONS button (available at the final step of the Wizard) to save the changes and complete the Wizard.
Alternatively, click the COST CENTERS>> button at the bottom of the Wizard to go to the next step. The button is available only if you have deselected the "All Cost Centers" checkboxes at the top of the initial step of the Wizard.
- Step 4 (optional): Limit Rights by Cost Centers.
If you deselect the "All Cost Centers" checkbox at the top of the initial step of the Wizard, you will be able to limit the rights granted to the User Role by Cost Center(s). At this step, locate and add to the grid Cost Center(s) whose member will have the rights granted at Step 1.
Click the SET PERMISSIONS button at the bottom of the Wizard to save the changes and complete the Wizard.
Reports
To get a better overview of all configured permissions a series of reports is provided. Those reports will help during audits and in cases of trouble shooting.
The reports aggregate all defined settings based on either role or person and audience.
- Person Permissions
- List of permissions based on a selected person. Security Roles are outlined at permission level.
- Role Permissions
- List of permissions based on a selected Security Roles. Members of the tole are outlined.
- Compare Users
- Two columns show permissions of selected users.
All three reports do have one section to either show (True) or hide (False) parts of the report based on the radio button settings.

'Web Services' are included in the 'Web Service Operations' option.
In case of person centric reports 'Person Permissions' and 'Compare Users' the 'Last Name' text box will help to reduce the amount of results in the 'Users' list option.
Latter one will show the users based on 'Last Name, First Name'.


 not set: a default option implies that the access is implicitly denied;
  allowed: click the default checkbox once to explicitly grant access;
 denied: click one more time to revoke the permission and change the allowed setting to a cross icon, stating that the access is explicitly denied.

