Create administrators and roles
Creating administrators and roles
There are three types of administrators in the Console:
- Supervisor: The supervisor is created during the installation of EgoSecure Data Protection. If not, supervisor is created during the first login to the Server. Receives all permissions, which cannot be restricted.
- Super administrator: A super administrator is created by the supervisor. He owns all rights. The rights can be restricted by the supervisor by hiding console commands for the super administrator. Any number of super administrators can be created. A Windows user account can also act as a super administrator.
- Administrator: An administrator is created by the supervisor or a super administrator. The rights of an administrator may be restricted by the supervisor or a super administrator through global or domain-specific roles. Any number of administrators can be created. A Windows user account can also act as an administrator.
Creating administrators in Console
You can create a new administrator in the Console or add a Windows user as an administrator. Once the Windows user is logged in to Windows, he can access the Console directly without further login (single sign-on).
Creating new administrator
- Go to Administration | Superadmin | Administrators & scopes.
- In the Administrators area, click the Super administrators or Administrators tab.
- Click Create.

- The Create account dialog appears.
- Define login and password for the administrator account.
- In the E-mail field, define an e-mail address of an administrator/super administrator.
- If later a super admin or a supervisor changes the e-mail of an administrator, the last changed e-mail is considered as a valid one.
- Click OK to confirm.
- The new administrator appears in the Administrators tab.
Granting administrative permissions to Windows user
- Go to Administration | Superadmin | Administrators & scopes.
- In the Administrators work area,
- click From AD in the Super Administrators tab to grant super administrative privileges or
- click From AD in the Administrators tab to grant administrative privileges.
- The Selection of users dialog appears.

- Select a user from a directory service structure. You can select several Windows user accounts as console administrators at once.
- Click OK.
- The new administrator appears in the Administrators tab. The selected user can now log on to the Console with his current Windows account as an administrator without having to specify the login data again (single sign-on).

Restricting Console layout
Define which Console sections are visible to all available super administrators and administrators of a currently used tenant or only to administrators (depends on the selected Console policy). Administrators must additionally have the role for viewing or modifying the section that is permitted within the Console layout.
Defining visible and hidden Console layout elements
- Go to Administration | Superadmin | Console layout.
- Set the check boxes for layout elements which must be visible, clear the check boxes for layout elements which must be hidden.
- Click Save.
- Click Export to save the Console layout. Exported Console layout can later be imported to another server or another tenant.
Defining administrator types for applying the console layout
- Go to Administration | Superadmin | Console policies.
- In the Console layout area, select whether the Console layout applies to both super administrators and administrators or only to administrators.
- Click Save.
Creating and assigning administrative roles
To restrict the rights of administrators (not super administrators), you can create roles and assign them to administrators. You determine, whether a role owner gets write or read access (or both) for certain options. Global roles apply to all directory service structure objects. Via scope specific roles, you determine for which areas of the directory service structure the roles apply.
Creating global role
- Go to Administration | Superadmin | Administrative roles.
- In the Administrative roles area, click the Global roles tab.
- Click Add.
- A new entry with the name New role appears in the list.
- Double-click the name to edit it.
- Press Enter to confirm the name change.
- In the Operations – [role name], edit the rights for certain options.
- In the Administrative roles work area, click Save on the toolbar.
Assigning global role
- Go to Administration | Superadmin | Administrators & scopes.
- In the Administrators area, select an administrator.
- In the Administrative roles – [admin name] work area, click the Global roles tab.
- Enable the check box with the role that you want to assign to the selected administrator.
- In the Administrative roles work area, click Save on the toolbar.
Creating scope specific role
- Go to Administration | Superadmin | Administrative roles.
- In the Administrative roles – [admin name] area, click the Scope specific roles tab.
- Click Add.
- A new entry with the name New role appears in the list.
- Double-click the name to edit it.
- Press Enter to confirm the name.
- In the Operations – [role name] area, edit the rights for certain options.
- In the Administrative roles work area, click Save.
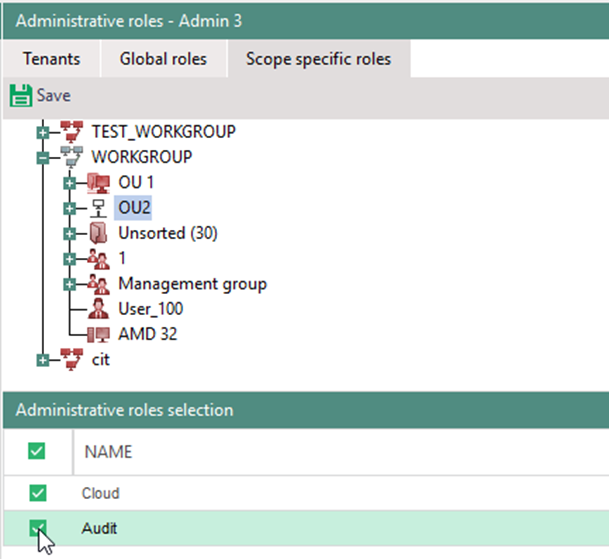
Assigning scope specific role
- Go to Administration | Superadmin | Administrators & scopes.
- In the Administrators area, select an administrator.
- In the Administrative roles work area, click the Scope specific roles tab.
- Select an area in the directory service structure.
- In the Administrative roles selection area, enable the checkbox of the role that you want to assign to the administrator of the selected area.
- In the Administrative roles – [admin name] work area, click Save

- The administrator receives the rights of the role for the selected scope of the directory service structure. Other areas for which the role does not apply are marked in red. When clicking on one of the areas marked in red, the check box for the selected role disappears in the lower section.