Release Notes Silverback 18.0 Update 3
About this release
Matrix42 Silverback 18.0 Update 3 provides new and improved features that have been implemented. During the development of this version, we have been focusing on valued feedback from our customers and partners in order to provide an ideal feature selection.
Please find the installation files of this version on Matrix42 Marketplace.
System requirements, instructions for installation and update as well as for basic configuration are available in the Matrix42 online manual.
Overview
New Features
- iOS
- Android
- Display Android Security Patch Level
- Samsung Safe - NFC Restrictions
- SamsungSafe - Tethering Restrictions
- SamsungSafe - Call Restrictions
- SamsungSafe - SMS Restrictions
- SamsungSafe - MMS Restrictions
- Manual Reinstallation Option for App Portal and WebClips in Companion
- Automatic Reinstallation of App Portal and WebClips in Companion for Android 7.1+ devices
- Privacy screen
- Windows 10
- Console
Improvements
- Mobile Operator Dashboard Summary includes now only active devices
- Companion App on Android displays now full profile list
- Companion App on Android displays now installing status for Enterprise Apps
- Android Enterprise profile installations has been improved
- Volume Purchase Program Applications will now be updated automatically
- Sorting VPP Apps is now possible via App Name
- VPP License Scrolling is now much faster
- Manual VPP App assignment is now much faster
- Certificate Area is now restructured under Settings Admin > Certificates
- Device Actions are now consolidated under "More" Button
- Companion Push Certificate has been updated
- iOS Restriction Allow App Store is listed now in supervised sections
It will still work for an unknown timeframe with non supervised devices, but the setting / payload is deprecated by Apple.
- When passcode settings are enabled in iOS, Account Modification and App Store are listed as a child item of Passcode Modification due to dependency
- Device Enrollment Program Account Overview display now more than 1.000 devices
- Updated iPad device types list
Minor Changes
- Removed Nitrodesk Touchdown from Device Information Page
- Removed Windows 10 Only information on Certificate
- Removed deprecated S-MIME Mode
- Changed Name of EPiC Push Certificate to Companion Push Certificate at licenses
- Changed Name of iOS7 App Config to iOS7+ App Config
- Changed Name of VPP App Licensing to Volume Purchase Program
- Changed Name of Simple Enrollment Program to Device Enrollment Program
- Changed Name for ID columns under Volume Purchase Program
- Fixed bad markups on Settings Admin Pages
- Fixed not seen in last days display issue
- Fixed difficulty for adding columns in device overview
- Fixed order for Resultant Tags on SamsungSafe devices
- Fixed oversized side menu when Knox is enabled
- Fixed displayed items when searching for applications at Assign More Apps
- Fixed connection error when searching for profiles by ID in Tags
- Fixed enrollments for users with u_ in name for iOS
Fixes
- PRB31508: ActiveSync Include User Password in Exchange Profile
- PRB31221: iOS Supervised Restriction for "Allow Passcode Modification"
- PRB32062: iOS Supervised Restrictions for "Allow Account Changes"
- PRB31915: Certificate List on devices needs a manual refresh
- PRB31916: Device Overview displays blacklisted apps as installed
Last calls
The following parts or features will be discontinued:
- Windows Phone 8
- TPAMS
- AerialLink
New Features
iOS
This chapter is about all feature changes or updates for iOS devices in Silverback 18.0.3. This includes iPhone and iPad.
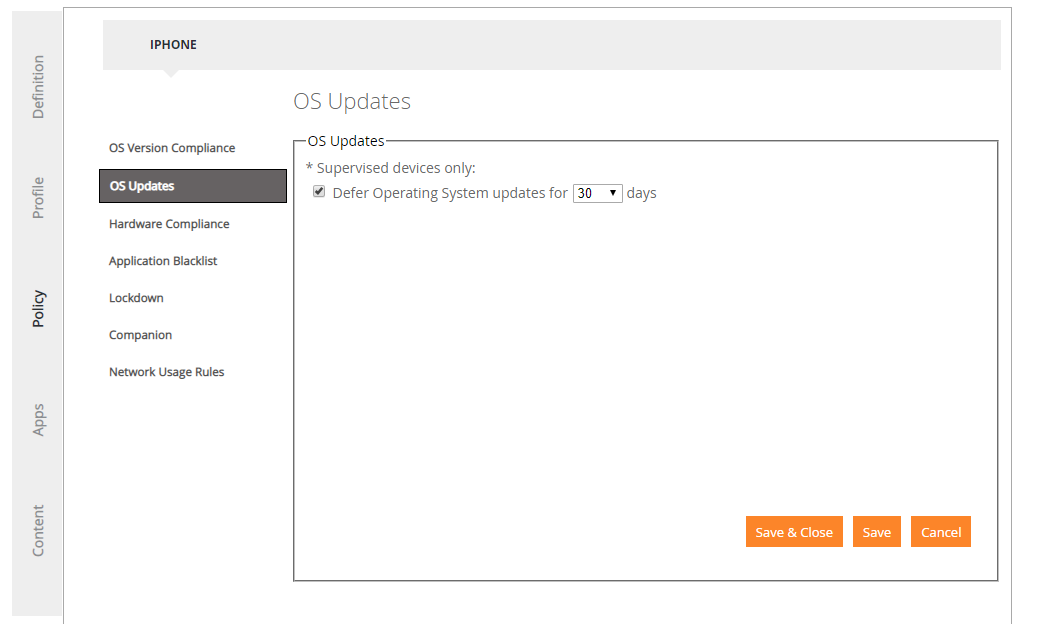
Defer Updates
A common question that you may already faced is how can we prevent our devices from updating to the latest version of iOS and how can we test the new iOS update before our users will install it? Often, organizations wish to check the latest iOS release, verifying that the business-related apps they are functioning properly on the devices used by their organization. Starting with iOS 11.3 and for supervised devices Apple began to offer the possibility to specify a number of days to delay software updates, with a maximum of 90 days. With this option enabled, the user of the device will not see a software update until the specified number of days has passed since the release.
With Silverback 18.0.3 we are happy to present the functionality of deferring OS Updates.
Perform the following steps to enable the feature:
- Navigate to Tags
- Edit or Create a new Tag
- Enable Profile Feature
- Enable Policy Feature
Profile and Policy Features must be enabled.
- Enable Device Types iPad and / or iPads
- Navigate to Policy
- Click OS Updates
- Enable Defer Operating system updates
- Select how many days you want to defer OS Updates (1-90)
- Click Save & Close
Create different Tags with different values to allow new OS updates in waves. Here is an example how it could look like:
- Do not use the feature for the internal IT or MDM department.
- Enable and restrict set the policy for Pilot Users to 14 days
- Enable and restrict set the policy for non-critical departments to 30 days
- For critical department use the maximum value of 90 days.
Push Updates for single device
As the complete opposite of deferring updates we are also happy to announce that Silverback 18.0.3 offers the ability for Administrators to push available OS Updates to supervised iOS devices. This should force an instant download of the available OS Update and will afterwards update the OS without any user action. In this case the word should is carefully considered because triggering OS update today isn’t always as reliable as it should be. A couple of blogs dealing already with this issues and name it like "Hitting a moving target" and this statement is accurate because sometimes the devices react not as they should. In most cases everything works fine, but in some cases the update will be downloaded, but not automatically installed. We are using the default install action command for devices which is designed for Download and/or install the software update, depending on the current device state. It means the software update should be downloaded and installed or installed when its already downloaded.
So how is the Push Update functionality working in Silverback?
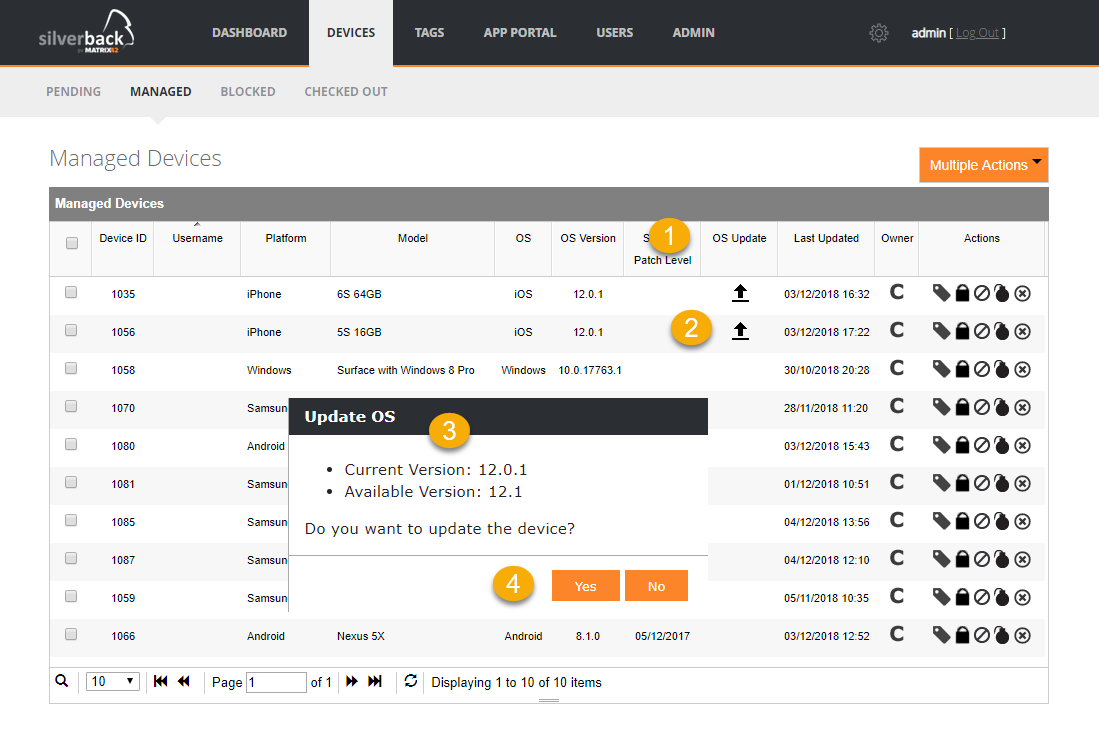
- A new column named OS Update is added into Device Overview
- Silverback detects with the device inventory that an OS Update is available
- In OS Update column Silverback displays an available OS Updates icon
- Administrator selects the device which should be updated and clicks the Update available icon
- A new pop-up is shown with the current and available version
- Administrator click Yes
- Silverback sends out the InstallAction command to the device
- Device downloads the update
- Device informs user that the device will be rebooted in a couple seconds
- Device installs the update
- On next device inventory the new OS Version is visible
- The Update available icon disappears
You may experience the best behavior with the following parameters:
- Device should be plugged into a power source
- Device needs minimum 50% of battery for installing an update or is plugged into a power source
- Devices has enough space
- Push updates during off-hours
- Push updates at one day, check the result on middle of the next day
- Push updates again to devices which are not updated yet
- Updates are probably already downloaded on device
- Push again will then install it when device has enough space and battery
Push Updates for multiple devices
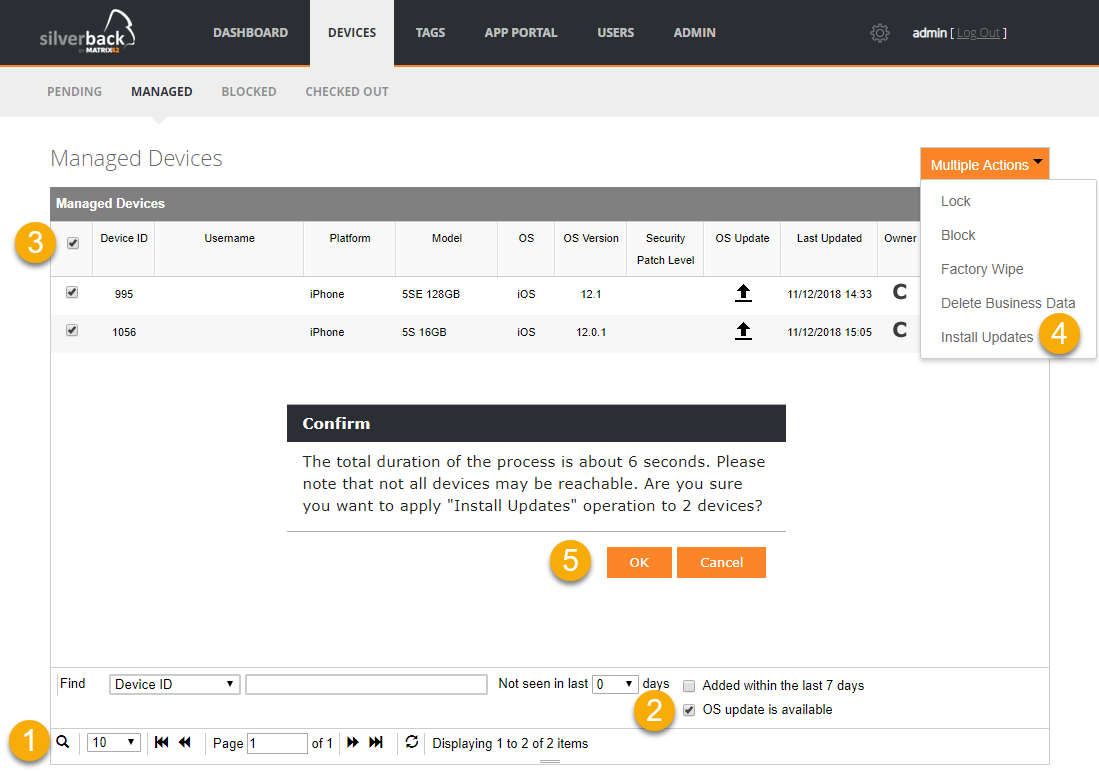
Besides pushing updates for single device we added Install Updates as a multiple action in Silverback 18.0.3. The process for push updates to multiple device is straight forward in two different ways. The first is just to select more than one device with an available update, click Multiple Actions and Install Updates.
As a reminder, the Multiple Actions button will be activated when more then 1 device is selected
Secondly we implemented a smarter way for a number of devices. To see how it works, proceed with the following steps:
- Click the Magnifier Icon
- Enable OS update is available checkbox.
- Now a list of all supervised iOS devices with an available update is shown
- Select all devices
- Click Multiple Actions
- Click Install Updates
- Confirm with OK
Please read carefully the section above about Push Update for a single device.
New Device Actions
In this release we worked on new device management options, that Apple provides. You will notice the result in every iOS device overview page, where we added a couple of new device actions. The new actions require all the supervised mode and are combined under the More button.
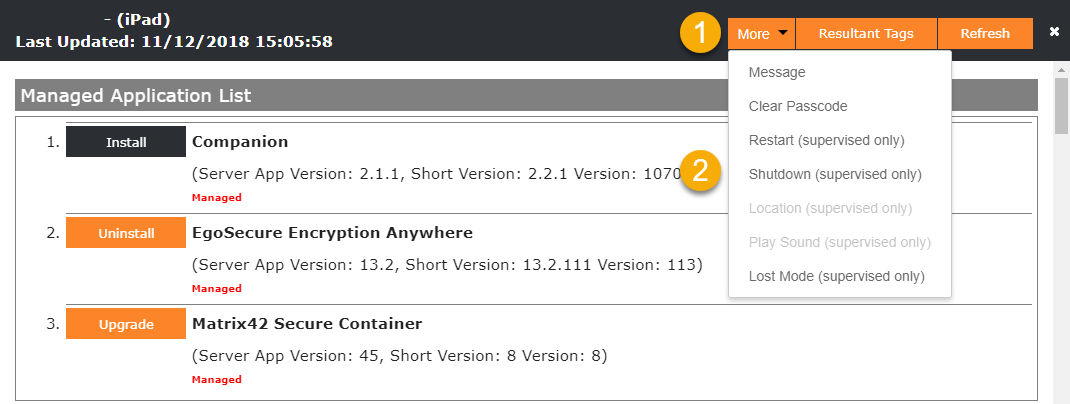
The new device actions includes:
| Device Action | Description |
|---|---|
| Restart |
After confirming the operation, the device will immediately reboot without any user notification as soon the Restart Device command has been processed. Passcode-locked iOS devices do not rejoin Wi-Fi networks after reboot until they were unlocked. |
| Shutdown |
After confirming the operation, the device will immediately shutdown without any user notification as soon the Restart Device command has been processed. |
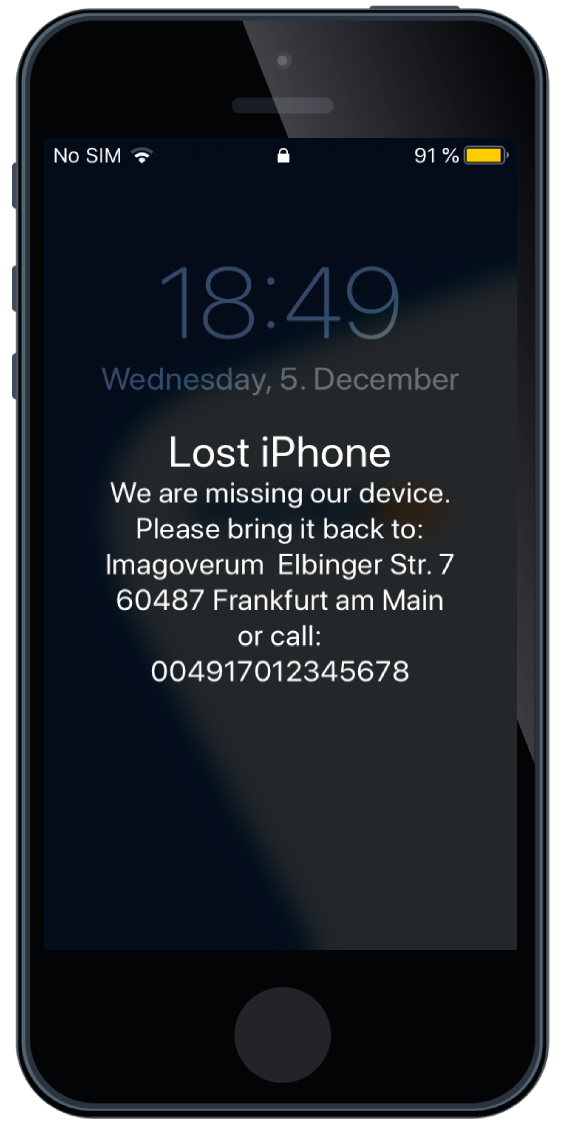
| Lost Mode |
When a device get lost or stolen enable the Lost Mode. In the next window enable Lost Mode, enter a phone number (e.g. 004917012345678) where the finder can reach you and enter a message. After enabling Lost Mode and a device refresh you will notice the Lost Mode status (No or Yes) in the Device Information area. Enabled Lost Mode looks like this on each device: To disable Lost Mode click Again Lost Mode and uncheck the enabled checkbox |
| Location |
After enabling the Lost Mode and after a refresh of the device, the Location action will be available. Please keep in mind that the device needs to respond first to Silverback that it is currently in Lost Mode to track the location. So you will probably need a manual refresh of the device, then you will the see the active Lost Mode in Device Information section. Click after the manual refresh again More, click Location and confirm. Click again Refresh and you will notice the Last known location status and a timestamp. Click on Map and you will be forwarded to Google Maps for the exact last known location of the device |
| Play Sound |
After enabling the Lost Mode and after a refresh of the device, the Play Sound action will be available. This command allows the server to tell the device to play a sound if it is in Lost Mode. The sound will play until the device is either removed from Lost Mode or a user disables the sound at the device. In practice the sound will sometimes play until you shutdown the device. |

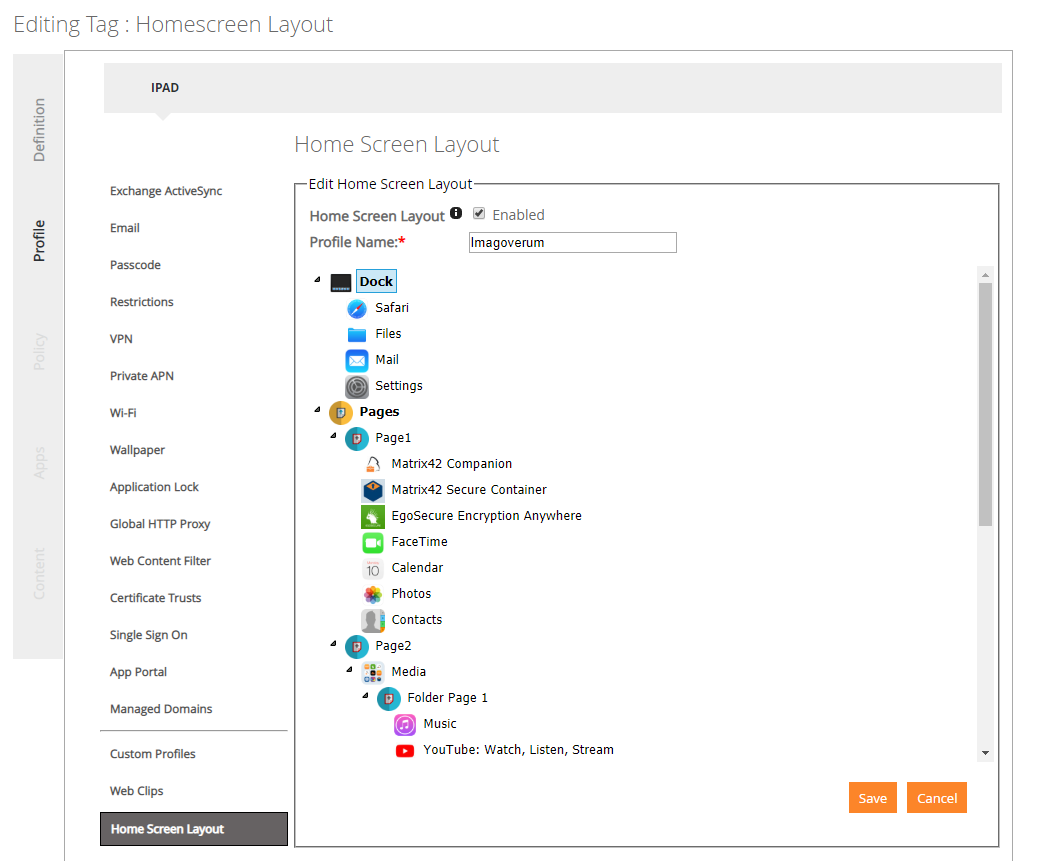
Home Screen Layout
We are excited to share with you the result of one of our most wanted Ideas in our Idea Portal. It was a highly recommended wish to arrange the icons on the iPads home screen via MDM. We can say now that this idea is realized in Silverback 18.0.3 as a feature called Home Screen Layout and it's possible for iPads and iPhones. Home Screen layout allows Administrators to organize app icons across supervised iOS devices. A unified layout of interfaces makes switching between devices easier and users and support can expect apps to be in the same location on their devices. Apps which aren't used very often can be moved to page 2 or 3 on the devices.
Let's start from the scratch:
- Navigate to Tags
- Click New Tag
- Enter a name and a description
- Enable Profile Feature
- Enable iPhone and/or iPad as device Type
- For testing purpose do not enable Auto Population
- Click Save
- Navigate to Profile
- Scroll down and click Home Screen Layout
- Enable Home Screen Layout
- Enter a Profile Name
Configure Home Screen Layout
- Right-Click Dock
- Click Add Application
Now you have a couple of options:
- Add Application
- Add Folder
| Add Application | Description | Handling |
|---|---|---|
| Select from native applications |
iOS delivers a couple of pre-installed or native applications with the operating systems. You can select them from here Native applications can only be added in English language |
Type as an example Phone, afterwards all results are shown with Phone in the name: e.g. Find iPhone and Phone. Click on the application icon to select the desired app Native applications can only be added in English language |
| Select from App Store | We implemented a direct search in Silverback, so that you can search for any app which is listed in the public App Store | Type as an example Matrix42 and you will see all Matrix42 related applications. Companion, M2Mobile and M42 Secure Container. Click on the application icon to select the desired app |
| Enter the Bundle ID of application | This field will be auto filled after selecting the desired App by select from native applications or from App Store. If you distributed any Enterprise app, then enter here the Bundle ID of your Enterprise App | Will be filled automatically or needs to be entered manually when adding an Enterprise app to Home Screen Layout |
| Enter the name of application | This field will be auto filled after selecting the desired App by select from native applications or from App Store. You can rename the application if you want but be aware that the Name is only visible in the Tag, the Application name on the devices will stay in the original name. | Will be filled automatically or can be entered or adjusted for convenience. |
Ensure that you enter just applications that you will deploy with Silverback to your device fleet or native application. So, every application, excluding native applications, should be available in App Portal section in Silverback.
| Add Folder | Description |
|---|---|
| Here you can enter the name of the folder you want to create on your Home Screen Layout. Afterwards you can add with Add Application apps that will be organized in this folder. The name you will enter here will be the name of the folder on every included device. |
Each folder contains pages. By default Silverback will create the Folder Page 1 as default. Right Click Folder Page 1 to add applications to that page.
- Right Click Pages
- Click Add
- Right Click Page 1
- Add here in the same way applications and/or folders.
- Proceed with creating pages and adding applications and/or folders
- For ordering everything just drag & drop folders or applications.
- Click Save
Some quick notes:
- Dock allows to add and assign overall 6 applications or folders
- Pages section allows to create overall 20 pages
- Each page allows to add 24 applications or folders
- If Dock or Pages are fully loaded it is not possible to drag & drop apps or folders into the right position. Remove one app or folder and rearrangement is again possible
- Apps that have not been assigned a screen position and apps that have been installed on the device manually will appear after the assigned apps
- Once a home screen layout has been applied, the app icon layout cannot be modified on the device itself
- If two or more Home Screen Layout profiles are assigned to one device, the latest modified will be in place
- Shortcuts can be used
- Rename (F2)
- Delete (Del)
- Add Application (Shift + A)
- Add Folder (Shift + F)
- Add Page (Shift + P)
As a result, it could look like this:
New Skip Setup Items for Device Enrollment Program
We've updated the Skip Setup Items area under Device Enrollment Program > Settings, so that now all currently available Setup Items for iOS and OS X can be skipped for pre-configured devices. The newly added items are:
| Skip Setup Items | Description |
|---|---|
| Zoom | Skips zoom setup |
| DisplayTone Setup | Skips DisplayTone setup |
| Privacy Pane | Skips privacy pane |
| Add Cellular Plan Pane | Skips the add cellular plan SIM Setup pane |
| Home Button Screen | Skips the Home Button Sensitivity screen in iOS. |
| iMessage and FaceTime Screen | Skips the iMessage and FaceTime screen in iOS. |
| On-boarding Screen | Skips on-boarding informational screens for user education (“Cover Sheet, Multitasking & Control Center”, for example) in iOS. |
| Screen Time | Skips the screen for Screen Time in iOS. |
| Software Update Screen | Skips the mandatory software update screen in iOS. |
| Watch Migration Screen | Skips the screen for watch migration in iOS |
| Choose Your Look Screen (OS X) | Skips the Choose Your Look appearance screen in macOS. |
| iCloud Analytics Screen (OS X) | Skips iCloud Analytics screen in macOS. |
| iCloud Documents and Desktop Screen (OS X): | Skips iCloud Documents and Desktop screen in macOS |
Detailed Logging for Volume Purchase Program
To make the life easier in support cases we added under Admin > Volume Purchase Program the ability to enable a detailed VPP logging. After enabling the checkbox, the detailed and complete process of updating Assets, Users and Licenses is shown in the Log Section under Click here to view VPP logs. This logging will display the following information:
- Connected IP Address from Apple Servers
- How long each process took
- How much items are collected
- Application Updates
- Which errors may occur
- When each step is done.
Support for Cisco AnyConnect on iOS12
Cisco iOS12 was accompanied with a switch to a new application. The application for below iOS12 is now with Silverback 18.0.3 named as Cisco AnyConnect legacy and the application for iOS12+ has been added and is named Cisco AnyConnect
Support for F5 2018 on iOS12
F5 iOS12 was also accompanied with a switch to a new application. The application for below iOS12 is still named F5 SSL and in Silverback 18.0.3 we added F5 2018 for devices with iOS12 and later.
Android
This chapter is about all feature changes or updates for Android devices in Silverback 18.0.3. This includes Android & Samsung Safe.
Display Android Security Patch Level
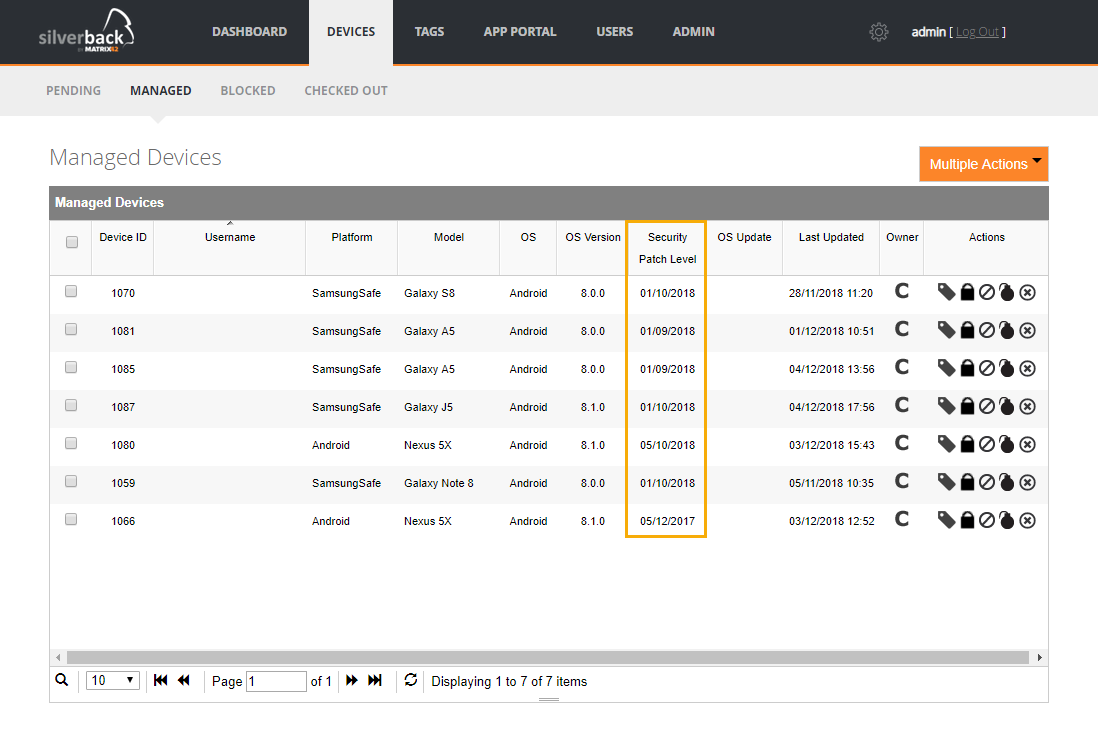
The operating system version on Android devices with newer Android versions does today not really give an overview of how patched the device currently is. Google launched for closing vulnerabilities more quickly the security patch levels which will come nearly every month. To provide all Silverback Administrators a quick overview of the current security patch level, we added one column in the dashboard overview which displays the Security Patch Level for the complete device fleet. You will find the Security Patch Level as well in the device overview for a single device below the OS Version information.
Displaying Security Patch Level requires minimum Companion version 2.1.4
Samsung Safe Restrictions
To provide Administrators more flexibility in handling Samsung Safe devices we added a couple of new restrictions for device interfaces, which are easily explained by their naming. By disabling the parent restrictions all child restrictions will be disabled as well.
All new restrictions requires minimum Companion version 2.2.0
| Restriction | Description |
|---|---|
| Allow NFC | Allows or disallows Near Field Communication |
| Allow SMS | Enables or disables all child items for SMS |
| Enable Incoming SMS | Allows or disallows incoming SMS |
| Enable Outgoing SMS | Allows or disallows outgoing SMS |
| Allow MMS | Enables or disables all child items for MMS |
| Enable Incoming MMS | Allows or disallows incoming MMS |
| Enable Outgoing MMS | Allows or disallows outgoing MMS |
| Allow Call | Enables or disables all child items for Call |
| Enable Incoming Call |
Allows or disallows incoming Calls. |
| Enable Outgoing Call |
Allows or disallows outgoing Calls Emergency calls will still work. |
| Allow Tethering | Enables or disables all child items for Tethering |
| Enable Bluetooth Tethering | Allows or disallows Bluetooth tethering. |
| Enable Wi-Fi Tethering | Allows or disallows Wi-Fi tethering. |
| Enable USB Tethering | Allows or disallows USB tethering. |
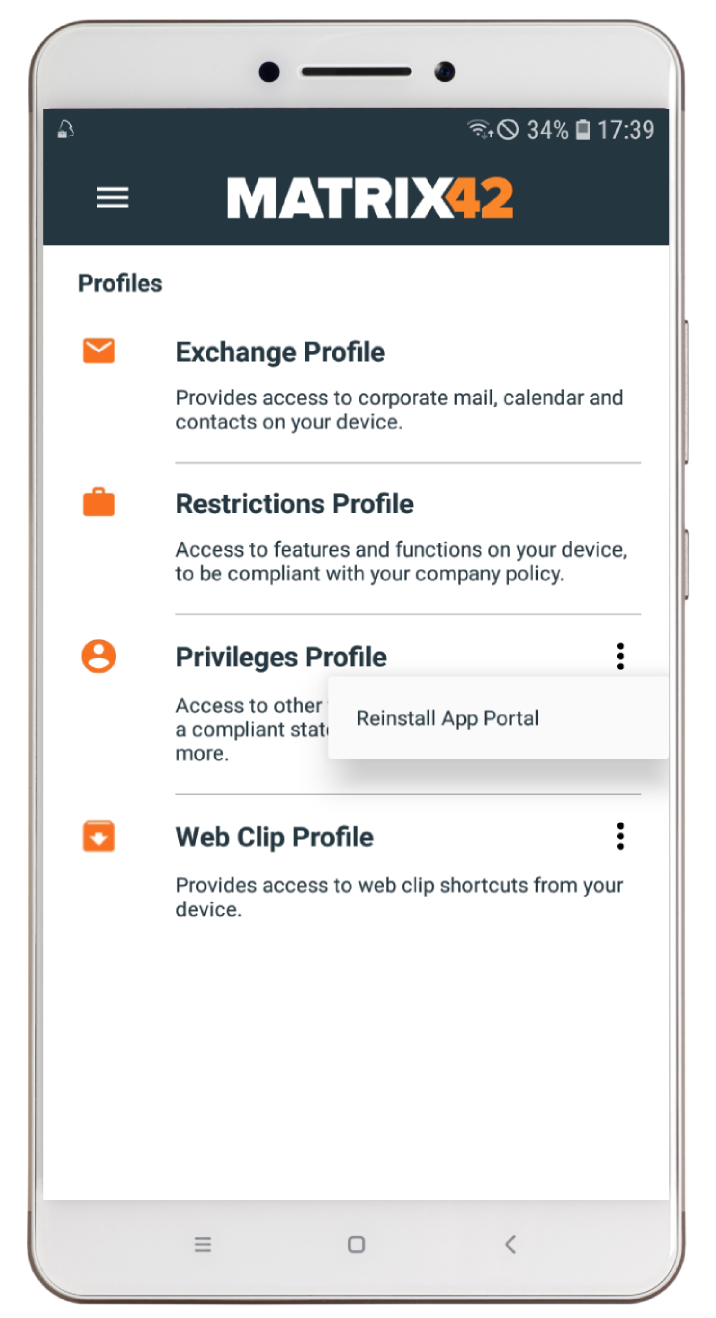
Manual Reinstall Option for App Portal and Web Clips in Companion
With Silverback 18.0.3 and Companion 2.2.2 we are happy to deliver a manual option to reinstall the App Portal and all assigned Web Clips to all users which deleted them by accident. This option is needed for devices with version for Android below 7.1 due to the fact that Android 7.1. and later offer the ability to automatically reinstall WebClips. Devices below Android 7.1 needs manual interaction with end users.
To reinstall App Portal and Web Clips perform the following actions:
- Open Companion
- Tab on the Hamburger Menu
- Tab Profiles
- Tab the three dots next to Privileges or Web Clip Profile
- Tab Reinstall
 |
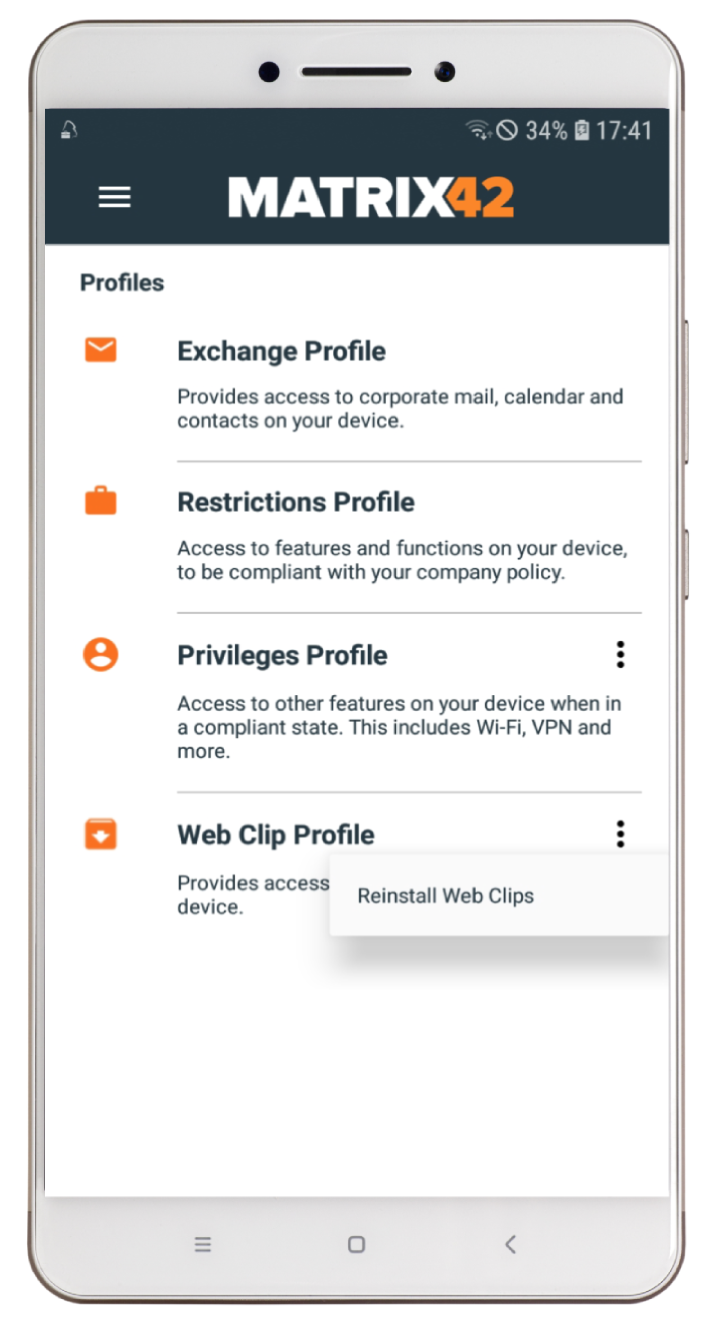 |
| Reinstall App Portal | Reinstall WebClips |
Automatic Reinstallation of App Portal and WebClips in Companion for Android 7.1+ devices
We are also happy to deliver an automated way to reinstall App Portal and assigned Web Clips besides the manual option. Companion now periodically checks the current condition and compares it with the should condition and if a mismatch appears, the end user will be prompted to re-install App Portal or Web Clips. Please note that this functionality needs devices with Android operating system version equal or higher then 7.1
Privacy screen
To make it more transparent we have added a Privacy screen into Companion for every end user, thus a user can see which type of information is collected by Silverback.
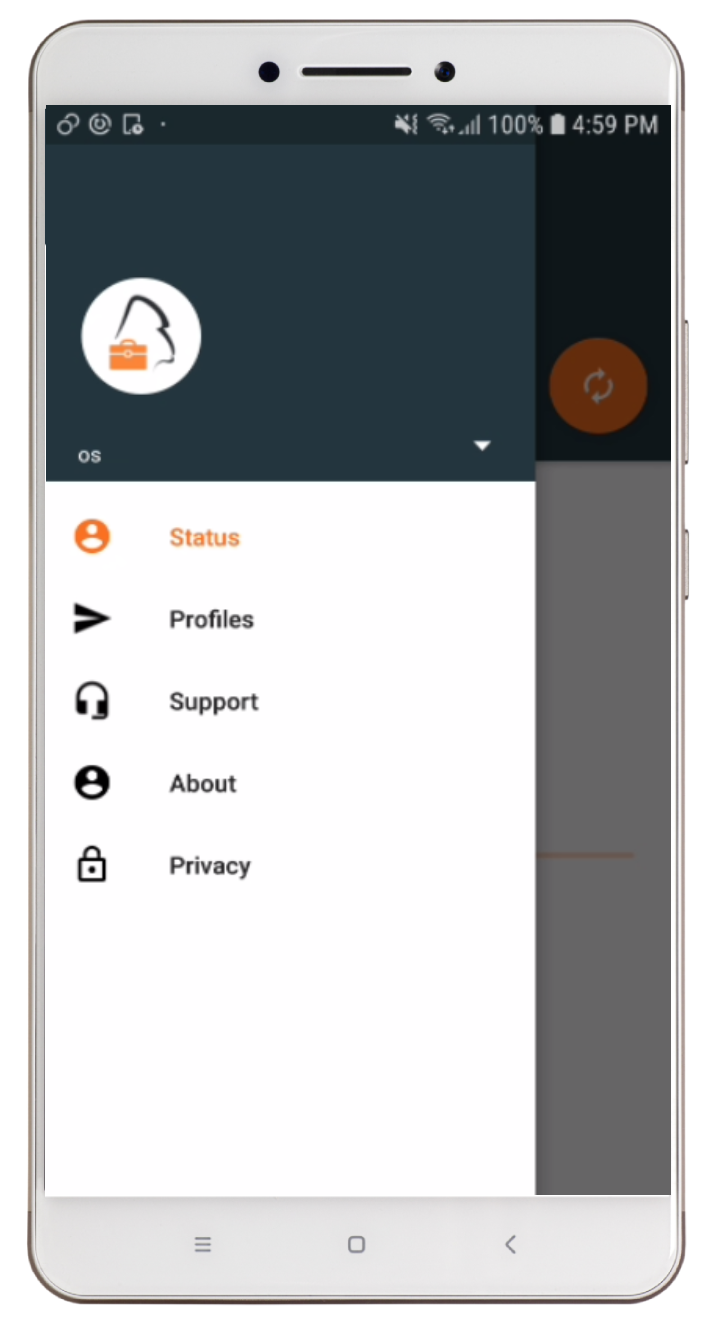 |
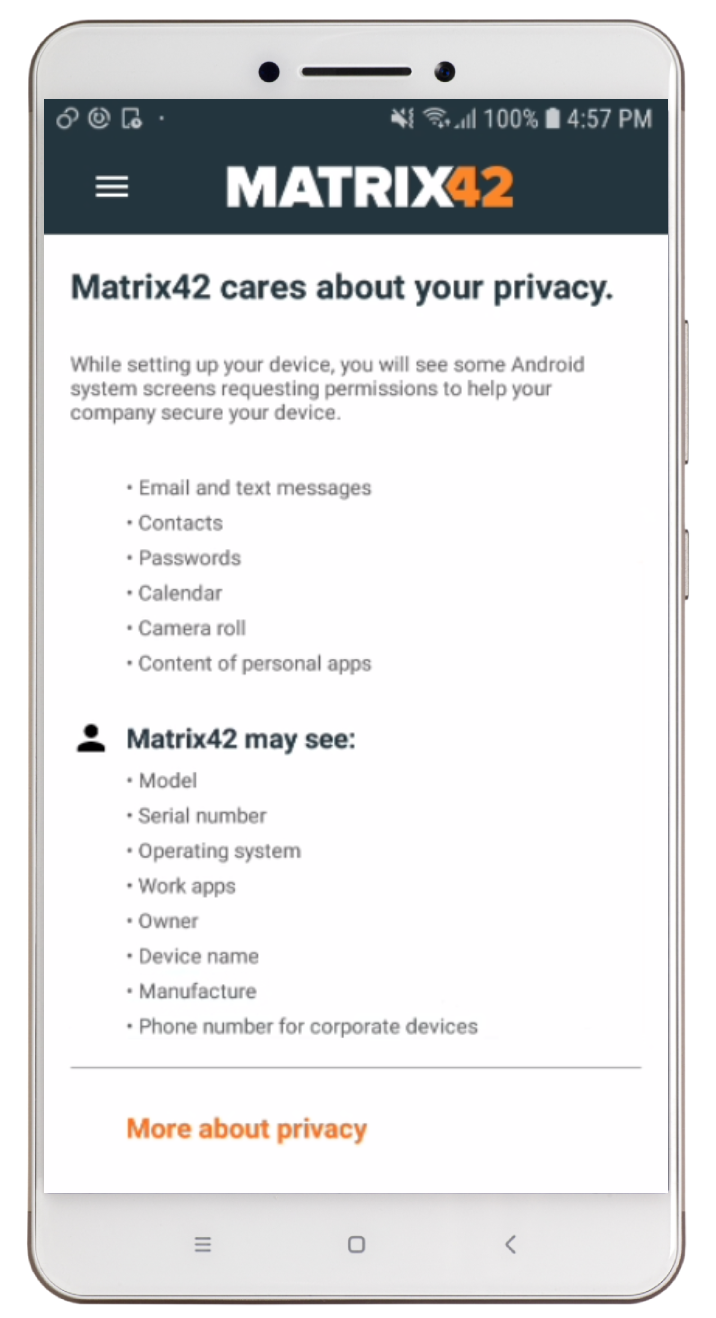 |
| Privacy on side menu | Privacy Page |
Windows 10
This chapter is about all feature changes or updates for Windows 10 devices in Silverback 18.0.3.
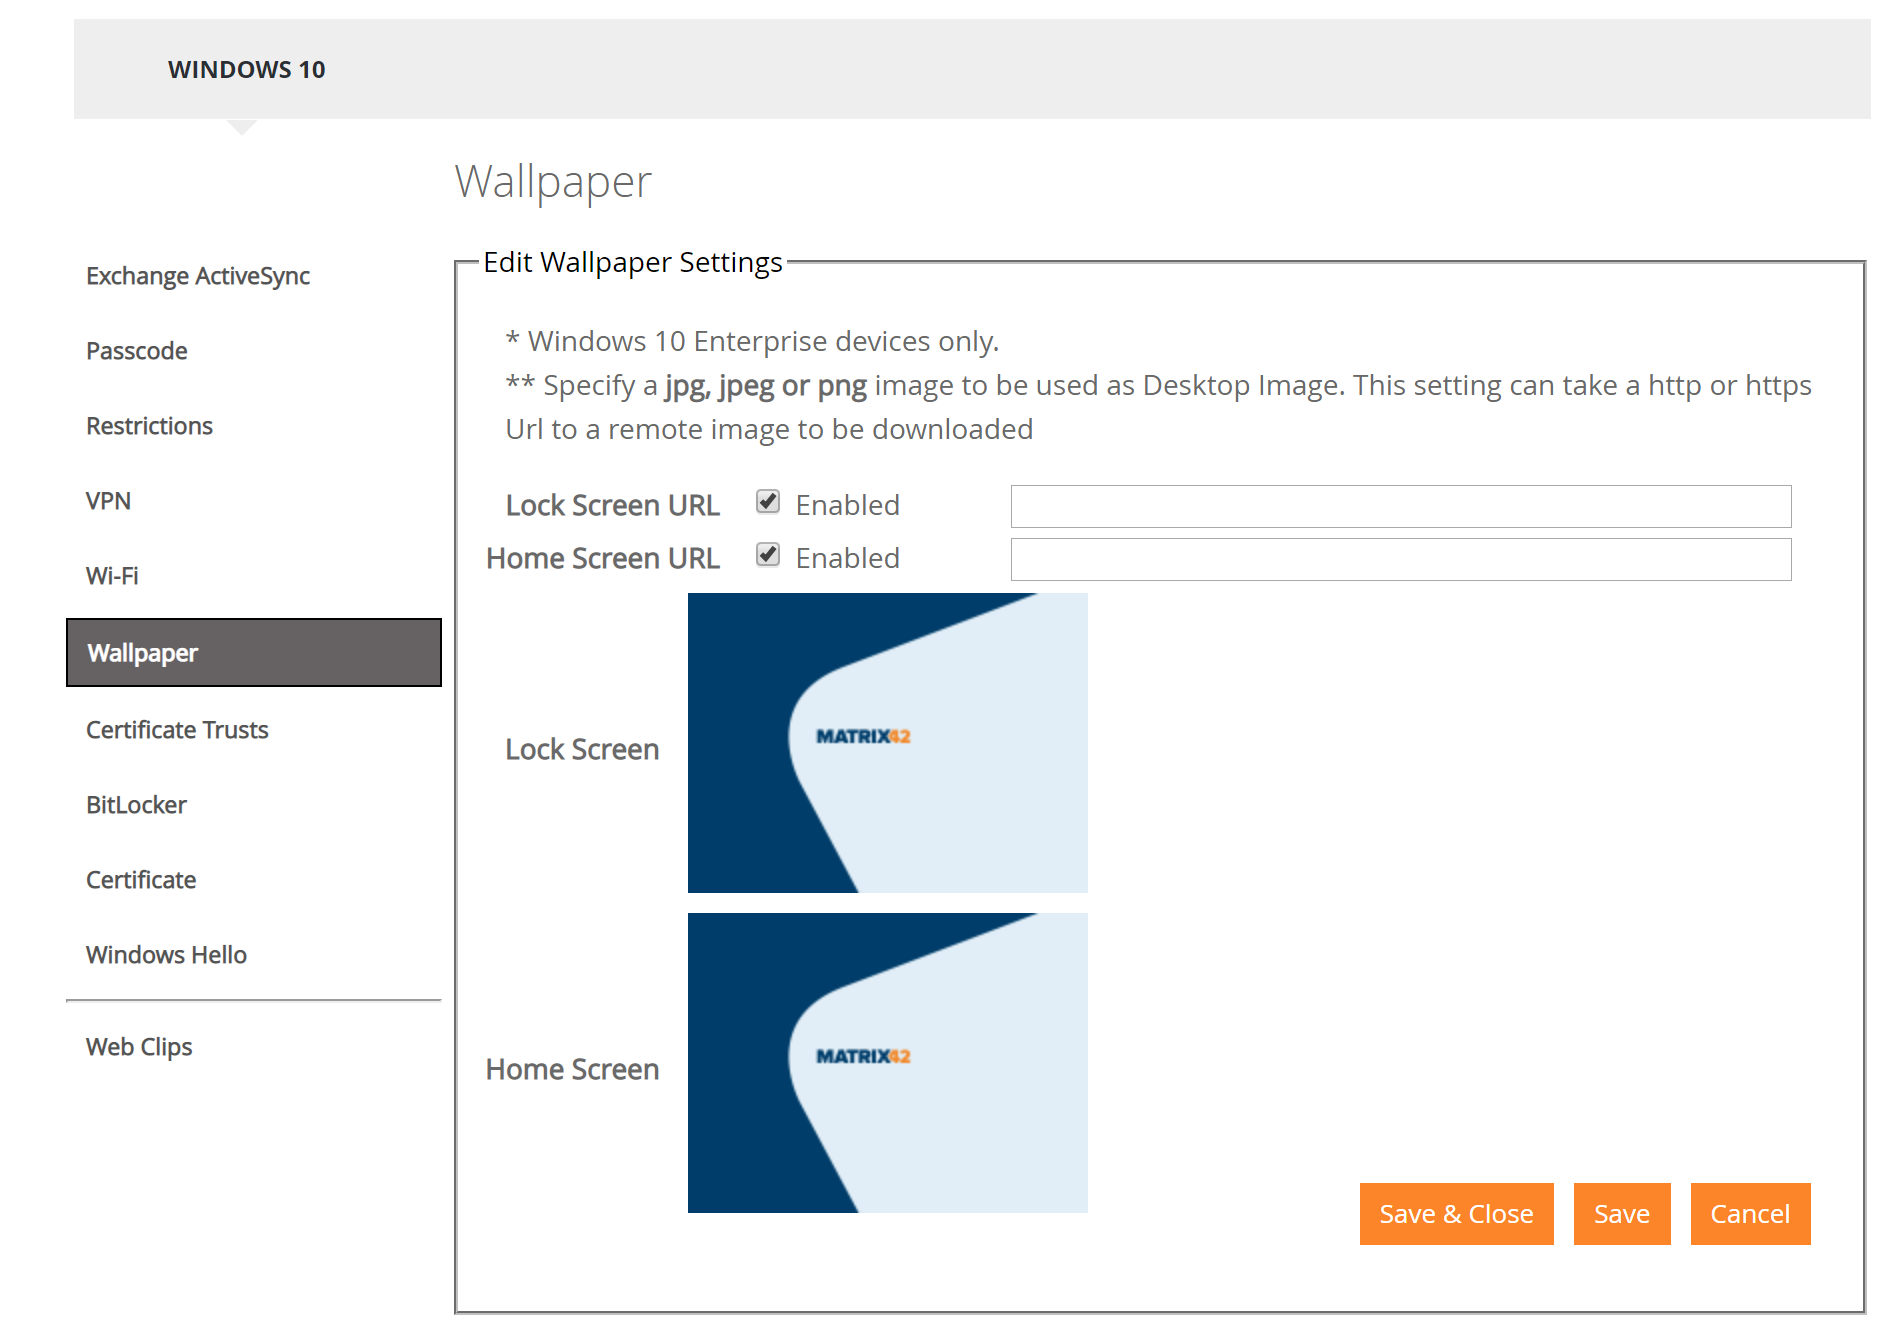
Home Screen & Lock Screen Wallpaper
For Windows 10 we are happy to provide a customization feature which will allow to define a Wallpaper for Home Screen and Lock Screen for Windows 10 Enterprise devices. The behavior from other device types differs a little bit in this case. First enabled the checkboxes for Home Screen or Lock Screen and enter a valid http or https URL where the *.jpg, *.jpg or *.png image is stored. After clicking save both wallpapers will be shown as in the screenshot below.
You need to have a reboot before changes will get active.
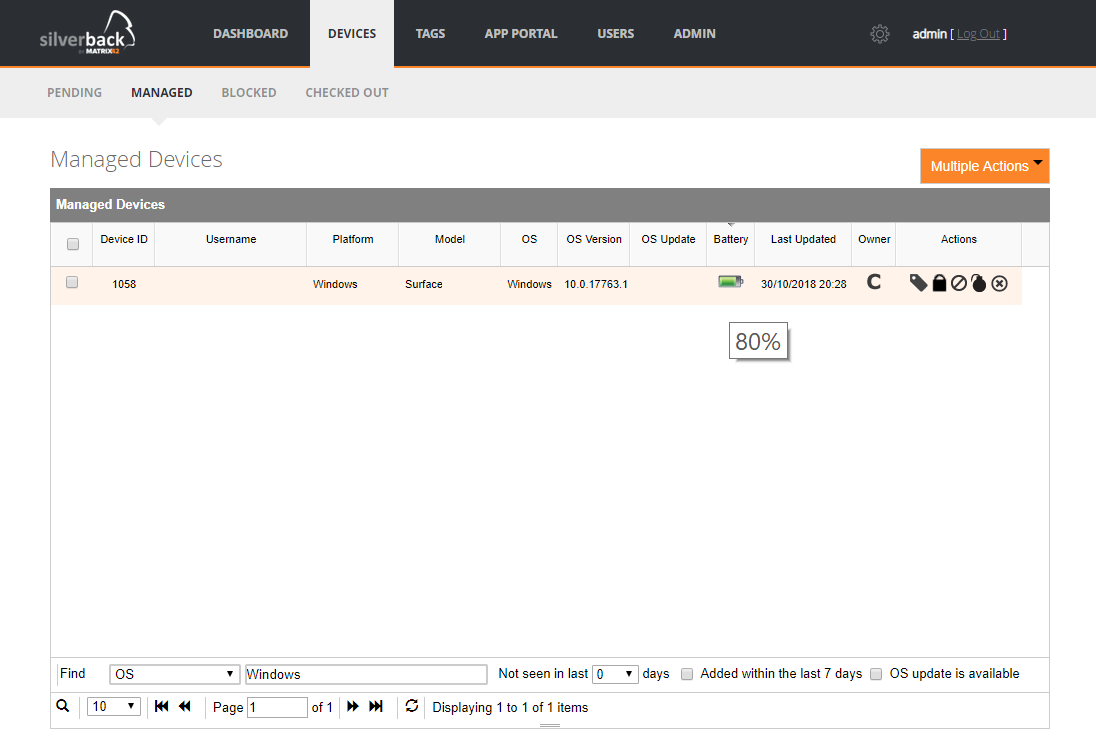
Display Battery level
With Windows 10 Microsoft offers the ability to display the Battery level for each enrolled Windows 10 Device, so with Silverback 18.0.3 you are now able to see the battery level for your Windows 10 devices. With a hovering over the Icon you will see the exact battery level percentage.
Console
This chapter is about all changes that are not device or operating system related.
Admin Login via Active Directory
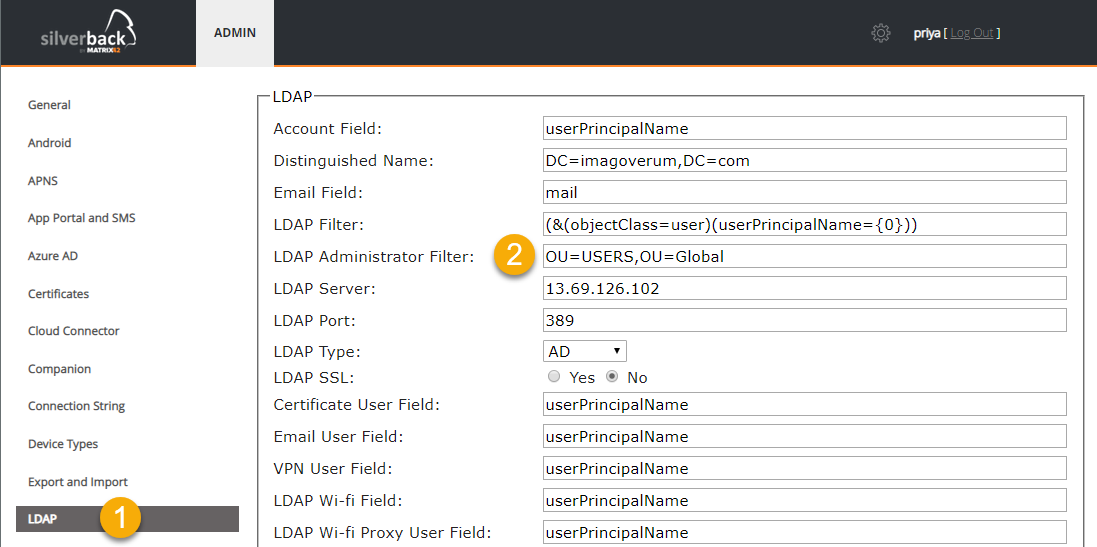
One highly recommended feature from our customer base was that Silverback System Users should be able to use their Active Directory credentials for Login. With Silverback 18.0.3 we make this now possible. To make it happen in your environment perform the following steps:
- Login as Settings Administrator
- Navigate to LDAP
- Enter the LDAP Administrator Filter, e.g. OU=USERS,OU=Global
- Click Save
- Silverback will look now for System Users in this Organization Unit
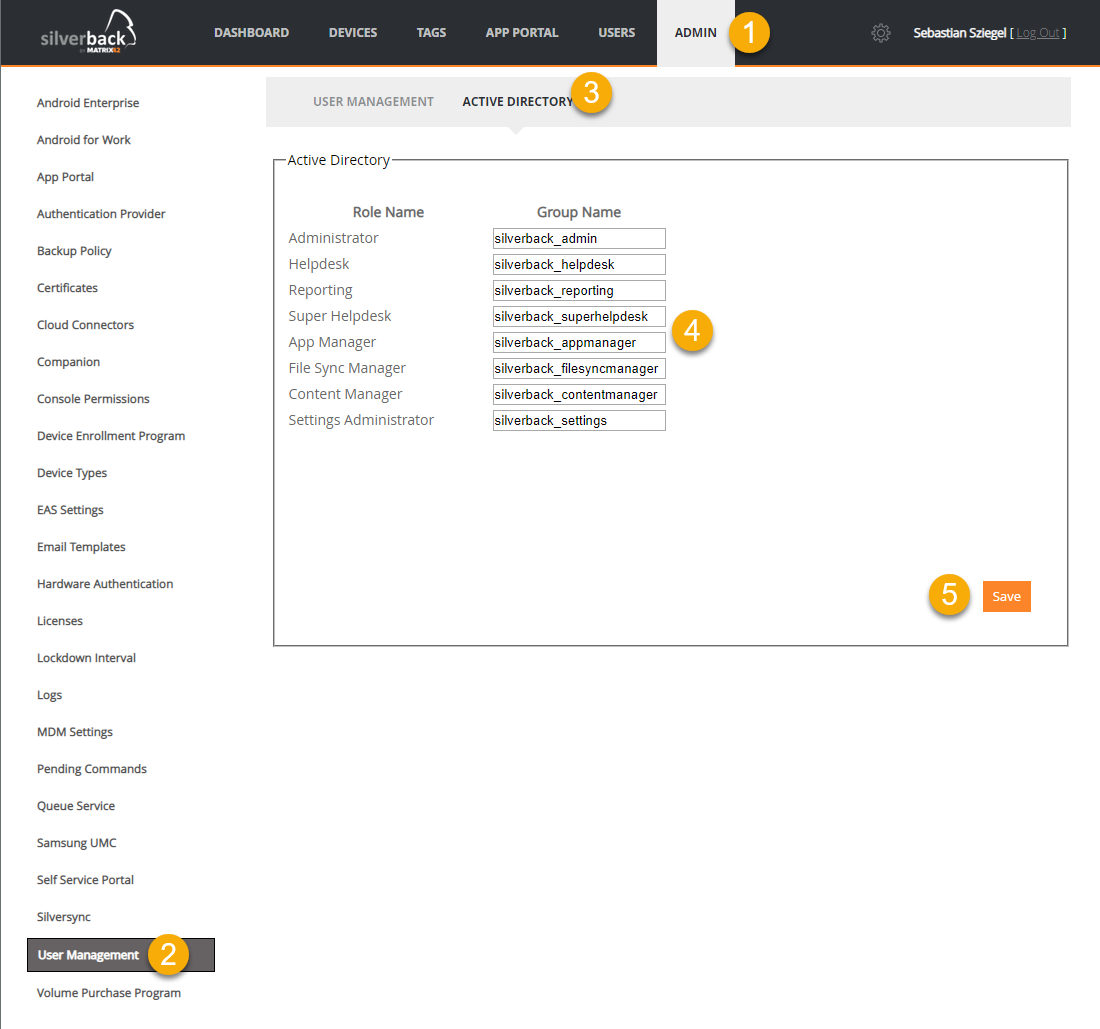
- Login as Administrator
- Click Admin Tab
- Navigate to User Management
- Click Active Directory
- Now enter for each desired Role the Active Directory Group name, e.g silverback_admin
- Add your Active Directory User objects into each group
- Click Save
12. Depending on your LDAP Interval Refresh lookup wait the amount of time until Silverback has refreshed the LDAP information
The setting is located under Settings Administrator > Services > Refresh LDAP User Info every (minutes) but keep it is as it is now.
- Open your Silverback Admin URL
- Login with your UPN or SAMAccount
Frequently asked questions
- Do I need to have all users in one Organizational Unit in my Active Directory? The answer is yes.
- Do the Active Directory Groups must be located somewhere special? No, we are looking for Groups which were inside your Domain.
- What happens after the first login of a user? Silverback will create a System User under User Management.
- What happens when the user will be removed from AD Group? The System User will stay in Silverback but he will not be able to Login anymore.
- Does Silverback clean up System Users which came from AD Group? No, you need to clean up the Users by yourself.
- What happens when I move a user from Groups, e.g. Admin to Helpdesk? After a LDAP refresh run the user will be a HelpDesk user.
- What happens when I add the HelpDesk User as well to the Admin Group? After a LDAP refresh run the user will be an Administrator.
- Why this? Because we add users from top to bottom from the Role list.
- Do i need to add the corresponding users into the security groups? - Yes
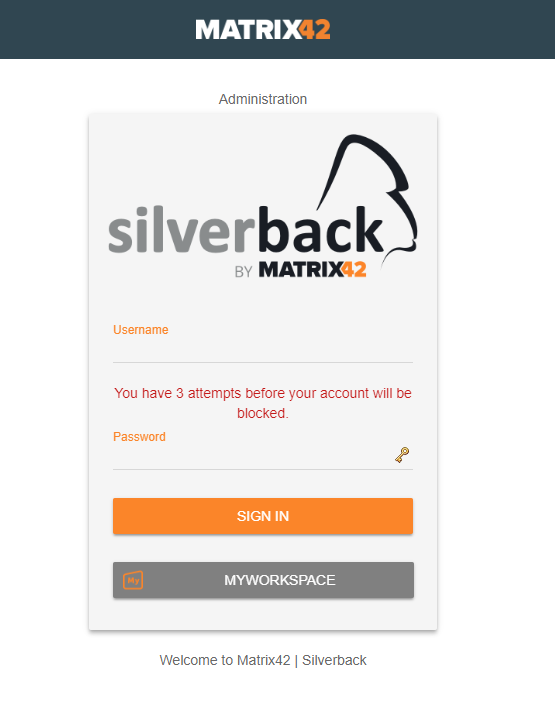
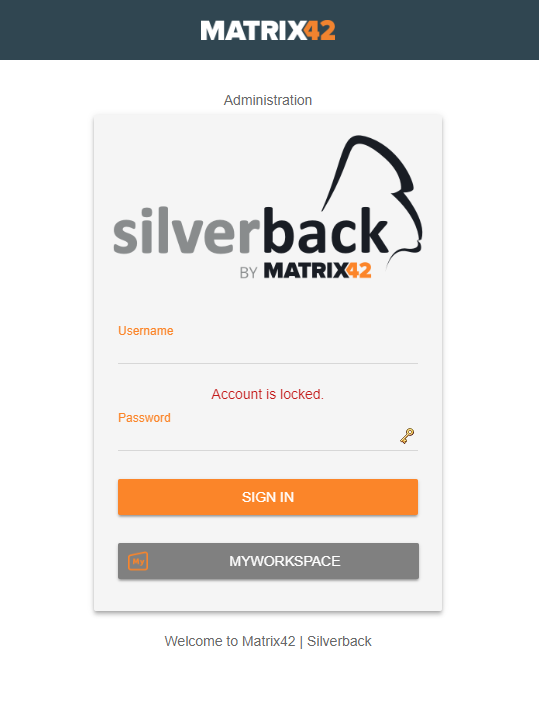
Admin Account status on Login Screen
For convenience reasons we will now display two different status for administrative logins. The first one is that Administrators will see the last three changes information to use the correct credentials for login. After missing these changes the information will change to that the Account is in locked status.
To change the values for the maximum attempts for each user login as Settings Administrators, navigate to General and change the value Maximum Failed Login Attempts for Console Users.
To unlock the account login as Administrator, navigate to Admin > User Management and edit the locked Administrator Account and untick Account Locked Out and click save
 |
 |
| Last attempts, start counting on three last attempts | Information when account is locked |
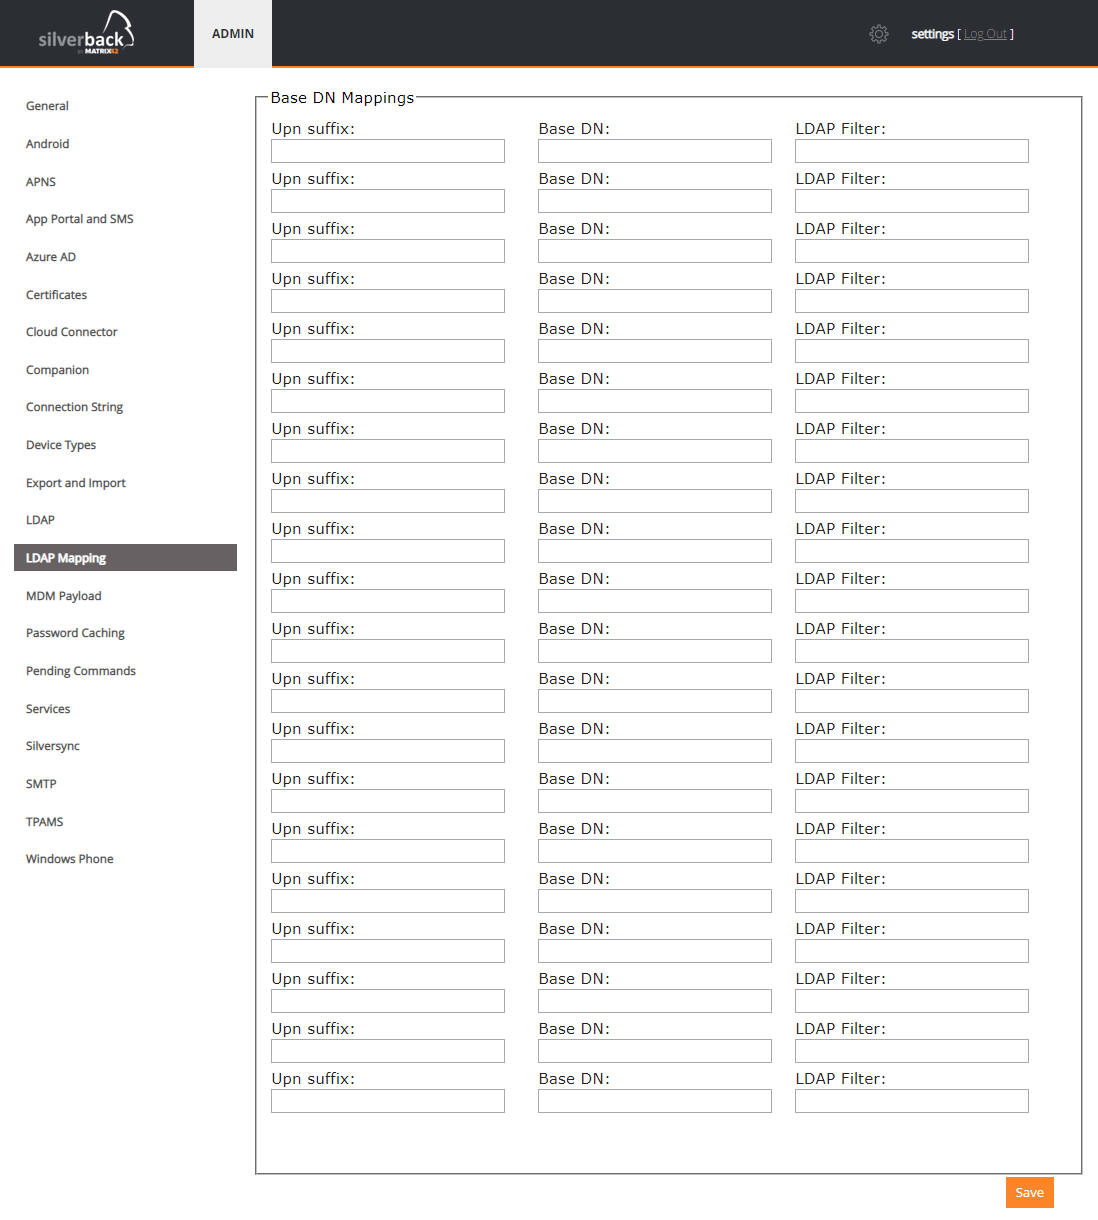
Added LDAP Mappings
In larger environments it might be that Administrators come into the limit of possible LDAP Mappings. For this reasons we added 10 more LDAP mappings to meet all the requirements.
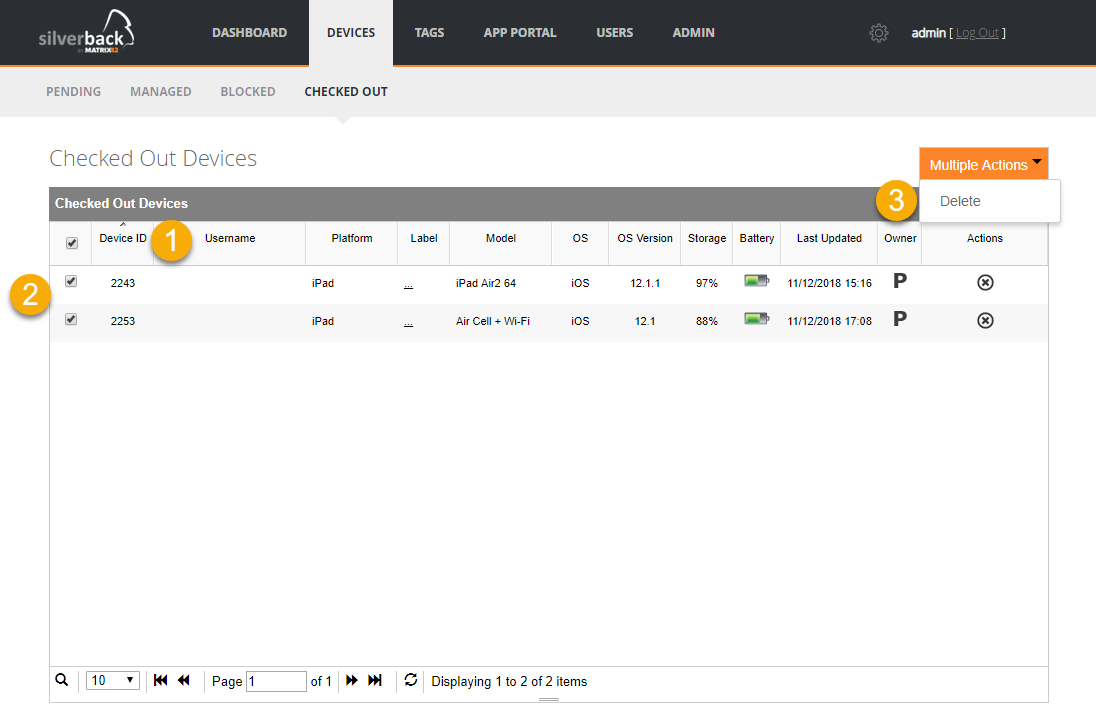
Updated Checked Out section
With this release we are happy to share our progress with Device IDs and Multiple Actions. In Silverback 18.0.3 we display now the Device ID (1) in the checked out area as you are already familiar on Managed and Blocked. As well we added the possibility to select multiple devices (2) and perform as Multiple Action the Delete (3) action.
Multiple Action button will get active when you select more than 1 device.