Windows 10/11: Add Certification Authority and Assign Certificates
Overview
Managing certificates is essential for securing authentication, encryption, and communication on Windows devices. This guide explains how to distribute certificates to Windows 10 and 11 devices efficiently. With this solution, multiple certificate profiles can be integrated within a single tag, allowing for flexible deployment across different use cases. Certificates can be installed in either the computer or user certificate store, ensuring compatibility with various security requirements. Additionally, different certificate templates can be used, and the key length can be configured between 1024 and 4096 bits to meet specific encryption standards. Furthermore, custom system variables can be utilized to define important certificate attributes such as Subject Name, UPN SAN (User Principal Name Subject Alternative Name), and RFC 822 SAN (Email Subject Alternative Name), ensuring dynamic and automated certificate issuance. This article provides step-by-step instructions for setting up and managing certificate deployment effectively.
Prerequisites
- Certification Authority Server needs the following configured roles
- Certification Authority
- Domain Administrator Credentials
Certification Authority
- Log into your Certification Authority server
Create User Certificate Template
- Open the Certification Authority MMC snap-in
- Choose from Server Manager > Tools > Certification Authority
- Or run (Windows + R) MMC > Add/Remove Snap-In > Certification Authority > Add > Local Computer
- Expand the Configuration Tree on the Right until the Certificate Templates section is visible
- Right Click Certificate Templates
- Click Manage
- Right Click User in the middle pane
- Click Duplicate Template
- When Certificate Authority is running on Windows Server 2008 R2 you will be prompted to select the Template version
- Select Windows Server 2003 Enterprise
- Click OK
General
- Navigate to General
- Enter as Template Display Name: Silverback User
- Enter as Template name: SilverbackUser (will be filled automatically)
- Uncheck Publish certificate in Active Directory
Request Handling
- Navigate to Request Handling
- Make sure that the configuration will be the following:
- Purpose: Signature and encryption
- Enabled Include symmetric algorithms allowed by the subject
- Enabled Allow private key to be exported
- Selected Enroll subject without requiring any user input
Subject Name
- Navigate to Subject Name
- Enable Supply in the request
- Click OK to confirm
Issuance Requirements
- Navigate to Issuance Requirements
- Ensure that CA certificate manager approval is unchecked
Extensions
- Navigate to Extensions
- Select Application Policies
- Click Edit
- Select Encrypting File System
- Click Remove
- Click OK
Client Authentication (1.3.6.1.5.5.7.3.2) and Secure Email (1.3.6.1.5.5.7.3.4) should be included.
Security
- Navigate to Security
- Select Authenticated Users
- Ensure that Read Permissions are enabled
- Click Add
- Enter in the "Enter the object names to select": Silverback
- Click Check Names
- Select Silverback Enterprise Device Management
- Click Ok
- Enable Read and Enroll Permissions
- Select Domain Users
- Click Remove
Review other present users or groups and take into account to decrease the permission for these users or groups as well. At least one administrative account should have Read and Write permissions to adjust Template settings in the future.
- Click OK to finish Template Configuration
- Close Certificate Templates Console window
Change CEP Encryption Permissions
- Right click CEP Encryption Template
- Click Properties
- Navigate to Security
- Click Add
- Search for any Domain Admin Account with which you want to proceed
- Click Check Name
- Click OK
- Enable Read
- Enable Enroll
- Click OK
Change Exchange Enrollment Agent Permissions
- Right click Exchange Enrollment Agent (Offline request) Template
- Click Properties
- Navigate to Security
- Click Add
- Search for any Domain Admin Account with which you want to proceed
- Click Check Name
- Click OK
- Enable Read
- Enable Enroll
- Click OK
- Close Certificate Templates Console
Issue Certificate Templates
- Navigate to Certification Authority window
- Right Click Certificate Templates in the left panel
- Select New
- Click Certificate Template to Issue
- Select the following Certificate Templates
- CEP Encryption
- Exchange Enrollment Agent (Offline request)
- Silverback User
- Click OK
- All of them should now be listed in Certificate Templates section
Export Certification Authority Certificate
This step is only necessary, if your server is not a domain member.
- Press Windows + R or right click the Windows try icon
- Enter MMC
- Click File
- Select Add/Remove Snap-in
- Select Certificates
- Click Add
- Select Computer Account
- Click Next
- Click Finish
- Click OK
- Expand Certificates (Local Computer)
- Expand Personal
- Click Certificates
- Right click your Certification Authority Certificate (it is issued from and by your CA)
- Select All Tasks
- Click Export
- Click Next
- Select No, do not export the private key
- Click Next
- Select DER encoded binary X.509 (.CER)
- Click Next
- Click Browse
- Select a location and name it e.g. CertificationAuthorityRootCertificate
Choose a shared folder e.g. \\FILESHARE\Certificates, we need to import that Certificate later into your Silverback Server.
- Click Save
- Click Next
- Click Finish
- Click OK
Server Preparation
- Log onto your Silverback or Cloud Connector Server
Create Enrollment Agent Setup Information File (*.inf)
- Open File Explorer
- Create a new Folder under C:\ and name it Certificates
- Perform a double click on C:\Certificates
- Right Click in any empty are in this Folder
- Click New
- Select Text Document
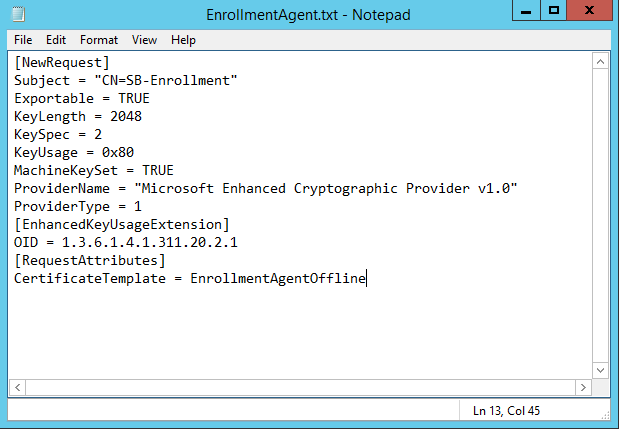
- Name it EnrollmentAgent.txt
- Open the File with Notepad
- Paste the following information into the File
| Values | Screenshot |
|---|---|
| [NewRequest] Subject = "CN=SB-Enrollment" Exportable = TRUE KeyLength = 2048 KeySpec = 2 KeyUsage = 0x80 MachineKeySet = TRUE ProviderName = "Microsoft Enhanced Cryptographic Provider v1.0" ProviderType = 1 [EnhancedKeyUsageExtension] OID = 1.3.6.1.4.1.311.20.2.1 [RequestAttributes] CertificateTemplate = EnrollmentAgentOffline |
 |
- Click File
- Click Save As
- Ensure that Encoding it set to ANSI
- Change Save as type to All Files (*.*)
- Change the File ending from .txt to .inf
- Click Save
- Navigate back to your Windows Explorer and ensure the file is saved as EnrollmentAgent.inf
Create CEP Setup Information File (*.inf)
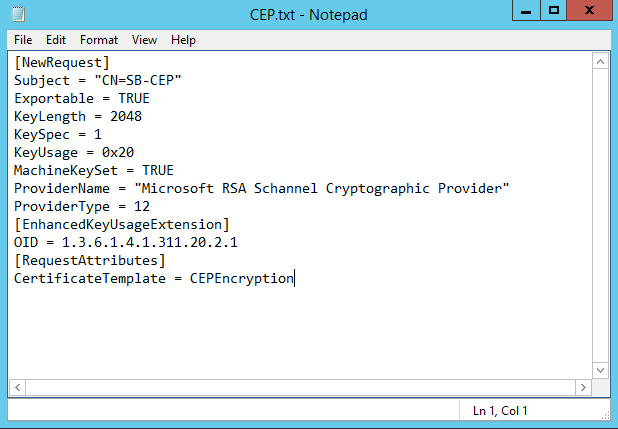
- Create in C:\Certificates a new Text Document
- Name it CEP.txt
- Open the File with Notepad
- Paste the following information into the File
| Values | Screenshot |
|---|---|
| [NewRequest] Subject = "CN=SB-CEP" Exportable = TRUE KeyLength = 2048 KeySpec = 1 KeyUsage = 0x20 MachineKeySet = TRUE ProviderName = "Microsoft RSA Schannel Cryptographic Provider" ProviderType = 12 [EnhancedKeyUsageExtension] OID = 1.3.6.1.4.1.311.20.2.1 [RequestAttributes] CertificateTemplate = CEPEncryption |
 |
- Click File
- Click Save As
- Ensure that Encoding it set to ANSI
- Change Save as type to All Files (*.*)
- Change the File ending from .txt to .inf
- Click Save
- Navigate back to your Windows Explorer and ensure the file is saved as CEP.inf
Generate Enrollment Agent Certificate
- Open an Administrative Command Prompt
- Navigate to C:\Certificates
- Adjust and run the following commands step by step
- certreq –f -new EnrollmentAgent.inf EnrollmentAgent.req
- certreq –submit -config "ca.imagoverum.com\domain-server-CA" EnrollmentAgent.req EnrollmentAgent.cer
- certreq –accept EnrollmentAgent.cer
Click OK at the User context template conflict prompt. You can ignore this warning.
Change the Enterprise Root Authority Address path to your own. Open a command prompt on your Certification Authority and type certutil, press enter and take the value displayed in config.
Generate CEP Certificate
- Now run the following commands for the CEP Certificate step by step
- certreq –f -new CEP.inf CEP.req
- certreq –submit -config "ca.imagoverum.com\domain-server-CA" CEP.req CEP.cer
- certreq –accept CEP.cer
Click OK at the User context template conflict prompt. You can ignore this warning.
Change the Enterprise Root Authority Address path to your own. Open a command prompt on your Certification Authority and type certutil, press enter and take the value displayed in config.
Change Permissions
- Run certlm.msc
- Expand Certificates (Local Computer)
- Expand Personal
- Click Certificates
- Right Click SB-Enrollment Certificate
- Select All Tasks
- Select Manage Private Keys
- Click Add
- Search for Network Service
- Click OK
- Uncheck Full control and ensure that Read is enabled
- Click OK
- Right Click SB-CEP Certificate
- Select All Tasks
- Select Manage Private Keys
- Click Add
- Search for Network Service
- Click OK
- Uncheck Full control and ensure that Read is enabled
- Click OK
Import Certification Authority Certificate
This step is only necessary, if your server is not a domain member.
- Right Click Certificate Folder in the left panel or click in any free are in the middle panel
- Click All Tasks
- Click Import
- Proceed with Next
- Click Browse
- Now navigate to your exported Certification Authority Certificate
- e.g. \\FILESHARE\Certificates
- Select the Certificate
- Click Open
- Proceed with Next
- Ensure the certificate will be placed in Personal Store
- Proceed with Next
- Click Finish
- Click OK
- You should now have 3 newly imported certificates
- SB-CEP
- SB-Enrollment
- Certification Authority Certificate
Copy Certification Authority Certificate
This step is only necessary, if your server is not a domain member.
- Right Click your Certification Authority Certificate
- Select Copy
- Expand Trusted Root Certification Authorities Folder
- Select Certificates
- Click Action in the navigation pane
- Click Paste
Silverback Configuration
Set Default Configuration
Prior to Silverback 24.0 Update 3, as an administrator, you had to define the general deployment settings for certificates on Windows 10/11 devices in the Web Settings configuration. Here you had to decide which certificate deployment method (Enterprise Certificate or Individual Client) to choose. Based on the selected deployment method, the certificate profile within the Tags had different views. You could either upload an Enterprise Certificate (if configured) or configure the template name and custom variables for the Individual Client Certificate. In Silverback 24.0 Update 3, we made several improvements to the whole process, including combining both deployment methods in the Certificate Profile and moving the settings from the (global) Web Settings configuration to the individual Certificate Profile. However, we have also kept the settings in the Web Settings menu so that you can use them as defaults when generating a new Certificate Profile and selecting the Individual Client method. So you can now choose whether you want to continue configuring the default configuration, or whether you want to select all the certificates you have created and add the CA address to your Certificate Profile each time. If you want to add the default configuration, proceed with Add Certification Authority and alternatively with Create a Tag.
Add Certification Authority
- Open your Silverback Management Console
- Login as an Settings Administrator
- Navigate to Certificates
- Under Certificate Deployment enable Individual Client
- Enter your Corporate Certification Authority in the following format:
- ca.imagoverum.com\domain-server-CA
- Click Save
- Confirm with OK
Select Certificate
- Scroll down to Windows Certificate Settings
- Choose for Enrollment Issuing CA the CA Certificate
- Choose for CEP Encryption Agent the SB-CEP Certificate
- Choose for Exchange Enrollment Agent the SB-Enrollment Certificate
- Click Save
- Confirm with OK
For all cloud customers, the certificates needs to be imported on your hosted server. Please get in touch with our technical support.
Restart Services
- Run PowerShell with elevated privileges
- Run the following command:
- restart-service w3svc,silv*,epic*
For all cloud customers, restart your Cloud Connector services after the certificates have been updated in Web Settings.
Change User
- Logout as Settings Administrator
- Login as Administrator
Create a new Tag
Create Windows 10/11 Certificate Tag
- Create a Tag
- Name it e.g. Windows 10/11 Certificate
- Enter as description e.g. Windows 10/11 Certificate Distribution (optional)
- Enable Profile under Enabled Features
- Enable Windows under Device Types
- Click Save
Create Windows 10/11 Certificate Profile
- Navigate to Profile
- Navigate to Certificate Profile
- Enable Certificate Settings
- Press Add new Certificate
- Enable the Profile
- Enter a friendly Name, e.g. User Certificate
- Select Individual Client as Certificate Deployment
- Choose wether the certificate should be stored in the Computer or User Store
- Now its time to configure some relevant information. Depending on your choice made in Set Default Configuration, the information might already be prefilled
- Add your certificate Authority in the following format: ca.imagoverum.com\domain-server-CA
- Choose for Enrollment Issuing CA the CA Certificate
- Choose for CEP Encryption Agent the SB-CEP Certificate
- Choose for Exchange Enrollment Agent the SB-Enrollment Certificate
- Add the name of your created Template, e.g. SilverbackUser
- Now, select your desired Key Length
- Add a Custom Subject Name Variable, e.g. u_{firstname}.{lastname} (optional)
- Add a Custom UPN SAN Variable (optional)
- Add a Custom RFC 822 SAN Variable (optional)
- Press Save
- Navigate to Definitions
- Click Associated Devices
- Click Attach More Devices
- Select your previously enrolled device
- Click Attach Selected Devices
- Click OK
- Click Close
- Click Push to devices
- Click OK
Refresh Device
- On your device, open Settings
- Navigate to General
- Navigate to Accounts
- Navigate to Access work or school
- Click on your added connection
- Click Info
- Scroll down and press sync
- Wait until sync process is finished
Open Certificates Management Console
- Enter in your Windows 10/11 search either certmgr.msc (user) or certlm.msc (computer)
- Press enter
- Click Yes
- Expand Personal
- Expand Certificates
- You should see now a new client certificate issued by your certification authority
Check Certification Authority
- Navigate back to your Certification Authority
- Navigate to Issued Certificates
- Right click and click refresh
- You should see now a newly issued certificate with the requester name Domain\Silverback$ with the SilverbackUser Template