Android III: Certificate Profile for VPN and Apps
Certificate Profile for VPN and Apps
With Silverback, you can use certificates to authenticate your users to applications and corporate resources such as E-Mail, Wi-Fi, and Virtual Private Networks. The distribution of certificates facilitates the access for a seamless authentication without the need to enter usernames and passwords. In the past, the certificate distribution on Android was part of profile installations for Exchange ActiveSync, Wi-Fi and VPN. With the introduction of Android Enterprise and Managed Configurations, the correlation between certificates and profiles has been dropped (except for Wi-Fi profiles) as applications like Gmail, Samsung Mail and other 3rd party (VPN) applications like Cisco AnyConnect, F5 access etc. can be configured independently via Managed Configurations.
For Managed Configurations, the certificate distribution uses as different mechanism than in the past and this is the goal of the Certificate Profile in Silverback, which is dedicated to meet the great capabilities of Managed Configurations. With the Certificate Profile, you can independently deploy certificates to the Android User VPN and Apps Certificate Key Storage (Credential Location) on the device. A certificate placed in this key storage can be accessed by any application installed on the device that supports certificate-based authentication. In the Managed Configuration of an application, you can define the subject name of the certificate with an alias (e.g. using System Variables) and if multiple certificates are present on the device, the certificate specific to that application is pre-selected for users.
To ensure the chain of trust, you can select Trusted Credential as Credential Location to upload your root and/or intermediate certificates. For the VPN and apps credential location, you can either upload an enterprise certificate or distribute individual certificates to your users’ devices.
The following guide describes the configuration for distributing certificates for VPN and applications, including the two distribution methods for distributing individual certificates with or without adding the certificates to Active Directory user objects. Depending on the desired approach, different requirements have to be considered, which are based on the Android Certification Authority Guides I and II and are summed up here in the certificate profile configuration.
Benefits of the Certificate Profile
- Multiple certificates profiles are supported within one Tag
- Created certificate profiles can be imported easily in other tags and between the platforms Android and Samsung Knox
- Trusted Credentials and VPN and Apps can be selected as credential location
- For VPN and Apps, enterprise certificates with private keys can be uploaded and/or individual client certificates can be configured
- Individual client certificates support different templates
- Alias and Subject names are supporting System Variables and can be used in Managed Configurations
- Certificate Locations can be addressed for all supported management types
- The certificate profile works independently from the selected Web Setting Certificate Deployment Method
Before you Start
Before you start, please note the following:
- Certificate Profiles are dedicated for VPN and Apps with Managed Configurations
- Certificate Profiles are not supported for Wi-Fi Profiles
- Certificates can be distributed without and with adding them into user objects Active Directory and both scenarios require different prerequisites
- Ensure to select later on only the Certificate Location that should target your Management Type
- If you have only Device Owner Devices, enable only Device Owner
- If you have only Work Profiles, enable only Work Profile
Prerequisites
When working with certificates on Android and Samsung Knox devices, ensure to deploy a passcode profile as highlighted in this guide later on. Depending on the certificate type, the following prerequisites must be met.
Root and/or Intermediate Certificate
- A certificate that contains the public key (.cer)
Enterprise Certificate
- A certificate that contains a private key (*.pfx)
- The corresponding password for the private key
Individual Certificates
- A Certification Authority Server with the configured Certification Authority role
- The Certification Authority and the Silverback or the Cloud Connector Server must be joined to the same Active Directory Domain
- The Silverback or Cloud Connector Computer Object is added to the Silverback Mobile Device Manager group
- If you have a setup with a Cloud Connector, ensure to have enabled both Web Settings in the Cloud Connector configuration:
- Send LDAP requests through Tunnel
- Request Client Certificates through Tunnel
- If you plan to distribute certificates without adding them into the user objects in the Active Directory, at least one created and issued User Certificate Template, based on the configuration from Android I: Add Certification Authority and Assign Certificates is required
Silverback Enterprise Device Management Group will gain access to created templates on the Certification Authority.
- If you plan to distribute certificates and add them to user objects in Active Directory, the following Certificate Authority steps from Android II: Assign Certificates to Active Directory User Objects are required:
- Create and issue the Enrollment Agent Certificate Template
- Create and issue the User Certificate Template with the Publish certificate in Active Directory is enabled option
- Create the Enrollment Agent Certificate Request and export and import the certificate
Create your Profile
Ensure to have at least one test device enrolled before starting with the certificate profile configuration.
Create a new Tag
- Open your Silverback Management Console
- Login as Administrator
- Navigate to Tags
- Click New Tag
- Name it e.g. Certificate Profile
- Enter as description e.g. Certificate Profile for VPN and Apps (optional)
- Enable Profile under Enabled Features
- Enable your desired device type, e.g. Samsung Knox
- Click Save
Create a Passcode Profile
In case your devices do not have already a passcode profile assigned, create a new one in this tag.
- Navigate to Profile
- Navigate to Passcode
- Enable Passcode Settings
- Enable minimum Numeric as Quality
- Keep or change the minimum length (optional)
- Adjust Maximum Passcode Age (optional)
- Adjust Auto-lock in minutes (optional)
- Enforce passcode history (optional)
- Change Maximum Failed Attempts to a suitable value, e.g. 5 or 10 or keep 0 for deactivated
- Click Save
- Confirm with OK
- Navigate to Definitions
- Click Associated Devices
- Click Attach More Devices
- Select your previously enrolled device
- Click Attach Selected Devices
- Click OK
- Click Close
- Click Push to devices
- Click OK
- Check your Device
- If not already present, you should now configure your screen unlock settings
- Choose e.g. PIN and create one for the device
- Proceed with the next chapter
Upload a Root or Intermediate Certificate
- Navigate to Profile
- Select Certificate Profile
- Click Add new Certificate
- Select Choose File to upload your intermediate or root certificate
- Ensure to have at least one certificate location enabled
Depending on your current setup, you may have already added root and/or intermediate certificates via the Certificate Trusts or Wi-Fi Profile to your devices. In this case you can skip upload the intermediate or root certificate, as they should be already present under the Trusted Credential key store on the device.
- Press Save and Confirm with OK
Upload an Enterprise Certificate
- Press Add new Certificate
- Select as Credential Location VPN and apps
- Ensure to select as Certificate Type Enterprise Certificate
- Select Choose File and upload your Enterprise Certificate
- Enter the corresponding password for the private key
- Ensure to have at least one certificate location enabled
- Press Save and Confirm with OK
Deploy Individual Certificates
- Press Add new Certificate
- Select as Credential Location VPN and apps
- Select as Certificate Type Individual Certificate
- Enter your Certification Authority Address in the following format: ca.imagoverum.com\domain-server-CA
Open a command prompt and run the certutil command to retrieve the config name of your CA.
If a Corporate Certification Authority is added to the Web Settings, the address will be pre-filled and is adjustable.
- Enter a Template Name, e.g. SilverbackUser
- If you plan to distribute certificates and add them to user objects in Active Directory, use e.g. CorporateUser
- Enter a subject name, e.g. {UserName}
- Enter a Subject Alternative Name, e.g. {DeviceEmail}
- If you plan to add certificates to user objects in Active Directory, enter SamAccountName
- If you plan ta add certificates to user objects in Active Directory, select also your created Agent Certificate from the drop down list
- If you have a setup with a Cloud Connector, paste the Agent Certificate thumbprint manually: e.g. d17843663fbaa87f49c4e97cd860867efc2c20b6
- Enter as Renewal Threshold the time when the certificate should be renewed. Enter e.g. 180 if after 180 days you want to let the certificate be replaced
- Ensure to have at least one certificate location enabled
- Press Save and Confirm with OK
Review Certificate Installation
Depending on your certificate and management types, you have several options to review the certificate installation as following:
Review Device
Depending on your hardware vendor, the way to the installed certificate location might be different. The following covers a Samsung device running on Android 12 with Device Owner.
- Open Settings applications
- Select Biometrics and security
- Tap Other security settings
- Tab View security certificates
- Select Users, you should see here now your uploaded root and/or intermediate certificate
- Go Back
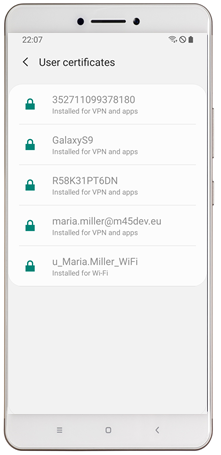
- Select User certificate
- Review your Enterprise and/or Individual Client Certificate
Review Certificate List
- At your Silverback Management Console, navigate to Devices
- Locate your device and open the device overview
- Ensure the device is online and press refresh
- Scroll down to the certificate list to review available certificates
- Please note the following table of supported certificate listings in device overview:
| Platform / Management Type | Android Enterprise Device Owner | Android Enterprise Work Profile |
|---|---|---|
| Android |
|
|
| Samsung Knox |
|
|
Review Certification Authority
- Log into your Certification Authority server
- Open the Certification Authority MMC snap-in.
- Choose from Server Manager > Tools > Certification Authority
- Or run (Windows + R) MMC > Add/Remove Snap-In > Certification Authority > Add > Local Computer
- Navigate to Issued Certificates
- Right click and click refresh
- You should see now a newly issued with the requester name Domain\Silverback$ with the SilverbackUser Template
- If you distribute certificates with adding them to user objects in Active Directory, the requester name will be the SamAccountName of the User with the CorporateUser Template
- If you have assigned 2 or more Individual Client Certificate Profiles to your device, you will see multiple created certificates
Review Active Directory
- If you distribute certificates and add them to user objects in Active Directory, go to your Active Directory Server
- Open Active Directory Users and Computers
- Locate the Active Directory object of the user
- Perform a double-click on the object
- Select the Published Certificates Tab
- Review the recently created certificate
Import Certificate Profiles
In case you want to create now certificate profiles for a different tag or for a different platform, e.g. when you created the profiles for Samsung Knox devices and now you want to import the profiles for Android, just Press the Import from Database button and select all profiles that you want to import. With the Assign select Certificate button the Certificate Profiles will be imported to your new Tag or your new Platform. By default, the imported profiles are set to disabled, so you can enable them afterwards manually. Additionally, please note the following:
- When importing a Profile to a new Tag or to a new Platform, it will receive a new ID
- But the Profiles are still linked, so when you change something in the imported profile, the change will be additionally applied in all existing tags that contains the profile.
- After making a change, the next time you will import the profile, it will contain the changes also.
User Experience and Managed Configuration
The following screenshots are demonstrating a Tag that contains several Certificate Profiles. As designed, all certificates are installed on the device with their corresponding Subject and Subject Alternative Name. Afterwards you can configure the managed configuration for your application and with a provided alias like {DeviceEmail}, the certificate will be preselected when opening or configuring the application.
| Create one or multiple profiles within Tags | Certificates will be distributed to managed devices |
 |
 |
| Configure Gmail Account through Managed Configuration | In case of multiple present certificates, the alias will be pre-selected |
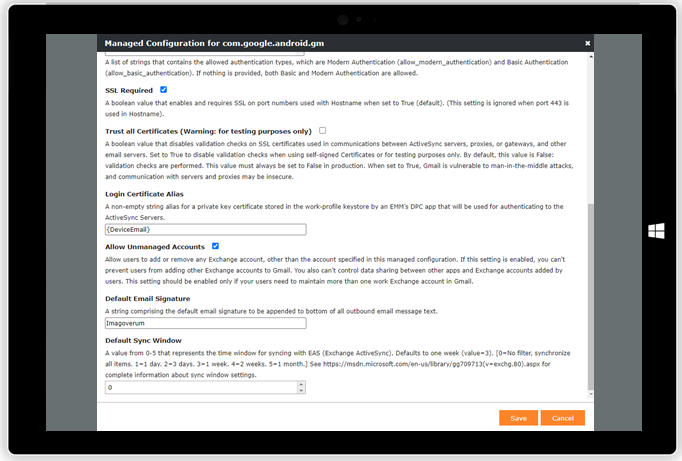 |
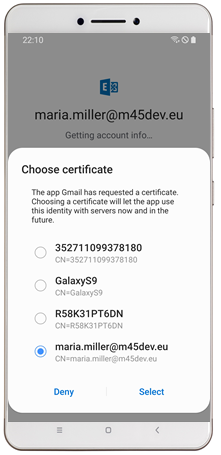 |
| Configure your Cisco AnyConnect VPN connection through Managed Configurations | In case of multiple present certificates, the alias will be pre-selected |
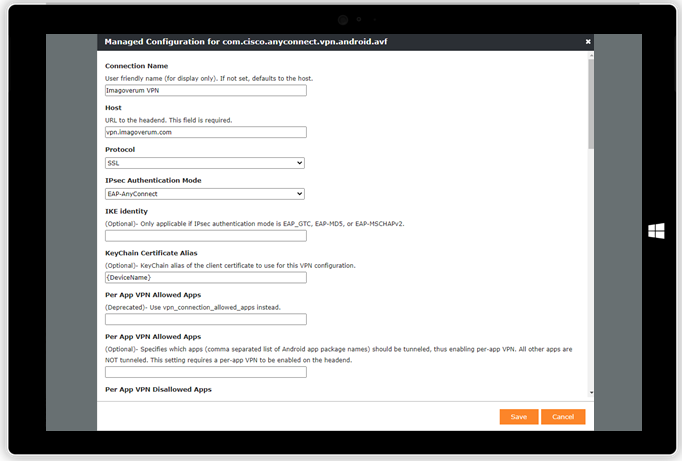 |
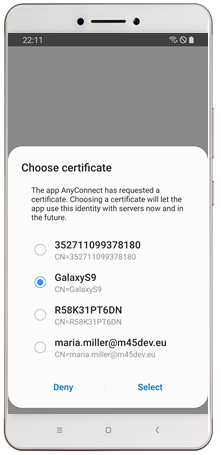 |
Remove and Delete Certificate Profiles
To remove a profile from a Tag, simply press the Remove button in the Certificate Profile overview. To delete a Certificate Profile completely, press the Import from Database button and use the Remove button and confirm with OK. Only not assigned Profiles are listed in the Import from Database overview, so ensure to either remove the Certificate Profile from your current opened Certificate Profile or remove it from another Tag. In case the Certificate Profile is currently assigned in any Tag, a warning will be shown and by confirming with OK, the profile will be completely removed from the database and from all Tags.