Getting started with OS Deployment
Introduction
This Getting started explains how to use the Empirum offline tools on a Windows client, e.g. to create a WinPE boot image and upload and import it to the master server in the cloud.
It is helpful to set up an offline Subdepot server first. A description of the procedure can be found here.
The following procedure is possible directly on the Subdepot server.
- Start the Matrix42 Management Console via the link provided to you.
Procedure if A SubDepot has been set up yet
The packages required to create an offline boot image can be installed by assigning and activating them.
Prerequisite: A functional latest UEM agent is already installed! More information can be found here
If the client is not yet in the Matrix42 Management Console, it can be integrated by taking inventory of the client.
- Assign the Empirum Packaging Center and the Matrix42 WinPE Support Package to the client. Your configuration group will look something like this:

- Activate the client.
The activated packages are automatically installed by the UEM Agent on the client.
Procedure if "no" SubDepot has been set up yet
Only with a running local Subdepot OS Deployment is supported!
Prerequisite: A Windows 10 or Windows 11 client is required. The following requirements must be met on this client:
- Fully installed operating system (here Windows 10).
- Administrative rights must be available on the client.
- All Windows updates are installed.
- A up to date WADK & WinPE Add-On installed (Download WADK 10 | 11).
- The latest WinPE Support package is installed (Download WinPE from Matrix42 Marketplace).
- The latest UEM agent (Download latest UEM Agent from Marketplace) is installed (via MSI package) - HTTPS.
- The latest Matrix42 Packaging Center is installed.
- The latest Matrix42 WinPE Support Software package is installed.
- Matrix42 Packaging Center must be run "as administrator".
- The Empirum master server (Cloud) is accessible via assigned and running Agent Template.
Install UEM Agent
After the Windows 10 client is installed, equipped with all Windows updates and the complete WADK and latest WinPE add-on, the UEM agent must now be installed first. The required UEM Agent version must be downloaded from the Marketplace.
- Launch a browser (Edge), log in to the Matrix42 Marketplace site and download the latest Matrix42 UEM Agent Standard Feature Release version to e.g. C:\Temp.
- Unzip the file UEM_Agent_XXXX.X.X-Standard-Feature-Release.zip.
- Execute the file ".\Empirum\Configurator\Packages\Matrix42\UEM Agent Windows\MSI\XXXX.X.X\Matrix42 UEM Agent XXXX.X.XStandard Feature Release Setup 64bit.msi".
- Click Next.
- Accept the terms in the license agreement and click Next.
- Select https as protocol, enter your server name and port 443. Enter the user to be used for the UEM agent and the associated password (sync-encrypted, not encrypted is also possible).
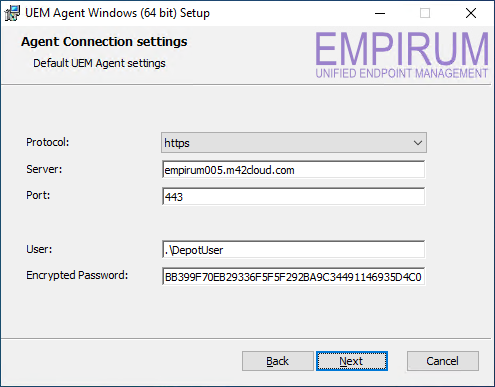
Protocol: https
Server: empirumXXX.m42cloud.com (Replace XXX with your instance)
Port: 443
User: .\DepotUser (Replace this user with your user)
Password: <Your Password> - Click Next. The installation will be performed.
- After successful installation, click Finish.
- It may be necessary to restart the client.
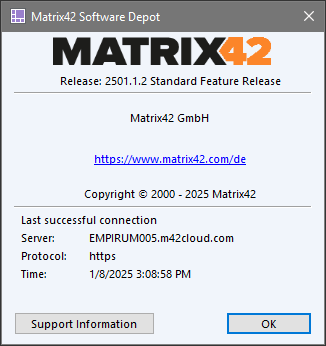
- If you right-click on the Matrix42 Software Depot logo
 at the bottom right (System Tray) and select Info About, you will see the connected server and the protocol used.
Install Packaging Center and WinPE Support Software package
- Double click on the Matrix42 Software Depot logo , highlight the latest Empirum Packaging Center package and the latest Matrix42 WinPE Support Software package.

- Click on Install 2 programs.
After successful installation of the two packages, there is now an Empirum Packaging Center icon on the desktop.
Create Offline WinPE Boot Image
A detailed description of the Matrix42 Offline PXE Image Creator can be found here DE / EN.
In this example configuration, a WinPE boot image is created that accesses the offline depot server via SMB protocol.
If you don't see the UI you need to reinstall the newest Empirum Packaging Center package on your client.
The created WinPE boot image can also be uploaded and imported directly to the master server via the "Offline PXE Image Creator".
The prerequisite for this is that a UEM Agent 2501.1.2 or newer is installed and the used Agent Template is connected to the Empirum Master server in the Cloud.
- Right-click the Empirum Packaging Center desktop icon and select Run as administrator.
- You will be taken to the Matrix42 Packaging Center. Click Offline PXE Image Creator at the bottom left.
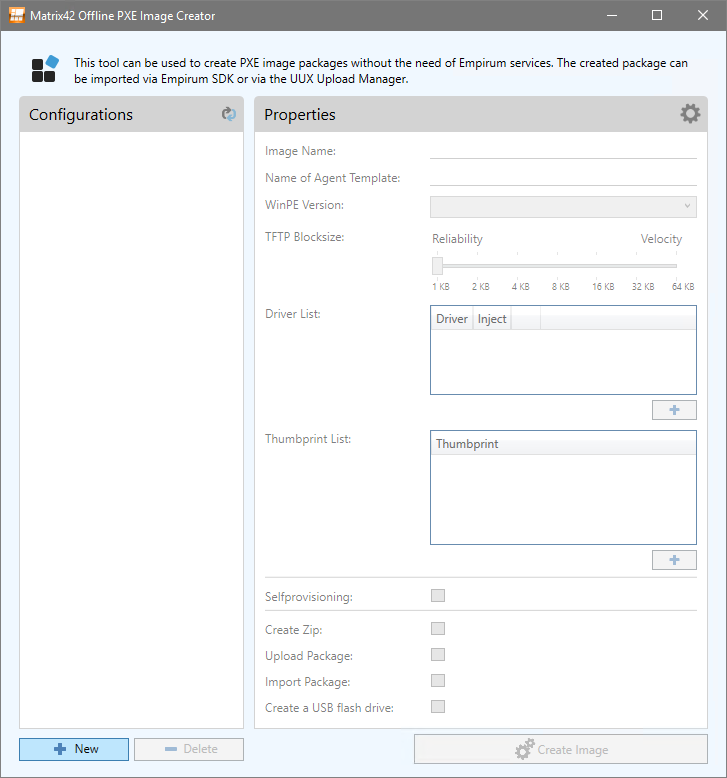
The Matrix42 Offline PXE Image Creator window is displayed. If there is no configuration yet, an empty window is displayed.
If a cogwheel with an exclamation mark is displayed at the top right, the Empirum API connection information must be entered if an import is also to be carried out directly.
 - Click on the cogwheel
 at the top right to enter the Empirum API values for the Import. The prerequisite for this is that a UEM Agent 2501.1.2 or newer is installed and the used Agent Template is connected to the Empirum Master server in the Cloud.
At the first start, the connection information of the installed UEM agent is read out and entered here. This connection information is required if the newly created offline PXE boot image is also to be uploaded directly (Upload Package option) and imported (Import Package option).
The user (.\DepotUser) read by the UEM agent and the associated password cannot be used here. The user EmpCloudXXX-X is used for the Import.

Enter a user and the corresponding password (non-encrypted) and click OK.
If the Empirum API connection information is correct, a green tick is displayed in the top right-hand corner. Two small cogwheels
  are displayed during the connection check. If the connection information has not been entered correctly, a red cross
  is displayed. If you highlight the icons with the mouse, the corresponding information is displayed.
The Reset button is used to read and enter the connection information of the installed UEM agent again. This overwrites all current connection information. - Click on New.
- The default settings for a self-provisioning image are prefilled.
- Enter an Image Name (in this example WinPEx64DepotSMB).
- Enter the Name of Agent Template (in this example Depot - Client - SMB).
Note: If you don't know the correct name of the Agent Template, let it empty. The power shell script will transfer all known Agent Templates from the server in a local temp folder. - Select a WinPE Version (if not already entered).
- Select the TFTP Blocksize that is functional for your environment.
- Enter the WinPE drivers required for this boot configuration under Driver List.
The required drivers were previously stored under "D:\Temp\Drivers\WinPE". - As this is not an HTTPS configuration, Thumbprint List remains empty.
- Deactivate the Selfprovisioning option.
- The upload is done via PowerShell, therefore the option Create Zip remains deactivated.
- Activate the Upload Package and Import Package options.
Your configuration now looks something like this:

- Click on Create Image.
The offline PXE boot image is created via a PowerShell script (parameters that cannot be verified are queried).

If you entered no Agent Template name, the PowerShell script is searching for all available Agent Templates on the Empirum server and it looks like you see in the picture below.

After a successful run, if activated, a successful upload, a successful import and the complete path to the created PXE image is displayed. If the upload or import runs into an error, you can have a look into the logs under %ProgramData%\Matrix42\Logs\Packaging Center.

When the PowerShell script is exited with ENTER, the Matrix42 Offline PXE Image Creator shows that the script has been saved.

If authorization problems occur when starting PowerShell - or during its work - the local PowerShell execution policy must be adjusted. To do this, start an administrative PowerShell and enter the following command:
Set-ExecutionPolicy unrestricted
You can view your current PowerShell ExecutionPolicy setting by using the Get-ExecutionPolicy command.
If you are using Self Provisioning you need to use the right Port to connect to the Empirum API.
Empirum Managemen Console starts under "https://empirum000.m42cloud.com/... - API Port 8443
Empirum Managemen Console starts under "https://client.wvd.microsoft.com/arm/... - API Port 443
Transfer Offline PXE Boot Image to the Master Server
You can use directly upload and import via the Offline PXE Image Creator Tool or in general for all Software packages you can use the Package Upload & Import Tool.
If you are familiar with the WinSCP tool, you can find a detailed description here.
Import WinPE Boot Image via SDK
You can use directly upload and import via the Offline PXE Image Creator Tool or in general for all Software packages you can use the Package Upload & Import Tool.
If you are familiar with the Empirum SDK, you can find a detailed description here.
View in the Matrix42 Management Console
- The PXE boot image imported via SDK is now displayed in the Matrix42 Management Console under Configuration > Boot Configurations.

Boot configurations created offline cannot be edited in the Matrix42 Management Console (grayed out). Therefore, if changes to the boot configuration are necessary, the boot image created offline must be recreated, or another boot image - see Create Offline WinPE Boot Image - must be created.
- In Management > Administration the boot image can now be assigned to a configuration group.

Create USB flash drive
To create a USB flash drive, a PXE boot image is created as described above under Create Offline WinPE Boot Image - but here the option "Create a Self Provisioning image?" must be answered with yes "y" and the Empirum API user and password must be specified.
- Make sure that ADK and ADK Windows PE Add-on are installed on your PC.
- Right-click the Empirum Packaging Center desktop icon and select Run as administrator.
- You will be taken to the Matrix42 Packaging Center. Click Offline PXE Image Creator at the bottom left.
- Click on New.
- Enter an Image Name (in this example WinPEx64DepotSP).
- Enter the Name of Agent Template (in this example Depot - Client - SMB).
Note: If you don't know the correct name of the Agent Template, let it empty. The power shell script will transfer all known Agent Templates from the server in a local temp folder. - Select a WinPE Version (if not already entered).
- Select the TFTP Blocksize that is functional for your environment.
- Enter the WinPE drivers required for this boot configuration under Driver List.
The required drivers were previously stored under "D:\Temp\Drivers\WinPE". - As this is not an HTTPS configuration, Thumbprint List remains empty.
- Activate the Selfprovisioning option (Check mark is set).
Enter the EmpirumAPI Server.
Enter the EmpirumAPI Port.
Enter the EmpirumAPI Username.
Enter the corresponding EmpirumAPI Password. - The upload is done via PowerShell, therefore the option Create Zip remains deactivated.
- Activate the Create a USB flash drive option (Check mark is set).
Your configuration now looks something like this:

- Click on Create Image.
The offline PXE boot image is created via a PowerShell script (parameters that cannot be verified are queried). - After the PowerShell script has been started, the configuration parameters are evaluated and all connected USB flash drives are displayed in a list.
Select the USB flash drive (here in the example it is only one USB flash drive, no. 1, drive P:) that is to be written to with this configuration.

If no USB flash drive is displayed, a further search can be carried out by entering "0".

- The PXE boot image is created, followed by a confirmation prompt asking whether all data on the selected USB flash drive should really be deleted.
- Answer the security prompt with Yes.

- Once the WinPE USB flash drive has been successfully created, it can then be used for the operating system installation via self-provisioning.
Operating system and language packages - create - transfer - import
If an offline subdepot is not yet installed, or if it is not to be used, the requirements as described above must also be fulfilled here.
After an operating system source and / or language package has been created via the Packaging Center > Prepackaged OS Wizard, it must also be transferred to the master server in the cloud.
The procedure is identical to "Transfer Offline PXE Boot Image to the Master Server". You can use the Package Upload & Import Tool.
Operating system drivers - create - transfer - import
If an offline subdepot is not yet installed, or if it is not to be used, the requirements as described above must also be fulfilled here.
After a driver package has been created via the Packaging Center > Offline Driver Package Creator, it must also be transferred to the master server in the cloud.
The procedure is identical to "Transfer Offline PXE Boot Image to the Master Server". You can use the Package Upload & Import Tool.
Set DHCP Options / Default PXE Image
To set the DHCP options or change the default PXE Image (use Self Provisioning) you need to open a Support ticket via Helpdesk@matrix42.com. Our Support helps in setting the DHCP options or change the default PXE image for your environment.