HowTo: Configuration of Active Directory
Overview
This Guideline will enable you to setup anything necessary in Software Asset and Service Management (SASM) to let your end users login to Self-Service with an Active Directory (AD) User assuming that SASM runs in a different network than the Active Directory Domain.
This article requires that you have a Matrix42 MyWorkspace (MWS) Subscription and SASM.
Supported Authentication Protocols for Identity Providers:
OAUTH2
This article contains configurations of the following areas/contents:
- Software Asset & Service Management Data Gateway
- Will import users from AD to SASM
- MyWorkspace Cloud Connector
- Will import Users from AD to MWS
- Software Asset & Service Management Administration
- Data Gateway configuration
- AD Connector Configuration
- MWS Connector Configuration
- OAUTH configuration / activation
- Matrix42 MyWorkspace Administration
- Cloud Connector download
- OAUTH APP Configuration
- General Configurations
Prerequisites
Before you start there are some pre-requites to make sure they're fulfilled and/or prepared:
- Server for Data Gateway(s) (SASM and MWS Cloud Connector). A small VM will do if you do not want to install on the AD directly. (1 - 2 CPU / 4 - 8 GB RAM / Windows x64 with min. .NET 4.6.1).
- (You can install both on the same Server)
- MWS recommends to install Cloud Connector on AD directly, so installing both or just one component there is also viable.
- You’ll need access to the AD (or have an Admin who could access it for you) if you plan to install the MWS Cloud Connector on the AD Server.
- Server must have access to the internet (Port 80 for http or Port 443 for https)
- It is recommended to use Port 443!
- Matrix42 Accounts (Enterprise) Account (for Token generation and login to MWS)
- Domain User that can read from AD (The user who executes the Cloud Connector Setup)
- Matrix42 Software Asset & Service Management Version 9.1.0.2477 or higher. (Since April 1st. 2019 we’re only accepting TLS 1.2 on our NEW Cloud Services). Software Asset & Service Management Versions 9.0.4 and lower are not compatible with TLS 1.2 and external tools like Data Gateway or Workflow Studio will not be able to communicate with the Cloud Service.
Remember: Only the Data Gateway opens a connection to a Software Asset & Service Management . A SASM will NEVER open a connection to the Data Gateway (That’s called “polling”), so you can hide the Data Gateways behind a firewall.
Note: The whole setup will take 1-2 hrs.
SASM Data Gateway installation / Setup
In this step we will create, configure, deploy and test the Data Gateway (DGW) on an external Server.
- Create the Domain in SASM where the Server that will host the DGW is a member of. (your network)
- Navigate to: Administration > Integration > Domains > Add Active Directory Domain
- Fill all variables (Please ensure that the Domain and NT4 Domain names are correct)
 (Since this is a test environment, backup DC is the same as primary, in customer environments you’ll probably have a valid backup DC. Note: By default the DGW will always call the backup DC in case it cannot fetch data from the primary AD). If you do not have a backup DC just fill in your primary again.
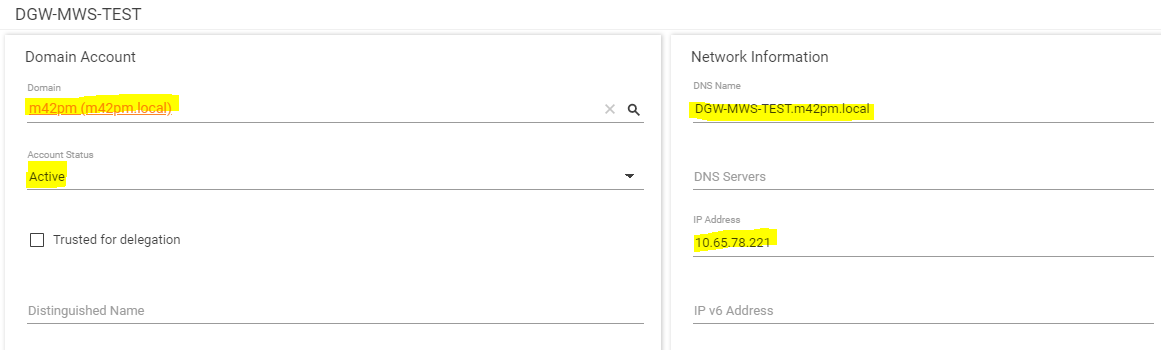
- Now create the Computer Object where the DGW is running on (your network)
- Navigate to: Assets > Endpoint Devices > Add Computer
- In TAB “Identification” Fill all network related variables (Set the Domain previously created, set Asset to “Active”, Set the DNS Name and the IP. Also set a Computername on the General TAB). Note: IP address is not mandatory. This machine needs to be able to communicate with the SASM Cloud Service. (Port 80 or 443 < recommended)
- Save your settings
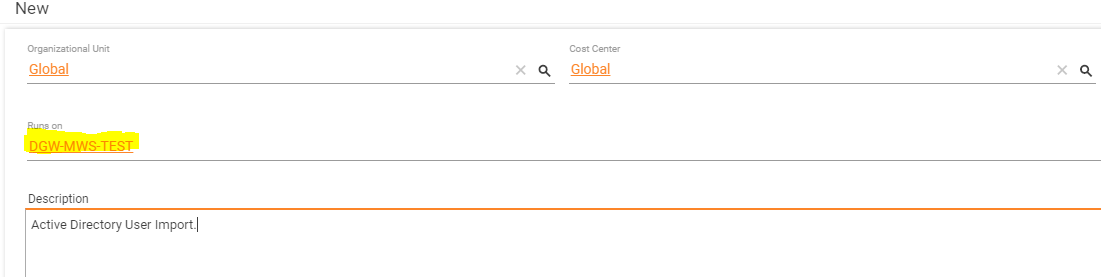
- Now we are going to create a new data gateway
- Navigate to: Administration > Integration > Data Gateways > Add Data Gateway
- Fill “Runs On” with your created Asset from previous Step. (Data Gateway Server in your Network)
- Save and Download the DGW (Go back to the search page, single-click the Data Gateway and press Download Data Gateway in Preview Window).
- Copy and extract the Data Gateway ZIP anywhere on the specified Server in your network.
- Edit the DGW config File (Matrix42.DataGateway.exe.config)
- Use Basic Authentication (out comment or remove windows authentication part otherwise it won’t work). Only Basic Authentication is supported!!!!
- You get an internal domain user provided by Matrix42 with the Welcome E-Mail, in general you could use this or create your own. (Must be an administrative user in SASM!)
- You could add “UseHttps=true;” behind the PW Parameter to activate https communication between DGW and SASM. (recommended!)
- (optional) You are able to encrypt the pw in data gateway config (check the Original Data Gateway Help here for a guide).

- Run Data Gateway Install on elevated command line (cmd) (AS ADMINISTRATOR, otherwise it won’t work) => <DataGatewayInstallFolder>\Matrix42.DataGateway.exe -install
- When done, set a User at the Data Gateway Service (services.msc) that can connect to local AD (read) and has access to the local file system.
- Run data gateway EXE with –test parameter (<DataGatewayInstallFolder>\Matrix42.DataGateway.exe -test) and check the M42Services logs of SASM (Download it from Administration Area). The DGW Log should also give you the needed hints => (can be found in /logs Folder of your DGW Installation). If connection was successful you should see this in logs:
2018-04-11 15:43:01 INFO Running in TestMode.
2018-04-11 15:43:01 INFO Starting service console
2018-04-11 15:43:01 INFO Service console has been started.
2018-04-11 15:43:04 INFO Initializing host version: 9.0.1.2177
2018-04-11 15:43:11 INFO Connectivity test was successful.
2018-04-11 15:43:11 INFO Shutted down
(Note: Host Version can differ depending on your SVS Version)
- Now get back to SASM and configure and run AD Connector Data Provider (do not forget to set the AD Connector to run on your created Data Gateway on your network)
- Navigate to Administration > Integration > Data Providers > Active Directory > Add new Configuration
- Finish the configuration by setting your prefered Base DNs etc. and run a Full Import (this might take a few minutes)
- (NOTE: DO NOT USE THE “TEST CONFIGURATION” MODE to test your config, as it will NOT work [It will fail even if all your settings are correct]. This is a known issue when the Data Gateway runs on a different server than the SASM Application).
- Check if configured objects were imported. (You could also check DGW Logs to be 100% sure)
- When all configured objects have been imported to SASM you can continue with the MWS Cloud Connector Setup.
MWS Cloud Connector Setup
We are going to download and install the Cloud Connector now. This connector will transfer the users from AD to MWS.
- Login to your MWS Application (https://myworkspace.matrix42.com/app)
- Navigate to Administration Area and download the Cloud Connector for AD (Connectors Tab)
- If you need to create a new AD Connector, click the “+” sign in the lower right of the screen, you’ll be prompted to download the connector then.
- Copy the Setup file to your Server (Preferably the one where the SASM Data gateway is installed. (The AD Server is also a good choice).
- Execute the setup, login to MWS when prompted and choose the companies AD Folders for Users and Groups (Enable Users Export Sync). You’ll be able to edit the LDAP Strings also in MWS later, in case you need to change something.
- When setup is done open your MWS and navigate to Administration > Connectors Area. When everything was done right, it looks something like this:
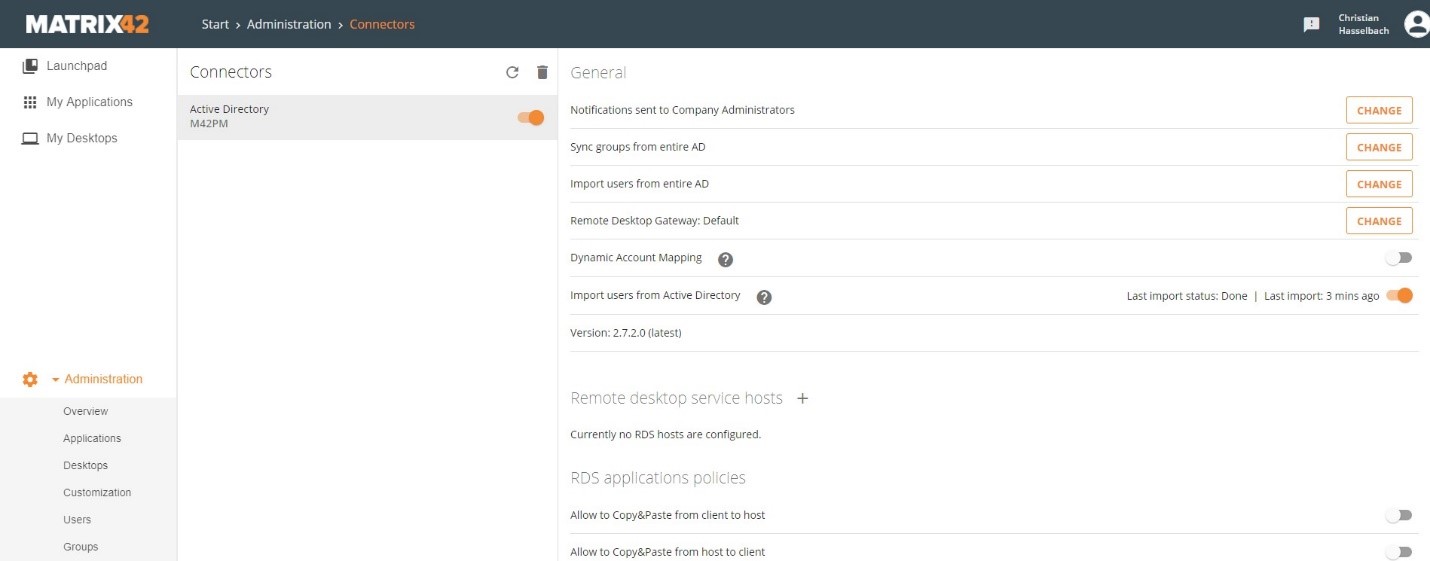
(MWS Connector)
(Note 1: It may take a bit until all users show up, click the Users Tab in MWS to ckeck)
Note 2: Only Users with E-Mail addresses will be imported to MWS as they are needed to access MWS!
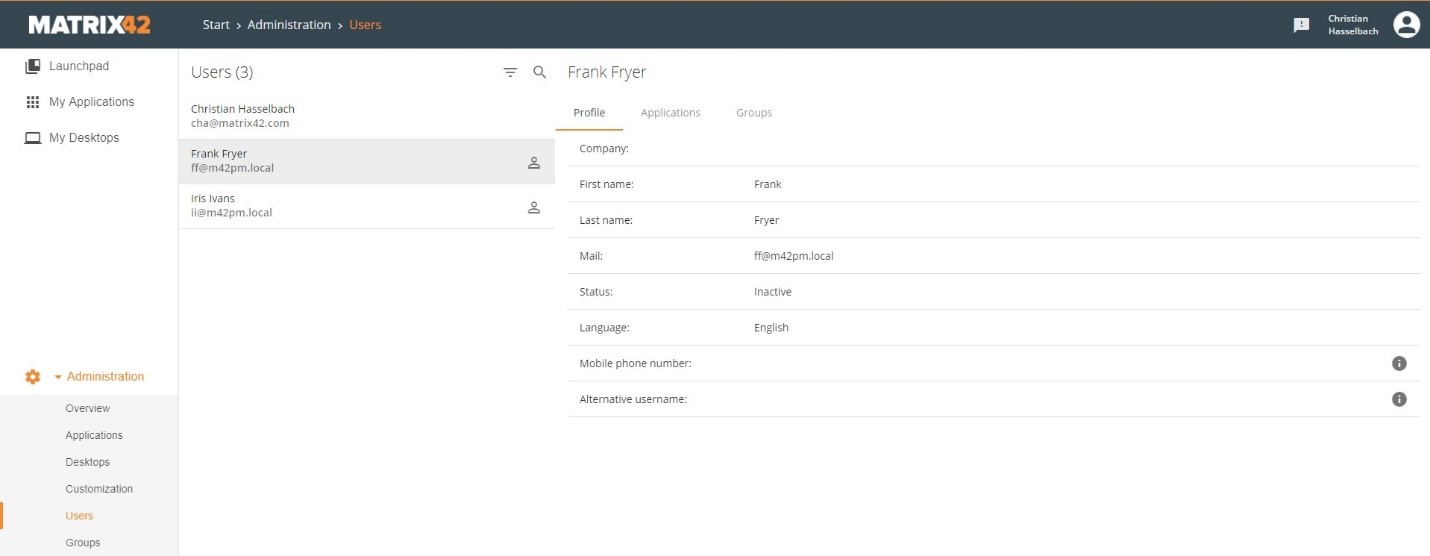
(MWS Users)
- Now you must enable the SSO (NTLM) option for the Identity Provider.
- Navigate to “Security” Tab in your MWS and enable the checkbox “Enable single-sign-on via NTLM for Active Directory” and activate the switch: “Enable Identity provider management”
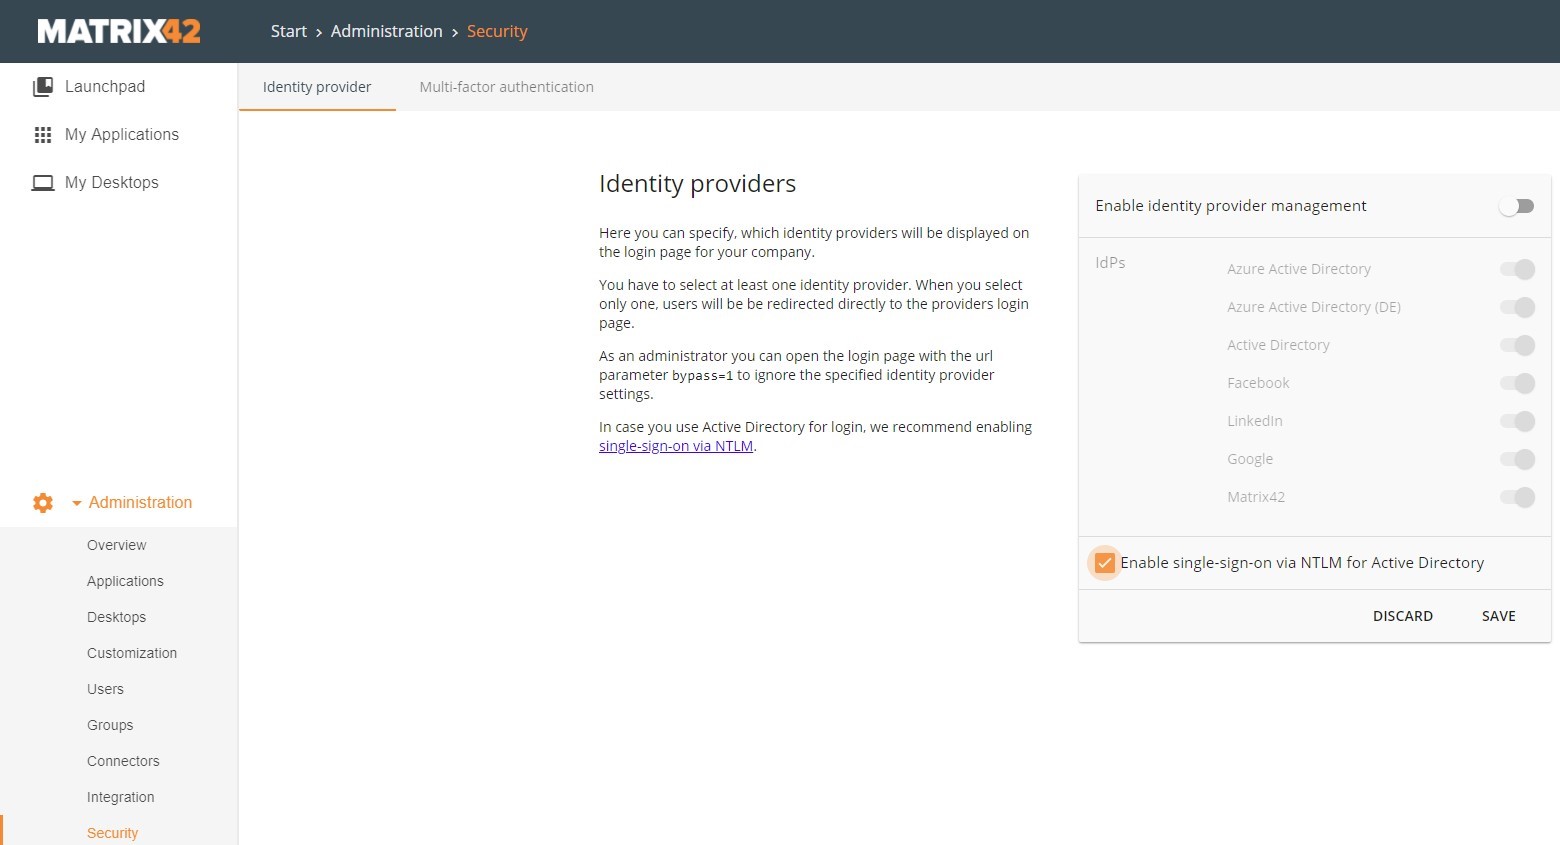
(MWS Identity Security Settings)
- “Save” your settings.
- (optional) Enable the “Identity Provider Management” checkbox and disable all not needed Providers (Note: AD & Matrix42 are mandatory and you should not deactivate them!)
- (optional): You can check out some additional SSO Browser configuration details here.
Creating a new Application in MWS (and configure it for SASM Authentication)
We're going to create the Application now that allows users to use MWS to login to SASM or Login via SASM directly.
- Create a new OAuth2 Application (for SASM)
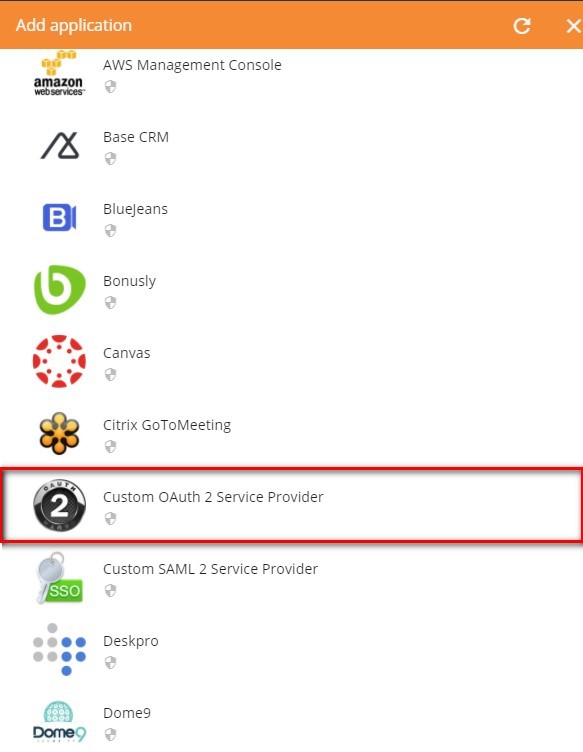
- Navigate to “Applications” Area in your MWS Administration and create a new Application by clicking the “+” in the lower right corner or the empty tile.
- From the menu choose “Custom OAuth2 Service Provider”
-
In order to get the values (scope, client secret & client id) we need to create a dummy application first (that we’re going to edit at a later point with real data), so please fill out the information with some values first (see Screenshot below). It is important that you fill the Values “Service Provider URL” and “Redirect Url” with some valid URLs (see Screenshot below) like https://google.com (No worries, we’re going to change that later)
Note:
We are doing this because the values Scope, Client Secret and ID are only created when you save an Application in MWS and we need those specific values to create the Service Provider URL for this Application so that we can login to SASM)
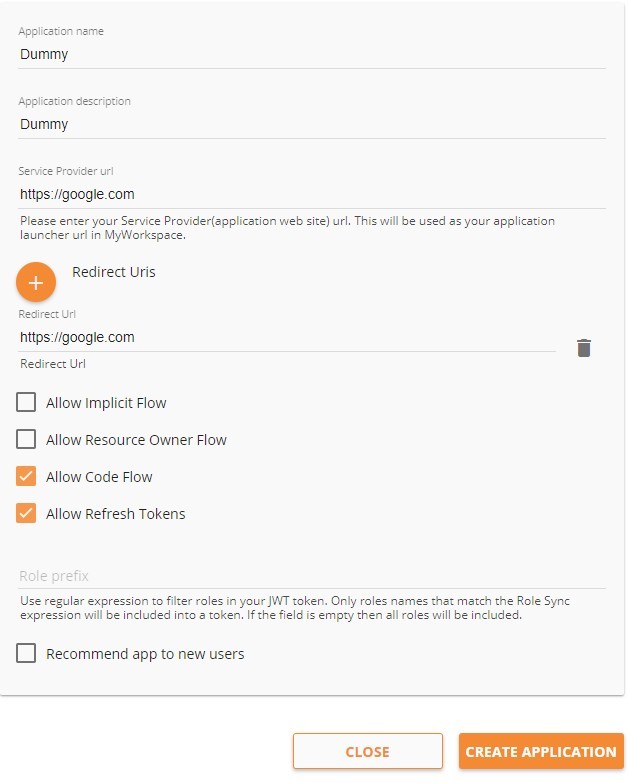
- Click “Create Application”. (Will take a few seconds).
- When saving is done you’ll see the same Screen and the Top Menu will now be available.
- Click the “Integration Guide” Tab on the Top Navigation.
- You will see a Screen that will look like this:

- We will need a few Informations from this page so it is a good idea to copy them to a notepad or something else where you can access it (We need those values for configuration at least two times).
The following values need to be copied:- SCOPE (normally looks like: scope=urn:[NUMBERS&LETTERS]
- Client ID (normally looks like: client_id=[NUMBERS&LETTERS]
- Client Secret (normally looks like client_secret=[NUMBERS&LETTERS]
- When you have all values, go back to the “General” Tab
Now we are going to fill out the real information for the SASM Application. This is the tricky part! - PLEASE NOTE: You have to create an own Application for every SASM Endpoint. (Endpoints are: /sps for Console /sps/Portal for Self Service and /wm for Unified User Experience [UUX]).
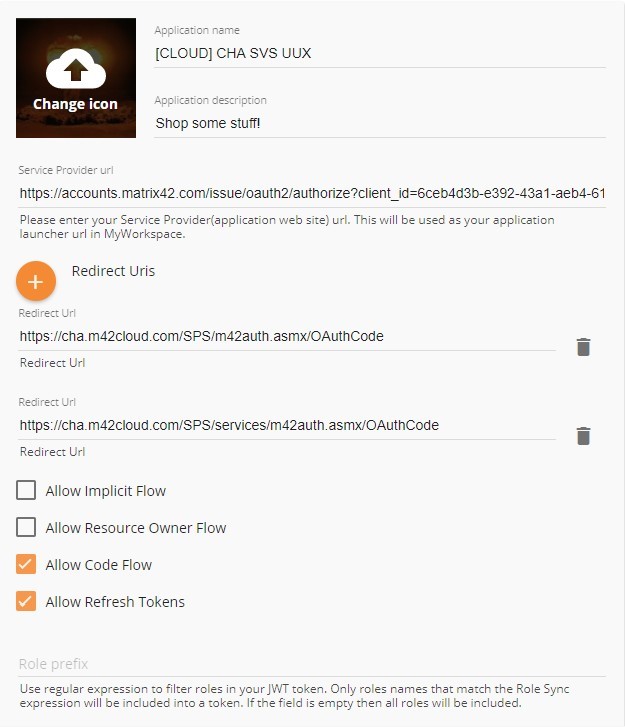
In my usecase we’re setting up the UUX (/wm) Login.- Application Name: Choose anything you like
- Application Description: Choose anything you like
- Service Provider URL: Enter the correct URL to your SASM Application (copy & paste + edit the below URL)
- For a Cloud Service this could look something like this:
(YOU MUST EDIT THE VALUES: "YOUR_CLIENT" > "YOUR_URN" > "CUSTOMERDOMAIN (x2)" with the values you've created previously)https://accounts.matrix42.com/issue/oauth2/authorize?client_id=YOUR_CLIENT_ID&scope=urn:YOUR_URN&redirect_uri=https%3a%2f%2fCUSTOMERDOMAIN%2fSPS%2fm42auth.asmx%2fOAuthCode&response_type=code&state=https%3a%2f%2fCUSTOMERDOMAIN%2fwm%2f
Or a more eye friendly version (use the above one if this does not work):https://accounts.matrix42.com/issue/oauth2/authorize?client_id=YOUR_CLIENTID&scope=urn:YOUR_URN&redirect_uri=https://CUSTOMERDOMAIN/SPS/m42auth.asmx/OAuthCode&response_type=code&state=https://CUSTOMERDOMAIN/wm/
Here is an example of how a fully configured Service Provider URL could look like:https://accounts.matrix42.com/issue/oauth2/authorize?client_id=529f2XXX-2595-4e23-b4c7-8d6913XXX1d4&scope=urn:49bedd4f-3daf-XXXX-907b-0e584146436c&redirect_uri=https://cha.m42cloud.com/SPS/m42auth.asmx/OAuthCode&response_type=code&state=https://cha.m42cloud.com/wm/
- Please note: If you create the Application for /sps (Legacy Console) or sps/portal (Legacy Portal) you must change the part at the end (wm) with the corresponding values.
- Also: Just copy the plain Number & Letter values (and not the client_id= or scope= prefixes)
- For a Cloud Service this could look something like this:
- Redirect Uris: Enter the correct SVS Application Redirect URI (Used for authentication). We need to create two objects here:
- For a Cloud Service this could look like this:
FIRST REDIRECT URI (edit the CUSTOMERDOMAIN Value)https://CUSTOMERDOMAIN/SPS/m42auth.asmx/OAuthCode
SECOND REDIRECT URI (edit the CUSTOMERDOMAIN Value)https://CUSTOMERDOMAIN/SPS/services/m42auth.asmx/OAuthCode
- For a Cloud Service this could look like this:
- Activate the checkboxes:
- Allow Code Flow
- Allow Refresh Tokens
- Create the Application (takes a bit)
It should look something like this now:
-
(Hint) If you want to make the Application visible to all Users click the “Permissions” Tab in your Application and type in “All users” and save. (Otherwise nobody will see your Application).
Configuring the SASM Application for MWS Authentication
In this Part of the documentation we're going to configure the OAuth2 functionality in SASM so that Users are able to login to the Application by clicking on the Tile in MWS or use the direct login in SASM.
Before we continue we need to create an access Token for SASM.
- Open https://accounts.matrix42.com site and login with the Enterprise Administrator Account of the company.
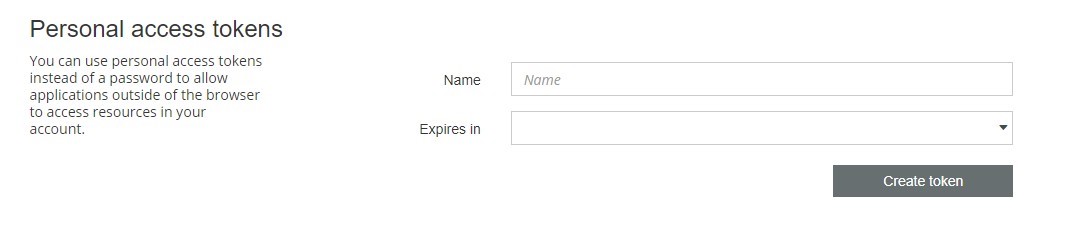
- Scroll down a bit until you see the "Personal access tokens" area.
- Scroll down a bit until you see the "Personal access tokens" area.
- Fill in a “useful” Name and I also suggest to use the 360 days token (remember this needs to be refreshed then). Probably make a reminder, so that you're able to refresh the Token in time.
- Click “Create Token” PLEASE NOTE: If you close the next window without copy and pasting the Token somewhere it is forever lost and you have to create a new one. So please copy the token somewhere before closing the pop-up window.
Head over to your SASM Installation.
- Navigate to Administration > Settings > Edit > Matrix42 MyWorkspace
- Now you will need the Scope, Client_ID, Client Secret and your Access Token from My Workspace.
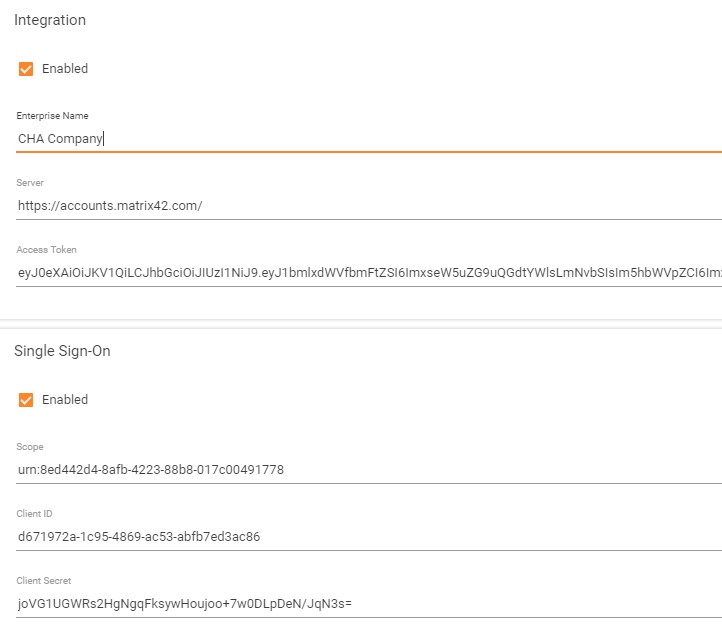
- Activate the checkbox "Enabled" at "Integration" and "Single Sign On"
- Copy the values into the designated fields.
- Also fill the field "Enterprise Name" with your Company Name and the field "Server" with "https://accounts.matrix42.com/"
- When everything is done it should look like this:
- Save the settings! In the next Step we're going to configure the MWS Data Provider to import MWS Data (Accounts) to your SASM Installation.
(Note: The MWS Data Provider will generate additional Accounts besides your AD Accounts and "connects" them to the Person Object, so that Users are able to login) - Navigate to Administration > Integration > Data Providers
- Open the Matrix42 MyWorkspace Data Provider (Single Click > Edit)
- In the "Configurations" Area click the
 sign to add a new configuration
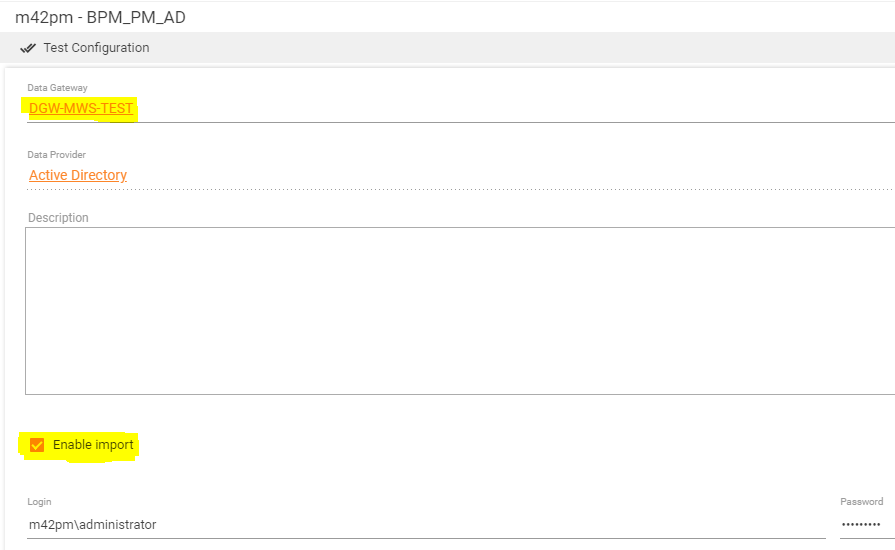
- Change the "Data Gateway" value to the external server where your Data Gateway is hosted.
- Don't forget to set the checkbox "Enable Import" (this is unchecked by default)
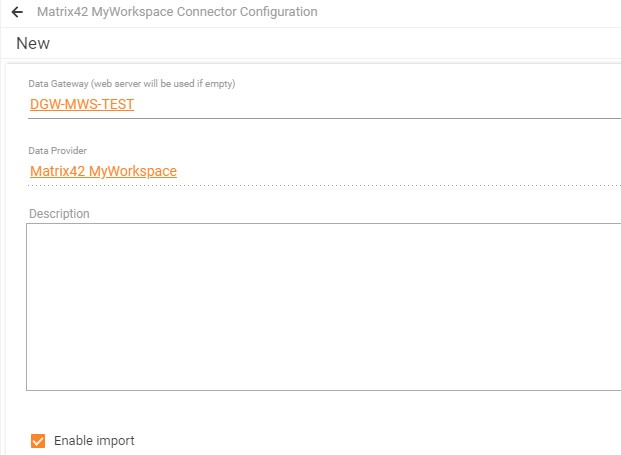
- Save your configuration
- Navigate Back to the Data Provider Search Page and "Enable" the Matrix42 MyWorkspace Data Provider
- Then click "Activate (Full Import)" the “Matrix42 My Workspace” Data Provider (Starts the import) and wait until all objects are imported. (Can take a while depending on the number of objects that have to be imported).
- When the import has finished users can login by using the “Use M42 MyWorkspace Login” from the UUX Login page or they can log on to MWS and click on the corresponding tile and get logged in automatically.
Note: When you get an Error 500 “Resource Owner Flow failed.” after the login to SVS with MWS then there is a high possibility that one of your Service Provider or Redirect URLs in MWS is wrong (maybe type-o etc.). Recheck them and also compare values of client id, client secret & scope in MWS and SASM.
- When the import has finished users can login by using the “Use M42 MyWorkspace Login” from the UUX Login page or they can log on to MWS and click on the corresponding tile and get logged in automatically.
-
(Important Hint) If you want to create an additional SASM Application (in this guide we’ve configured UUX) like /sps (Legacy Console) or /sps/Portal (Legacy Portal) you MUST re-use the Scope, Client_ID and Client Secret values from your first application that you have created (the values that you’ve provided in the Global System Settings of your SASM Installation) and NOT the (new) ones that are provided in MWS when you create a new application.
-
If you happen to "lock out" yourself from SASM (in case the OAuth2 Provider is not working etc.), you could always FORCE the login by using the following parameter in your SASM URL: /wm?ForceLoginPage=true (Example: https://cha.m42cloud.com/wm?ForceLoginPage)